
When it comes to upgrading or replacing the radio in your 2002 Honda Accord, having a wiring diagram is essential. The diagram allows you to properly connect the new radio to your car’s electrical system, ensuring that everything functions correctly. In this article, we will provide you with a detailed 02 Honda Accord radio wiring diagram, so you can easily install a new radio and enjoy your favorite music while driving.
The wiring diagram will show you the color codes for each wire in the car’s radio harness, making it easier to identify and connect the corresponding wires. This is particularly important when installing an aftermarket radio, as the color coding may not be the same as the factory radio. The diagram will also indicate the purpose of each wire, such as power, ground, speakers, and antenna, making it easier to make the proper connections.
By following the wiring diagram and using the correct wire connections, you can ensure that the new radio works properly, and that all features, such as AM/FM radio, CD player, and auxiliary inputs, function as intended. Additionally, having a wiring diagram will make it easier to troubleshoot any issues that may arise during or after the installation process, saving you time and frustration.
Overview
When it comes to upgrading or troubleshooting the audio system in a 2002 Honda Accord, having a reliable wiring diagram is essential. The wiring diagram provides a visual representation of how the different components of the radio are connected, allowing users to easily identify and troubleshoot any issues.
The 2002 Honda Accord radio wiring diagram is a helpful tool for those looking to install aftermarket radios, amplifiers, or speakers in their vehicle. It provides detailed information on the color coding and connection points for the various wires, making it easier to match the aftermarket equipment to the factory wiring harness.
Some key phrases that may be useful when searching for a 2002 Honda Accord radio wiring diagram include “wiring diagram for 2002 Honda Accord radio,” “radio wiring diagram for 02 Honda Accord,” and “Honda Accord radio wiring schematic.”
Key Features of a Wiring Diagram
- Color coding: Each wire is labeled with a specific color to make it easier to identify and connect the wires correctly.
- Connection points: The diagram shows where each wire should be connected to ensure proper functionality.
- Component locations: The diagram may provide information on the location of various components, such as the radio unit, amplifier, or speakers.
- Pin diagram: Some wiring diagrams may include a pin diagram, which shows the pin numbers for each connection point on the radio and other components.
By following the instructions provided in the wiring diagram, users can ensure a proper and successful installation or troubleshooting process for their 2002 Honda Accord radio system.
Understanding the Basics: Honda Accord Radio Wiring
When it comes to installing or troubleshooting the radio wiring in your 2002 Honda Accord, it’s important to have a clear understanding of the basics. The radio wiring diagram provides a visual representation of the electrical connections between the various components of your car’s audio system.
In order to properly install or repair your radio, you’ll need to know the purpose and function of each wire. While the specific colors of the wires may vary depending on the manufacturer, here are some key terms to familiarize yourself with:
- Power wire: This wire supplies the radio with constant power, even when the ignition is turned off. It is typically connected to the battery.
- Ignition wire: This wire provides power to the radio when the ignition is turned on. It helps control the radio’s on/off functions.
- Ground wire: This wire ensures a solid electrical connection with the vehicle’s chassis, allowing the radio to function properly.
- Speaker wires: These wires carry the audio signal from the radio to the speakers, allowing you to hear sound.
- Antenna wire: This wire connects the radio to the car’s antenna, allowing it to receive radio signals.
By using a radio wiring diagram specific to your Honda Accord model, you can easily identify each wire and its corresponding function. This will help you avoid common installation mistakes and ensure the best audio performance.
When working with radio wiring, it’s important to follow proper safety precautions and disconnect the car’s battery before making any connections. If you’re unsure about any aspect of the wiring process, it’s always recommended to consult a professional or refer to the vehicle’s manual for guidance.
Why You May Need to Access the Radio Wiring Diagram
In the case of a 2002 Honda Accord, accessing the radio wiring diagram can be necessary for a number of reasons. Whether you are installing a new radio head unit, troubleshooting an electrical issue, or simply want to understand how the audio system is wired, having access to the wiring diagram is essential.
One common reason you may need the radio wiring diagram is when installing a new radio head unit. Each car model can have different wiring configurations, so it is important to have the correct wiring diagram for your specific vehicle. This will help ensure that you connect the new radio correctly to the existing wiring harness, avoiding any potential damage or electrical issues.
If you are experiencing problems with your car’s audio system, accessing the radio wiring diagram can help you troubleshoot the issue. By understanding how the wires are connected and where they lead, you can identify any potential wiring faults or loose connections that may be causing the problem. This information can also be helpful if you need to replace a faulty component, such as a speaker or amplifier.
Finally, having access to the radio wiring diagram can simply help you better understand how your car’s audio system is wired. This can be useful for DIY enthusiasts who want to make modifications or upgrades to their system. By understanding the wiring configuration, you can easily identify which wires are responsible for specific functions, such as power, ground, or speaker connections.
Identifying the Wiring Color Codes
When it comes to understanding the wiring in your 2002 Honda Accord’s radio, it’s important to be familiar with the wiring color codes. These color codes define the function of each wire and make it easier to install or troubleshoot the radio system.
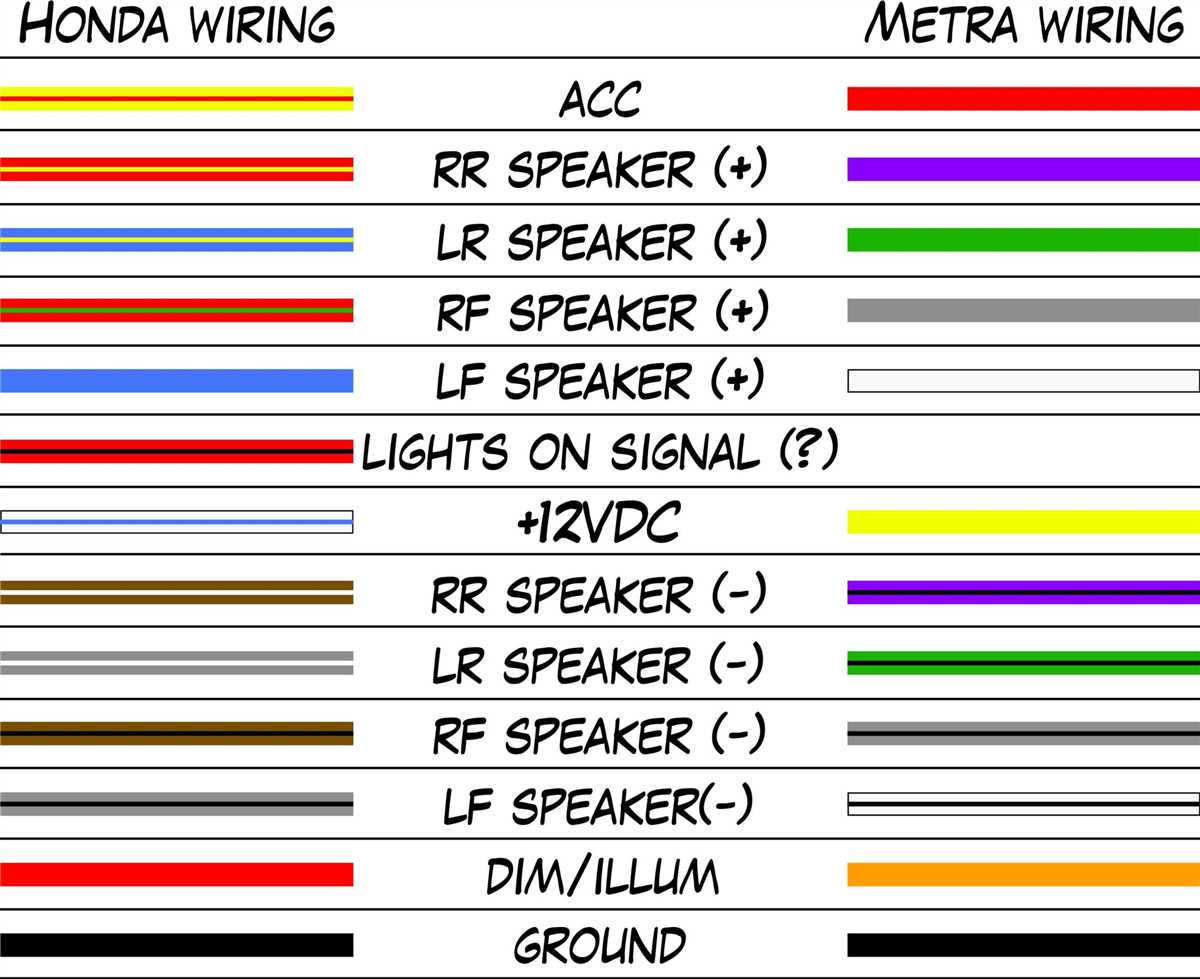
In the case of the 02 Honda Accord, the wiring color codes for the radio are as follows:
- Yellow: This wire is for the constant 12-volt power supply. It provides power to the radio even when the ignition is turned off.
- Red: This wire is for the accessory power supply. It is turned on when the ignition is in the accessory or on position.
- Black: This wire is the ground wire. It provides a path for electrical current to return to the battery.
- Blue/White: This wire is for the amplifier turn-on signal. It is used to turn on an external amplifier when the radio is turned on.
- Green: This wire is for the left rear speaker positive (+) connection.
- Green/Black: This wire is for the left rear speaker negative (-) connection.
- Violet: This wire is for the right rear speaker positive (+) connection.
- Violet/Black: This wire is for the right rear speaker negative (-) connection.
- White: This wire is for the left front speaker positive (+) connection.
- White/Black: This wire is for the left front speaker negative (-) connection.
- Gray: This wire is for the right front speaker positive (+) connection.
- Gray/Black: This wire is for the right front speaker negative (-) connection.
By having a clear understanding of these wiring color codes, you can confidently install or troubleshoot your 2002 Honda Accord’s radio system.
Decoding the Wiring Color Codes
When it comes to deciphering the wiring color codes for your 2002 Honda Accord radio, it’s important to understand the purpose of each wire and how they connect to the different components of the radio system. Here is a breakdown of the wiring color codes and their functions:
- Yellow: This wire is typically used for the constant power supply to the radio system. It should be connected to a fuse that provides power even when the ignition is turned off.
- Red: The red wire is responsible for the switched power supply. It connects to a fuse that only provides power when the ignition is turned on.
- Black: This wire is the ground connection and should be securely connected to a metal part of the car’s chassis.
- Blue: The blue wire is usually used for the antenna power supply. It provides power to the antenna amplifier and should be connected to the appropriate wire in the car’s wiring harness.
- Green and Green/Black: These wires are the speaker wires for the front left and right speakers respectively. Connect them to the corresponding wires in the harness.
- White and White/Black: Similar to the green wires, these are the speaker wires for the rear left and right speakers.
- Gray and Gray/Black: These wires are used for the front left and right speaker negative connections.
- Purple and Purple/Black: Similar to the gray wires, these are the negative connections for the rear left and right speakers.
- Orange: The orange wire is the illumination wire. It connects to the car’s lighting system to adjust the display brightness of the radio.
By understanding these wiring color codes, you can easily identify and connect the appropriate wires when installing or troubleshooting your 2002 Honda Accord radio. It’s important to refer to the specific wiring diagram for your model and make necessary adjustments if any variations exist.
Common Wiring Color Codes for Honda Accord Radios
The wiring color codes for Honda Accord radios can vary depending on the model year and trim level, but there are some common colors that are often used. These color codes are important to know if you are planning to install an aftermarket radio or make any modifications to your Accord’s audio system.
Here are some of the most commonly used wiring color codes for Honda Accord radios:
- Red: Power supply. This wire provides a constant power source for the radio and is typically connected to the vehicle’s battery.
- Yellow: Ignition switch power supply. This wire provides power to the radio only when the ignition key is turned on.
- Black: Ground. This wire is used to complete the electrical circuit and should be connected to a metal part of the vehicle’s chassis.
- Blue: Amplifier remote turn-on. This wire is used to control the power supply to an external amplifier, if equipped.
- White: Front left speaker positive (+).
- White/Black: Front left speaker negative (-).
- Gray: Front right speaker positive (+).
- Gray/Black: Front right speaker negative (-).
- Green: Rear left speaker positive (+).
- Green/Black: Rear left speaker negative (-).
- Purple: Rear right speaker positive (+).
- Purple/Black: Rear right speaker negative (-).
It’s important to note that these wiring color codes are general guidelines and may vary. It’s always recommended to consult a wiring diagram specific to your Honda Accord model year and trim level to ensure proper installation and compatibility with your vehicle’s audio system.
Steps to Connect a New Radio
Replacing the radio in a 2002 Honda Accord requires a few simple steps to ensure a successful installation. Follow the guide below to connect a new radio:
1. Gather the necessary tools and equipment
Before starting the installation process, gather the necessary tools and equipment. This typically includes a screwdriver or trim removal tool, wire strippers, electrical tape, and a wiring harness adapter specific to the Honda Accord model.
2. Disconnect the battery
Prior to working on any electrical components, it is important to disconnect the negative terminal of the battery to prevent any potential short circuits or electrical hazards.
3. Remove the existing radio
Using the screwdriver or trim removal tool, carefully remove the panel or trim surrounding the radio. Once removed, locate and unscrew the bolts or screws securing the radio in place. Gently pull the radio out of the dashboard, being mindful of any connected wires.
4. Disconnect the wiring and antenna
Disconnect the wiring harness and antenna cable from the back of the existing radio. The wiring harness adapter can be useful here, as it will allow for a seamless connection between the car’s wiring and the new radio.
5. Connect the new radio
Using the wire strippers, strip a small portion of the insulation from the end of each wire in the car’s wiring harness. Connect each wire to its corresponding color-coded wire on the new radio’s harness. Secure the connections using electrical tape, ensuring that there is a tight and secure connection.
6. Test the new radio
Once all the connections are made, reconnect the negative terminal of the battery and turn on the car’s ignition. Test the functionality of the new radio by tuning into a radio station or connecting a phone or music device via Bluetooth or auxiliary input.
Following these steps will allow for a successful connection of a new radio in a 2002 Honda Accord. It is important to double-check all connections and test the functionality of the radio before completing the installation. Consulting a professional or referring to the specific wiring diagram for the Honda Accord model can also be helpful.
Gathering the Required Materials

Before you begin installing your new radio in your 02 Honda Accord, make sure you have all of the necessary materials. Here is a list of what you will need:
- A radio wiring harness adapter specific to your Honda Accord model year
- A dash kit that matches the size and style of your Accord’s dashboard
- A set of wire connectors or soldering materials
- A set of wire strippers and crimping tools
- A screwdriver or other tools required for removing the old radio
Note: It is important to use a wiring harness adapter and dash kit designed for your specific make and model of the 02 Honda Accord to ensure compatibility and a professional-looking installation.
Once you have gathered all of these materials, you will be ready to proceed with the installation of your new radio. Follow the instructions provided by the radio manufacturer and the wiring harness and dash kit manufacturers to ensure a successful installation.
Q&A:
What materials do I need for the project?
The materials you need for the project may vary depending on the specific project. However, some common materials that you may need include tools, such as a hammer, screwdriver, or drill, as well as various building materials like wood, nails, screws, and paint.
Where can I purchase the required materials?
You can purchase the required materials from a variety of places, including hardware stores, home improvement stores, and online retailers. It’s a good idea to compare prices and quality from different sources before making a purchase.
How much will the required materials cost?
The cost of the required materials will depend on the specific project and the quantity and quality of materials needed. It’s a good idea to create a budget and research prices before starting the project to get an estimate of the cost.
Do I need any special tools or equipment?
Depending on the project, you may need special tools or equipment. It’s important to carefully read the project instructions or consult with an expert to determine if any special tools or equipment are necessary.
Can I use recycled materials for the project?
Yes, you can definitely use recycled materials for your project. It’s a great way to reduce waste and make use of items that would otherwise end up in a landfill. Just make sure that the recycled materials are suitable for the project and meet the necessary requirements.