
When it comes to setting up a water system for your home or campsite, a 12-volt water pump is often a popular choice. These pumps are efficient, reliable, and easy to install. Whether you’re looking to pump water from a well, a rainwater collection system, or a storage tank, a 12-volt water pump can get the job done.
Before you begin the installation process, it’s important to have a clear understanding of the wiring diagram for your 12-volt water pump. This diagram will outline the correct connections and ensure that your pump operates safely and effectively. By following the diagram and using the appropriate wire size and connectors, you can avoid any potential issues and ensure that your pump functions as intended.
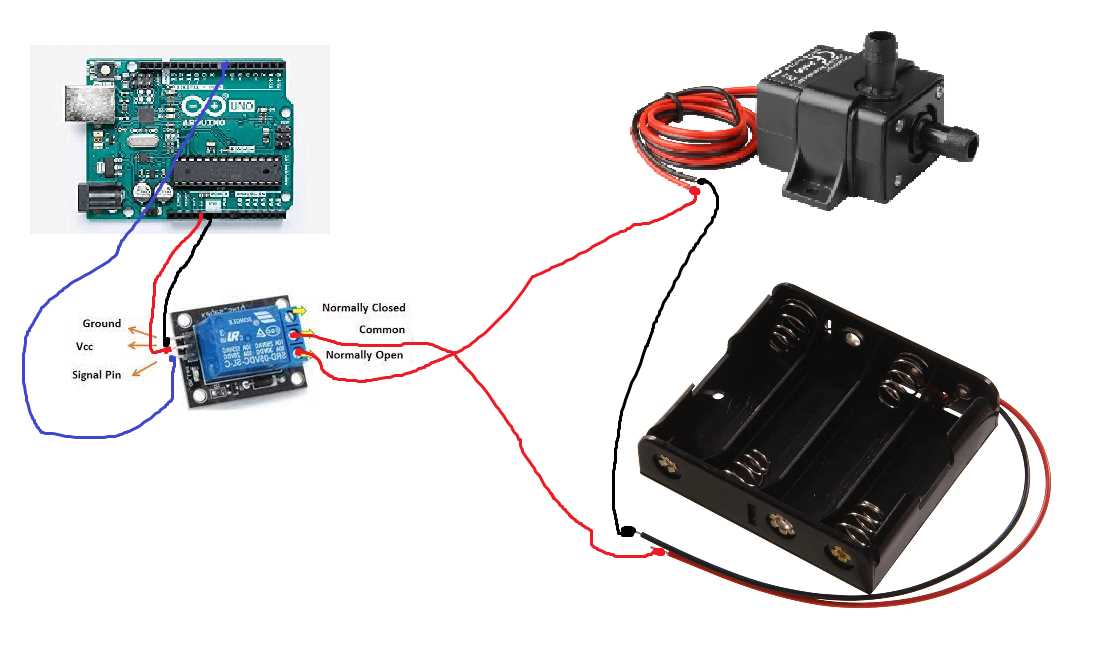
The wiring diagram for a 12-volt water pump typically includes connections for the power source, the pump switch, and the pump itself. The power source can be a battery or a power supply unit, depending on your setup. The pump switch is used to turn the pump on and off, while the pump connections include positive and negative terminals.
It’s worth noting that the specific wiring diagram may vary depending on the make and model of your water pump. Therefore, it’s essential to consult the manufacturer’s instructions or documentation for the correct wiring diagram. This will help you avoid any confusion and ensure that your wiring is accurate and safe.
What is a 12 Volt Water Pump?
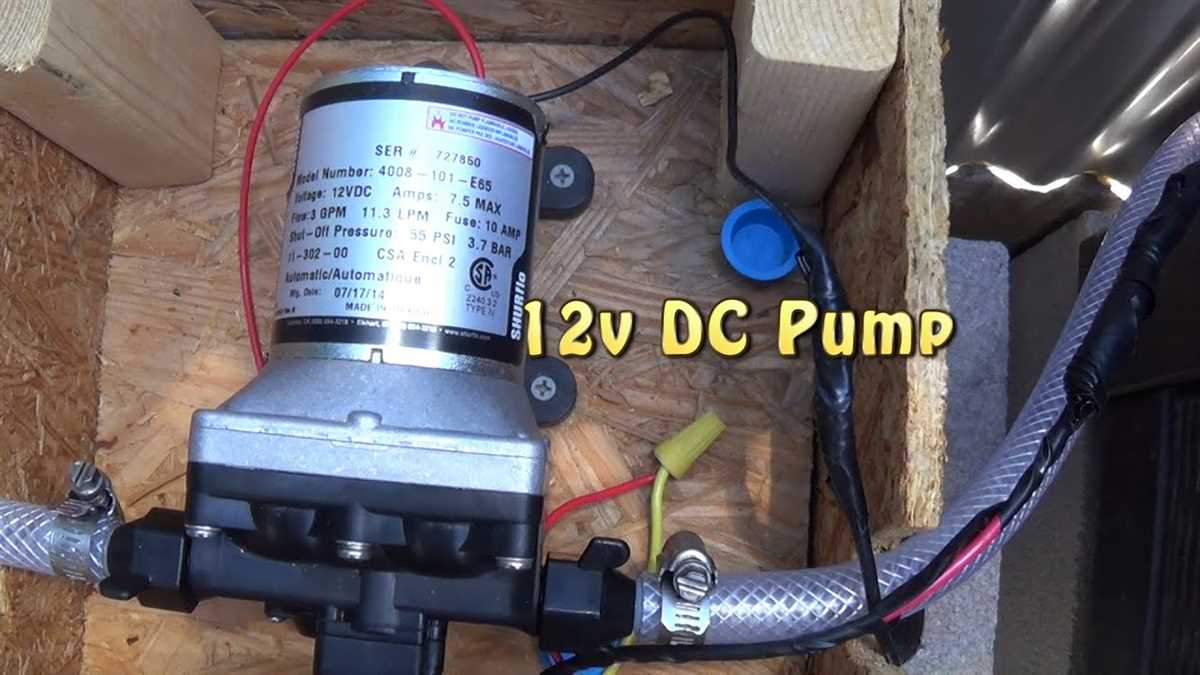
A 12 volt water pump is a small motor-driven device that is designed to move water from one place to another using a 12-volt power source. It is commonly used in various applications, such as in boats, recreational vehicles (RVs), camping setups, off-grid systems, and even in some residential setups.
These water pumps are specifically designed to operate efficiently and effectively with a 12-volt power source, making them ideal for situations where there is limited or no access to grid power. They are often compact in size and portable, allowing for easy installation and use in different settings.
Typically, a 12-volt water pump consists of a motor, impeller, housing, and inlet and outlet ports. The motor is powered by a 12-volt DC power source, which can be provided by a battery or a dedicated power supply. The impeller, driven by the motor, creates centrifugal force, which pushes water through the pump and out of the outlet port.
These water pumps can vary in terms of flow rate, pressure, and other specifications, depending on the specific application and requirements. Some models may also have built-in features such as automatic shut-off mechanisms, pressure switches, or adjustable speed settings.
Overall, a 12-volt water pump is a versatile and useful device that allows for the efficient transfer of water in various settings. Whether it’s for on-the-go camping adventures or ensuring a reliable water supply in remote locations, these pumps provide a reliable solution for their intended purposes.
Why Wiring Diagrams Are Important
In the world of electrical systems, wiring diagrams play a crucial role in ensuring that everything works safely and efficiently. These diagrams provide a visual representation of the various components and their connections, helping electricians and technicians understand the system’s layout and troubleshoot any issues that may arise.
One of the main reasons why wiring diagrams are important is that they provide a standardized way of documenting electrical systems. This ensures that everyone involved in the installation, maintenance, and repair of the system can easily understand how it is wired and how each component interacts with the others. This standardized documentation also makes it easier to communicate and collaborate with others, reducing the chances of miscommunication and mistakes.
In addition to providing a precise representation of the wiring and connections, these diagrams also provide valuable information about the voltages, currents, and other electrical parameters involved in the system. This allows electricians to accurately determine the requirements and limitations of the system, ensuring that it operates within safe and optimal parameters.
Furthermore, wiring diagrams are essential for troubleshooting electrical problems. By referring to the diagram, technicians can quickly identify the specific component or connection that is causing the issue and take the necessary steps to rectify it. This saves time and reduces the chances of causing further damage to the system.
Overall, wiring diagrams are an indispensable tool in the world of electrical systems. They provide a standardized and easily understandable representation of the system, ensuring safe and efficient operation. Whether it’s for installation, maintenance, or troubleshooting, having access to accurate and detailed wiring diagrams is essential for any electrician or technician.
How to Read a Wiring Diagram
Understanding how to read a wiring diagram is essential for anyone working with electrical systems. Wiring diagrams are graphical representations of the electrical components and their connections within a circuit. They provide a visual guide for understanding how the various elements of a system are interconnected and how electricity flows through the circuit.
1. Identify the symbols: Wiring diagrams use specific symbols to represent different electrical components, such as batteries, switches, resistors, and motors. It is important to familiarize yourself with these symbols, as they provide crucial information about the function and characteristics of each component.
2. Follow the circuit flow: Wiring diagrams typically show the flow of electricity through a circuit from the power source to the load. This flow is represented by lines and arrows. Start by identifying the power source and trace the path of the circuit until you reach the load. This will help you understand the direction of current flow and identify any potential areas of concern.
3. Read the labels and annotations: Wiring diagrams often include labels and annotations that provide additional information about the circuit. These may include values, ratings, or specific instructions. Pay attention to these details, as they can affect the overall operation and safety of the system.
4. Note the connections: Wiring diagrams show how the different electrical components are connected to each other. The connections may be represented by lines, dots, or other symbols. Pay close attention to these connections, as they determine how electricity flows within the circuit and can help troubleshoot issues or make modifications.
5. Verify compatibility: When reading a wiring diagram, it is important to ensure that the components and connections are compatible with the specific application or system. This includes checking the voltage ratings, current capacities, and any special requirements. Any discrepancies or deviations should be addressed before proceeding with the installation or repair.
By understanding and interpreting wiring diagrams correctly, individuals can effectively troubleshoot, install, or modify electrical systems. It is important to take the time to study the diagram carefully and consult any available documentation or resources to gain a comprehensive understanding of the circuit and its components.
Components of a 12 Volt Water Pump Wiring Diagram
A 12 volt water pump wiring diagram consists of several components that work together to ensure the proper functioning of the water pump. These components include:
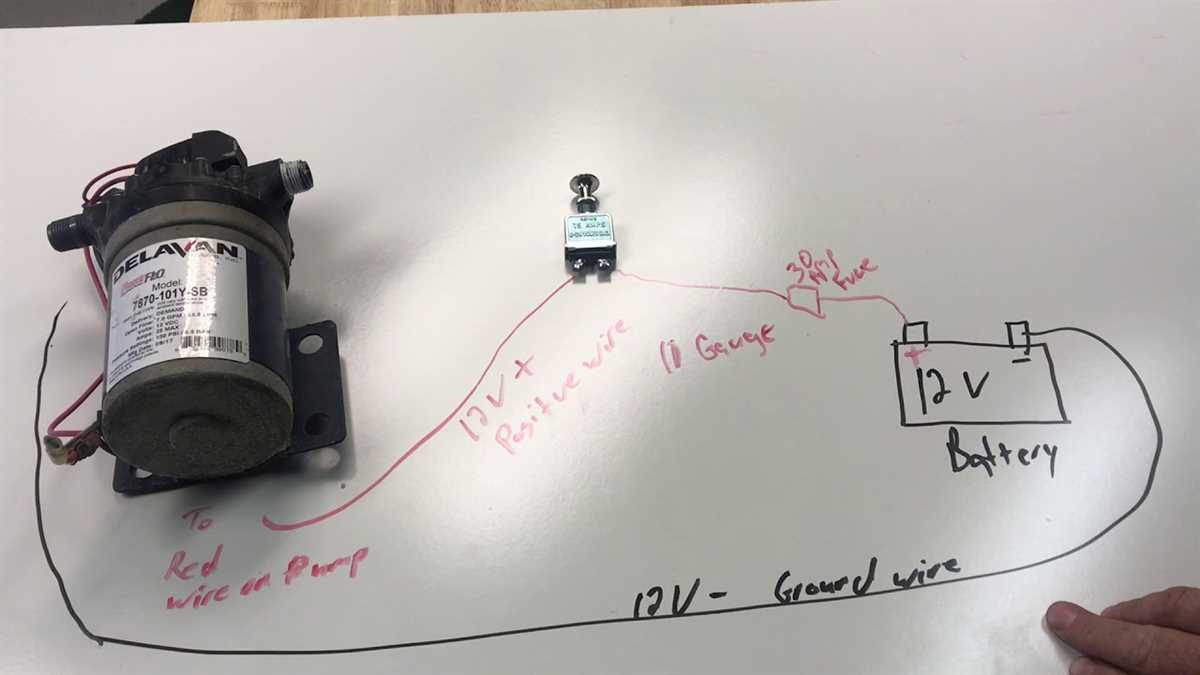
- Power Source: The power source provides the electrical energy needed to operate the water pump. In a 12 volt system, the power source is typically a battery or a solar panel.
- Switch: The switch is used to turn the water pump on and off. It can be a manual switch that is operated by the user, or it can be an automatic switch that is triggered by a water level sensor or a pressure sensor.
- Wiring: The wiring connects the various components of the water pump system. It includes the positive and negative wires that connect the power source to the water pump, as well as any additional wires that are needed for switches, sensors, or other components.
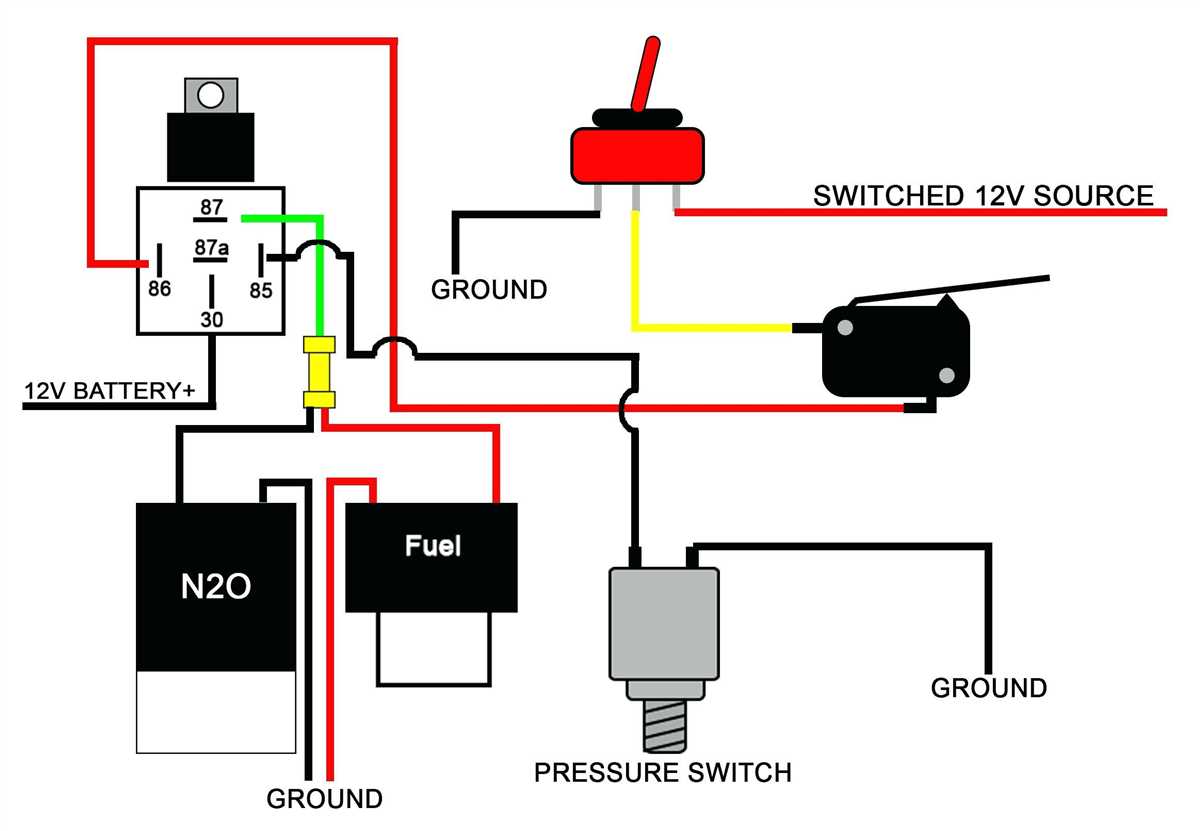
- Fuse or Circuit Breaker: A fuse or circuit breaker is used to protect the water pump and the wiring from excessive current. It is typically installed in-line with the positive wire and will blow or trip if there is a short circuit or an overload.
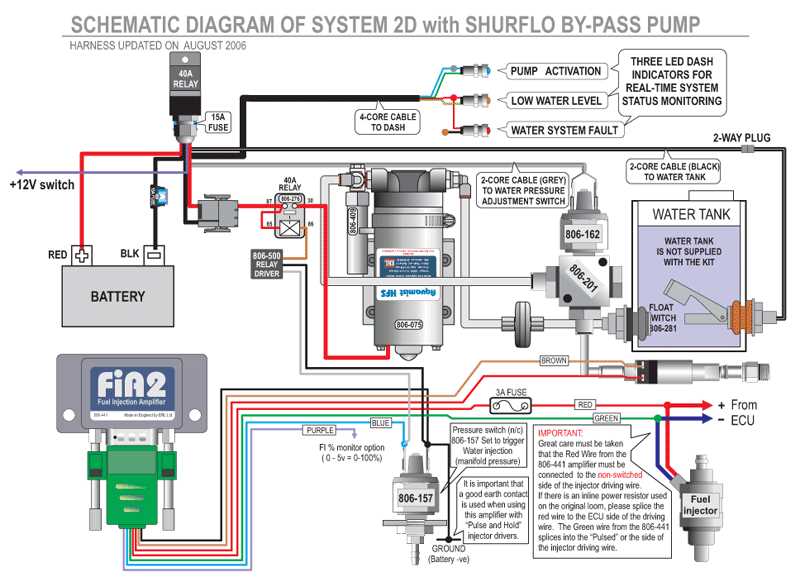
- Relay: A relay is an electrical switch that is activated by a small electrical signal. It is used to control a larger electrical load, such as a water pump, by allowing a small control current to turn on or off a larger current. The relay can be triggered by a switch, a sensor, or a timer.
- Water Pump: The water pump is the main component of the system. It is responsible for pumping water from a water source, such as a well or a reservoir, to the desired location. The water pump is usually a submersible or a surface-mounted pump that is designed to operate on 12 volt DC power.
- Pressure Switch or Sensor: A pressure switch or sensor is used to monitor the pressure in the water system. It can be used to automatically turn the water pump on and off based on the water pressure. When the pressure drops below a certain level, the switch or sensor will activate the pump, and when the pressure reaches a certain level, it will deactivate the pump.
These components work together to create a reliable and efficient water pump system. A well-designed wiring diagram will show the connections between these components and provide a clear understanding of how the system operates.
Step-by-Step Guide to Wiring a 12 Volt Water Pump
Wiring a 12 volt water pump can be a relatively simple task if you follow the correct steps. Whether you are setting up a new pump or replacing an old one, proper wiring is essential for ensuring the pump functions correctly. Here is a step-by-step guide to wiring a 12 volt water pump.
Step 1: Gather the necessary materials
Before you begin wiring, make sure you have all the necessary materials on hand. You will need a 12 volt water pump, a 12 volt power source, appropriate wiring (such as gauge wire or automotive wire), wire connectors, and electrical tape.
Step 2: Determine the power source and pump location

Decide where you want to install your water pump and identify the closest power source. Ensure that the power source can handle the amp load of the pump. Ideally, the pump should be located near the water source to minimize the distance the water needs to travel.
Step 3: Connect the pump to the power source
Using the appropriate gauge wire, connect the positive terminal of the pump to the positive terminal of the power source. Similarly, connect the negative terminal of the pump to the negative terminal of the power source. Ensure that the connections are secure and use wire connectors and electrical tape to cover and protect the exposed wire.
Step 4: Test the wiring
Once the connections are made, it is important to test the wiring to ensure it is functioning correctly. Turn on the power source and listen for the sound of the pump running. Observe the pump to confirm that water is being pumped as expected.
Step 5: Secure the wiring
After confirming the pump is working properly, secure the wiring to prevent any accidental damage or disconnection. Use cable clips or zip ties to secure the wire along the desired path and keep it away from any sharp objects or areas of potential damage.
By following these steps, you can successfully wire a 12 volt water pump and ensure it is ready for operation. Remember to always prioritize safety and consult the manufacturer’s instructions for your specific pump model if needed.
Troubleshooting Common Issues with 12 Volt Water Pump Wiring
In this article, we have discussed the wiring diagram for a 12-volt water pump and outlined the steps to properly wire it. However, sometimes issues can arise that may prevent the water pump from functioning correctly. Here are some common problems you may encounter and troubleshooting tips to help you resolve them.
No Power
If your 12-volt water pump is not receiving any power, there could be a few reasons for this. First, check the power source and ensure that it is providing the necessary voltage. Test the power source with a multimeter to determine if it is functioning correctly. If the power source is working, check the wiring connections to ensure they are secure and properly connected. Loose or faulty connections may prevent power from reaching the pump. Finally, check the fuse or circuit breaker to see if it has tripped or blown. Replace or reset as necessary.
Weak Flow or No Flow
If your water pump is running but producing a weak flow or no flow at all, there are a few potential causes to investigate. First, check the pump itself and ensure that it is properly primed. Some pumps may require priming before they can effectively move water. Also, check the intake strainer or filter for any clogs or blockages that may be restricting water flow. Clean or replace the strainer as necessary. Finally, check the wiring connections to the pump. Loose or damaged wires may prevent the pump from operating at full capacity.
Overheating or Overloading
If your water pump is overheating or causing circuit breakers to trip, it may be a sign of overloading. First, check the capacity of your water pump and ensure that it is not being asked to move more water than it can handle. If you are running multiple water pumps, make sure they are not exceeding the capacity of the power source. Additionally, check the wiring connections to the pump to ensure they are secure and not causing excessive resistance. If you suspect a problem with the pump itself, consult the manufacturer’s guidelines and consider contacting a professional for further assistance.
Overall, troubleshooting issues with 12-volt water pump wiring requires careful inspection of the power source, wiring connections, and pump itself. By systematically checking each component and addressing any issues, you can ensure your water pump operates efficiently and effectively.