
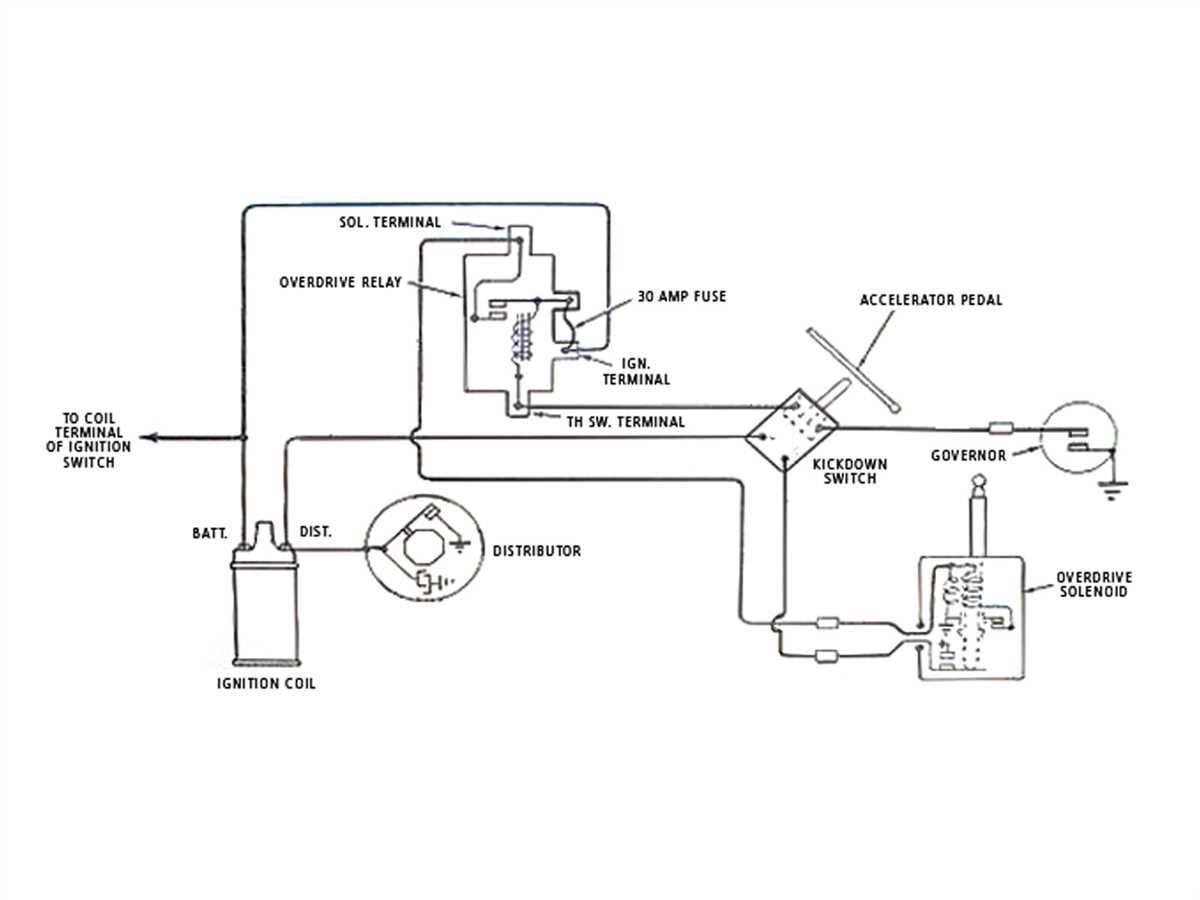
When it comes to the wiring of a 12v ignition coil, there are a few important things to understand. The ignition coil is a critical component in the ignition system of a vehicle. It is responsible for converting the low voltage from the battery into the high voltage needed to ignite the fuel in the engine. An ignition coil consists of two primary windings and a secondary winding, which are all connected in a series. Understanding the wiring diagram of a 12v ignition coil is essential for diagnosing and troubleshooting any ignition system issues.
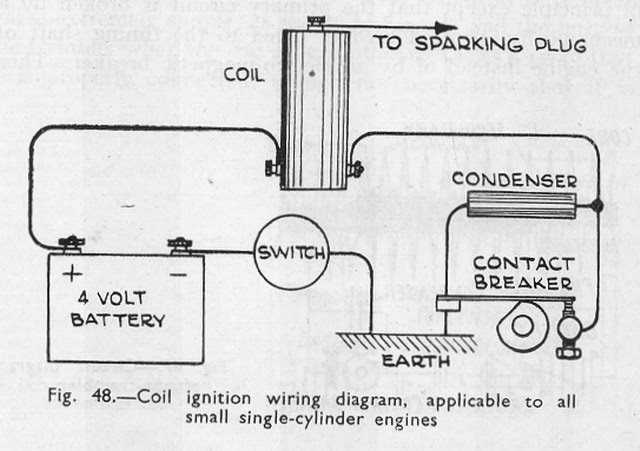
The wiring diagram for a 12v ignition coil typically includes three main components: the battery, the ignition switch, and the ignition coil itself. The battery is the power source that provides the initial low voltage current to the ignition coil. The ignition switch is responsible for controlling the flow of current to the ignition coil. When the ignition switch is turned on, a circuit is completed, allowing current to flow from the battery to the ignition coil. The ignition coil then converts this low voltage current into high voltage pulses, which are sent to the spark plugs to ignite the fuel.
It is important to note that the wiring diagram for a 12v ignition coil may vary depending on the specific make and model of the vehicle. However, the basic principles remain the same. The primary windings of the ignition coil are typically connected in series, while the secondary winding is connected to the distributor or directly to the spark plugs. The ignition coil may also include a capacitor, which helps to store and discharge energy for a more reliable spark.
In conclusion, understanding the wiring diagram of a 12v ignition coil is crucial for troubleshooting ignition system issues. By following the wiring diagram and properly connecting the battery, ignition switch, and ignition coil, you can ensure that your vehicle’s ignition system is functioning correctly. If you are experiencing any issues with starting or running your vehicle, it may be worth checking the wiring diagram and inspecting the ignition coil for any signs of damage or malfunction.
v Ignition Coil Wiring Diagram: A Comprehensive Guide
In the world of automotive electrical systems, the ignition coil plays a crucial role in providing the high voltage needed to ignite the fuel mixture in the combustion chamber. The 12v ignition coil is a key component in this process, as it converts the low voltage from the battery into the high voltage required for spark production.
When it comes to wiring a 12v ignition coil, it is important to follow a specific diagram to ensure proper installation and functioning of the system. A comprehensive guide can help simplify the process and ensure the correct connections are made.
Step 1: Identify the Components
Before diving into the wiring process, it is essential to understand the various components involved in the ignition coil setup. This includes the battery, ignition switch, coil, distributor, spark plugs, and any additional wiring or connectors.
Take the time to familiarize yourself with each component and its location within the system. This will make it easier to follow the wiring diagram and make the necessary connections.
Step 2: Locate the Wiring Diagram
Every vehicle has a specific wiring diagram for its ignition coil system. This diagram provides a visual representation of how the components are connected and ensures the correct wiring sequence is followed.
The wiring diagram can typically be found in the vehicle’s service manual or obtained from the manufacturer. It is crucial to use the correct diagram for your specific make and model to avoid any unnecessary complications or errors.
Step 3: Understand the Diagram
Once you have the wiring diagram in hand, take the time to understand its different symbols and connections. This will help you interpret the diagram accurately and avoid any confusion during the wiring process.
Pay close attention to the color codes, numbers, and labels used in the diagram. These are essential for identifying the correct wires and ensuring they are connected to the right components.
Step 4: Make the Connections
Now that you have a clear understanding of the wiring diagram, it’s time to start making the necessary connections. Begin by identifying the wires mentioned in the diagram and tracing them to their corresponding components.
Meticulously follow the sequence outlined in the diagram, making sure each wire is securely connected. Use proper connectors and insulate any exposed wires to prevent short circuits or electrical malfunctions.
Step 5: Test the System
Once all the connections are made, it is essential to test the ignition coil system to ensure everything is functioning correctly. Turn the ignition switch on and listen for any unusual sounds or check for sparks at the spark plug connections.
If everything is working correctly, you can proceed with reassembling any components that were removed during the wiring process. If any issues arise, carefully review the wiring diagram and double-check the connections before seeking professional assistance.
Following a comprehensive guide and using the correct wiring diagram can make the process of wiring a 12v ignition coil much easier and more efficient. By understanding the components, the diagram, and making the accurate connections, you’ll have a properly functioning ignition coil system that ensures smooth engine operation and reliable spark production.
Understanding the Basics of 12v Ignition Coils
Ignition coils are a crucial component in the ignition system of an internal combustion engine. They are responsible for transforming low voltage electrical current from the battery into high voltage current that is needed to ignite the fuel and start the engine. In a 12v ignition coil system, the coil receives 12 volts of electrical current from the battery and steps it up to several thousand volts.
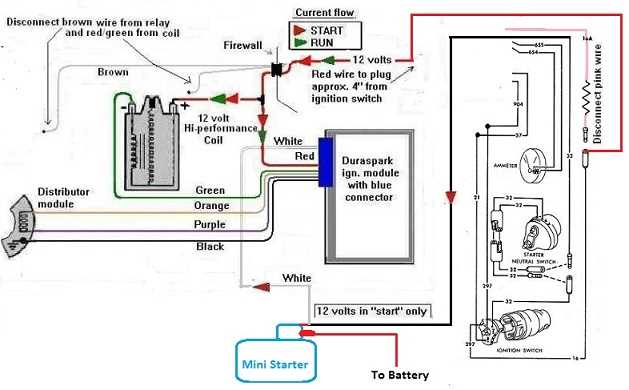
The wiring diagram of a 12v ignition coil typically consists of several components, including the ignition switch, the battery, the coil, the distributor, and the spark plugs. The ignition switch is usually located on the dashboard and is used to start or stop the engine. When the switch is turned on, it sends electrical current from the battery to the coil.
Inside the ignition coil, there are two primary windings and a secondary winding. The primary windings are connected to the battery and receive the 12-volt current. This current creates a magnetic field around the primary windings. When the ignition switch is closed, the primary circuit is completed and current flows through the primary windings. This creates a magnetic field that collapses when the current is interrupted.
When the magnetic field collapses, it induces a high voltage current in the secondary winding, which is connected to the distributor. The distributor then sends this high voltage current to the spark plugs, where it creates a spark that ignites the fuel and starts the engine. This process happens in a fraction of a second and is repeated for each cylinder in the engine.
In summary, 12v ignition coils are responsible for transforming low voltage electrical current into high voltage current needed to ignite the fuel in an internal combustion engine. They play a crucial role in the ignition system and are essential for starting the engine. Understanding the basics of how they work and their wiring diagram is important for troubleshooting and maintaining the ignition system of a vehicle.
Components and Connections in a 12v Ignition Coil
An ignition coil is an important component in the ignition system of a vehicle. It is responsible for transforming the 12v battery voltage into a high voltage charge, which is then used to ignite the fuel mixture in the engine’s cylinders. Understanding the components and connections in a 12v ignition coil is crucial for diagnosing and troubleshooting ignition system issues.
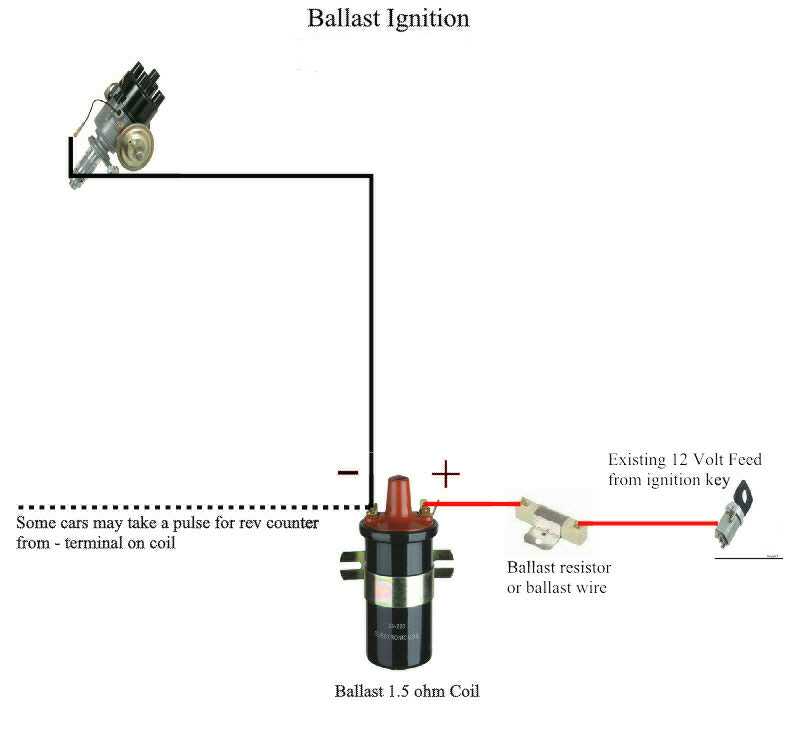
Primary and Secondary Windings: The ignition coil consists of two windings: the primary winding and the secondary winding. The primary winding is connected to the battery’s positive terminal and the ignition control module. It is designed with fewer turns of wire but with thicker gauge to handle the higher current flow. The secondary winding is connected to the spark plugs and is made of many turns of thinner wire to create a high voltage output.
High Tension Lead: The high tension lead, also known as the spark plug wire, connects the ignition coil to the spark plugs. It is a thick insulated wire that carries the high voltage charge from the secondary winding to the spark plugs, allowing for the ignition of the fuel mixture.
Distributor: In some ignition systems, a distributor is used to distribute the high voltage charge from the ignition coil to each spark plug. The distributor rotates and directs the high voltage charge to the correct spark plug at the right time, ensuring proper ignition timing.
Connections: The primary winding of the ignition coil is typically connected to the battery’s positive terminal through a fuse or fusible link. The negative terminal of the coil is connected to the ignition control module, which controls the switching of the primary current. The secondary winding is connected to the spark plugs via the high tension lead and distributor, if applicable.
Understanding the components and connections in a 12v ignition coil is essential for troubleshooting and diagnosing ignition system issues. By inspecting the connections and testing the coil’s primary and secondary windings, one can identify any faults or malfunctions that may be causing poor ignition performance. It is important to consult the vehicle’s wiring diagram and follow proper safety procedures when working with the ignition system.
Wiring Diagram for a 12v Ignition Coil: Step-by-Step Instructions
When it comes to wiring a 12v ignition coil, it is important to follow the correct steps to ensure proper installation and functionality. The ignition coil is a critical component in the ignition system, responsible for creating the high voltage needed to ignite the air-fuel mixture in the combustion chamber. Here is a step-by-step guide on how to wire a 12v ignition coil.
Gather the necessary materials
Before starting the wiring process, make sure you have all the necessary materials on hand. You will need the 12v ignition coil, appropriate wire connectors, wire strippers, electrical tape, and a wiring diagram specific to your vehicle’s make and model.
Identify the wiring connections
Refer to the wiring diagram to identify the specific connections for the 12v ignition coil. The diagram will typically show the positive and negative terminals of the coil, as well as any additional connections required for the specific ignition system.
Prepare the wires
Using the wire strippers, remove a small section of insulation from each end of the wires that will be connected to the ignition coil. This will expose the bare wire for a secure connection.
Connect the wires
Connect the positive wire to the positive terminal of the ignition coil, and the negative wire to the negative terminal. Use the appropriate wire connectors to ensure a solid and secure connection. If there are any additional connections required, refer to the wiring diagram for proper placement.
Secure the connections
Once all the wires are properly connected, use electrical tape to secure the wire connectors and prevent them from coming loose. This will ensure a reliable and durable connection.
Test the ignition coil
After completing the wiring process, it is important to test the ignition coil to ensure it is functioning correctly. Start the engine and observe the ignition system for any signs of malfunction. If the engine starts smoothly and runs without issue, the wiring of the 12v ignition coil has been successfully completed.
Following these step-by-step instructions will help you wire a 12v ignition coil correctly and ensure optimal performance of your vehicle’s ignition system. If you are uncertain about any step or encounter any difficulties, it is recommended to consult a professional automotive electrician for assistance.
Troubleshooting Common Issues with 12v Ignition Coil Wiring
Ignition coils play a crucial role in providing the necessary voltage for the spark plugs to ignite the fuel in an internal combustion engine. However, issues with the wiring of the ignition coil can lead to various problems. Here are some common issues you might encounter and possible solutions to troubleshoot them:
1. No Spark
If you are not getting any spark from your ignition coil, there could be several reasons. First, check the wiring connections to ensure they are secure and not damaged. Sometimes, loose or damaged wires can cause a loss of electrical current. Additionally, check the primary and secondary terminals of the ignition coil for any signs of corrosion or damage. Clean or replace the coil if necessary.
2. Weak Spark
If you notice a weak spark from the ignition coil, it may indicate a problem with the wiring or the coil itself. Check the wiring connections to make sure they are tight and free from corrosion. You can also test the coil using a multimeter to measure the resistance. If the resistance is not within the specified range, consider replacing the coil.
3. Misfiring or Rough Idle
A misfiring engine or a rough idle can be attributed to faulty ignition coil wiring. Inspect the wiring connections for any signs of damage or looseness. Make sure the wires are properly connected to the appropriate terminals. If the wires are damaged, replace them. Additionally, check the spark plugs for wear or fouling and replace if necessary.
4. Overheating
If the ignition coil is overheating, it could be due to a wiring issue. Check the wiring connections to ensure they are not loose or damaged. Make sure the coil is receiving the correct voltage from the battery. If the voltage is too high, it can cause the coil to overheat. Consider using a voltage regulator or seeking professional assistance to diagnose and resolve the issue.
Remember, proper wiring and maintenance of the ignition coil are essential for the efficient operation of your vehicle’s engine. If you are unable to troubleshoot the issue on your own, it is recommended to consult a qualified mechanic for further assistance.
Tips for Proper Installation of a 12v Ignition Coil
Installing a 12v ignition coil is an important step in ensuring proper performance of your vehicle’s ignition system. To ensure a smooth installation process and optimize the functionality of the coil, it is crucial to follow these tips:
- Proper grounding: Before installing the ignition coil, ensure that you have a solid and clean ground connection. A proper ground connection will prevent any electrical interference and ensure the efficient operation of the coil.
- Correct wiring: Refer to the wiring diagram provided by the manufacturer to ensure the correct connection of wires. Incorrect wiring can lead to poor performance or even damage to the ignition coil.
- Use appropriate connectors: It is important to use the correct connectors when installing the ignition coil. Improper connectors can result in loose connections, which can cause erratic performance or even failure of the ignition system.
- Secure mounting: Mount the ignition coil securely in a location that provides adequate ventilation. Proper mounting will prevent excessive heat buildup, which can affect the performance and lifespan of the coil.
- Inspect the ignition system: Before installing the new ignition coil, inspect the entire ignition system for any signs of wear or damage. Replace any worn-out components to ensure optimal performance.
- Test for proper functionality: Once the ignition coil is installed, test the ignition system to ensure proper functionality. Check for a strong spark and smooth engine operation.
By following these tips, you can ensure a proper installation of a 12v ignition coil, which will enhance the performance and reliability of your vehicle’s ignition system.
Benefits of Upgrading to a 12v Ignition Coil
Upgrading your ignition coil to a 12v system can bring a number of benefits to your vehicle’s performance. Here are some key advantages:
- Improved Spark Energy: One of the main benefits of upgrading to a 12v ignition coil is the increased spark energy it provides. This leads to a more powerful and efficient combustion process, resulting in improved engine performance and fuel efficiency.
- Enhanced Starting Power: A 12v ignition coil offers improved starting power, especially in colder weather. The higher voltage allows for a stronger spark, making it easier to ignite the fuel mixture and start the engine quickly and reliably.
- Increased RPM Range: With a 12v ignition coil, you can enjoy a wider RPM range for your engine. This means that you can rev your engine higher and push it to its limits without worrying about a weak spark or misfiring. This is particularly beneficial for high-performance vehicles or those that require frequent high-speed driving.
- Compatibility: Upgrading to a 12v ignition coil is usually a straightforward process as it is compatible with most modern vehicles. You may need to make some adjustments to the wiring, but overall, the installation should be relatively easy.
- Reliability: A 12v ignition coil offers improved reliability compared to older 6v systems. It is less prone to voltage drops or fluctuations, ensuring a consistent and strong spark throughout your engine’s operation.
- Availability and Cost: 12v ignition coils are widely available, and the cost of upgrading is generally affordable. This means that you can easily find the necessary components and upgrade your ignition system without breaking the bank.
Overall, upgrading to a 12v ignition coil can significantly enhance your vehicle’s performance, starting power, and reliability. It is a worthwhile investment for anyone looking to improve their driving experience and get the most out of their engine.