
If you’re in need of a belt diagram for your 1991 Toyota Pickup, you’ve come to the right place. The belt diagram is a visual representation of how the belts in your vehicle’s engine are routed. It shows the path that each belt takes around the various pulleys, ensuring proper operation and efficiency.
Having a belt diagram on hand can be incredibly helpful, especially if you’re new to working on vehicles or if you’ve never replaced a belt before. It can save you time and frustration by clearly showing you how each belt should be installed and how it should be positioned. This can prevent costly mistakes and ensure that your vehicle runs smoothly.
In addition to helping you install or replace belts, a belt diagram can also be useful for troubleshooting purposes. If you notice any issues with your belts, such as squeaking, slipping, or excessive wear, consulting the belt diagram can help you identify the problem and determine the appropriate solution. It can also help you determine if any other components, such as tensioners or pulleys, need to be inspected or replaced.
Overview of 1991 Toyota Pickup Belt Diagram
When it comes to the 1991 Toyota Pickup, knowing the belt diagram is crucial for proper maintenance and repair. The belt diagram shows the routing and configuration of the various belts that drive the engine’s accessories, such as the alternator, power steering pump, and air conditioning compressor.
By referring to the belt diagram, you can ensure that the belts are properly installed and aligned, which is essential for optimal performance and longevity. Incorrect belt routing or tension can result in decreased power output, increased wear on components, and potential belt failure.
Key Components and Belt Routing
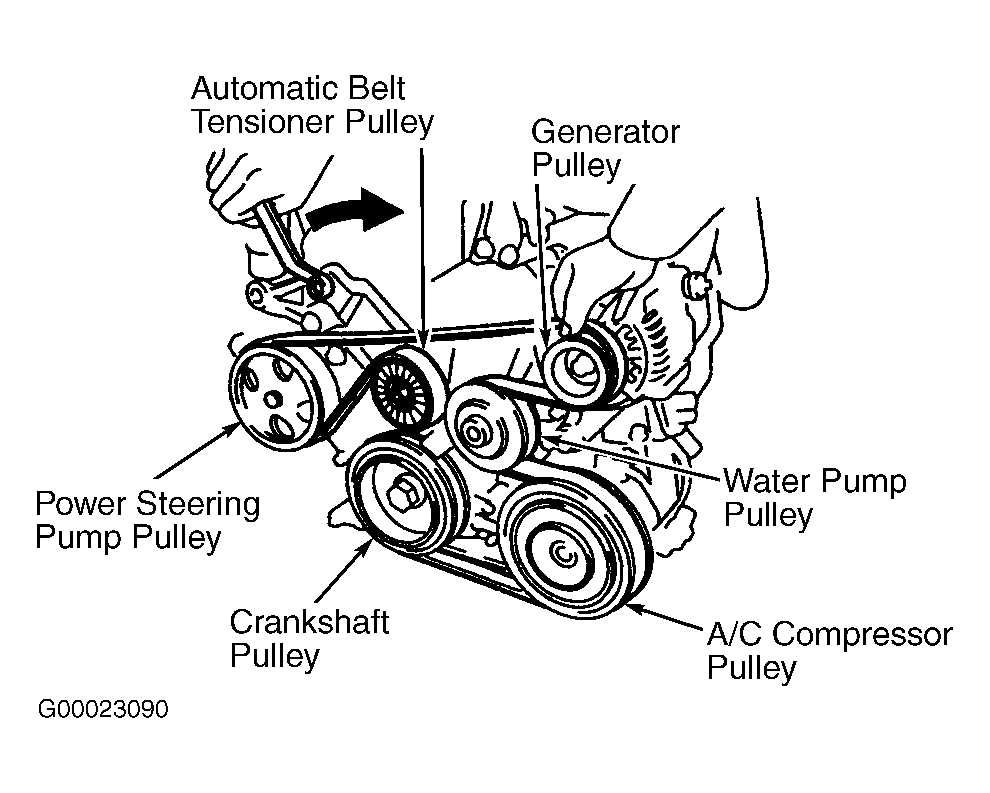
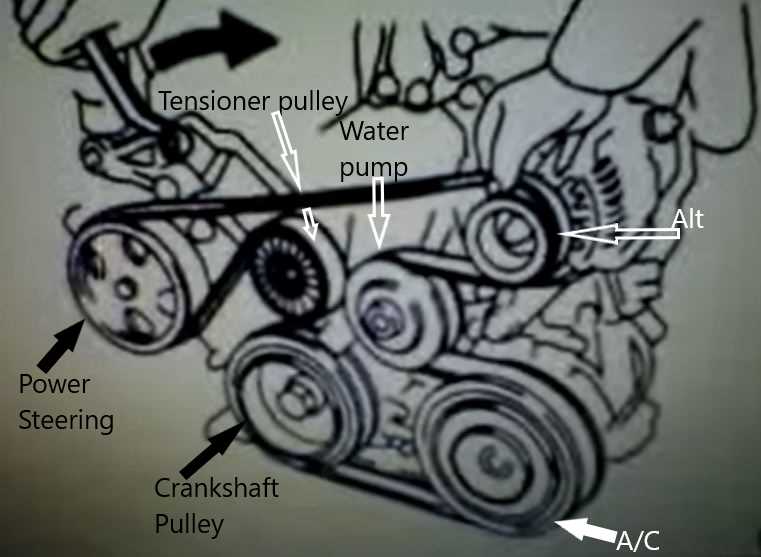
The 1991 Toyota Pickup has multiple belts that operate various components. The primary belt, known as the serpentine belt, controls the power steering pump, alternator, and air conditioning compressor. Additionally, there may be separate belts for the water pump, fan, and other accessories.
The belt diagram for the 1991 Toyota Pickup typically follows a specific routing pattern. The serpentine belt usually wraps around the crankshaft pulley and then around various other pulleys, such as the alternator and power steering pump. The specific routing may vary depending on the engine size and accessories installed in the vehicle.
Maintenance and Replacement
Regular maintenance is crucial to keep the belts in good condition and prevent premature failure. It is recommended to visually inspect the belts for signs of wear, cracks, or fraying. If any issues are detected, the belts should be replaced immediately to avoid any potential damage to the engine or accessories.
When replacing the belts, it is important to use the correct size and type of belt specified by the manufacturer. Following the belt diagram, carefully thread the new belt around the pulleys, ensuring proper alignment and tension. A belt tensioner tool may be necessary to achieve the correct tension.
- Regularly inspect the belts for wear and damage
- Use the correct size and type of belt for replacement
- Follow the belt diagram for proper routing and alignment
- Use a belt tensioner tool to achieve the correct tension
By following these guidelines and referring to the 1991 Toyota Pickup belt diagram, you can ensure that the belts are properly maintained and replaced. This will help keep your vehicle running smoothly and prevent any potential issues related to belt failure.
Serpentine Belt Routing for 1991 Toyota Pickup
The serpentine belt in a 1991 Toyota Pickup is an essential component for the proper functioning of the engine. It is responsible for powering various systems and components, such as the alternator, power steering pump, and water pump. Understanding the correct serpentine belt routing is crucial for maintenance and replacement purposes.
When looking at the engine from the front, the serpentine belt in a 1991 Toyota Pickup follows a specific path around the various pulleys. Starting at the crankshaft pulley, the belt typically wraps around the power steering pump pulley, then the alternator pulley, and finally, the water pump pulley. It is important to note that the exact routing may vary slightly depending on the specific engine configuration and additional accessories installed.
To ensure the serpentine belt is properly aligned and tensioned, it is recommended to refer to the vehicle’s owner’s manual or a professional repair guide. These resources generally include a diagram or illustration of the specific belt routing for the model year and engine type. Additionally, some engines may have a belt routing sticker located in the engine bay for quick reference.
Regular inspection and maintenance of the serpentine belt are crucial to prevent potential issues and ensure optimal performance. Signs of a worn or damaged belt include cracking, fraying, or excessive slack. If any of these signs are observed, it is recommended to replace the serpentine belt promptly to avoid engine damage and costly repairs.
- Ensure proper serpentine belt routing for a 1991 Toyota Pickup by referring to the owner’s manual or a professional repair guide.
- Inspect the serpentine belt regularly for signs of wear or damage, such as cracking or fraying.
- Replace the serpentine belt if any signs of wear or damage are observed to prevent engine damage.
Following the correct serpentine belt routing and regular maintenance will help ensure the longevity and optimal performance of a 1991 Toyota Pickup’s engine.
Power Steering Belt Routing for 1991 Toyota Pickup
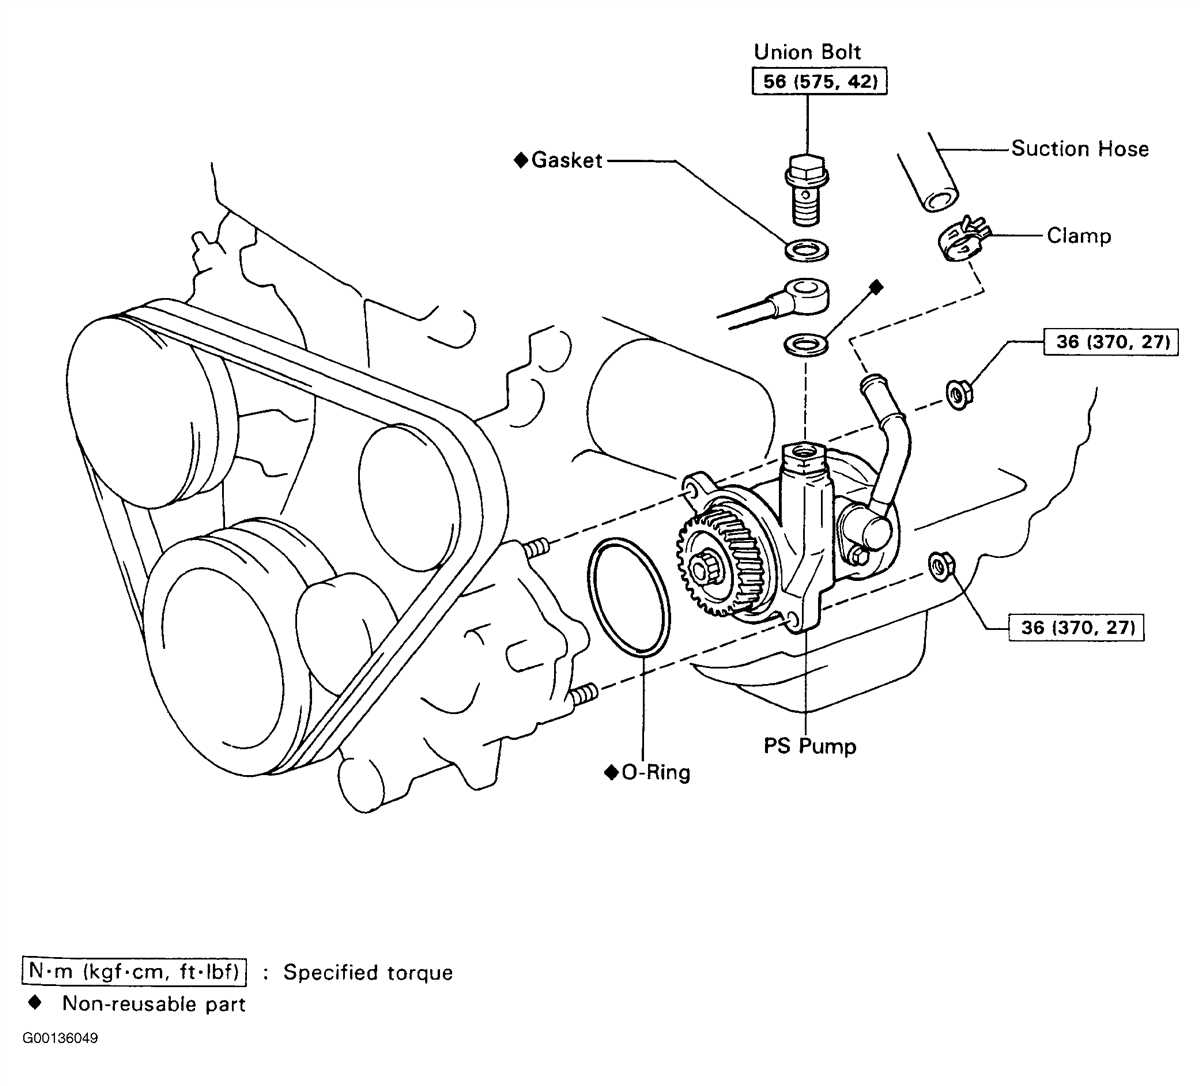
If you have a 1991 Toyota Pickup and need to replace the power steering belt, it’s important to know the correct routing. The power steering belt is responsible for turning the power steering pump, which allows you to easily steer your vehicle. Without a properly functioning power steering belt, it can be difficult to control your vehicle, especially at low speeds or when making sharp turns.
The power steering belt on a 1991 Toyota Pickup is typically a single belt that connects the power steering pump to the crankshaft pulley. The exact routing may vary depending on the specific engine configuration of your vehicle, so it’s important to consult the belt routing diagram in your vehicle’s owner’s manual or service manual. If you don’t have access to these manuals, you may be able to find the belt routing diagram online or by contacting a Toyota dealership or auto parts store.
Here is a general idea of the power steering belt routing for a 1991 Toyota Pickup:
- Start by locating the power steering pump, which is typically located on the passenger side of the engine.
- Next, locate the crankshaft pulley, which is at the bottom of the engine.
- Wrap the power steering belt around the power steering pump pulley.
- Route the belt around the crankshaft pulley.
- Tension the belt by adjusting the tensioner pulley or adjusting bolt.
- Make sure the belt is properly aligned and tensioned.
It’s important to follow the proper belt routing and tensioning procedures to ensure the power steering belt operates smoothly and does not slip or fail. If you’re unsure of how to properly route or tension the power steering belt on your 1991 Toyota Pickup, it’s recommended to consult a qualified mechanic or refer to a repair manual for your specific vehicle model.
By properly maintaining the power steering belt on your 1991 Toyota Pickup, you can ensure the smooth operation of your power steering system and maintain optimal control of your vehicle while driving.
Alternator Belt Routing for 1991 Toyota Pickup
When it comes to the 1991 Toyota Pickup, understanding the alternator belt routing is essential for proper maintenance and repair. The alternator belt is responsible for driving the alternator, which charges the battery and powers the electrical systems of the vehicle.
To ensure the alternator belt is installed correctly, follow these steps:
- Locate the alternator, which is typically located at the front of the engine on the right side.
- Identify the tensioner pulley, which is used to adjust the tension of the alternator belt. It is usually located near the alternator.
- Using a wrench or socket, rotate the tensioner pulley to loosen the tension on the alternator belt.
- Once the tension is loosened, remove the old alternator belt from the pulleys.
- Refer to the belt routing diagram, which is usually located on the fan shroud or in the vehicle’s owner’s manual.
- Install the new alternator belt, following the routing diagram provided.
- Use the tensioner pulley to tighten the belt until it has the proper tension. Check your vehicle’s specifications for the appropriate tension measurement.
- Double-check the belt routing and tension to ensure everything is installed correctly.
- If necessary, make any adjustments to the tension using the tensioner pulley.
By following these steps and referring to the alternator belt routing diagram, you can ensure the alternator belt is properly installed on your 1991 Toyota Pickup. This will help maintain the performance and reliability of your vehicle’s electrical system.
Air Conditioning Belt Routing for 1991 Toyota Pickup
In a 1991 Toyota Pickup, the air conditioning system plays a crucial role in keeping the vehicle cool and comfortable during hot weather. The air conditioning belt is responsible for powering the compressor, which pressurizes the refrigerant and helps regulate the temperature of the air inside the cabin.
Proper belt routing is essential to maintain the efficiency and functionality of the air conditioning system. Here is a step-by-step guide on how to correctly route the air conditioning belt on a 1991 Toyota Pickup:
- Locate the crankshaft pulley at the bottom of the engine. This pulley is responsible for driving the different engine accessories, including the air conditioning compressor.
- Identify the tensioner pulley, which is usually located near the top of the engine. The tensioner pulley keeps the air conditioning belt tight to prevent slipping and ensure proper operation.
- Begin the belt routing process on the crankshaft pulley. Wrap the belt around the pulley, ensuring it is properly seated in the grooves.
- Route the belt upwards and around the tensioner pulley. Again, make sure the belt is properly aligned in the grooves of the pulley.
- Finally, route the belt around the air conditioning compressor pulley. This pulley is usually located near the top of the engine, adjacent to the tensioner pulley. Ensure the belt is properly seated in the grooves of the pulley.
Once the air conditioning belt is properly routed, check the tension to ensure it is neither too loose nor too tight. A properly tensioned belt should have a small amount of deflection when pressed with moderate force.
Ensuring the correct and proper routing of the air conditioning belt is crucial for maintaining the functionality and efficiency of the system. Failing to do so may result in belt slippage, reduced cooling performance, or even damage to engine accessories. Regularly inspect the belt for signs of wear or damage, and replace it if necessary.
With the correct belt routing and regular maintenance, the air conditioning system in a 1991 Toyota Pickup can provide optimal cooling performance and keep the cabin comfortable during hot weather.