
If you own a 1993 Ford Ranger 4.0, then you know how important it is to have access to a wiring diagram. This diagram serves as a roadmap for your electrical system, allowing you to identify and troubleshoot any issues that may arise. Whether you’re a seasoned mechanic or a car enthusiast, having a wiring diagram on hand can save you time and frustration.
The 1993 Ford Ranger 4.0 wiring diagram provides a detailed illustration of the electrical components and their connections within the vehicle. This includes the ignition system, battery, alternator, starter, fuel pump, and more. By referencing this diagram, you can easily trace wires and identify any potential problems such as loose connections or damaged wiring.
Having a wiring diagram for your 1993 Ford Ranger 4.0 is especially useful when it comes to modifications or upgrades. If you’re looking to install a new stereo system, fog lights, or any other aftermarket accessory, the wiring diagram will guide you through the process. It will show you which wires to tap into for power, ground, and signal, ensuring a clean and professional installation.
Whether you’re a DIYer tackling repairs or a professional mechanic, the 1993 Ford Ranger 4.0 wiring diagram is an invaluable tool to have at your disposal. It can help you diagnose electrical issues, prevent damage to your vehicle’s systems, and ensure a successful installation of any aftermarket accessories. So, if you’re in need of a wiring diagram, be sure to find the appropriate one for your specific year and model of Ford Ranger 4.0.
Understanding the 1993 Ford Ranger 4.0 Wiring Diagram
When it comes to understanding the wiring diagram of a 1993 Ford Ranger 4.0, it is important to have some basic knowledge of automotive electrical systems. The wiring diagram is a visual representation of the electrical connections and components that make up the vehicle’s electrical system. It shows how the different components are connected and how they interact with each other.
One key aspect to understand in the wiring diagram is the color coding of the wires. Different colors represent different functions, such as power supply, ground, or signal. For example, red wires usually indicate power supply, while black wires represent ground connections. Understanding the color codes can help in troubleshooting and identifying specific circuits.
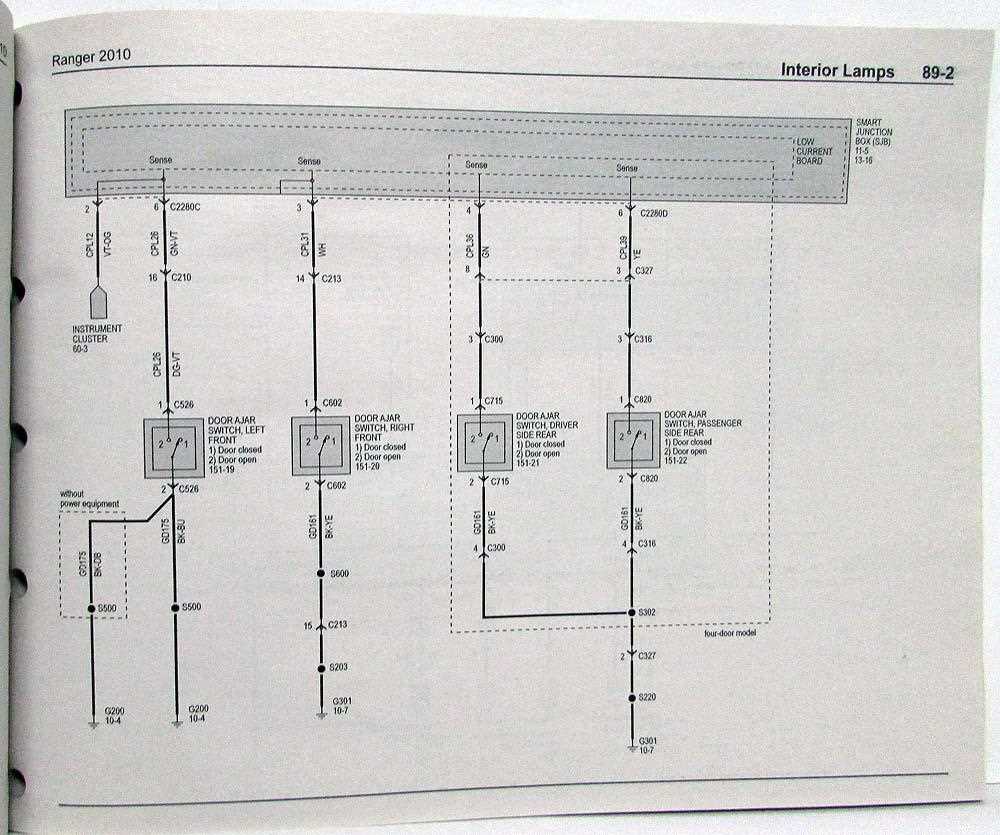
The wiring diagram also shows the various connectors and terminals used in the electrical system. These connectors allow different components to be connected and disconnected as necessary. It is important to understand the pin assignments and functions of these connectors when working on the electrical system.
Additionally, the wiring diagram provides information on the various fuses and relays used in the electrical system. Fuses are designed to protect the electrical system from overloads and short circuits by breaking the circuit when a certain current is exceeded. Relays, on the other hand, are used to control high-current devices by switching a smaller current to activate or deactivate the device.
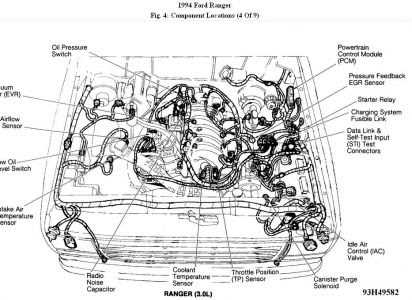
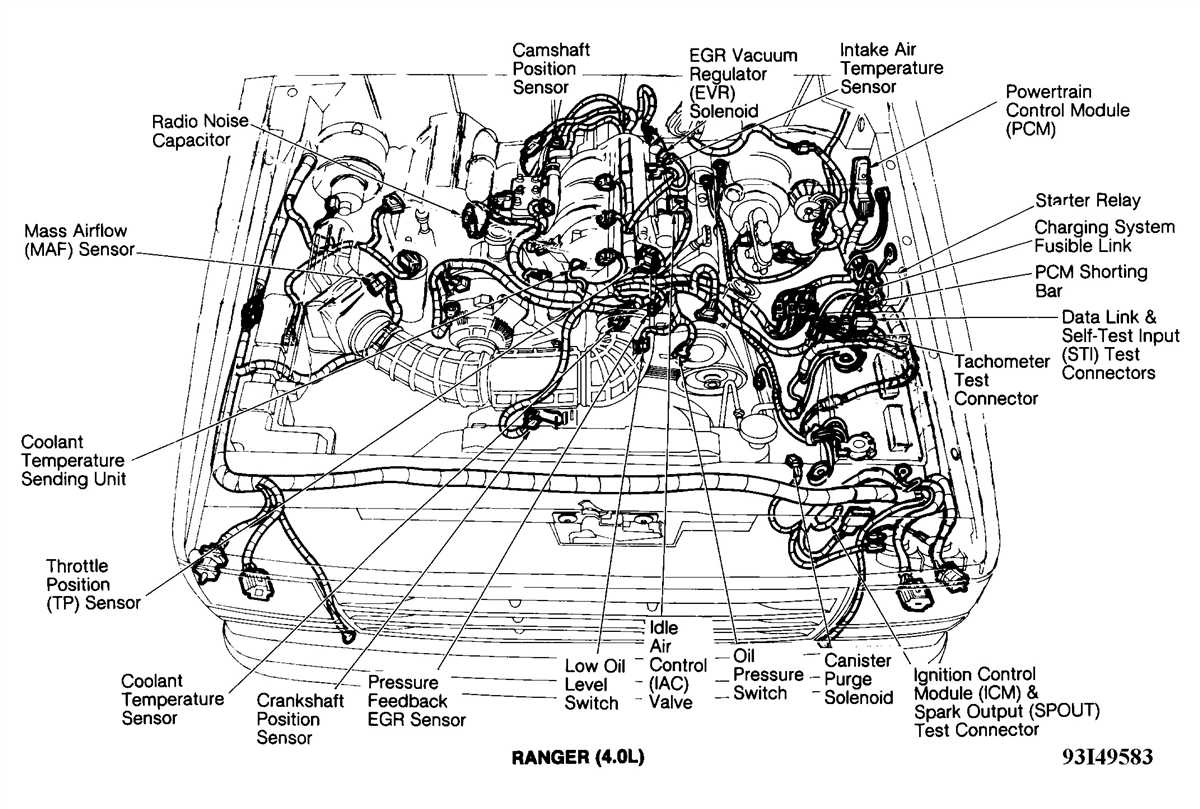
The wiring diagram for a 1993 Ford Ranger 4.0 also includes information on the different sensors and switches used in the engine management system. These sensors and switches provide input to the engine control module, which then adjusts various parameters to ensure optimal engine performance.
Understanding the wiring diagram is essential for diagnosing and repairing electrical issues in the 1993 Ford Ranger 4.0. It provides a roadmap of the electrical system, allowing technicians to trace and identify wiring problems quickly and efficiently. By knowing how the different components and circuits are connected, technicians can troubleshoot and fix electrical issues in a systematic and organized manner.
Overview of the 1993 Ford Ranger 4.0 Wiring Diagram
The 1993 Ford Ranger 4.0 wiring diagram is a comprehensive guide that provides detailed information on the electrical system of the vehicle. This diagram is essential for anyone who needs to perform electrical repairs or upgrades on their 1993 Ranger 4.0 model. It contains all the necessary wiring information, including wire colors, wire gauge, and circuit details, to ensure proper installation and troubleshooting.
The wiring diagram covers various components and systems in the 1993 Ford Ranger 4.0, including the ignition system, starting system, charging system, lighting system, power windows, power locks, and more. Each component and system is represented by a specific diagram or set of diagrams, making it easy to locate and understand the wiring connections.
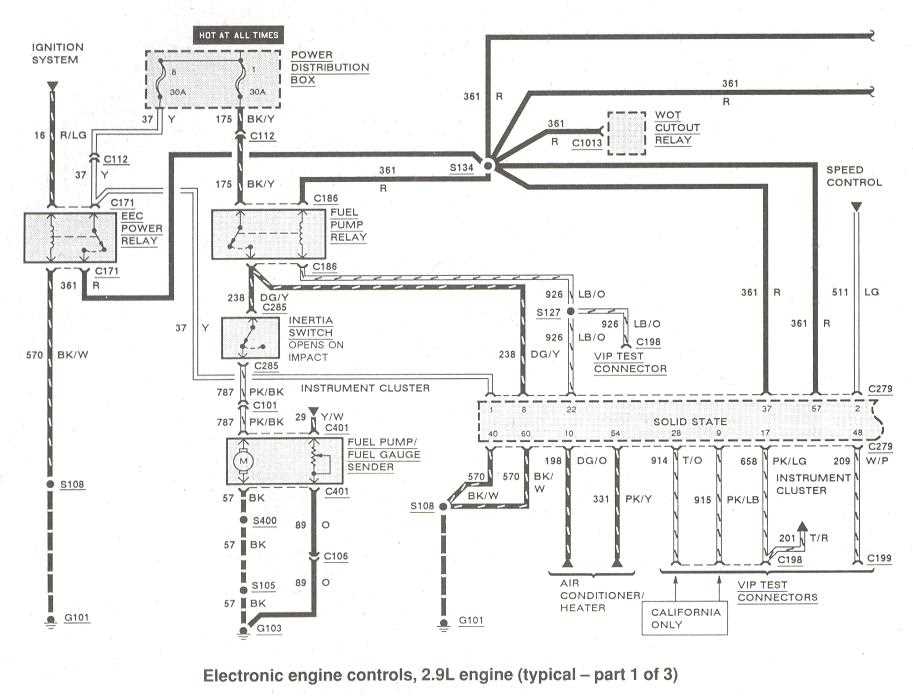
For example, the ignition system diagram provides detailed information on the wiring connections for the ignition coil, distributor, spark plugs, and related components. It also includes information on the power source, such as the battery and ignition switch. This diagram allows for easy identification and troubleshooting of any issues with the ignition system.
The wiring diagram also includes information on the various connectors used in the electrical system of the 1993 Ford Ranger 4.0. It provides details on the pin assignments, wire functions, and color codes, allowing for easy identification and proper connection of wires and connectors. This information is crucial for anyone performing repairs or modifications to the vehicle’s electrical system.
In summary, the 1993 Ford Ranger 4.0 wiring diagram is a valuable resource for anyone working on the electrical system of this specific model. It provides detailed diagrams and information on the various components and systems, making it an essential tool for troubleshooting and proper installation of electrical components.
Locating the Wiring Harness in the 1993 Ford Ranger 4.0

The wiring harness in the 1993 Ford Ranger 4.0 is an important component that connects various electrical systems and devices throughout the vehicle. It is responsible for transmitting power and signals to different parts of the truck, such as the engine, headlights, taillights, and dashboard.
The wiring harness is located underneath the hood and extends throughout the entire length of the vehicle. It is typically made up of multiple wires and connectors, which are organized and bundled together for efficient routing and protection. The harness is designed to withstand the heat, vibrations, and other harsh conditions that the vehicle may encounter.
To locate the wiring harness in the 1993 Ford Ranger 4.0, start by opening the hood of the truck. Look for a bundle of wires that are neatly organized and secured with plastic clips or brackets. The wiring harness will be visible near the engine compartment, running from the firewall to different components.
You may also find sections of the wiring harness inside the cabin of the truck. These sections are responsible for connecting the electrical systems of the dashboard, such as the gauges, switches, and radio, to the main harness. They are usually found along the driver’s side of the vehicle, underneath the dashboard.
When working with the wiring harness, it is important to exercise caution and follow proper safety procedures. Disconnect the battery before attempting any repairs or modifications to avoid the risk of electrical shock. If you are unsure about locating or working with the wiring harness, it is recommended to consult a professional mechanic or refer to the vehicle’s wiring diagram.
Identifying the Different Components in the Wiring Diagram
When looking at a wiring diagram for a 1993 Ford Ranger 4.0, it is important to identify and understand the different components that are represented. Doing so will help in troubleshooting and understanding how the electrical system of the vehicle works. Here are some key components that can be found in the wiring diagram:
- Battery: The battery is the primary source of electrical power for the vehicle. It stores and supplies electricity to various components, including the starter and ignition system.
- Alternator: The alternator is responsible for generating electricity while the engine is running. It charges the battery and also supplies power to the vehicle’s electrical system.
- Fuse Box: The fuse box is a centralized location for all the fuses and relays in the vehicle. It protects the electrical system from excessive current and prevents damage to components.
- Ignition Switch: The ignition switch is used to start the vehicle and control the power supply to various electrical components. It is connected to the battery and controls the flow of electricity.
- Spark Plugs: The spark plugs are responsible for igniting the fuel-air mixture inside the engine cylinders. The wiring diagram shows how the spark plugs are connected to the ignition system.
- Engine Control Module (ECM): The ECM is the brain of the vehicle’s engine management system. It receives data from various sensors and controls the fuel injection, ignition timing, and other engine functions.
- Instrument Cluster: The instrument cluster is the panel behind the steering wheel that displays information about the vehicle, such as speed, fuel level, and engine temperature. The wiring diagram shows how the various instruments are connected.
By understanding the different components in the wiring diagram, it becomes easier to diagnose electrical issues and make any necessary repairs. Each component plays a critical role in the overall functioning of the vehicle’s electrical system, and identifying them correctly is essential for troubleshooting and maintenance.
Interpreting the Wiring Diagram for Electrical Troubleshooting
When it comes to troubleshooting electrical issues in your vehicle, understanding the wiring diagram is essential. The wiring diagram serves as a map that outlines the electrical connections and components within your vehicle’s system. By interpreting the information provided in the diagram, you can efficiently track down the source of the problem and make the necessary repairs.
Identifying Components: The wiring diagram will typically include symbols and labels that represent different electrical components. These components can include switches, relays, fuses, connectors, and more. By referring to the diagram, you can identify the specific components associated with the circuit you are troubleshooting.
Tracing Circuits: The wiring diagram will show the flow of electricity through the various components and connections. It will indicate the direction of the current, as well as any branches or junctions in the circuit. By following the circuit path indicated in the diagram, you can determine where the electrical issue may be occurring.
Understanding Wiring Colors and Codes: Wiring diagrams will often include color codes to represent different wires and their functions. Understanding these color codes is crucial for accurately interpreting the diagram. Additionally, the diagram may include numeric codes or labels to further assist in identifying the wires and their connections.
Identifying Power Sources and Grounds: The wiring diagram will indicate the power sources and grounds associated with the circuit. Power sources provide the electrical energy needed for the components to function, while grounds provide a path for electrical current to return to the battery. By identifying these sources and grounds, you can check for voltage or continuity issues.
Using a Multimeter: To further diagnose electrical problems, a multimeter can be used to measure voltage, resistance, and continuity. By referencing the wiring diagram, you can determine where to place the multimeter probes to test for proper voltage levels or detect any breaks in the circuit.
In conclusion, the wiring diagram is an essential tool for electrical troubleshooting. By properly interpreting the information provided in the diagram, you can effectively track down the source of the problem and make the necessary repairs. Remember to refer to the specific wiring diagram for your vehicle model and year to ensure accurate troubleshooting.
Proper Maintenance of the Wiring System in the 1993 Ford Ranger 4.0
The 1993 Ford Ranger 4.0 is a reliable and durable pickup truck, but like any vehicle, it requires regular maintenance to ensure optimal performance. One critical area to pay attention to is the wiring system. The wiring system in the Ranger 4.0 is responsible for connecting various electrical components, such as the ignition system, lights, and sensors, and it is essential to keep it in good condition for the truck to function properly.
One of the key aspects of maintaining the wiring system is to regularly inspect it for any signs of wear or damage. Over time, the wires in the system can become worn, frayed, or corroded, which can lead to electrical malfunctions or even fires. It is recommended to visually inspect the wires and connectors, looking for any exposed wires or loose connections. If any issues are found, it is important to address them promptly by repairing or replacing the affected components.
In addition to visual inspections, it is also important to test the wiring system periodically. This can be done using a multimeter or similar electrical testing tool. By measuring the voltage and continuity of the wires, you can identify any issues such as broken or shorted wires. Testing the wiring system can help pinpoint the source of electrical problems and allow for targeted repairs.
Another critical step in maintaining the wiring system is to ensure proper routing and securing of the wires. The Ranger 4.0 has a complex network of wires that run throughout the vehicle, and it is important to make sure they are routed correctly and securely fastened. Loose or improperly routed wires can rub against other components, causing abrasion and potential shorts. It is recommended to refer to the vehicle’s wiring diagram and follow the manufacturer’s guidelines for proper wire routing.
Lastly, it is important to protect the wiring system from external elements that can cause damage. The undercarriage of the Ranger 4.0 is exposed to road debris, water, and chemicals, which can corrode the wiring and lead to electrical issues. Applying protective coatings or using wire looms can help shield the wires from these harmful elements and prolong their lifespan.
By regularly inspecting, testing, routing, and protecting the wiring system in the 1993 Ford Ranger 4.0, owners can ensure the longevity and reliability of their vehicle. Proper maintenance of the wiring system not only prevents electrical problems but also enhances overall safety and performance.
Tips for Upgrading or Modifying the Wiring System in the 1993 Ford Ranger 4.0
The 1993 Ford Ranger 4.0 is a popular vehicle for modifications and upgrades. One area that many owners choose to enhance is the wiring system. Upgrading or modifying the wiring system can improve performance, enhance safety, and allow for the installation of additional accessories. Here are some tips to consider when working on the wiring system of your 1993 Ford Ranger 4.0.
1. Plan and Research
Before starting any wiring upgrades or modifications, it’s important to plan and research. Understand the existing wiring system and the modifications you want to make. This will help you identify the necessary components, tools, and techniques needed for a successful upgrade.
2. Use High-Quality Wiring Components
When upgrading or modifying the wiring system, it’s crucial to use high-quality wiring components. Invest in new wires, connectors, terminals, and other necessary equipment. Using cheap or low-quality components may lead to electrical failures, shorts, or other issues down the road.
3. Follow Wiring Diagrams
Refer to wiring diagrams specific to the 1993 Ford Ranger 4.0 during the modification process. These diagrams provide a visual representation of the electrical connections and can help you understand the wiring layout. Follow the diagrams carefully to ensure proper installation and avoid any potential damage.
4. Properly Ground the Wiring System
A solid and reliable ground is crucial for the proper functioning of the wiring system. Ensure that all ground connections are clean, tight, and secure. Consider adding additional grounding points or upgrading existing ones to minimize electrical interference and improve overall performance.
5. Label and Organize Wires
As you modify or upgrade the wiring system, label and organize the wires to maintain clarity and simplify future maintenance or troubleshooting. Use color-coded labels, tags, or wire looms to keep track of different wires and their functions. This will save you time and effort when working on the system in the future.
6. Test and Inspect
After completing the wiring upgrades or modifications, thoroughly test and inspect the system to ensure everything is in proper working order. Check for any loose connections, shorts, or other issues. Use a multimeter or other electrical testing equipment to verify voltage, continuity, and proper functionality.
By following these tips, you can successfully upgrade or modify the wiring system in your 1993 Ford Ranger 4.0. Always prioritize safety and consult professional help if needed. With a well-designed and properly installed wiring system, you can enjoy improved performance, reliability, and functionality in your vehicle.