
If you own a 1998 Chevy Blazer, understanding the vacuum line diagram is essential for troubleshooting and maintenance. The vacuum system plays a crucial role in the vehicle’s overall performance, affecting functions such as the braking system, transmission shifting, and emission control. In this article, we will provide a comprehensive guide on the vacuum line diagram for the 1998 Chevy Blazer, helping you navigate through this intricate system.
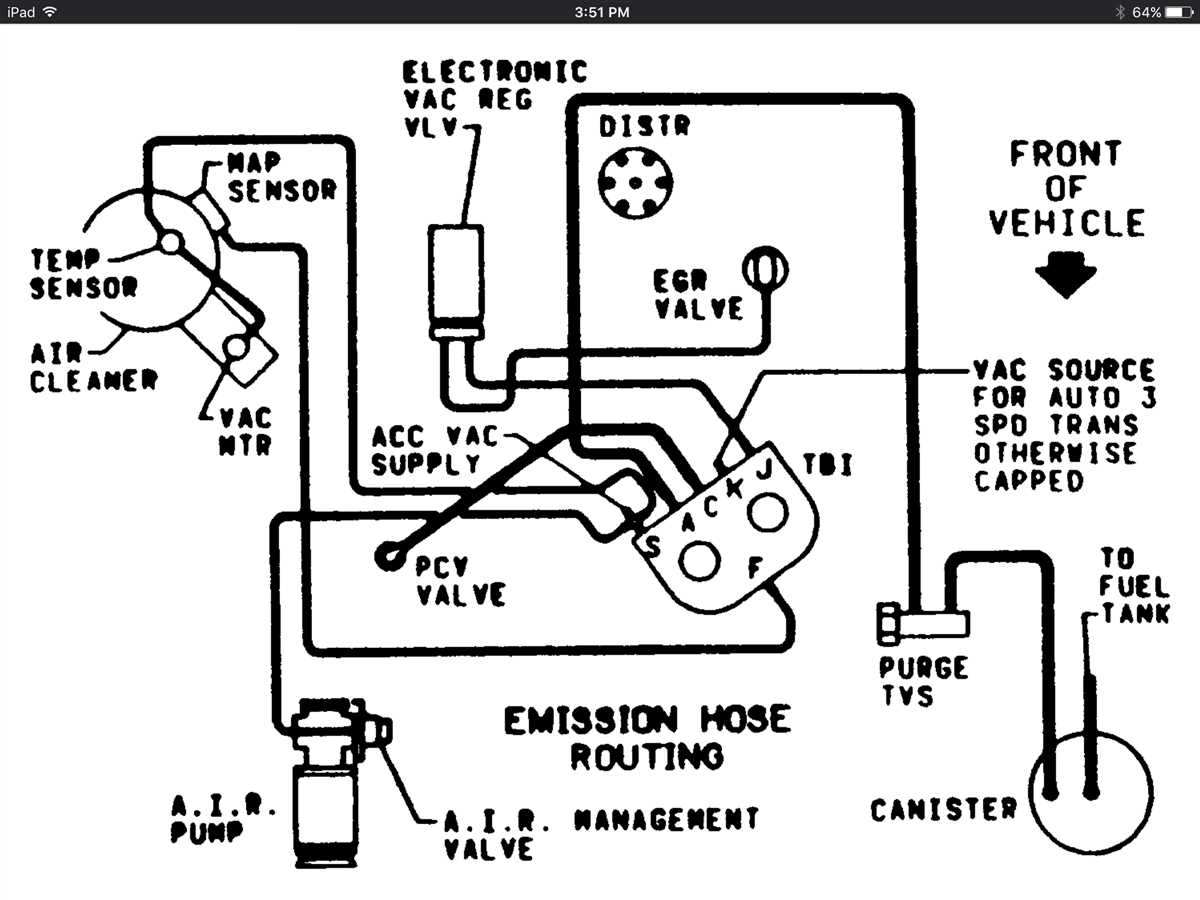
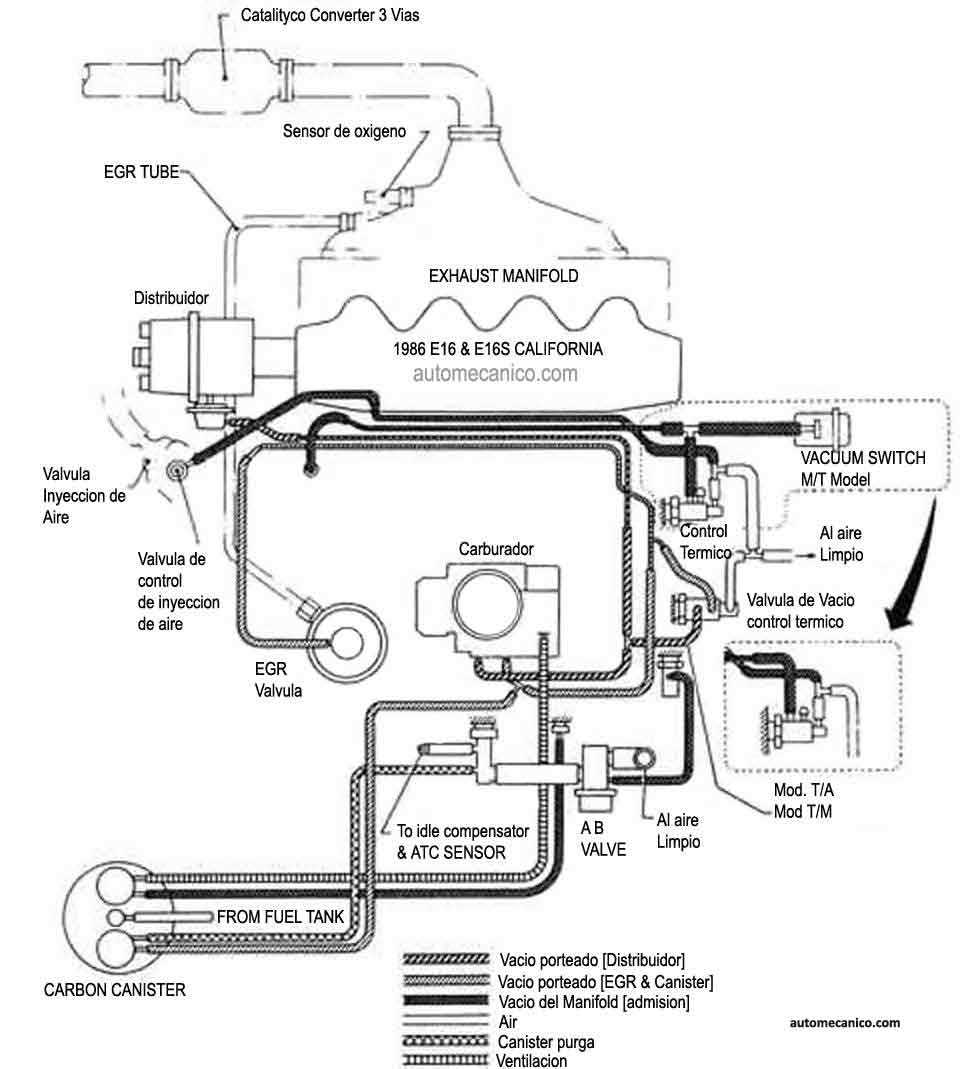
The vacuum line diagram illustrates the connections between various components in the vehicle’s vacuum system. It depicts the routing and interconnections of the vacuum lines, enabling mechanics and DIY enthusiasts to identify potential leaks, blockages, or misconnections that may lead to poor performance or other issues. With the diagram, you can easily trace the path of the vacuum lines and pinpoint any abnormalities that may require attention.
Understanding the vacuum line diagram is particularly crucial for troubleshooting and diagnosing issues related to the 1998 Chevy Blazer’s emission control system. The emission control system relies heavily on the vacuum system to regulate airflow, fuel mixture, and other factors that affect exhaust emissions. By referring to the diagram, you can identify any potential vacuum leaks or blockages that may be causing emissions problems, helping you take the appropriate corrective actions.
Additionally, the vacuum line diagram is essential for maintaining the 1998 Chevy Blazer’s braking system. The vehicle’s brake booster relies on vacuum pressure to assist the driver’s braking effort, providing increased stopping power. By consulting the diagram, you can ensure that the vacuum lines connecting the brake booster are in good condition and properly connected, thus ensuring optimal braking performance and safety.
Overview
If you are looking for a vacuum line diagram for a 1998 Chevy Blazer, you’ve come to the right place. The vacuum system in your Blazer plays a crucial role in the overall performance and efficiency of the vehicle. Understanding how the vacuum lines are routed and connected is important for troubleshooting and maintaining the system.
What is a vacuum line?
A vacuum line is a rubber or plastic hose that connects various components of the vehicle’s engine and emissions control system. These lines are responsible for carrying vacuum pressure, which is created by the engine’s intake manifold, to different components such as the brake booster, PCV valve, and various sensors.
Why do you need a vacuum line diagram?
Having a vacuum line diagram for your 1998 Chevy Blazer is important because it provides a visual representation of how the lines are routed and connected. This diagram can help you troubleshoot issues such as vacuum leaks, misconnections, or damaged lines. It also serves as a reference when replacing or repairing vacuum lines.
Where can you find a vacuum line diagram?
You can find a vacuum line diagram for a 1998 Chevy Blazer in a few different places. One option is to consult the vehicle’s owner manual, which often includes a diagram of the vacuum system. Additionally, you can search online for a diagram specific to your vehicle make and model. There are also repair manuals available that provide detailed diagrams and instructions for various systems in your Blazer.
Conclusion
Having a vacuum line diagram for your 1998 Chevy Blazer is essential for understanding and maintaining the vacuum system. This diagram provides a visual representation of how the lines are routed and connected, allowing you to troubleshoot issues and make necessary repairs. Whether you consult the owner manual, search online, or use a repair manual, having access to a vacuum line diagram will help you keep your Blazer running smoothly.
Importance of Vacuum Line Diagram
The vacuum line diagram is a crucial component of the engine system in a vehicle. It provides a visual representation of the vacuum lines and their connections, helping mechanics and owners understand how the system functions and how to troubleshoot any issues that may arise.
One of the main reasons why the vacuum line diagram is important is because it helps ensure the proper functioning of the vehicle’s engine. The vacuum system plays a critical role in controlling various engine functions, such as the fuel delivery, emission control, and overall performance. By referring to the diagram, mechanics can easily identify and fix any disconnected or damaged vacuum lines that may be affecting the engine’s performance.
Another reason why the vacuum line diagram is important is for maintenance purposes. Regular inspection of the vacuum lines is necessary to prevent potential issues and maintain the vehicle’s efficiency. By having a clear diagram, owners and mechanics can quickly locate the vacuum lines and check for any signs of wear, corrosion, or leaks. This proactive approach can help prevent costly repairs and ensure the longevity of the engine.
In addition, the vacuum line diagram is essential for troubleshooting purposes. If the vehicle experiences any performance issues or has warning lights illuminated on the dashboard, mechanics can consult the diagram to pinpoint the source of the problem. By understanding the vacuum system’s layout and the interconnections between different components, mechanics can efficiently diagnose and resolve the issue, saving time and money.
In conclusion, the vacuum line diagram is a valuable tool for anyone working on a vehicle’s engine system. It provides a visual reference of the vacuum lines and their connections, facilitating proper maintenance, troubleshooting, and overall performance of the engine. Whether you are a mechanic or a vehicle owner, understanding and utilizing the vacuum line diagram can greatly contribute to the efficient operation and longevity of the vehicle.
Identifying the Vacuum Lines

In order to properly diagnose and troubleshoot any issues with the vacuum system in your 1998 Chevy Blazer, it is important to first identify and understand the vacuum lines. The vacuum lines in your vehicle play an essential role in various systems, including the brakes, emissions, HVAC controls, and more.
One way to identify the vacuum lines is by referring to a vacuum line diagram specific to your vehicle. This diagram, often found in the vehicle’s repair manual or available online, will provide a visual representation of the vacuum lines and their connections. It will typically indicate the different components that the vacuum lines connect to, such as the intake manifold, vacuum reservoir, and various actuators.
When examining the vacuum lines, it is important to look for any signs of damage or deterioration. Vacuum lines are typically made of rubber or plastic, and over time, they can become brittle, cracked, or even disconnected. Any noticeable leaks or breaks in the vacuum lines can disrupt the proper functioning of the connected systems, leading to performance issues or malfunctions.
If you are unable to locate a vacuum line diagram or need further assistance, you can also consult a dealership or experienced mechanic. They will have the knowledge and expertise to help identify the vacuum lines and provide guidance on any necessary repairs or replacements. Additionally, there are online forums and communities where you can seek advice and guidance from fellow Blazer owners or automotive enthusiasts who may have experience with similar issues.
By properly identifying the vacuum lines in your 1998 Chevy Blazer, you can ensure that the vacuum system is functioning correctly and address any issues promptly. This will help maintain the performance and efficiency of your vehicle’s various systems that rely on vacuum pressure for operation.
Common Vacuum Line Issues
In a 1998 Chevy Blazer, vacuum lines play a crucial role in the proper functioning of various systems, such as the braking, emission, and heating/cooling systems. However, over time, vacuum lines can develop issues that can affect the overall performance of the vehicle. Here are some common vacuum line problems that owners may encounter:
1. Vacuum Leaks: One of the most common issues with vacuum lines is the development of leaks. These leaks can occur due to wear and tear, age, or exposure to extreme temperatures. When there is a vacuum leak, it can cause a decrease in engine power, poor fuel efficiency, and unreliable braking. To identify a vacuum leak, owners may notice hissing sounds coming from the engine compartment or experience a rough idle.
2. Cracked or Damaged Lines: Another common problem is the presence of cracked or damaged vacuum lines. When vacuum lines become brittle over time, they are more prone to developing cracks or breaks. These issues can disrupt the flow of vacuum pressure and lead to poor performance. Visual inspection of the lines can help identify any cracks or damages, and replacement is necessary.
3. Misrouted Lines: Sometimes, vacuum lines can be misrouted during repairs or maintenance work. This can result in improper functionality of the systems that rely on vacuum pressure. If owners notice issues with the heating/cooling, emission, or braking systems, it is essential to check if the vacuum lines are correctly connected and routed.
4. Clogged Lines: Over time, vacuum lines can accumulate debris or become clogged with dirt, causing reduced airflow and vacuum pressure. This can affect the performance of various systems, leading to incorrect engine operation, heating or cooling issues, or even malfunctioning brakes. Regular cleaning and maintenance can help prevent clogs and ensure optimal performance.
Understanding and addressing these common vacuum line issues in a 1998 Chevy Blazer is crucial for maintaining the vehicle’s performance and reliability. Regular inspection, cleaning, and timely replacement of vacuum lines can help prevent major problems and ensure the smooth operation of various systems.
Repairing or Replacing Vacuum Lines
When it comes to repairing or replacing vacuum lines in a 1998 Chevy Blazer, there are a few important steps to follow. Here is a summary of the process:
1. Identify the problem
Before starting any repairs or replacements, it is important to identify the specific issue with the vacuum line. This can be done by inspecting the lines for any visible damage or leaks, listening for any hissing noises indicating a leak, or using a vacuum gauge to test for proper vacuum pressure.
2. Gather the necessary tools and materials
Once the problem is identified, gather the necessary tools and materials for the repair or replacement. This may include a set of wrenches, pliers, a vacuum line kit, clamps, and any other specific parts needed for the job.
3. Remove and replace the damaged vacuum line
To remove a damaged vacuum line, use pliers or a wrench to loosen any clamps or fittings holding it in place. Once removed, compare the old line to the new one to ensure they are the same length and have the same fittings. Install the new line by securely attaching it to the appropriate fittings and using clamps to secure it in place.
4. Test for proper operation
After the repair or replacement is complete, it is important to test the vacuum system for proper operation. Start the engine and listen for any abnormal noises or hissing sounds. Use a vacuum gauge to check for proper vacuum pressure, which should be within the specified range for the vehicle.
Overall, repairing or replacing vacuum lines in a 1998 Chevy Blazer can be a straightforward process if the steps are followed properly. It is important to take the time to properly identify the issue, gather the necessary tools and materials, and test for proper operation after the repair or replacement. By doing so, the vacuum system can be restored to its optimal functioning condition.
Q&A:
What are vacuum lines?
Vacuum lines are hoses or tubes that carry the vacuum pressure from the engine to different parts of the vehicle, such as the brake booster, emissions control system, and heating and cooling system.
Why do vacuum lines need to be repaired or replaced?
Vacuum lines can become cracked, deteriorated, or disconnected over time, which can lead to a loss of vacuum pressure and cause various issues with engine performance and vehicle operation. Therefore, they may need to be repaired or replaced to ensure proper functioning.
How can I identify a problem with the vacuum lines?
Some common signs of a vacuum line issue include a rough idle, decreased engine power, poor fuel efficiency, a hissing or sucking noise under the hood, and a malfunctioning heating or cooling system. A visual inspection may also reveal cracked or disconnected vacuum lines.
Can I repair vacuum lines myself?
Yes, you can repair vacuum lines yourself if the issue is a small crack or disconnection. You can use duct tape or hose clamps to seal small cracks or reconnect disconnected lines. However, if the damage is significant or there are multiple issues, it is recommended to replace the affected lines entirely.