
As a car owner, it’s important to have a basic understanding of your vehicle’s various systems. One crucial component of many vehicles is the belt system, which plays a vital role in the proper functioning of your car. In this guide, we will specifically focus on the belt system of the 2000 Corolla, a popular model known for its reliability and longevity. By providing you with a clear and easy-to-understand belt diagram, we aim to help you better understand how the belts in your car work.
One of the primary functions of the belt system in the 2000 Corolla is to transfer power from the engine to various components, such as the alternator, air conditioning compressor, and power steering pump. Without the belts, these components would not be able to function properly, ultimately affecting the performance of your vehicle. Understanding the belt diagram will enable you to identify the different belts and their routes, ensuring proper maintenance and replacement when needed.
By referring to the 2000 Corolla belt diagram, you’ll be able to see how the belts are routed around the pulleys and other components in the engine bay. This visual representation will not only help you understand the proper placement of the belts but also highlight any potential issues or concerns. For instance, if you notice excessive wear or cracks on a belt, you can refer to the diagram to identify the specific belt and its corresponding part number, making it easier to find a replacement.
Whether you’re a seasoned DIY mechanic or simply want to have a better understanding of your vehicle, the 2000 Corolla belt diagram is an invaluable resource. It provides you with a comprehensive overview of your car’s belt system, empowering you to take better care of your vehicle and make informed decisions when it comes to maintenance and repairs. Utilize this guide to familiarize yourself with the belt system of your 2000 Corolla and ensure its smooth operation for years to come.
About the 2000 Corolla Belt Diagram
The 2000 Corolla belt diagram is a valuable resource for owners and mechanics who need to understand the routing of the various belts in the vehicle. The diagram provides a visual representation of how the belts are installed and connected to different components in the engine bay. This information is important for proper belt tensioning and alignment, as well as for troubleshooting potential issues related to the belts.
One of the key benefits of having a belt diagram is that it can help prevent incorrect belt installation. Without a proper understanding of how the belts should be routed, there is a risk of misalignment, over-tensioning, or even damage to the belts or other components. The diagram serves as a helpful guide to ensure that the belts are installed correctly and are functioning properly.
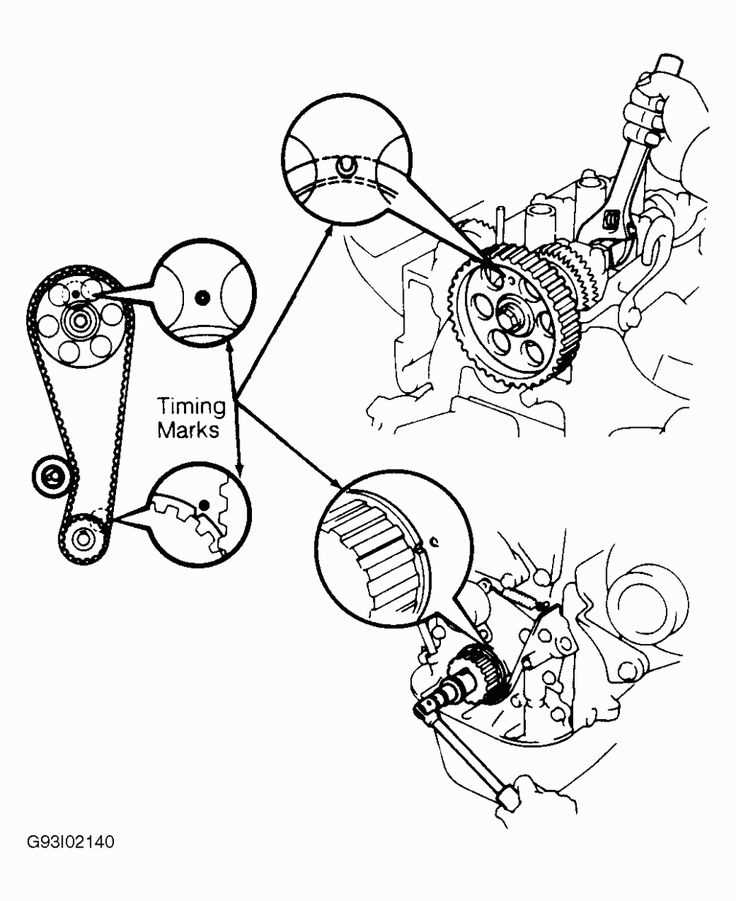
The 2000 Corolla belt diagram typically includes the routing for the serpentine belt, which is responsible for driving multiple accessories such as the alternator, power steering pump, and air conditioning compressor. Additionally, it may also include the routing for other belts, such as the timing belt or accessory belts for specific components.
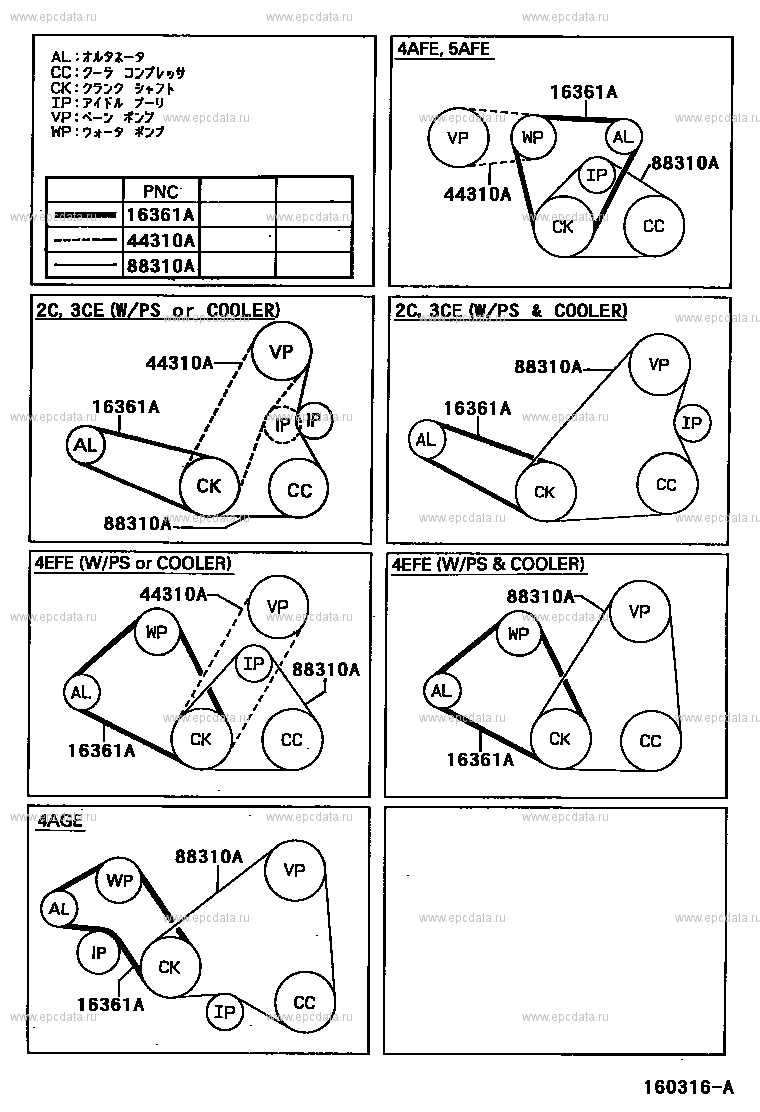
It is important to consult the correct belt diagram for the specific year, make, and model of the Corolla, as belt configurations can vary between different vehicles. The diagram may be included in the vehicle’s owner’s manual or can be obtained from reputable online sources or automotive repair manuals.
Overall, the 2000 Corolla belt diagram is an essential tool for anyone working on the vehicle’s belts. It provides a clear visual reference for correct belt installation and helps ensure proper functioning of the various components driven by the belts. By following the diagram, owners and mechanics can maintain optimal performance and avoid costly repairs related to belt misalignment or failure.
Overview of the Belt Diagram in the 2000 Corolla
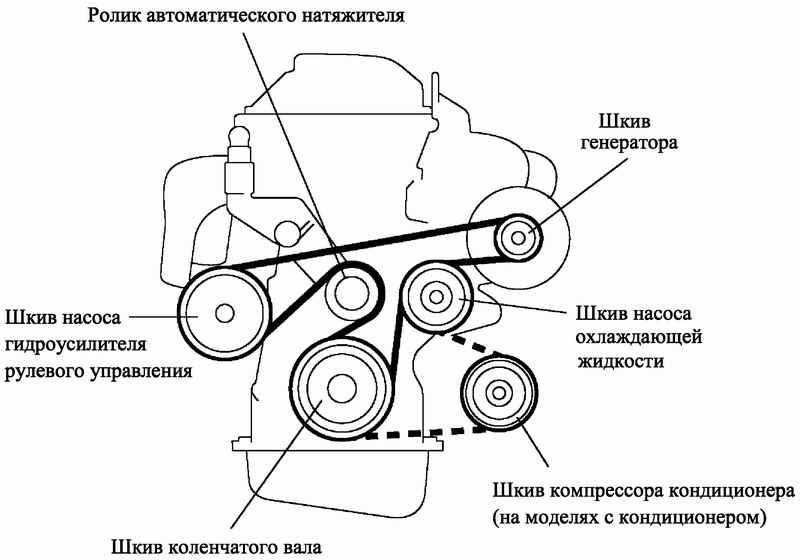
The belt diagram in the 2000 Corolla is an essential visual guide that illustrates the routing of the various belts in the engine compartment. It helps in understanding how the different belts are connected to the engine components, ensuring proper functioning of the vehicle’s systems.
The 2000 Corolla typically features three main belts: the serpentine belt, alternator belt, and the power steering belt. Each belt is responsible for driving specific components of the engine, ensuring their optimal performance. The belt diagram provides a clear representation of how these belts are positioned and attached to their respective pulleys.
The serpentine belt, prominently displayed in the belt diagram, is the most critical belt in the engine. It drives multiple components simultaneously, such as the alternator, power steering pump, water pump, and air conditioning compressor. The belt diagram outlines the specific path the serpentine belt takes, ensuring proper tension and alignment to maximize efficiency.
The alternator belt is another important component in the 2000 Corolla, responsible for providing electrical power to the vehicle’s battery and electrical system. The belt diagram provides a visual representation of how the alternator belt is routed and connected to the alternator pulley, ensuring proper tension and functioning.
Lastly, the power steering belt in the 2000 Corolla is responsible for assisting in the steering mechanism, making it easier for the driver to maneuver the vehicle. The belt diagram highlights the route the power steering belt takes, ensuring proper tension and alignment to guarantee smooth steering functionality.
In conclusion, the belt diagram in the 2000 Corolla serves as a crucial reference tool for understanding the routing and positioning of the belts in the engine compartment. By following the belt diagram, proper installation, tension, and alignment can be ensured, leading to optimal performance and longevity of the vehicle’s various engine components.
The Importance of the Belt Diagram in the 2000 Corolla
The belt diagram is a crucial component of the 2000 Corolla as it provides a visual representation of how the belts are routed throughout the engine. This diagram is important for several reasons:
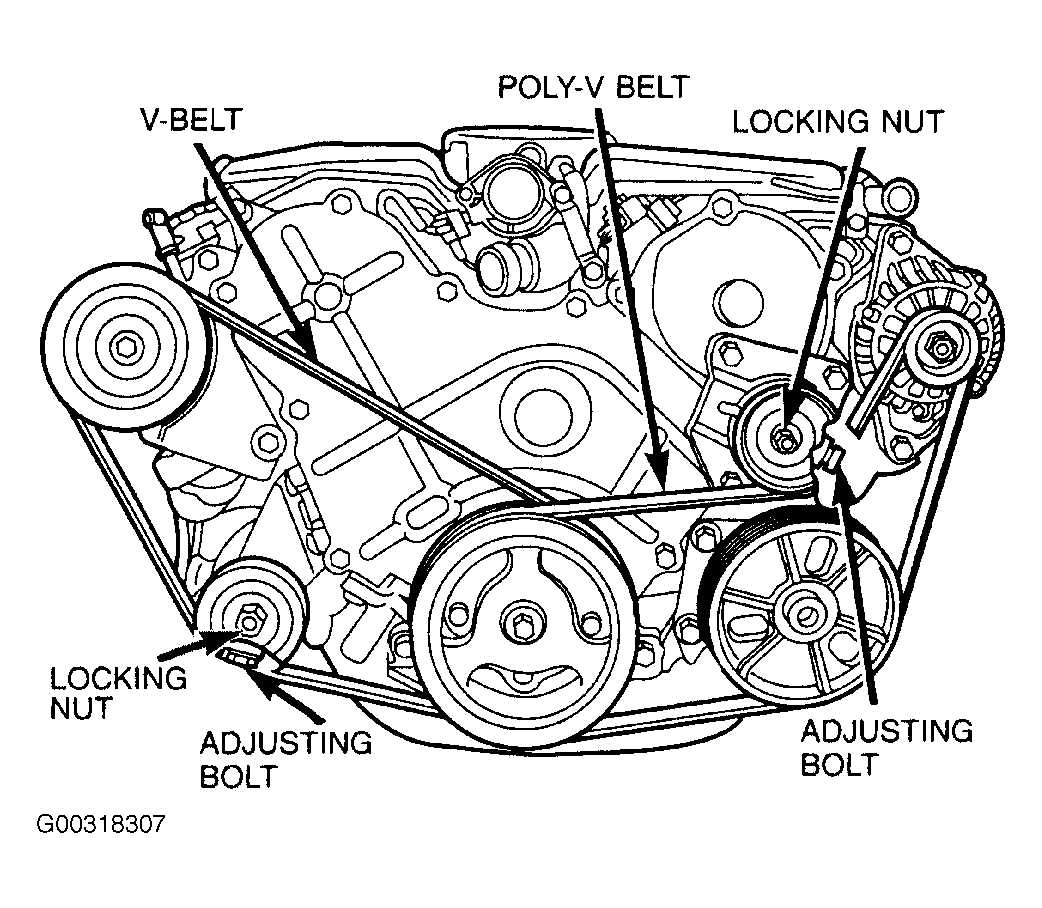
- Belt Routing: The belt diagram shows the correct path for each belt, ensuring that they are correctly installed and properly aligned. This is essential for optimal performance and longevity of the belts.
- Tension Adjustment: The belt diagram also indicates the tension adjustments for each belt. Proper tension is necessary to prevent slippage and ensure that the belts effectively transfer power to various engine components. The diagram helps mechanics and car owners alike adjust the tension correctly.
- Identifying Components: The belt diagram serves as a visual guide for identifying the different components that the belts connect to. This is especially useful when inspecting the belts for wear or damage. It helps ensure that all necessary components are accounted for and properly connected.
- Troubleshooting: In the event of a belt-related issue, the belt diagram can help troubleshoot the problem. By following the diagram, one can easily verify if a belt is misaligned, loose, or damaged. This can save time and effort in diagnosing and fixing the issue.
In summary, the belt diagram plays a vital role in the 2000 Corolla by providing a visual guide for proper belt routing, tension adjustment, component identification, and troubleshooting. It is an essential tool for both mechanics and car owners to ensure the belts are installed correctly and functioning optimally.
Common Issues with the Belt Diagram in the 2000 Corolla
The belt diagram in the 2000 Corolla is responsible for guiding the path of the engine belt, which drives various components of the vehicle. However, there are some common issues that can arise with the belt diagram, causing problems with the overall functionality of the car.
One common issue is a misaligned or improperly tensioned belt. If the belt is not aligned properly or does not have the correct tension, it can cause slipping or squeaking noises. This can also lead to a loss of power to the accessory components that rely on the belt’s rotation, such as the alternator or power steering pump.
Another common problem with the belt diagram in the 2000 Corolla is the occurrence of belt wear and tear. Over time, the belt can become frayed, cracked, or stretched, which can affect its ability to function effectively. This can cause the belt to break or deteriorate prematurely, leading to a sudden loss of power and potential damage to other engine components.
To avoid these issues, regular inspection and maintenance of the belt diagram is essential. This includes checking the belt’s alignment and tension, as well as monitoring for any signs of wear or damage. Additionally, it is important to replace the belt at the recommended intervals to ensure optimal performance and prevent any potential issues from occurring.
- Regular inspection and maintenance of the belt diagram
- Checking the belt’s alignment and tension
- Monitoring for signs of wear or damage
- Replacing the belt at the recommended intervals
By addressing these common issues with the belt diagram in the 2000 Corolla, owners can ensure the longevity and proper functioning of their vehicle’s engine belt system. This will not only prevent unexpected breakdowns but also contribute to the overall performance and reliability of the car.
Steps to Replace the Belt in the 2000 Corolla
The serpentine belt in a 2000 Corolla is responsible for driving various engine accessories such as the alternator, power steering pump, and air conditioning compressor. If the belt becomes worn or damaged, it is essential to replace it to ensure the proper functioning of these components. Here are the steps to replace the serpentine belt in a 2000 Corolla:
- Prepare the necessary tools: Before beginning the replacement process, gather the required tools, including a wrench or socket set, a belt tensioner tool, and a new belt that is compatible with the 2000 Corolla model.
- Locate the belt tensioner: The belt tensioner is responsible for maintaining the proper tension on the serpentine belt. In the 2000 Corolla, it is typically located near the front of the engine, above the alternator. Use the belt tensioner tool to release the tension on the old belt by rotating the tensioner clockwise.
- Remove the old belt: Once the tension has been released, carefully remove the old belt from the various pulleys and components. Make note of the belt routing to ensure the new belt is installed correctly.
- Install the new belt: Begin by routing the new belt around the various pulleys, following the correct pattern. Use the belt tensioner tool to release the tension and allow the new belt to fit onto the pulleys. Ensure that the new belt is correctly aligned and seated properly on each pulley.
- Check belt tension: After the new belt has been installed, double-check the tension to ensure it is within the manufacturer’s specifications. Gradually release the tension on the belt tensioner until the proper tension is reached. This can be done by referring to the vehicle’s manual or consulting a professional if necessary.
- Test the belt: Once the new belt is in place and properly tensioned, start the engine and observe the belt’s movement. Ensure that it operates smoothly and without any slipping or unusual noises. If any issues are detected, stop the engine and recheck the belt installation.
By following these steps, the old serpentine belt in a 2000 Corolla can be effectively replaced with a new one, ensuring the proper functioning of the engine accessories. Regular inspection and maintenance of the belt is recommended to prevent premature wear and potential damage to the engine components.
Tips for Maintaining the Belt in the 2000 Corolla
The belt in the 2000 Corolla plays a crucial role in the functioning of the vehicle’s engine and various components. To ensure that the belt operates smoothly and lasts for a long time, it is essential to perform regular maintenance. Here are some tips for maintaining the belt in the 2000 Corolla:
- Inspect the belt regularly: Check the condition of the belt for signs of wear, cracks, or fraying. It is recommended to inspect the belt every 12,000 miles or as per the manufacturer’s guidelines. If any damage is found, the belt should be replaced immediately.
- Tighten the belt if necessary: Over time, the belt may become loose due to frequent usage. If you notice any slipping or squeaking noises, it might be an indication that the belt needs tightening. Consult the vehicle’s manual or take it to a professional mechanic to adjust the belt tension correctly.
- Keep the belt clean: Make sure to keep the belt clean and free from debris, dirt, or oil. Any foreign substances on the belt’s surface can cause it to slip or wear out quickly. If you notice any contamination, gently clean it using a damp cloth or a recommended belt cleaning solution.
- Avoid over-tensioning: While it is crucial to maintain proper belt tension, over-tightening can also be harmful. Excessive tension can put unnecessary stress on the belt and other components, leading to premature failure. Refer to the vehicle’s manual or consult a mechanic to ensure the belt has the correct tension.
- Replace the belt on time: The belt in the 2000 Corolla has a recommended lifespan, typically around 60,000 to 90,000 miles. It is essential to replace the belt before it reaches its limit to prevent sudden breakdowns or damages to other engine parts. Refer to the vehicle’s manual for the recommended replacement interval.
In conclusion, proper maintenance of the belt in the 2000 Corolla is vital for the vehicle’s overall performance and longevity. Regular inspections, tightening if necessary, keeping the belt clean, avoiding over-tensioning, and timely replacement are key practices to ensure optimal belt performance. By following these tips, you can extend the lifespan of the belt and avoid potential issues down the road.