
If you are looking for the wiring diagram for the infinity amp in a 2002 Dodge Ram 1500, you have come to the right place. The infinity amp is a key component of the vehicle’s audio system, and understanding its wiring diagram can help you troubleshoot any issues you may be experiencing.
This wiring diagram will show you how the different components of the amp are connected, including the power supply, ground, speaker outputs, and input signals. It will also indicate the wire colors for each connection, making it easier for you to identify and trace the wires in your vehicle.
By referring to the wiring diagram, you can determine if the issue you are facing is related to a faulty connection or a problem with the amp itself. Additionally, having a clear understanding of the wiring diagram can make it easier for you to upgrade or replace components of the audio system in your Dodge Ram 1500, should you choose to do so.
Overall, having access to the wiring diagram for the infinity amp in a 2002 Dodge Ram 1500 can be a valuable tool for anyone looking to troubleshoot or modify the vehicle’s audio system. It provides the necessary information to understand how the amp is wired, which can aid in diagnosing and resolving any issues you may encounter.
How to Install a New Stereo System in Your 2002 Dodge Ram 1500
Upgrading the stereo system in your 2002 Dodge Ram 1500 can greatly enhance your driving experience. Whether you’re looking to improve the sound quality or add new features like Bluetooth connectivity, installing a new stereo system is a relatively straightforward process. Here are the steps to help you get started:
1. Gather the necessary tools
Before you begin, make sure you have all the tools you’ll need. This may include a screwdriver, wire strippers, electrical tape, crimping tool, and a trim removal tool. Having these tools handy will make the installation process much smoother.
2. Remove the old stereo system
Start by disconnecting the negative terminal of your car battery to prevent any electrical mishaps. Use the trim removal tool to carefully pry off the plastic trim surrounding the stereo. Once the trim is removed, you’ll be able to unscrew the stereo unit and disconnect the wiring harnesses and antenna cable.
3. Prepare the wiring harness
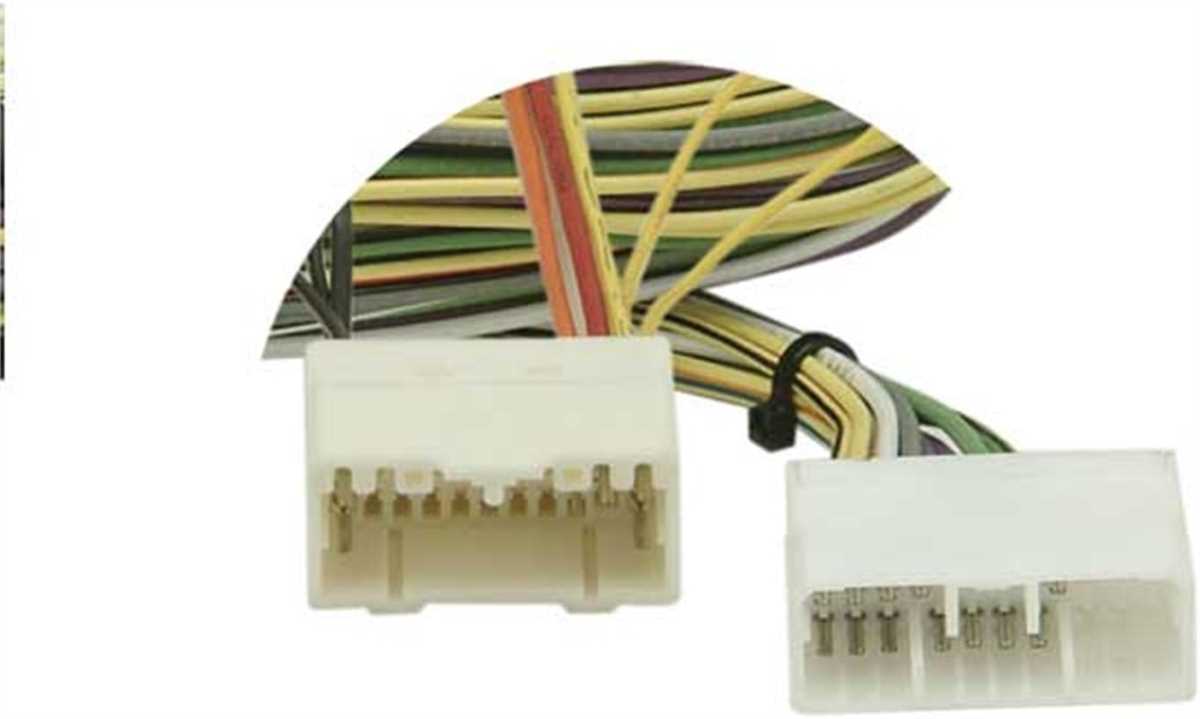
Instead of directly connecting the new stereo to the existing wiring, it’s recommended to use a wiring harness adapter. This adapter will make the installation easier and prevent any damage to your car’s electrical system. Follow the instructions provided with the adapter to properly connect the wires.
4. Connect the new stereo
With the wiring harness prepared, you can now connect the new stereo unit. Follow the instructions specific to your stereo model to properly connect the wiring harnesses and antenna cable. Make sure all connections are secure, and use electrical tape or connectors to prevent any loose wires.
5. Test the new stereo system
Before reassembling the trim and securing the stereo unit in place, it’s crucial to test the new system. Reconnect the negative terminal of the car battery and power on the stereo. Check if all the functions and features are working properly, including audio playback, radio reception, and any additional features you’ve installed.
6. Reassemble the trim
If everything is working as expected, you can now reassemble the plastic trim around the new stereo unit. Carefully align the trim and press it into place until it securely fits. Make sure all screws are tightened, and the trim is flush against the dashboard.
7. Enjoy your new stereo system
With the installation complete, you can now enjoy your new stereo system in your 2002 Dodge Ram 1500. Whether you’re listening to your favorite music or making hands-free calls, the upgraded system will enhance your driving experience.
Remember to consult the user manual and wiring diagram specific to your stereo and vehicle model to ensure a successful installation. If you’re not comfortable with the process, it’s recommended to seek professional assistance to avoid any potential damage.
Step-by-Step Guide to Wiring Diagram for the Infinity Amp in Your 2002 Dodge Ram 1500
If you are looking to install a new audio system or upgrade the existing one in your 2002 Dodge Ram 1500, it’s important to understand the wiring diagram for the Infinity amp. The Infinity amp is responsible for powering the speakers in your vehicle, and knowing how to properly connect it is crucial for optimal sound quality. Follow this step-by-step guide to ensure a successful wiring installation.
Step 1: Gather all the necessary tools and materials before starting the installation. You will need a wiring harness adapter, wire cutters/strippers, electrical tape, and a multimeter for testing connections.
Step 2: Remove the negative battery cable to prevent any electrical accidents during the installation process. It’s crucial to disconnect the power source before working with any wiring components.
Step 3: Locate the Infinity amp in your Dodge Ram 1500. It is typically located behind the passenger-side kick panel or under one of the front seats. Remove the necessary panels or seats to access the amp.
Step 4: Use the wiring harness adapter to connect the factory wiring harness to the new aftermarket head unit. This adapter will simplify the installation process and ensure compatibility between the two systems.
Step 5: Identify the speaker wires coming out of the Infinity amp. They are usually color-coded. Consult the wiring diagram for the specific color codes used in your Dodge Ram 1500 to determine the correct connections.
Step 6: Cut and strip the speaker wires that are connected to the Infinity amp. Use the wire cutters/strippers to remove a small portion of insulation from each wire, exposing the bare copper underneath.
Step 7: Connect the stripped ends of the speaker wires to the corresponding wires on the aftermarket head unit’s wiring harness. Use electrical tape or crimp connectors to secure the connections and prevent any short circuits.
Step 8: Test the connections using a multimeter set to the appropriate settings. Ensure that there is continuity between the amp and the head unit to guarantee a proper signal flow.
Step 9: Once all the connections are verified, reinstall any panels or seats that were removed earlier. Make sure everything is securely fastened and that there are no loose wires that could cause issues in the future.
Step 10: Reconnect the negative battery cable to restore power to the vehicle. Turn on the audio system and test it to ensure that all speakers are working and producing sound as expected.
By following this step-by-step guide, you should be able to successfully wire the Infinity amp in your 2002 Dodge Ram 1500. Remember to always exercise caution when working with electrical components and consult the appropriate wiring diagrams for your specific vehicle and audio system.
Understanding the Wiring Diagram and Components of the Infinity Amp
The wiring diagram and components of the Infinity Amp in a 2002 Dodge Ram 1500 are crucial elements in the overall audio system of the vehicle. The Infinity Amp is responsible for amplifying and shaping the audio signals sent from the head unit to the speakers, providing an enhanced audio experience for the driver and passengers.
One important component of the Infinity Amp is the power supply. It receives power directly from the vehicle’s battery and distributes it to the various components of the amp. The power supply ensures that the amp has the necessary power to operate effectively and provide optimal audio performance.
Another key component of the Infinity Amp is the audio input circuitry. This circuitry is responsible for receiving the audio signals from the head unit and preparing them for amplification. It ensures that the signals are clean and free from any distortions or interference before they are sent to the amplification stage.
The amplification stage is where the audio signals are boosted to a level that can effectively drive the speakers. The Infinity Amp utilizes high-quality amplifiers to ensure that the audio signals are amplified accurately and efficiently, resulting in clear and powerful sound reproduction.
Additionally, the Infinity Amp includes a crossover network. This network separates the audio signals into different frequency ranges and directs them to the appropriate speakers. This allows for better control over the sound distribution and ensures that each speaker receives the frequencies it is designed to handle, resulting in a well-balanced and immersive audio experience.
In conclusion, the wiring diagram and components of the Infinity Amp in a 2002 Dodge Ram 1500 play a vital role in the overall audio system of the vehicle. Understanding how these components work together can help in troubleshooting and improving the audio performance of the vehicle.
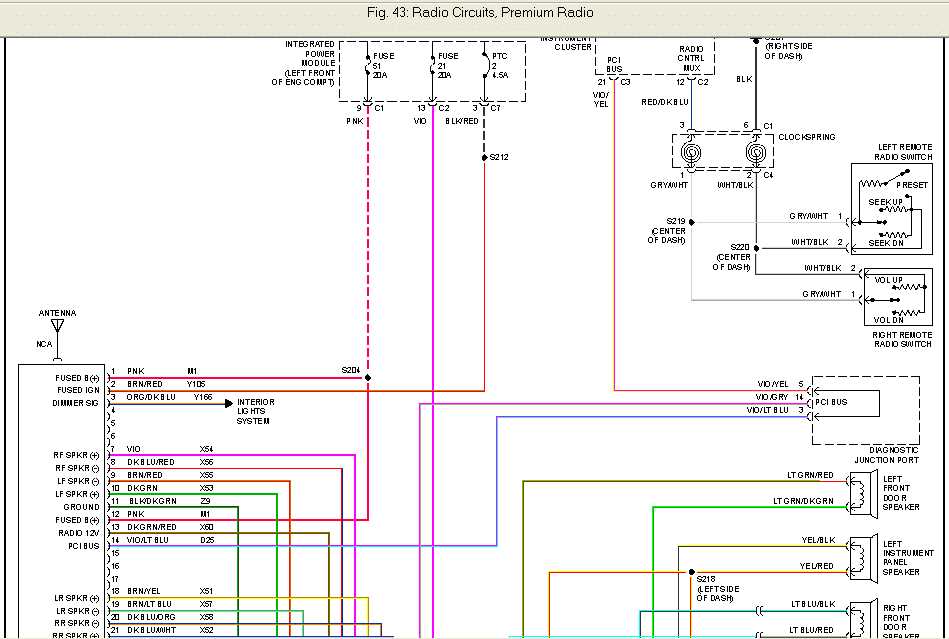
Identifying the Wire Colors and Connections for the Infinity Amp

When it comes to wiring diagrams for the Infinity Amp in a 2002 Dodge Ram 1500, it’s important to understand the wire colors and connections in order to properly install or troubleshoot the audio system. The Infinity Amp is responsible for powering the speakers in the vehicle and is located in the center console. By familiarizing yourself with the wire colors and connections, you can ensure a successful installation or repair.
The wire colors for the Infinity Amp in the 2002 Dodge Ram 1500 are as follows:
- Gray/Orange: Left Front Speaker (+)
- Gray/Yellow: Left Front Speaker (-)
- Dark Green/Violet: Right Front Speaker (+)
- Dark Green/Yellow: Right Front Speaker (-)
- Dark Blue/White: Left Rear Speaker (+)
- Dark Blue/Yellow: Left Rear Speaker (-)
- Brown/Red: Right Rear Speaker (+)
- Brown/Yellow: Right Rear Speaker (-)
It’s important to match the correct wire colors when connecting the speakers to the Infinity Amp. Improper connections can result in distorted sound or no sound at all. Using a wiring diagram or consulting a professional can help ensure the connections are made correctly.
In addition to the speaker connections, there are also a few other important connections to note. The wire colors for these connections are as follows:
- Red/White: Power (+)
- Purple/Yellow: Ground (-)
- White/Red: Power Antenna (+)
- Purple/White: Ignition Key Switched Power (+)
These connections are crucial for powering the Infinity Amp and ensuring proper functionality. Again, consulting a wiring diagram or seeking professional assistance can be helpful when making these connections.
Removing the Factory Stereo and Accessing the Infinity Amp
Upgrading the audio system in your 2002 Dodge Ram 1500 often requires accessing the Infinity Amp, which controls the power and output of the speakers. To access the Infinity Amp, you first need to remove the factory stereo unit. Here’s a step-by-step guide on how to do it.
- Start by disconnecting the negative terminal of the battery to prevent any electrical issues.
- Locate the trim panel surrounding the stereo and carefully pry it off using a trim tool or a flathead screwdriver wrapped in a cloth to avoid damaging the dashboard.
- Once the trim panel is removed, you’ll see several screws securing the stereo unit. Unscrew them using a Phillips-head screwdriver.
- After removing the screws, gently pull the stereo unit out of the dash and disconnect any wiring harnesses and antenna cables connected to the back of it.
- With the factory stereo removed, you can proceed to access the Infinity Amp. The Infinity Amp is typically located behind the dash, near the stereo unit. It’s a silver or black rectangular box with multiple wiring harnesses connected to it.
- Identify the wiring harness that connects the factory stereo to the Infinity Amp. Disconnect it by pressing down on the release tab and pulling it apart.
- Once the wiring harness is disconnected, the Infinity Amp should be free. You can now remove it by unscrewing any mounting screws and pulling it out.
With the Infinity Amp removed, you can continue with the installation of a new aftermarket stereo or any other audio components. Remember to reconnect the negative terminal of the battery before testing the new system to ensure proper functionality.
Wiring the New Stereo System to the Infinity Amp
When installing a new stereo system in a 2002 Dodge Ram 1500 with an Infinity amp, it is important to understand how to properly connect the wiring. The Infinity amp is an integral part of the sound system and requires specific connections in order for the new stereo to function correctly.
The first step is to identify the wiring harness that connects to the Infinity amp. This harness can usually be found behind the stereo or in the dash area. It is important to locate the correct harness, as there may be multiple harnesses in the vicinity. Once the harness is identified, it can be disconnected from the amp.
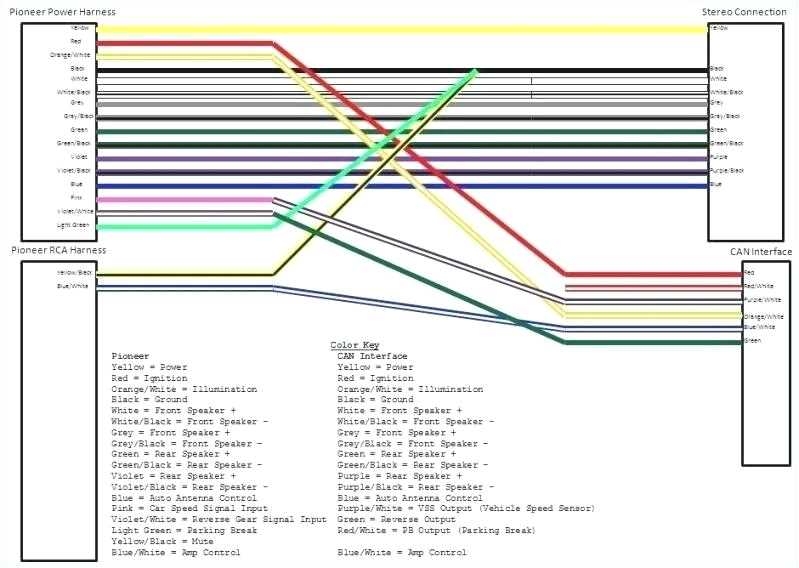
Next, the new stereo system’s wiring harness needs to be connected to the Infinity amp. This can be done by matching the wire colors on the two harnesses. Each wire has a specific function, such as power, ground, and speaker connections. It is important to make sure that each wire is connected to the corresponding wire on the other harness.
Once all of the wires are connected, the new stereo system can be secured in place. This can be done by using the mounting brackets or screws provided with the stereo. It is important to make sure the stereo is securely fastened to prevent any movement or vibration while driving.
Finally, the stereo system can be tested to ensure it is functioning correctly. This can be done by turning on the power and checking that all of the speakers are producing sound. If there are any issues with the sound, it may be necessary to recheck the wiring connections to ensure they are correct.
Testing and Troubleshooting the Infinity Amp Wiring Connections
When it comes to diagnosing and repairing issues with the Infinity amp wiring connections in a 2002 Dodge Ram 1500, there are a few steps you can take to troubleshoot the problem. The Infinity amp is responsible for powering the speakers in the vehicle, so if there is an issue with the wiring connections, it can result in poor sound quality or no sound at all.
Here are some steps you can follow to test and troubleshoot the Infinity amp wiring connections:
- Check the power connections: Start by checking the power connections to ensure that the amp is receiving power. Make sure that the amp is properly connected to the battery and that the fuse is intact. If there is no power, you may need to check the wiring for any breaks or loose connections.
- Inspect the speaker connections: Next, inspect the speaker connections to ensure that they are properly connected to the amp. Look for any loose or disconnected wires and reconnect them if necessary. It’s also a good idea to check the condition of the speaker wires for any signs of damage.
- Test the wiring with a multimeter: If you suspect that there may be an issue with the wiring connections, you can use a multimeter to test the continuity of the wires. Set the multimeter to the continuity or resistance setting and touch the probes to each end of the wire. If there is no continuity or high resistance, it indicates a problem with the wiring.
- Consider bypassing the amp: If all else fails and you are unable to identify the source of the problem, you may consider bypassing the Infinity amp altogether. This can be done by directly connecting the speaker wires from the head unit to the speakers. Keep in mind that bypassing the amp may result in a loss of certain features or sound quality.
In conclusion, testing and troubleshooting the Infinity amp wiring connections in a 2002 Dodge Ram 1500 requires checking the power connections, inspecting the speaker connections, testing the wiring with a multimeter, and possibly bypassing the amp. By following these steps, you can identify and resolve any issues with the amp wiring connections, ensuring optimal sound quality in your vehicle.