
If you own a 2003 Honda VTX 1300 motorcycle and are experiencing electrical issues or simply want to understand the wiring system better, having access to a wiring diagram is essential. The wiring diagram provides a visual representation of the electrical connections and components in your motorcycle, allowing you to troubleshoot and make necessary repairs. In this article, we will discuss the importance of a wiring diagram for your Honda VTX 1300 and how it can help you diagnose and fix electrical problems.
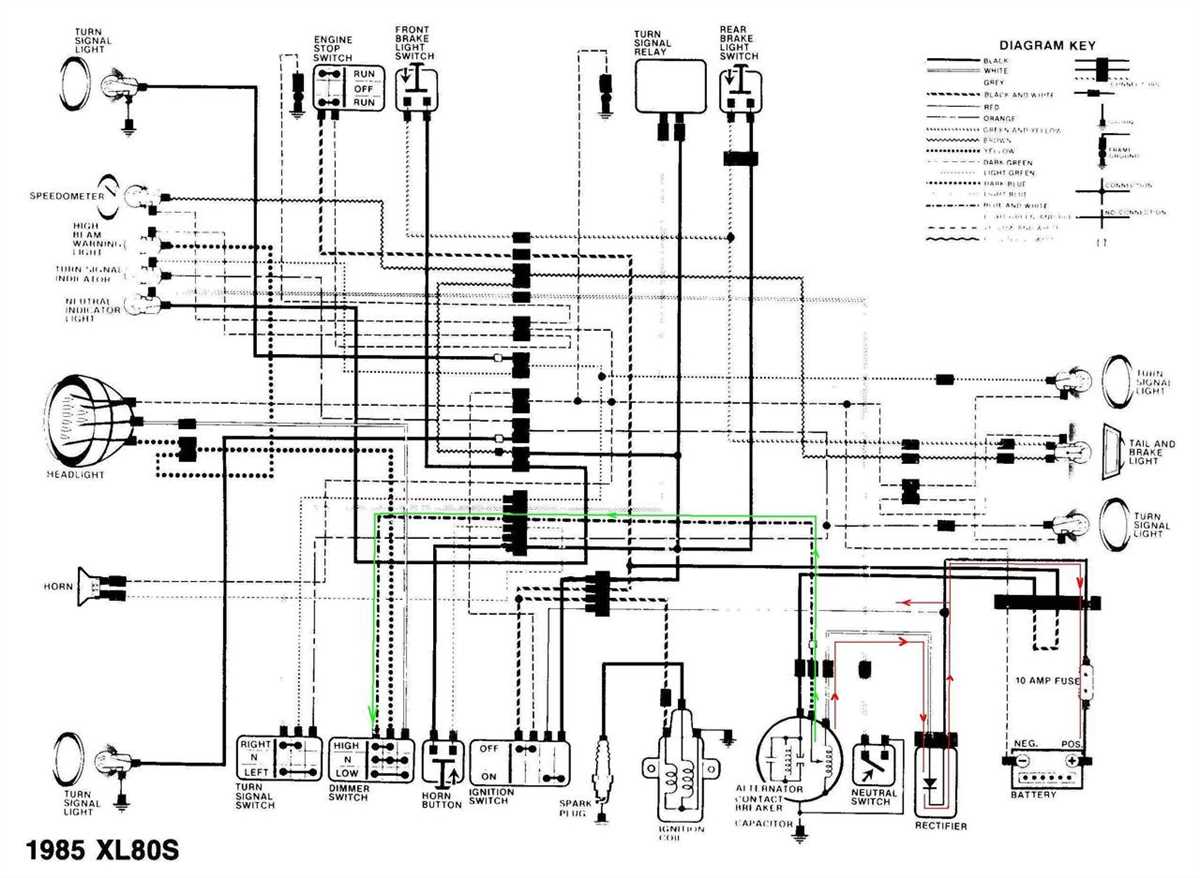
The wiring diagram for a 2003 Honda VTX 1300 is a comprehensive guide that illustrates the electrical systems, circuits, and connections in your motorcycle. It includes information about the ignition system, charging system, lighting system, and more. By referring to the wiring diagram, you can identify the various components, their locations, and how they are interconnected.
Understanding the wiring diagram is crucial when troubleshooting electrical issues in your Honda VTX 1300. If you are experiencing problems with the lights, starter, or other electrical components, the wiring diagram can help you trace the issue back to its source. It allows you to follow the flow of electricity and pinpoint any faulty connections or components that may be causing the problem.
In conclusion, having a wiring diagram for your 2003 Honda VTX 1300 is essential for understanding and troubleshooting the electrical system. Whether you are a DIY enthusiast or a professional mechanic, the wiring diagram provides a valuable resource for diagnosing and repairing electrical issues in your motorcycle. By familiarizing yourself with the wiring diagram, you can confidently tackle any electrical problem that may arise and ensure the optimal performance of your Honda VTX 1300.
Understanding the Basics of the 2003 Honda VTX 1300 Wiring Diagram
If you are a proud owner of a 2003 Honda VTX 1300 motorcycle, it is essential to have a good understanding of its wiring diagram. The wiring diagram is a visual representation of the electrical connections and components of the motorcycle. By understanding the basics of the wiring diagram, you can troubleshoot electrical issues and make modifications to the wiring system.
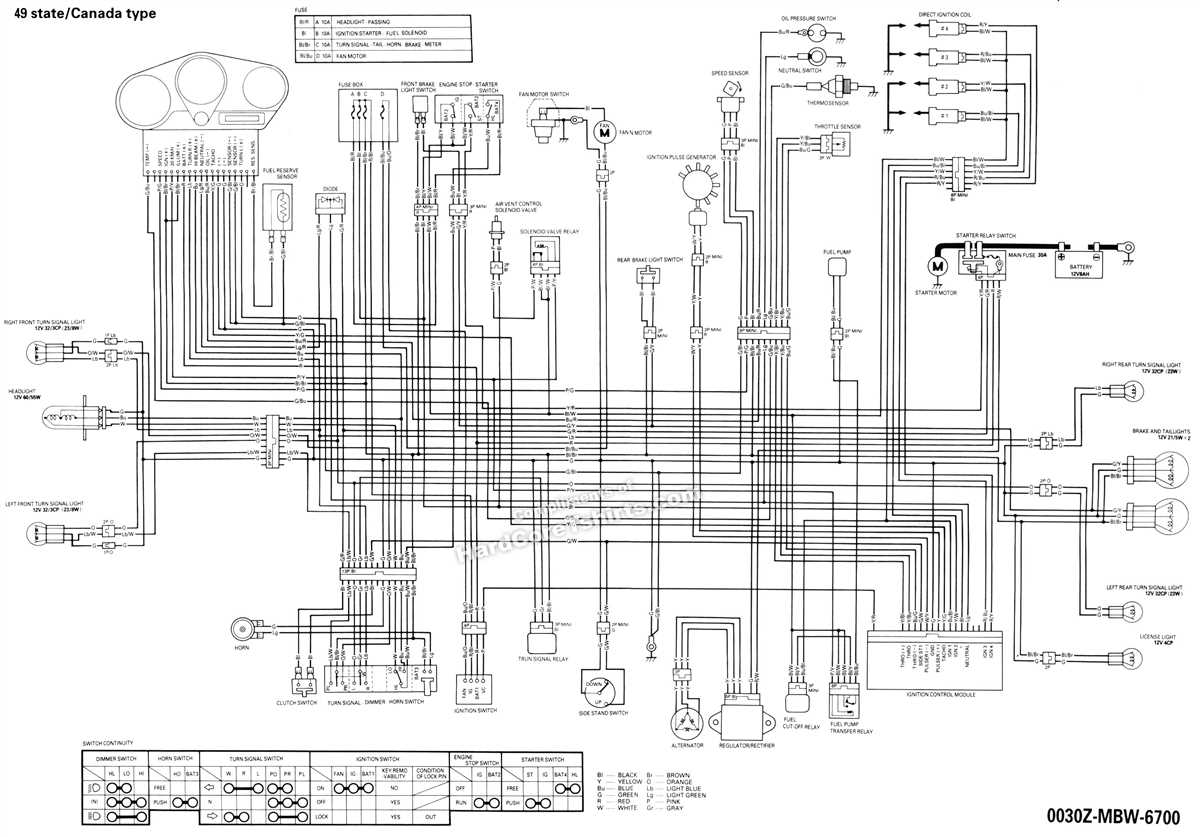
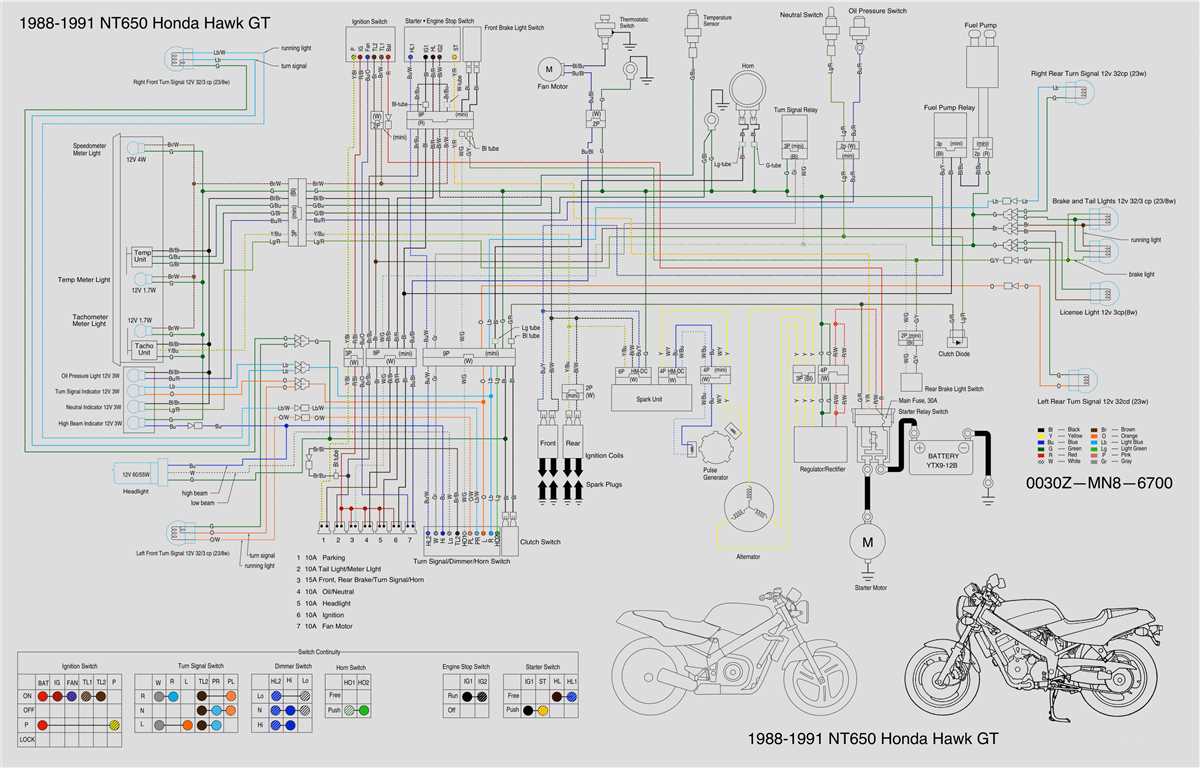
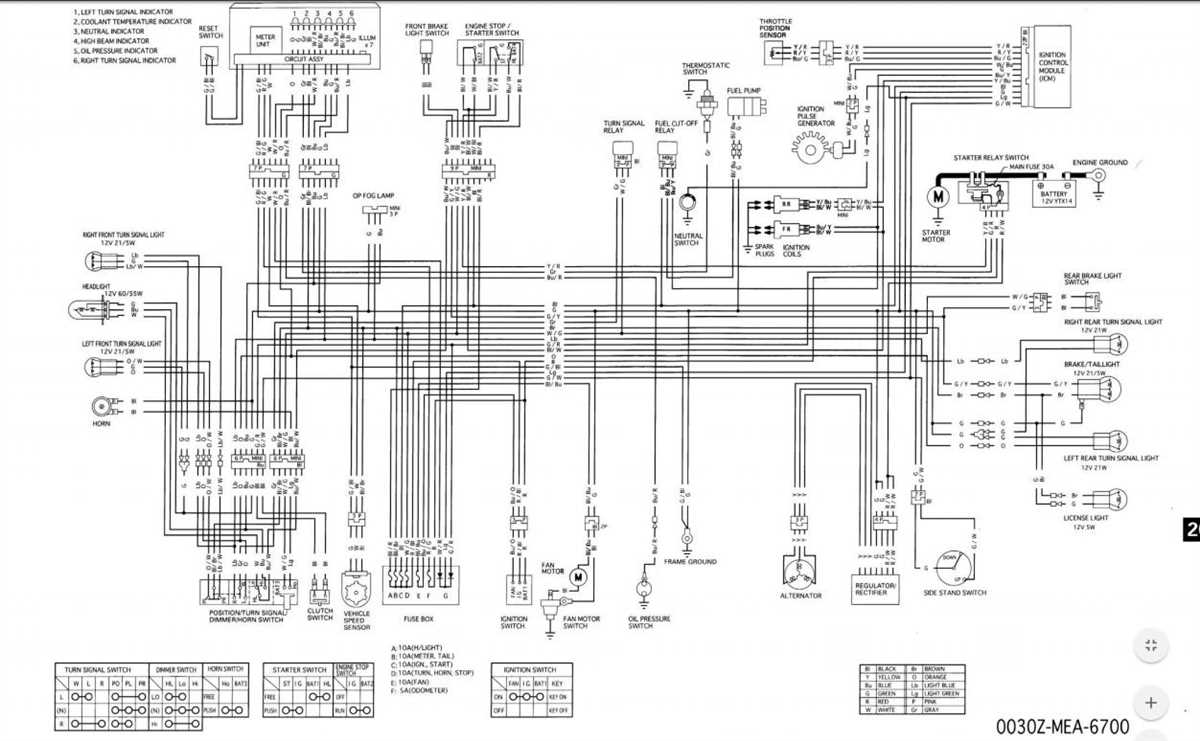
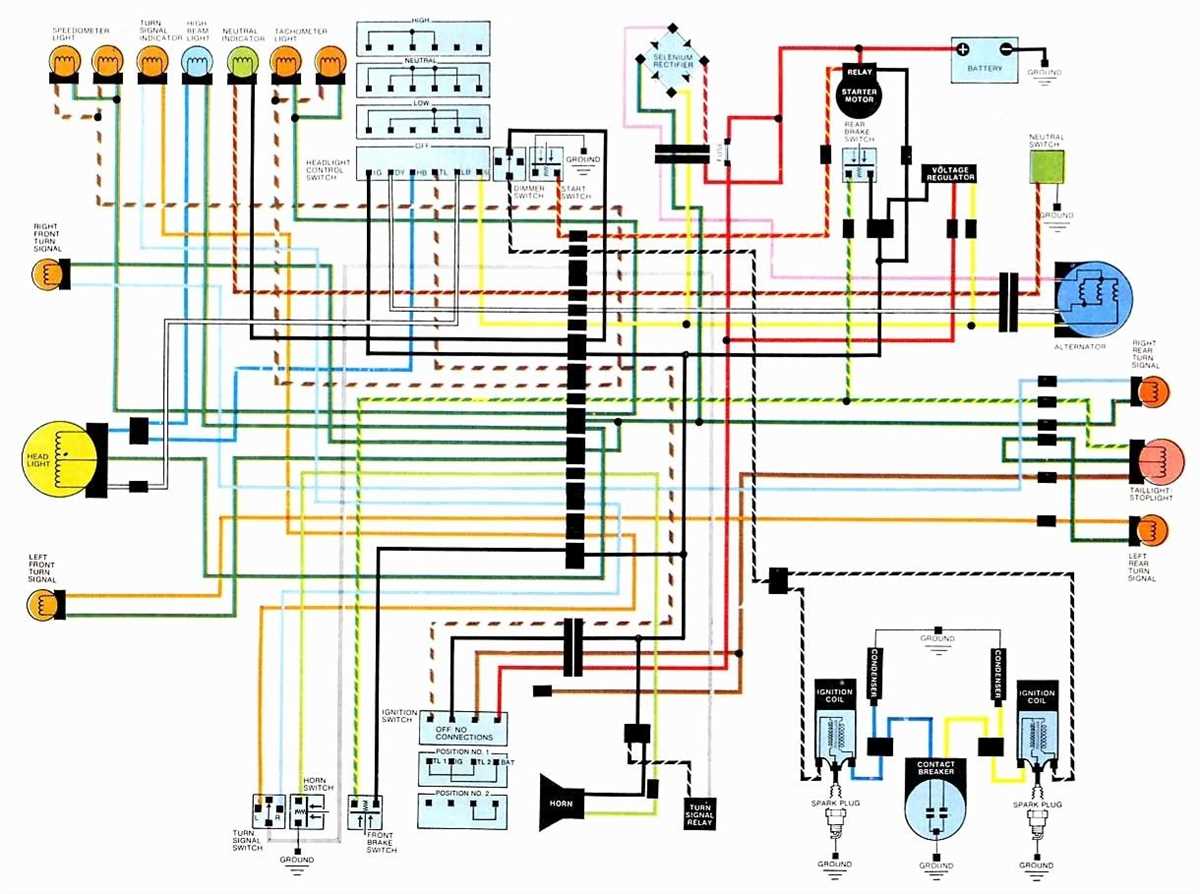
The wiring diagram for the 2003 Honda VTX 1300 is divided into several sections, each representing a different electrical circuit. These sections include the ignition system, lighting system, starting system, charging system, and more. Each circuit is labeled with specific colors and symbols to help you identify the components and their connections.
Ignition system: The ignition system is responsible for starting the motorcycle’s engine. The wiring diagram shows the connections between the ignition switch, starter relay, ignition coil, and spark plugs. It also shows the wiring for the kill switch and engine stop switch, which are used to shut off the engine.
Lighting system: The lighting system includes the headlight, taillight, turn signals, and other lights on the motorcycle. The wiring diagram shows the connections between the lighting switch, fuses, relays, and the lights themselves. It also indicates the wire colors and size for each connection to ensure proper installation.
Starting system: The starting system includes the starter motor, starter solenoid, and associated wiring. The wiring diagram provides a clear view of the connections between these components, as well as the battery and main fuse. It also shows the wire colors and size for each connection, allowing you to verify the correct wiring during troubleshooting.
Charging system: The charging system is responsible for charging the motorcycle’s battery while the engine is running. The wiring diagram shows the connections between the stator, regulator/rectifier, and battery. It also indicates the wire colors and size for each connection, enabling you to check for proper voltage and continuity.
By referring to the 2003 Honda VTX 1300 wiring diagram and understanding the basics of each circuit, you can confidently work on the electrical system of your motorcycle. Whether you need to diagnose a problem, install additional accessories, or make modifications, a thorough understanding of the wiring diagram is essential for a successful outcome.
Overview of the 2003 Honda VTX 1300
The 2003 Honda VTX 1300 is a powerful cruiser motorcycle that offers an impressive blend of performance, comfort, and style. With its classic design and V-twin engine, it is a popular choice among riders who value both looks and performance.
The VTX 1300 features a 1312cc liquid-cooled V-twin engine, delivering strong and smooth power throughout the RPM range. This engine provides ample torque for accelerating quickly and effortlessly, making it ideal for highway cruising and passing maneuvers. The fuel injection system ensures precise fuel delivery and optimal performance in all conditions.
Comfort is a priority on the VTX 1300, with a spacious seat and ergonomic design that allows for long rides without discomfort. The suspension system provides a smooth and stable ride, absorbing bumps and rough surfaces with ease. The bike’s low center of gravity and wide handlebars contribute to its excellent stability and maneuverability.
In terms of style, the VTX 1300 features a classic cruiser design with chrome accents and a sleek silhouette. The large fuel tank and wide fenders give it a bold and muscular appearance, while the dual exhaust pipes add a touch of aggression. The bike is available in several color options, allowing riders to choose the one that suits their personal style.
The 2003 Honda VTX 1300 also comes equipped with a range of features that enhance its performance and convenience. These include a reliable braking system, a spacious storage compartment, and a clear and easy-to-read instrument panel. With its combination of power, comfort, and style, the VTX 1300 is an excellent choice for riders who want a dependable and enjoyable cruiser motorcycle.
Importance of the Wiring Diagram
When it comes to working on a complex system like a 2003 Honda VTX 1300 motorcycle, having a wiring diagram is essential. A wiring diagram is a visual representation of the electrical connections and components in a circuit or system. It provides detailed information about the wiring harnesses, connectors, and switches, allowing technicians to understand how the electrical system is structured and troubleshoot any issues that may arise.
A wiring diagram is especially important when it comes to electrical repairs or modifications. Without a clear understanding of the wiring diagram, it can be easy to make mistakes and potentially damage the electrical system. With the wiring diagram, technicians can locate the correct wires, identify the proper connections, and ensure that everything is wired correctly.
Additionally, a wiring diagram can also be a valuable resource for learning and understanding the electrical system of a vehicle. It can help technicians and enthusiasts gain a better understanding of how different components interact with each other and how the electrical system functions as a whole. This knowledge can be useful for diagnosing and troubleshooting electrical issues, as well as for making modifications or upgrades to the system.
Overall, having access to a wiring diagram is crucial for anyone working on the electrical system of a 2003 Honda VTX 1300 or any other vehicle. It provides a clear and detailed representation of the wiring connections and components, ensuring that repairs and modifications are done correctly and safely. Whether you’re a professional technician or a DIY enthusiast, a wiring diagram is an invaluable tool that can save you time, money, and headaches.
Components and Connections in the Wiring Diagram
The wiring diagram for the 2003 Honda VTX 1300 provides a detailed overview of the various components and connections within the motorcycle’s electrical system. This diagram is essential for understanding how the different parts of the system work together to power the bike and control its various functions.
One of the key components shown in the wiring diagram is the battery. The battery supplies the initial power to start the motorcycle and provides the energy needed to run the electrical system. It is connected to the main fuse box, which regulates the flow of electricity to the different parts of the bike.
The wiring diagram also illustrates the various connections between components such as the ignition switch, starter motor, and lights. These connections allow for the proper functioning of each part and ensure that power is distributed correctly throughout the motorcycle. Additionally, the diagram shows the location and routing of the wiring harness, which bundles and protects the electrical wires.
Other components that are included in the wiring diagram include the alternator, which charges the battery while the engine is running, and the various sensors and switches that control the bike’s performance and safety features. The diagram also provides information on the electrical system’s grounding and grounding points, which are essential for proper operation and safety.
Summary:
- The wiring diagram for the 2003 Honda VTX 1300 shows the various components and connections in the motorcycle’s electrical system.
- Key components include the battery, main fuse box, ignition switch, starter motor, and lights.
- Other components include the alternator, sensors, switches, and wiring harness.
- The diagram also includes information on grounding and grounding points.
Understanding the Color Codes in the Wiring Diagram
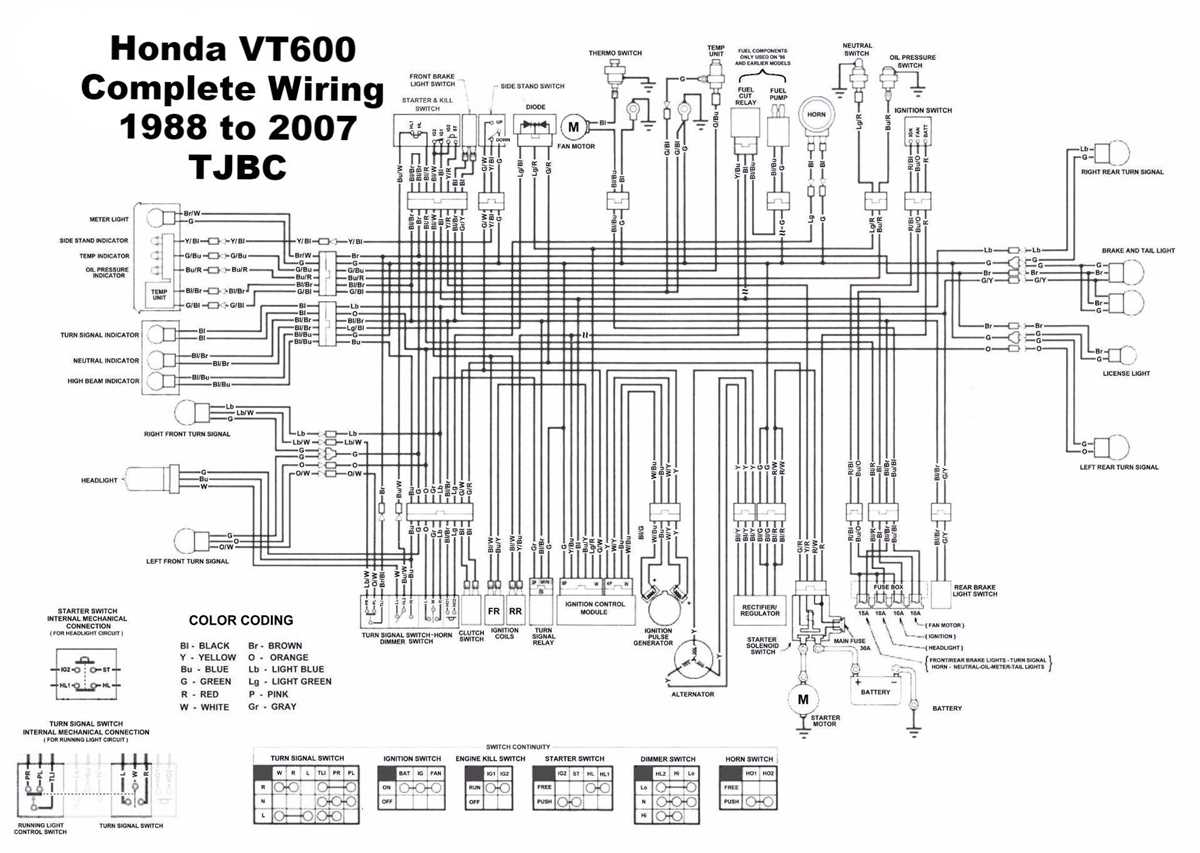
When it comes to understanding the wiring diagram for a 2003 Honda VTX 1300, it’s crucial to decipher the color codes present in the diagram. These color codes provide important information about the electrical connections in the motorcycle and help ensure proper installation and troubleshooting.
The wiring diagram typically includes various wires and their corresponding colors. These colors are universally recognized and standardized to make it easier for technicians and enthusiasts to identify the function and purpose of each wire.
Key Color Codes
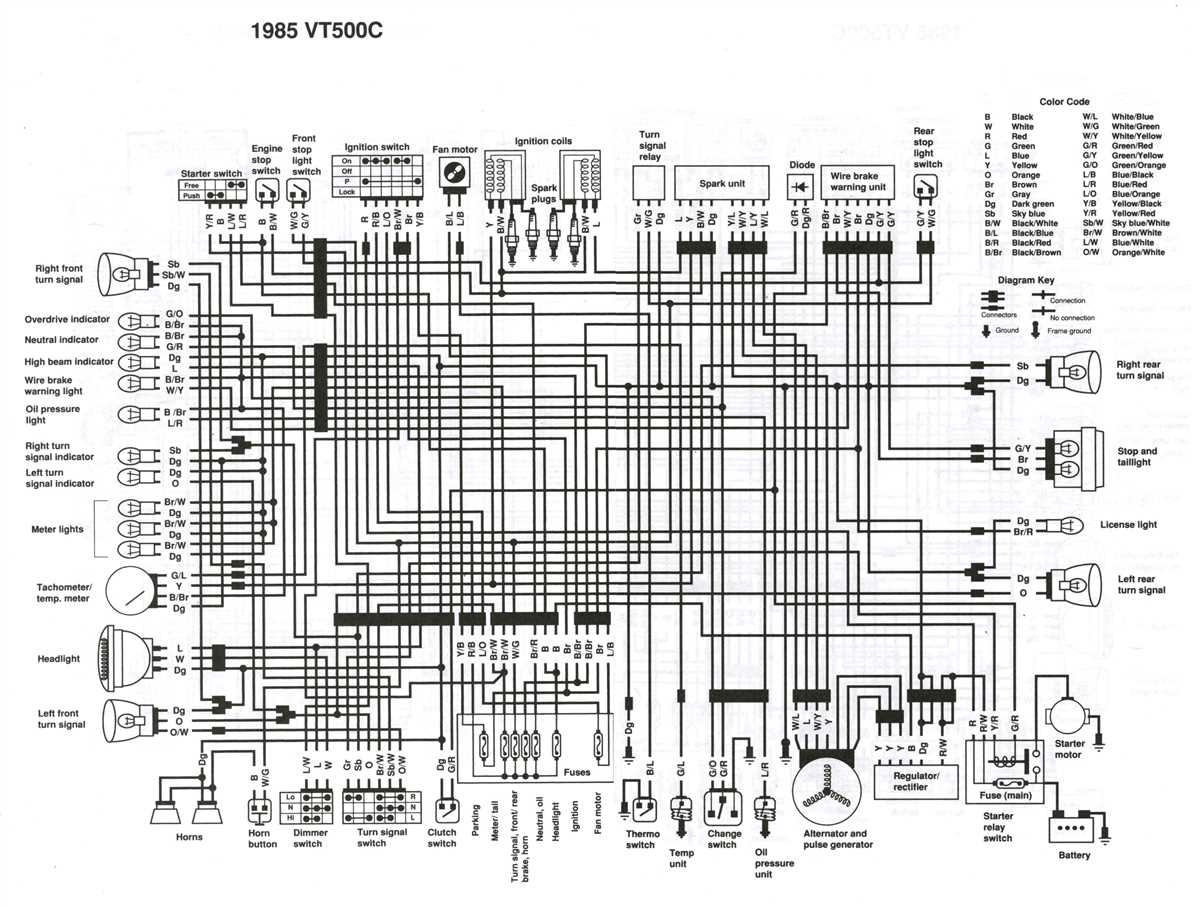
Here are some of the key color codes commonly used in Honda VTX 1300 wiring diagrams:
- Black: This color is often used for grounding or negative connections. It is important to ensure proper grounding to avoid electrical issues.
- Red: Red wires are generally associated with power supply or positive connections. They can be used to transmit power to various components in the motorcycle.
- Green: Green wires are typically used for sending signals or data. They may be connected to sensors, switches, or other devices that require communication.
- Blue: Blue wires are often associated with lighting or illumination. They may be used for connecting headlights, taillights, turn signals, or other lighting components.
- Yellow: Yellow wires are commonly used for accessory connections. They can be connected to accessories such as radios, GPS systems, or auxiliary lights.
It is important to consult the specific wiring diagram for your Honda VTX 1300 model to accurately identify the color codes used in the diagram. By understanding these color codes, you can effectively navigate the wiring diagram and perform any necessary electrical work with confidence.
Troubleshooting Common Wiring Issues
Electrical issues can be frustrating to deal with, especially when it comes to wiring problems in your Honda VTX 1300 motorcycle. However, with a systematic approach, you can troubleshoot and solve common wiring issues on your own.
One common wiring issue that riders may encounter is a blown fuse. If certain electrical components, such as the turn signals or lights, stop working, it could indicate a blown fuse. To check for a blown fuse, locate the fuse box on your VTX 1300 and inspect the fuses visually or with a multimeter. Replace any blown fuses with the correct amperage rating to restore functionality.
Another common wiring issue is a loose or corroded connection. Over time, vibrations and exposure to the elements can cause wiring connections to become loose or develop corrosion. Inspect all wiring connections, especially those near the affected electrical component, and tighten or clean them as necessary. Using contact cleaner or dielectric grease can help prevent future corrosion.
If the issue persists, it may be a faulty switch or relay. Faulty switches can prevent electrical signals from reaching the desired component, while faulty relays can fail to activate the necessary circuit. Using a multimeter, test the switches and relays for continuity and replace any faulty ones. It’s crucial to consult the wiring diagram specific to your VTX 1300 to correctly identify and test these components.
In some cases, the issue may be with the wiring harness itself. A damaged or frayed wire can cause intermittent power loss or complete failure of electrical components. Inspect the wiring harness for any signs of damage, such as exposed wires or melted insulation. If you find any issues, it’s best to replace the affected section of the wiring harness or seek professional assistance if the damage is extensive.
Remember, troubleshooting wiring issues requires patience and attention to detail. Take your time to thoroughly inspect and test each component, and refer to the wiring diagram for accurate identification. If you’re unsure or uncomfortable with electrical troubleshooting, it’s always best to consult a professional mechanic or electrician for assistance.
Tips for Proper Maintenance and Wiring Modifications
Proper maintenance plays a crucial role in ensuring the longevity and performance of your 2003 Honda VTX 1300. Along with regular servicing and check-ups, paying attention to the wiring system is important for safe and reliable operation of your motorcycle. Here are some tips to help you with proper maintenance and wiring modifications:
1. Routine Inspection:
- Regularly inspect the wiring harness for any signs of damage, such as frayed wires or loose connections.
- Check for any exposed wires that may come into contact with other components or the frame, as it can lead to short circuits and electrical failures.
- Ensure that all connectors are securely plugged in and there are no loose contacts.
- Look out for any loose or corroded terminals, as they can impede the flow of electricity.
2. Proper Wire Routing:
- Make sure the wiring harness is properly routed and secured, away from areas with excessive heat, moving parts, or sharp edges to prevent any potential damage.
- Avoid pinching or tightly bending the wires, as it can cause breakage or insulation damage over time.
- Use cable ties or clamps to secure the wiring harness at regular intervals, ensuring it is not too tight or too loose.
3. Wiring Modifications:
- Before making any modifications to the wiring system, refer to the wiring diagram specific to your 2003 Honda VTX 1300 to understand the existing setup.
- If you are not familiar with electrical systems, it is recommended to seek professional assistance or consult a knowledgeable person to avoid any mistakes.
- When adding accessories or making modifications, use the appropriate wire gauge and connectors to ensure compatibility and prevent electrical overload.
- Label or document any modifications you make to the wiring system for future reference.
By following these tips, you can maintain the wiring system of your 2003 Honda VTX 1300 and make necessary modifications safely and effectively. Remember to prioritize safety and consult professionals when in doubt.