
The 2003 Hyundai Santa Fe is a popular SUV known for its reliability and versatility. However, like any vehicle, it may experience electrical issues from time to time. One of the most common problems car owners face is a blown fuse. When a fuse blows, it can cause a variety of electrical systems to malfunction, from the headlights to the power windows.
If you are experiencing electrical issues with your 2003 Hyundai Santa Fe, it is essential to have a fuse diagram on hand. A fuse diagram will help you locate and identify the specific fuse that controls the malfunctioning system. With the right diagram, you can quickly and easily replace the blown fuse and restore functionality to your vehicle.
The 2003 Hyundai Santa Fe fuse diagram provides a clear illustration of the fuse box and the corresponding fuses for each system. It typically includes information such as the fuse number, amp rating, and the systems it controls. This diagram is essential for car owners who prefer to troubleshoot and repair minor electrical issues themselves, without the need for professional assistance.
Having a 2003 Hyundai Santa Fe fuse diagram is also helpful for car owners who want to be prepared for potential electrical problems. By familiarizing yourself with the fuse box and the location of each fuse, you can quickly identify and address any future issues that may arise. This knowledge can save you time and money, as you will have the confidence to tackle minor repairs on your own.
What is a Fuse Diagram?
A fuse diagram, also known as a fuse box diagram or fuse panel diagram, is a visual representation of the arrangement and function of the fuses in a vehicle’s electrical system. It provides a detailed overview of the different fuses and their corresponding circuits, helping vehicle owners locate and identify specific fuses for troubleshooting or replacement purposes.
A fuse diagram typically includes information about the fuse’s amperage rating, which determines the maximum amount of electrical current that can pass through it before the fuse blows. It also specifies the circuit or component that the fuse protects, such as the headlights, taillights, or power windows. Additionally, the fuse diagram may indicate the fuse’s location in the fuse box or panel, making it easier for owners to locate and check the fuse in question.
A fuse diagram is an essential tool for both vehicle owners and automotive technicians. It allows owners to quickly identify and replace faulty fuses, preventing further damage to the electrical system and ensuring the proper functioning of various vehicle components. Additionally, technicians can refer to the fuse diagram to diagnose electrical issues or perform repairs, as it provides valuable information about the circuit layout and helps in troubleshooting specific electrical problems.
Overall, a fuse diagram is a valuable resource for anyone working with a vehicle’s electrical system. Whether you need to replace a blown fuse or troubleshoot an electrical issue, referring to the fuse diagram ensures a safe and efficient repair process.
Understanding the Fuse Diagram
When it comes to troubleshooting electrical issues in your 2003 Hyundai Santa Fe, understanding the fuse diagram can be incredibly helpful. This diagram outlines the location and function of each fuse in the vehicle’s electrical system, allowing you to easily identify and replace any blown fuses.
The fuse diagram typically consists of a chart or table that lists the fuse number, amp rating, and description of the circuit protected by each fuse. It may also indicate the location of the fuse box in the vehicle, as well as any additional fuse panels that may be present. Some diagrams may even include a color-coded legend to help you quickly identify specific circuits.
Using the fuse diagram, you can determine which fuse corresponds to the circuit experiencing issues. For example, if your interior lights are not working, you can refer to the diagram to find the fuse that controls the interior lighting circuit. Then, you can check if the fuse is blown by visually inspecting it or using a multimeter to test for continuity.
Replacing a blown fuse is a relatively simple task. After identifying the faulty fuse, you can use a fuse puller tool or a pair of needle-nose pliers to remove it from the fuse box. Be sure to replace the blown fuse with one of the same amp rating to prevent electrical damage or fires.
Understanding the fuse diagram in your 2003 Hyundai Santa Fe can save you time and frustration when troubleshooting electrical issues. By knowing the location and function of each fuse, you can quickly pinpoint the problem and resolve it effectively. Always refer to the vehicle’s owner’s manual for the most accurate and up-to-date fuse diagram.
Locating the Fuse Box on a 2003 Hyundai Santa Fe
If you need to find the fuse box on your 2003 Hyundai Santa Fe, it is important to know where it is located. The fuse box contains various fuses that control different electrical components in your vehicle. By locating the fuse box, you will be able to easily identify and replace any blown fuses.
To locate the fuse box on a 2003 Hyundai Santa Fe, you will first need to open the hood of the car. Once the hood is open, look towards the back of the engine compartment. The fuse box is usually located near the battery or on the driver’s side of the engine bay. It may be covered by a plastic cover that can be easily removed by hand or with the help of a screwdriver.
When you have located the fuse box, you can remove the cover to access the fuses. Inside the fuse box, you will find a diagram that indicates which fuse corresponds to each electrical component. This diagram is usually located on the underside of the fuse box cover or on a separate sheet of paper that is included with the vehicle’s owner’s manual.
Once you have identified the fuse that needs to be replaced, you can use a pair of needle-nose pliers or a fuse puller tool to carefully remove the old fuse. Be sure to replace it with a new fuse of the same amperage rating to ensure proper function of the electrical component.
If you are unsure about which fuse to replace or how to properly replace it, it is recommended to consult the vehicle’s owner’s manual or seek assistance from a professional mechanic. They will be able to provide you with the necessary guidance and ensure that the fuse is replaced correctly.
Identifying the fuses
When dealing with a 2003 Hyundai Santa Fe fuse diagram, it is crucial to be able to identify the different fuses accurately. Each fuse has a specific purpose and protects a specific electrical component of the vehicle. By understanding the fuse diagram, you can quickly troubleshoot any electrical issues that may arise.
Fuse box location
The fuse box in a 2003 Hyundai Santa Fe is located in the engine compartment. It is typically found near the battery and is secured with a lid or cover. To access the fuses, you will need to remove the cover by lifting it off or unscrewing the screws that hold it in place.
Fuse diagram
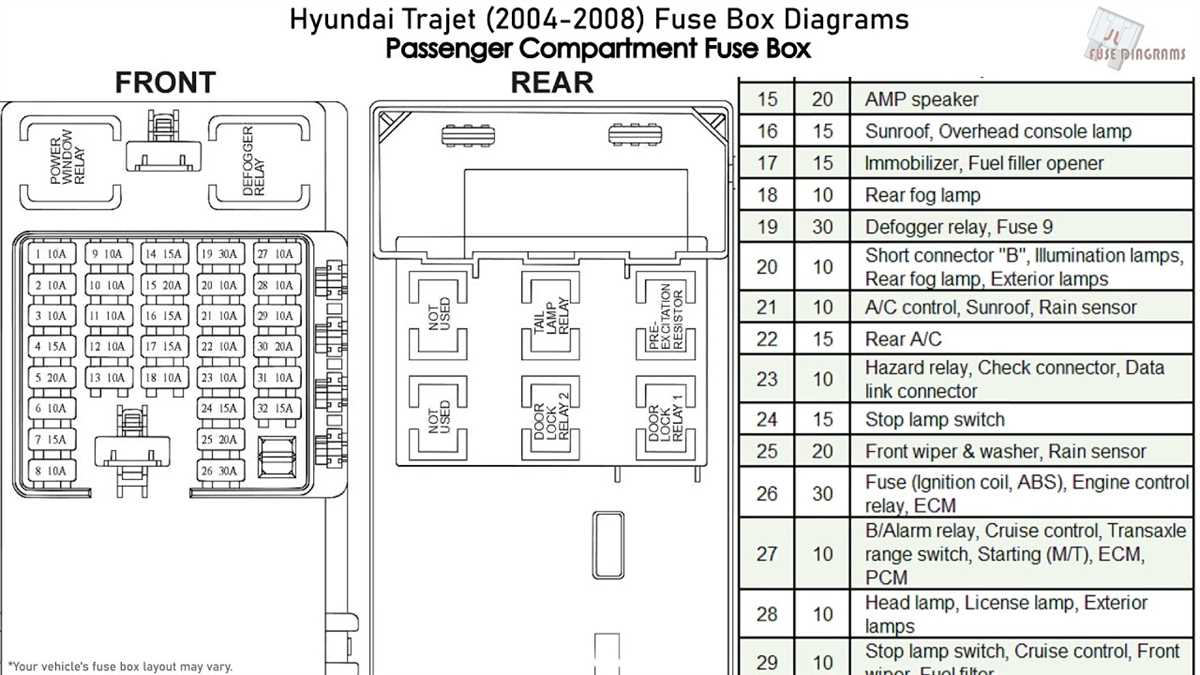
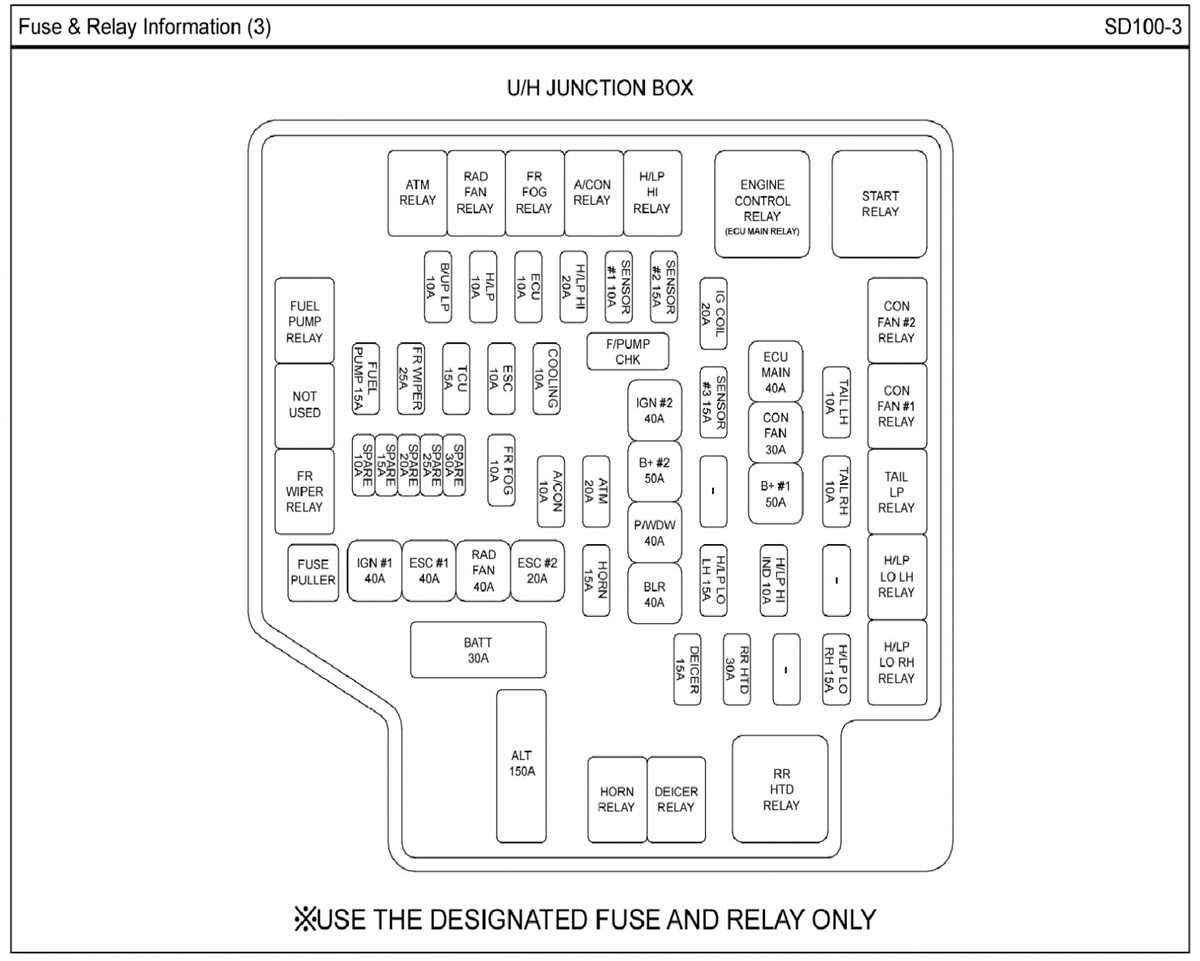
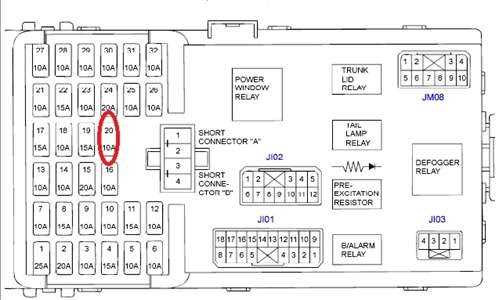
The fuse diagram for a 2003 Hyundai Santa Fe is usually printed on the inside of the fuse box cover. It provides a map of the different fuses and their corresponding electrical components. The diagram will typically indicate the fuse number, the amp rating, and the component it protects.
For example, the fuse diagram may indicate that fuse number 25 is a 10-amp fuse that protects the vehicle’s audio system. This means that if the audio system stops working, you should check fuse number 25 for any signs of damage or a blown fuse.
It is crucial to consult the fuse diagram whenever troubleshooting electrical issues in your 2003 Hyundai Santa Fe. By identifying the correct fuse, you can easily locate and replace any faulty fuses, ensuring that your vehicle’s electrical components are functioning correctly.
Reading the Fuse Diagram
When it comes to troubleshooting electrical issues in your 2003 Hyundai Santa Fe, it’s essential to understand how to read the fuse diagram. The fuse diagram provides a visual representation of the fuses and their corresponding circuits in the vehicle. It allows you to identify which fuse protects a specific electrical component or system.
Locating the Fuse Diagram: In the 2003 Hyundai Santa Fe, the fuse diagram is typically located on the inside of the fuse box cover. It provides a detailed map of the fuses and their locations, which are usually labeled with numbers or symbols corresponding to specific electrical systems.
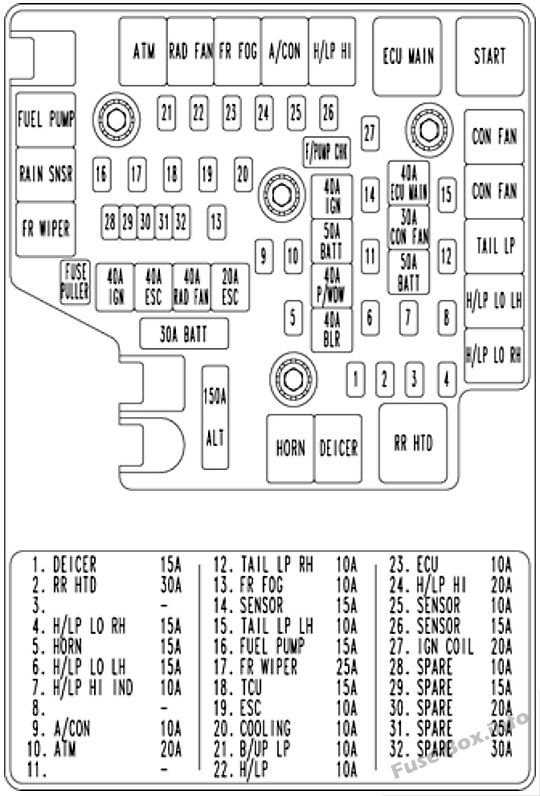
Identifying Fuses: The fuse diagram will show you the different fuses in your Santa Fe and their ratings. Each fuse is assigned a specific amperage rating and protects a particular electrical circuit. The diagram usually includes a key or legend to help you understand the purpose of each fuse and its corresponding electrical system.
Understanding the Diagram: Use the fuse diagram to determine which fuse is related to the specific electrical issue you’re experiencing. Look for any fuses labeled with the system or component that’s having problems. For example, if your headlights are not working, check the fuse diagram for any fuses related to the headlight system.
Checking the Fuses: Once you have identified the fuse in question, visually inspect it for any signs of damage, such as a blown fuse or a melted filament. If the fuse appears to be faulty, replace it with a new fuse of the same amperage rating. It’s crucial to always use the correct amperage fuse to avoid damaging the electrical system.
Consulting the Owner’s Manual: If you’re unsure about the specific functions of the fuses or need additional information, refer to your 2003 Hyundai Santa Fe’s owner’s manual. The manual will provide detailed explanations of the fuse diagram, including the purpose of each fuse, the amperage rating, and any related warnings or precautions.
By understanding how to read the fuse diagram in your 2003 Hyundai Santa Fe, you can effectively troubleshoot electrical issues and resolve them in a timely manner. Remember to always consult the diagram and owner’s manual for accurate information and to prioritize safety when dealing with electrical components.
Common Fuse Issues
Having issues with the fuses in your 2003 Hyundai Santa Fe? Don’t worry, you’re not alone. Fuse problems are common in many vehicles, and understanding how they work can help you troubleshoot and resolve any electrical issues you may be experiencing.
One common fuse issue is a blown fuse. This occurs when the fuse is overloaded with too much electrical current and it burns out. To identify a blown fuse, you can visually inspect the fuse or use a multimeter to test its continuity. If you find a blown fuse, simply replace it with a new one of the same amperage rating.
Another common fuse issue is a loose or corroded connection. Over time, the terminals that hold the fuse in place can become loose or develop corrosion, resulting in a poor electrical connection. This can cause intermittent power loss or other electrical problems. To fix this issue, remove the fuse, clean the terminals with a wire brush or sandpaper, and ensure a tight connection when reinstalling the fuse.
It’s also important to note that fuse diagrams are often provided in the vehicle’s owner’s manual or on the fuse box cover. These diagrams show the location and amperage ratings of each fuse, allowing you to easily identify and replace any faulty fuses. Using the correct amperage fuse is crucial to avoid damaging the electrical system or causing a fire.
In conclusion, fuse issues are common in vehicles, including the 2003 Hyundai Santa Fe. Understanding how fuses work and knowing how to troubleshoot and resolve common fuse issues can save you time and money. If you’re unsure about handling fuse issues yourself, it’s always best to consult a professional mechanic or refer to your vehicle’s owner’s manual for guidance.
Blown Fuses
Blown fuses in a vehicle can be a frustrating issue to deal with, as they can cause various electrical components to stop working. Understanding how fuses work and how to identify a blown fuse can help in troubleshooting and resolving the issue.
Causes of blown fuses:
- Overloading: If a circuit is drawing more power than the fuse is designed to handle, it can cause the fuse to blow.
- Short circuit: When a wire or component in a circuit comes into contact with a ground or another wire, it can create a short circuit, leading to a blown fuse.
- Faulty equipment: A malfunctioning electrical component or device can cause excessive current flow, resulting in a blown fuse.
Identifying a blown fuse:
- No power to a specific component: If a specific electrical component, such as the radio or interior lights, stops working, it may be due to a blown fuse.
- Fuse indicator light: Some vehicles have a fuse indicator light on the dashboard that illuminates when a fuse is blown.
- Visual inspection: Fuses are typically color-coded and have a transparent window to inspect the fuse element. If the element appears melted or broken, the fuse is likely blown.
Replacing a blown fuse:
- Identify the correct fuse: Refer to the vehicle’s owner’s manual or the fuse diagram to locate the specific fuse for the component that is not working.
- Remove the blown fuse: Use a fuse puller tool or a pair of needle-nose pliers to gently remove the blown fuse from the fuse box.
- Replace with a new fuse: Insert a new fuse of the same rating into the appropriate slot in the fuse box.
- Test the component: Once the new fuse is in place, test the electrical component to ensure it is working properly.
It is important to remember that blown fuses are often symptoms of underlying electrical issues. If a new fuse blows immediately or if the issue persists after replacing the fuse, it may be necessary to seek professional assistance to diagnose and repair the problem.
Incorrectly labeled fuses
When dealing with electrical issues in a vehicle, it is always important to check the fuse box to see if any fuses are blown. However, in some cases, the fuses may be incorrectly labeled, which can make troubleshooting more difficult.
Incorrectly labeled fuses can lead to confusion and frustration when trying to locate the appropriate fuse for a specific component or system in the vehicle. This can result in wasted time and effort, as well as potentially causing further damage if the wrong fuse is removed or replaced.
One way to mitigate the issue of incorrectly labeled fuses is to consult the vehicle’s fuse diagram. This diagram provides a visual representation of the fuse box and indicates which fuse corresponds to each component or system. However, if the fuse diagram is also incorrect or missing, it can make the situation even more challenging.
Another option is to use a multimeter to test the fuses individually. By testing each fuse for continuity, it is possible to identify which fuse is blown, regardless of its label or position in the fuse box. This method requires some basic electrical knowledge and the use of a multimeter, which may not be accessible to everyone.
In conclusion, incorrectly labeled fuses can be a frustrating issue when troubleshooting electrical problems in a vehicle. It is important to have alternative methods, such as consulting a fuse diagram or using a multimeter, to accurately identify and replace blown fuses. Taking the time to properly locate and address faulty fuses can save both time and money in the long run.
Q&A:
What are incorrectly labeled fuses?
Incorrectly labeled fuses are fuses that have been marked or labeled with the wrong rating or purpose. This means that the fuse may not provide the correct level of protection or may not function as intended.
Why are incorrectly labeled fuses a problem?
Incorrectly labeled fuses can pose a safety hazard. If a fuse is labeled with a higher rating than it can handle, it may not blow when it should, potentially causing damage to the circuit or even starting a fire. On the other hand, if a fuse is labeled with a lower rating than it can handle, it may blow unnecessarily, causing an inconvenience and potential downtime.
How can incorrectly labeled fuses be identified?
Incorrectly labeled fuses can be identified by comparing the ratings on the fuse with the ratings specified by the manufacturer or on the electrical panel. Additionally, if a circuit consistently blows its fuse despite having a lower load, it may be an indication that the fuse is incorrectly labeled.
What should be done if incorrectly labeled fuses are found?
If incorrectly labeled fuses are found, they should be replaced with fuses that have the correct rating and purpose. It is important to always follow the specifications provided by the manufacturer or consult a professional electrician to ensure that the correct fuses are used.
How can the risk of incorrectly labeled fuses be minimized?
The risk of incorrectly labeled fuses can be minimized by regularly checking and verifying the ratings of the fuses in an electrical system. It is also important to properly label all fuses and maintain accurate documentation to avoid any confusion or mistakes. Following proper installation and maintenance procedures, as well as consulting with professionals, can also help minimize the risk of incorrectly labeled fuses.
What should I do if I find incorrectly labeled fuses?
If you find incorrectly labeled fuses, you should contact a professional electrician. Incorrectly labeled fuses can be dangerous and potentially cause electrical hazards. A professional electrician will be able to properly identify and label the fuses, ensuring the safety of your electrical system.