
If you own a 2006 Hyundai Tucson, it’s important to understand the various systems and components that make up your vehicle. One crucial aspect of any car’s operation is the serpentine belt, which controls multiple functions and ensures the smooth operation of various engine components. Understanding the belt diagram is essential for maintaining and repairing your Hyundai Tucson efficiently and effectively.
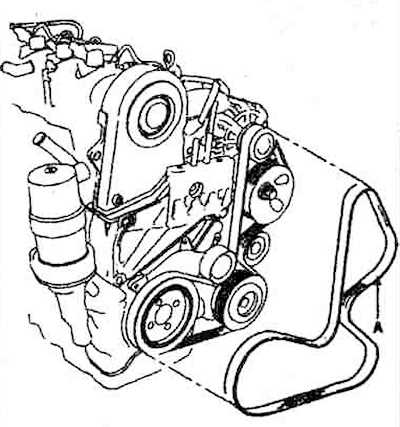
The serpentine belt in your 2006 Hyundai Tucson is responsible for turning a variety of engine components, including the alternator, power steering pump, and air conditioner compressor. Over time, this belt can become worn and stretched, leading to decreased performance and the potential for a breakdown. By referring to the belt diagram, you can easily identify the proper routing and tension for your Hyundai Tucson’s serpentine belt.
To locate the belt diagram for your 2006 Hyundai Tucson, refer to your vehicle’s owner’s manual or consult a reputable repair manual. These resources will provide you with a detailed diagram showing the correct routing and tension for your serpentine belt. It’s essential to follow this diagram precisely to ensure proper operation and prevent potential damage to your engine components.
By understanding the 2006 Hyundai Tucson belt diagram, you can confidently perform routine maintenance and make repairs when necessary. By keeping your serpentine belt in good condition, you’ll ensure optimal performance and longevity for your vehicle, allowing you to enjoy many more miles of reliable driving.
What is a Belt Diagram for a 2006 Hyundai Tucson?
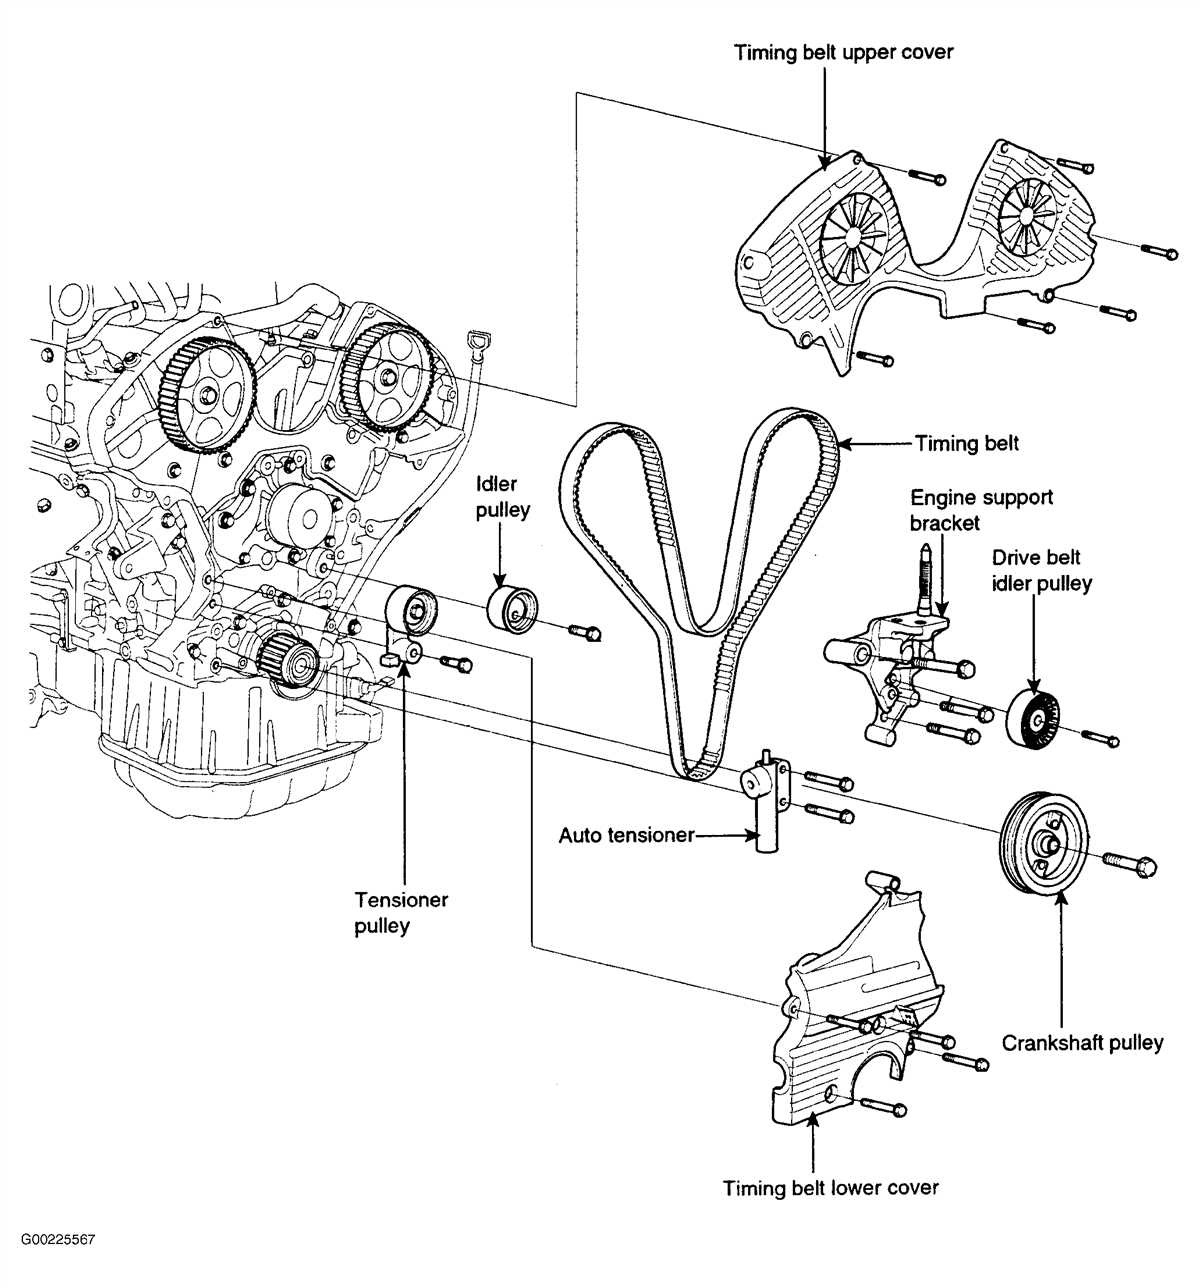
A belt diagram for a 2006 Hyundai Tucson is a visual representation of how the belts in the vehicle are routed. The diagram shows the specific path that each belt takes, including any pulleys or accessories it may pass through. This diagram is useful for understanding how the belts are connected and for proper installation and tensioning of the belts during maintenance or repair.
In the 2006 Hyundai Tucson, there are typically several belts that need to be routed correctly, including the serpentine belt, which drives the engine accessories such as the alternator, power steering pump, and air conditioning compressor. There may also be separate belts for the engine’s water pump and air conditioning compressor, depending on the specific configuration of the vehicle.
- The belt diagram for the 2006 Hyundai Tucson can typically be found in the owner’s manual or in a service manual for the vehicle.
- If the diagram is not available, it may be possible to find it online through a Hyundai forum or by contacting a Hyundai dealership or authorized repair center.
- When using the belt diagram, it is important to pay attention to the routing and tensioning instructions to ensure the belts are installed correctly.
- Improper installation of the belts can lead to failure or damage to the engine accessories and can result in loss of power steering, electrical charging, or air conditioning.
Overall, a belt diagram for a 2006 Hyundai Tucson is a useful tool for understanding and maintaining the proper operation of the vehicle’s belts. It helps ensure that the belts are installed correctly, reducing the risk of belt failure and associated engine problems. If the diagram is not readily available, it is recommended to consult a Hyundai dealership or authorized repair center for assistance.
Understanding the Belt Diagram in Your 2006 Hyundai Tucson
When it comes to the functionality of your 2006 Hyundai Tucson, understanding the belt diagram is crucial. The belt diagram shows the routing and arrangement of the different belts in your vehicle’s engine. These belts play an essential role in various systems, such as the alternator, power steering, and air conditioning. By understanding the belt diagram, you can easily identify and address any issues with your belts.
The belt diagram in your 2006 Hyundai Tucson typically consists of three main belts: the serpentine belt, the power steering belt, and the air conditioning belt. Each belt has a specific function and needs to be properly aligned and tensioned for optimal performance. The serpentine belt, for example, powers multiple components in your engine, including the alternator, water pump, and air conditioning compressor.
It’s important to regularly inspect the belt diagram and visually inspect the belts for any signs of wear, cracks, or fraying. If you notice any issues, it’s crucial to replace the affected belt as soon as possible to prevent further damage to your engine. While the belt diagram provides a general route for the belts, it’s always recommended to consult your vehicle’s owner manual or a reliable source for the exact routing and tensioning specifications.
In summary, the belt diagram in your 2006 Hyundai Tucson is a visual representation of the arrangement and routing of the different belts in your engine. Understanding this diagram helps you identify any issues with your belts and ensures that they are properly aligned and tensioned for optimal performance. Regular inspection and maintenance of your belts are crucial for the overall functionality and longevity of your vehicle.
Why is the Belt Diagram Important for Your 2006 Hyundai Tucson?
Understanding the belt diagram for your 2006 Hyundai Tucson is crucial for ensuring proper maintenance and troubleshooting of your vehicle. The belt diagram shows the route and arrangement of the different belts in the engine, including the serpentine belt, which is responsible for powering various components such as the alternator, power steering pump, and air conditioning compressor.
The belt diagram provides a visual representation of how the belts are threaded through the pulleys, enabling you to easily identify and locate each belt. This is particularly useful when it comes to replacing worn or damaged belts, as it ensures that you install the new belt correctly and prevent any potential issues that may arise from improper installation.
Having a clear understanding of the belt diagram also helps in troubleshooting any belt-related problems that you may encounter. If you notice any unusual noises, such as squealing or grinding, or if you notice that one of the components powered by the belt is not functioning properly, referring to the belt diagram can help you pinpoint the issue. You can visually inspect the belts and pulleys to check for any signs of wear or damage, and refer to the diagram to ensure that everything is properly aligned.
In addition, the belt diagram is a valuable resource when it comes to routine maintenance. It provides guidance on how to properly tension the belts and ensure that they are not too loose or too tight. This is important for preventing premature belt wear and ensuring optimal performance of the engine and its components.
Overall, the belt diagram for your 2006 Hyundai Tucson is an essential tool for maintaining and troubleshooting your vehicle. By familiarizing yourself with the belt diagram, you can ensure that the belts are properly installed, identify and resolve any belt-related issues, and perform routine maintenance effectively. This will help prolong the life of your vehicle and prevent costly repairs down the line.
How to Read and Interpret the Belt Diagram
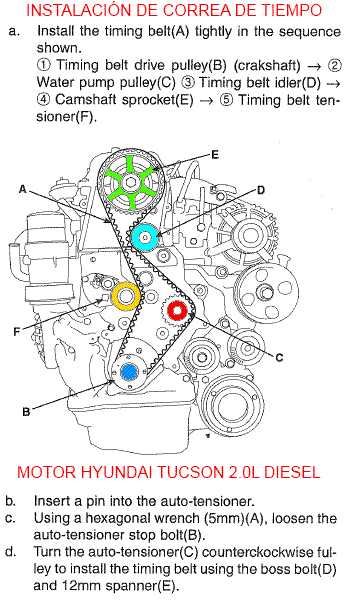
In order to properly maintain and repair your 2006 Hyundai Tucson, it is important to understand how to read and interpret the belt diagram. The belt diagram provides a visual representation of how the different belts in your vehicle are routed around various pulleys and components. By understanding this diagram, you can identify the correct routing for each belt and ensure that they are properly installed.
The first step in reading the belt diagram is to locate the diagram itself. In the case of the 2006 Hyundai Tucson, the belt diagram can usually be found in the owner’s manual or on a placard located in the engine compartment. Once you have located the diagram, take note of the different belts and their respective routes.
To interpret the belt diagram, start by identifying the different pulleys and components mentioned in the diagram. Each pulley or component is usually labeled with a corresponding number or letter on the diagram. Refer to the legend or key provided in the diagram to understand what each number or letter represents.
Next, follow the route of each belt as indicated by the arrows in the diagram. The arrows indicate the direction in which the belt should be routed around each pulley or component. Pay close attention to any tensioners or idler pulleys mentioned in the diagram, as these are crucial for maintaining proper belt tension.
It is also important to note that the belt diagram may show different routing options for different engine configurations or optional equipment. Make sure to select the correct routing diagram for your specific vehicle to avoid any installation errors.
In conclusion, understanding how to read and interpret the belt diagram is essential for maintaining and repairing your 2006 Hyundai Tucson. By familiarizing yourself with the diagram and following the correct routing, you can ensure that your belts are installed correctly and functioning properly. This will help to prevent any potential issues and keep your vehicle running smoothly.
Common Issues with the Belt in a 2006 Hyundai Tucson
The belt in a 2006 Hyundai Tucson is an important component of the engine system, as it is responsible for driving various accessories such as the alternator, power steering pump, and air conditioning compressor. However, over time, the belt can experience wear and tear, leading to several common issues that Tucson owners may face.
One common problem with the belt in a 2006 Hyundai Tucson is squealing or chirping noises. This can be caused by a loose or damaged belt, or improper belt tension. If the belt is loose, it may need to be tightened or replaced. If the belt is damaged, it should be replaced immediately to prevent further damage to the engine components.
Another issue that can occur with the belt in a 2006 Hyundai Tucson is slipping. This can happen when the belt does not have enough tension or when the pulleys it runs on are worn or damaged. Slipping can cause the accessories driven by the belt to not function properly, leading to issues such as a dead battery, loss of power steering, or lack of air conditioning.
It is also possible for the belt to become misaligned in a 2006 Hyundai Tucson. This can happen if the tensioner or idler pulleys are worn or if there is an issue with the belt routing. A misaligned belt can cause excessive wear on the belt and other engine components, leading to costly repairs if not addressed promptly.
In summary, the belt in a 2006 Hyundai Tucson can experience various issues such as squealing or chirping noises, slipping, and misalignment. It is important for Tucson owners to regularly inspect the belt and address any issues promptly to prevent further damage to the engine system. Regular maintenance and replacing the belt as recommended by the manufacturer can help ensure the longevity and proper functioning of the belt in a 2006 Hyundai Tucson.
Steps to Replace the Belt in a 2006 Hyundai Tucson

The serpentine belt, also known as the drive belt, plays a crucial role in the operation of the engine in a 2006 Hyundai Tucson. Over time, the belt may become worn or damaged, leading to a loss of power to essential components. Replacing the belt is a relatively simple and cost-effective maintenance task that can prevent more significant issues down the line. Here are the steps to replace the belt in a 2006 Hyundai Tucson:
- Gather the necessary tools: Before starting the replacement process, gather the necessary tools, including a ratchet, a socket set, and a pry bar.
- Locate the serpentine belt: Open the hood of the Hyundai Tucson and locate the serpentine belt. It is typically located in the front part of the engine, near the radiator.
- Release tension on the belt: Use a ratchet and socket set to release the tension on the belt. Locate the belt tensioner pulley and insert the ratchet into the square hole. Rotate the ratchet counterclockwise to release tension on the belt.
- Remove the old belt: Once the tension is released, carefully remove the old belt from the pulleys. Take note of the belt’s routing pattern to ensure you install the new belt correctly.
- Install the new belt: Begin by routing the new belt around the different pulleys, following the same pattern as the old belt. Ensure the belt is properly aligned and engaged in each pulley groove.
- Reset the tensioner: Use the ratchet and socket set to rotate the tensioner counterclockwise again, creating enough slack to allow the new belt to be installed.
- Double-check the belt installation: Once the new belt is in place, double-check that it is properly installed and engaged in all the pulleys. Make sure there are no twists or knots in the belt.
- Test the belt: Start the engine and let it run for a few minutes, ensuring that the belt is operating smoothly and without any squealing or slipping sounds.
By following these steps, you can successfully replace the belt in a 2006 Hyundai Tucson, ensuring the continued smooth operation of your vehicle’s engine and essential components.
Q&A:
What tools do I need to replace the belt in a 2006 Hyundai Tucson?
You will need a socket wrench, a serpentine belt tool, and a pry bar to replace the belt in a 2006 Hyundai Tucson.
Where is the serpentine belt located in a 2006 Hyundai Tucson?
The serpentine belt is located in the front engine compartment of the 2006 Hyundai Tucson. It is connected to various engine components such as the alternator, power steering pump, and air conditioning compressor.
How do I release tension on the serpentine belt in a 2006 Hyundai Tucson?
To release tension on the serpentine belt in a 2006 Hyundai Tucson, you will need to use a serpentine belt tool or a socket wrench to rotate the tensioner pulley in a clockwise direction. This will loosen the belt and allow you to remove it.
What is the correct belt routing for a 2006 Hyundai Tucson?
The correct belt routing for a 2006 Hyundai Tucson can be found in the owner’s manual or a repair manual for your specific vehicle. It is important to follow the correct routing to ensure proper operation of the engine components.
Are there any additional steps or precautions I should take when replacing the belt in a 2006 Hyundai Tucson?
When replacing the belt in a 2006 Hyundai Tucson, it is recommended to inspect the other engine components such as the pulleys and tensioner for any signs of wear or damage. It is also a good idea to replace the belt tensioner if it is worn or not functioning properly. Additionally, make sure to disconnect the battery before starting the replacement process to avoid any electrical accidents.