
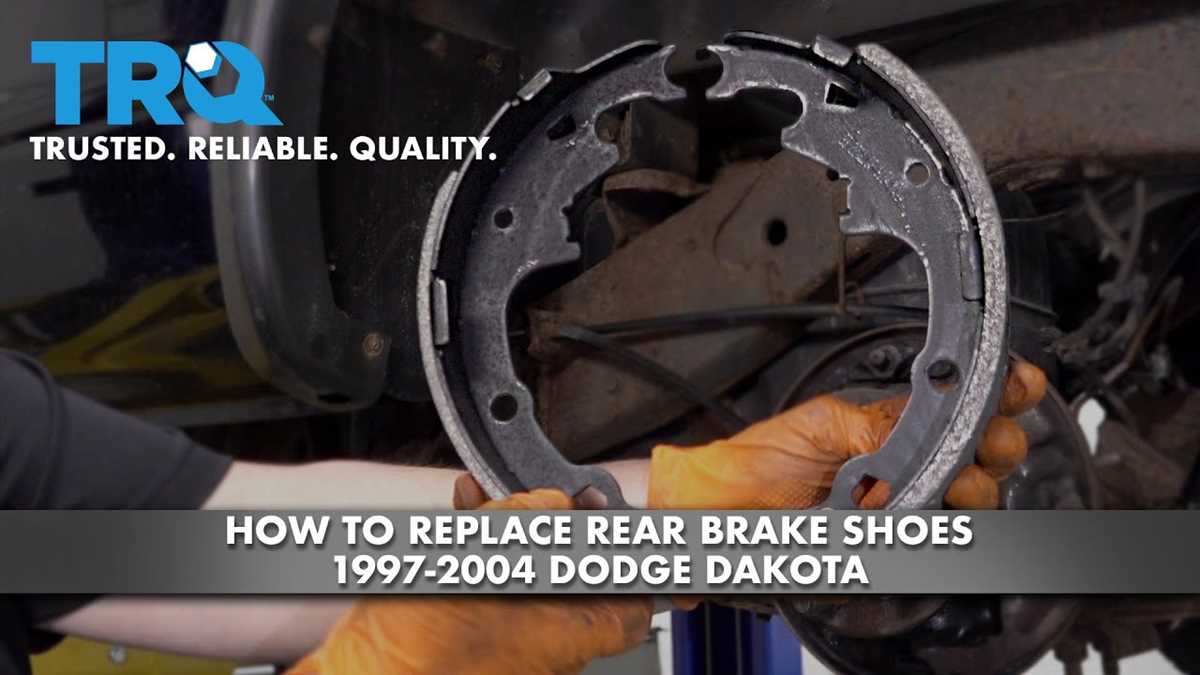
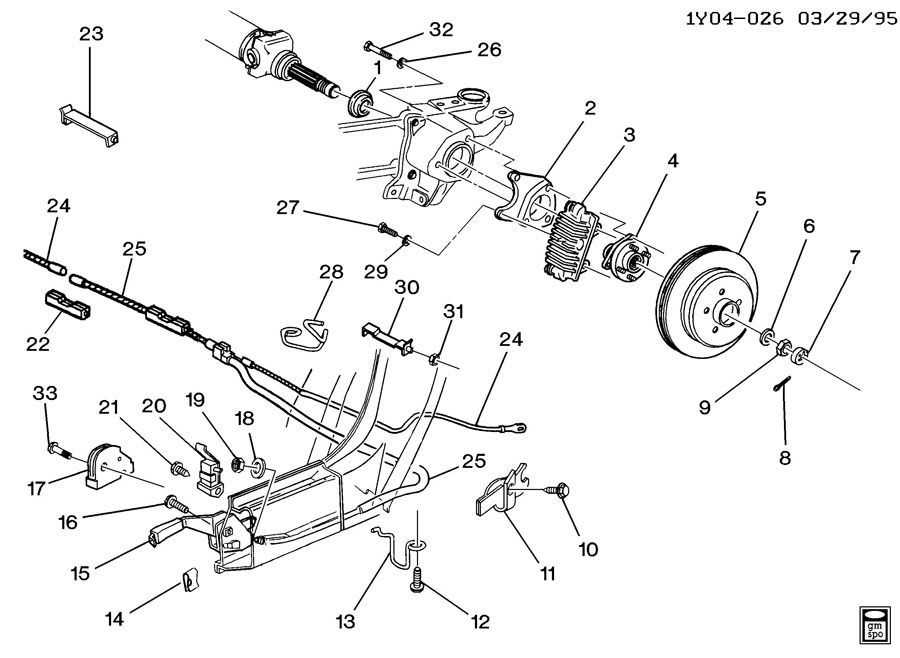
When it comes to the safety and performance of your vehicle, the braking system plays a crucial role. Understanding the components and their functions is essential for maintaining and repairing your brakes. In this article, we will be discussing the rear brake system of the 2007 Dodge Dakota and providing a diagram to help you visualize the various parts.
The rear brake system in the 2007 Dodge Dakota consists of several key components, including the brake calipers, brake rotors, brake pads, and brake lines. These components work together to apply pressure and friction to the rotor, causing the vehicle to slow down or come to a complete stop.
The brake calipers are responsible for housing the pistons and brake pads. When you press on the brake pedal, hydraulic pressure is created, forcing the pistons to push the brake pads against the rotor. This action creates friction, which slows down the rotation of the rotor and ultimately the vehicle.
The brake rotors are attached to the wheel hubs and rotate along with them. They provide a smooth and flat surface for the brake pads to press against. Over time, the brake rotors can become worn or warped, affecting the overall braking performance. It is important to inspect them regularly and replace them if necessary.
Detailed Breakdown of a 2007 Dodge Dakota Rear Brake System
The rear brake system is a crucial component of a 2007 Dodge Dakota’s overall braking system. It plays a vital role in assisting the vehicle to slow down, stop, and maintain control during driving. A detailed breakdown of the rear brake system will help understand its components and their functions.
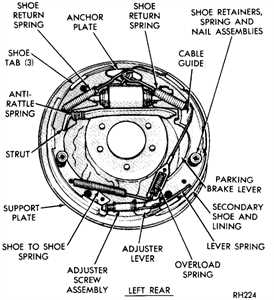
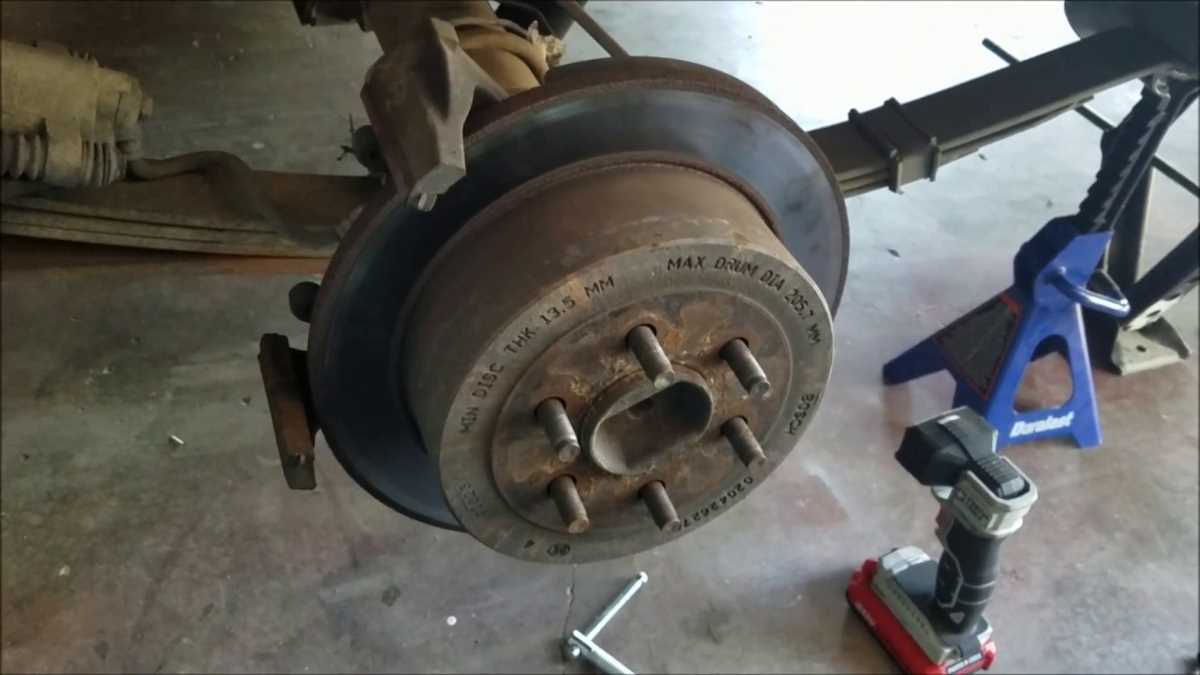
1. Brake Drum
The rear brake system of a 2007 Dodge Dakota utilizes brake drums. These round metal drums are attached to the axle and rotate along with the wheels. When the brake pedal is pressed, brake shoes are forced against the inner surface of the drum, creating friction that slows down the rotation of the wheels and brings the vehicle to a stop.
2. Brake Shoes
The brake shoes within the drum contact the brake drum’s inner surface when the brakes are applied. Each wheel has a set of two brake shoes–primary and secondary. The primary shoe has a larger friction material contact area and is positioned towards the front of the vehicle. The secondary shoe complements the primary shoe and is positioned towards the rear of the vehicle.
3. Wheel Cylinder
Located inside the drum, the wheel cylinder converts hydraulic pressure from the brake lines into mechanical force that pushes the brake shoes against the drum. When the brake pedal is pressed, hydraulic fluid is forced into the wheel cylinder, causing the piston to extend, pushing the brake shoes against the drum’s inner surface.
4. Brake Springs
Brake springs are responsible for retracting the brake shoes after the brakes are released. They help ensure that the shoes do not remain in contact with the drum, allowing the wheels to rotate freely when the brakes are not applied.
5. Parking Brake
In addition to the main rear brake system, the 2007 Dodge Dakota also has a parking brake system. The parking brake is typically activated by a hand lever or foot pedal and engages a separate set of brake shoes or pads. This system allows the vehicle to be securely parked and prevents it from moving when parked on an incline.
In conclusion, the rear brake system of a 2007 Dodge Dakota consists of several components such as brake drums, shoes, wheel cylinders, springs, and a parking brake system. Each component performs a specific function to ensure effective braking and vehicle control. Regular maintenance and inspection of these components are essential for optimal braking performance and overall driving safety.
Understanding the Components of the Rear Brake System
The rear brake system of a 2007 Dodge Dakota consists of several key components that work together to provide reliable stopping power. Understanding these components is essential for proper maintenance and troubleshooting of the rear brakes.
1. Rear Brake Calipers
The rear brake calipers are responsible for applying pressure to the brake pads, which in turn press against the brake rotors to create friction and slow down or stop the vehicle. They are typically operated by hydraulic pistons that push the brake pads against the rotors when the brake pedal is pressed.
Each rear wheel has its own brake caliper, and they are connected to the brake lines and hydraulic system to ensure synchronized braking. Over time, the calipers may experience wear and tear, leading to reduced braking performance or potential leaks that require replacement or repair.
2. Rear Brake Pads
Rear brake pads are the friction materials pressed against the brake rotors to create the necessary friction for stopping the vehicle. They are typically made of a composite material that combines durability, heat resistance, and effective braking performance.
As the brake pads wear down over time, they will need to be replaced to maintain optimal braking performance and prevent damage to the brake rotors. Regular inspection and measurement of the brake pads’ thickness is recommended to determine when they need replacement.
3. Rear Brake Rotors
The rear brake rotors are round metal discs that are mounted to the wheel hub. When the brake pads press against the rotors, the friction between them generates the stopping force needed to slow down or stop the vehicle.
Over time, brake rotors may become worn or warped due to heat and constant friction. If the rotors become too thin or develop uneven surfaces, they may need to be resurfaced or replaced to ensure reliable braking performance.
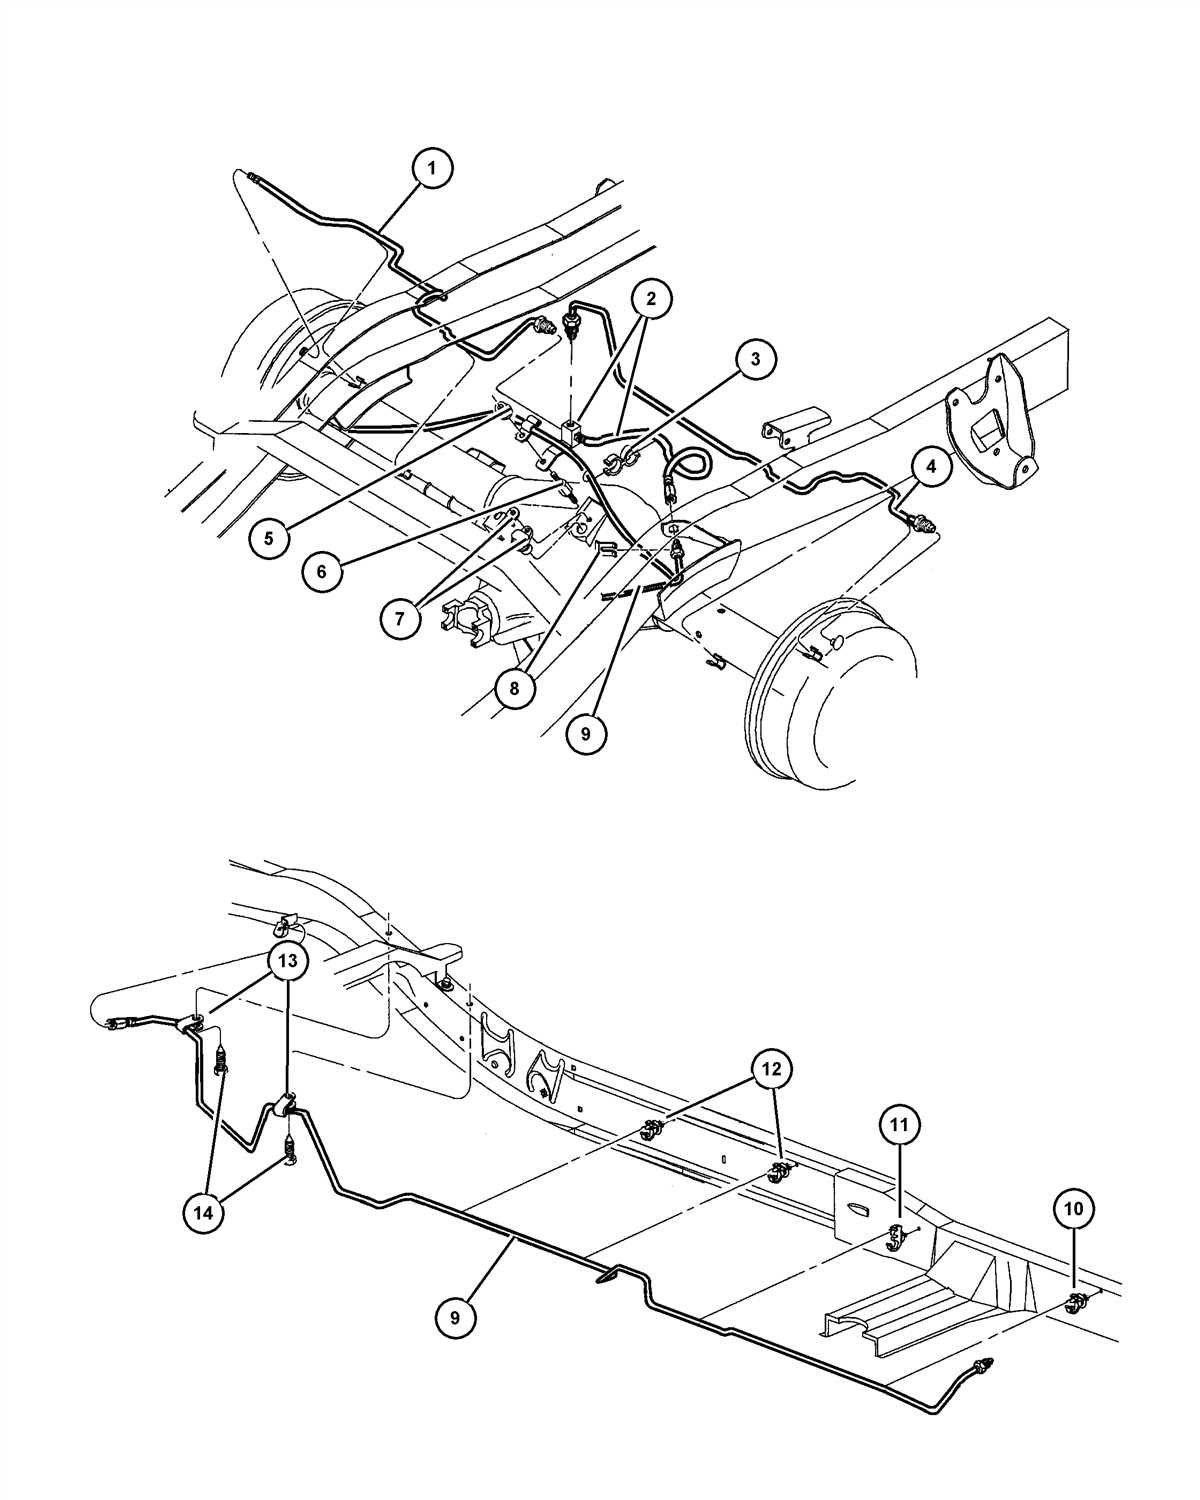
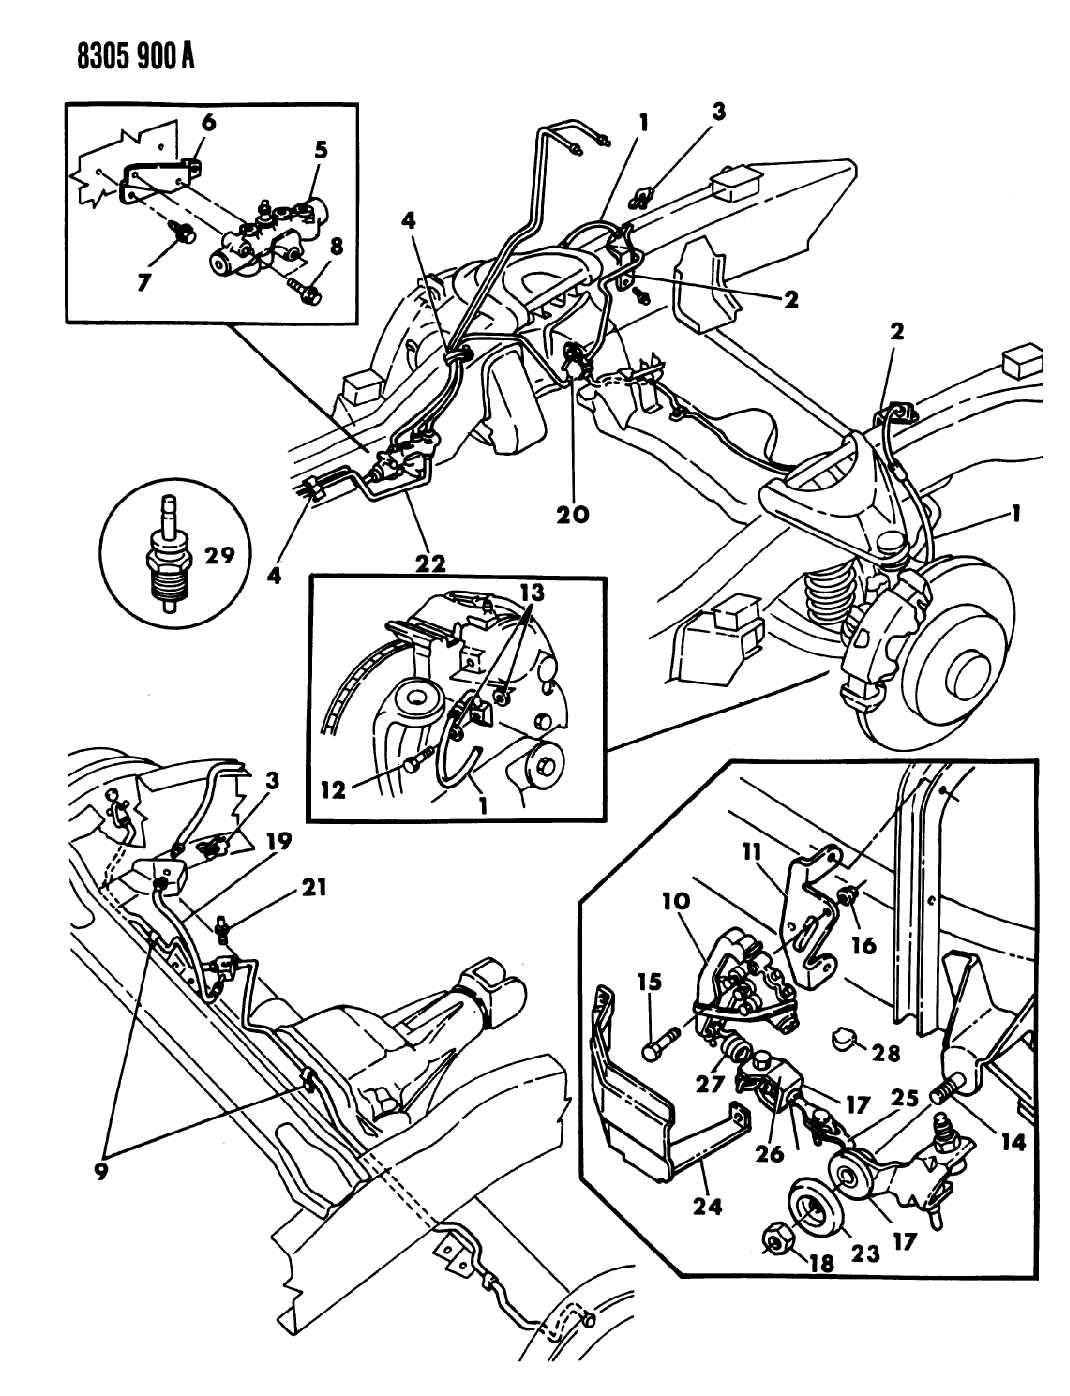
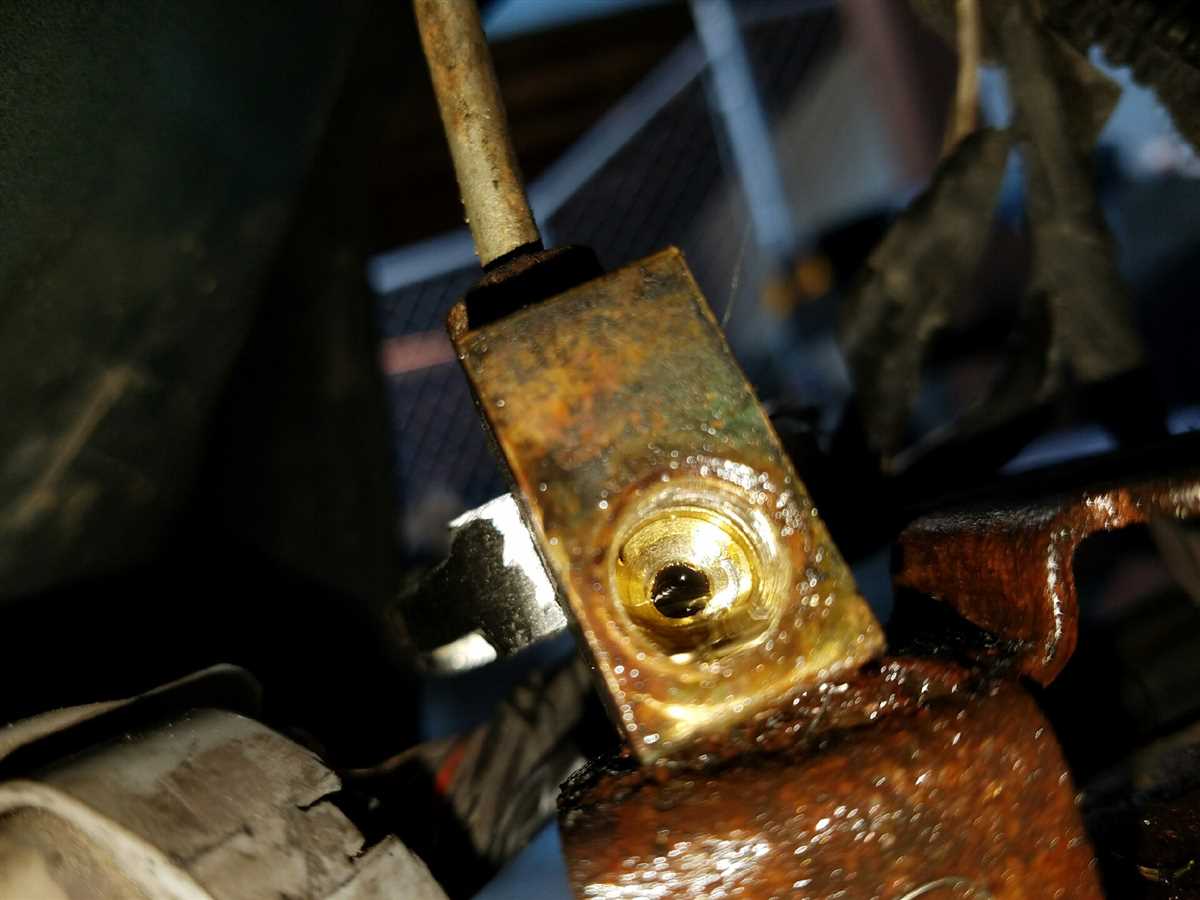
4. Rear Brake Lines and Hoses
The rear brake lines and hoses are responsible for carrying hydraulic fluid from the master cylinder to the brake calipers. These lines are made of durable materials such as steel or flexible rubber to withstand the pressure and heat generated during braking.
Inspecting the brake lines for leaks, cracks, or other signs of damage is crucial to prevent potential brake failures. Additionally, ensuring proper fluid levels and regularly flushing or replacing the brake fluid are crucial to maintain optimal brake performance.
5. Rear Brake Master Cylinder
The rear brake master cylinder is the main component that converts the force applied to the brake pedal into hydraulic pressure. It distributes the hydraulic fluid to the brake calipers via the brake lines, allowing the driver to control the braking pressure applied to the rear wheels.
A malfunctioning master cylinder can result in a loss of brake pressure or a spongy brake pedal feel. Regular maintenance and inspection of the master cylinder, such as checking the fluid levels and replacing a worn-out or damaged cylinder, are necessary for optimal brake performance.
Conclusion
Understanding the various components of the rear brake system is essential for maintaining the safety and performance of a 2007 Dodge Dakota. Regular inspection, maintenance, and prompt replacement of worn or damaged components will ensure reliable braking performance and keep the vehicle in optimal condition.
Step-by-Step Guide to Removing and Replacing Rear Brake Pads
Regular maintenance and replacement of brake pads is crucial for ensuring the safety and proper functioning of your 2007 Dodge Dakota’s rear brakes. If you notice any signs of wear or reduced braking performance, it’s time to replace the brake pads. Follow this step-by-step guide to remove and replace the rear brake pads on your vehicle.
Step 1: Gather the necessary tools and materials. Before you begin, make sure you have all the tools and materials you’ll need for the job. This includes a jack, jack stands, lug wrench, C-clamp, brake fluid, and a set of new brake pads.
Step 2: Prepare your vehicle for the brake pad replacement.
- Start by positioning your vehicle on a level surface and engage the parking brake.
- Loosen the lug nuts on the rear wheels using a lug wrench, but do not remove them completely.
- Place the jack under the rear axle and lift the vehicle off the ground. Secure it with jack stands for added safety.
- Fully remove the lug nuts and take off the rear wheels.
Step 3: Remove the old brake pads.
- Locate the brake caliper, which is attached to the brake rotor.
- Using a socket wrench, remove the caliper bolts and carefully lift the caliper off the rotor. Hang it with a wire or bungee cord to avoid straining the brake hose.
- Take out the old brake pads from the caliper, and inspect the condition of the caliper and rotor for any signs of damage or wear. If necessary, clean the components using brake cleaner.
Step 4: Install the new brake pads.
- Apply a thin layer of brake grease or anti-seize compound to the back of the new brake pads to prevent noise and vibration.
- Insert the new brake pads into the caliper, ensuring they are properly aligned.
- Place the caliper back onto the rotor and secure it with the caliper bolts. Torque the bolts according to the manufacturer’s specifications.
Step 5: Reinstall the wheels and test the brakes.
- Put the rear wheels back onto the vehicle and tighten the lug nuts by hand.
- Lower the vehicle back to the ground using the jack.
- Use a torque wrench to tighten the lug nuts to the recommended torque setting.
- Pump the brake pedal a few times to restore pressure in the brake system.
- Check for any brake fluid leaks and ensure the brake pedal feels firm when pressed.
By following these steps, you can successfully remove and replace the rear brake pads on your 2007 Dodge Dakota, ensuring optimal braking performance and safety on the road.
Examining the Role and Function of the Rear Brake Caliper
The rear brake caliper plays a crucial role in the braking system of a 2007 Dodge Dakota. It is responsible for exerting force on the brake pads, which then press against the rotor to create friction and slow down or stop the vehicle. Understanding the function and components of the rear brake caliper is essential for maintaining and troubleshooting the braking system.
The rear brake caliper consists of several key components, including the caliper body, brake pads, piston, and guide pins. The caliper body is a sturdy metal housing that holds all the other components together. The brake pads, typically made of a composite material, are attached to the caliper body. When the brakes are applied, the piston inside the caliper body pushes against the brake pads, forcing them to make contact with the rotor. This action creates friction and slows down the rotation of the rear wheel.
The piston, usually made of metal, is a crucial part of the rear brake caliper. As the piston moves forward, it exerts pressure on the brake pads, causing them to grip the rotor and generate friction. The piston is controlled by hydraulic pressure, which is transmitted through brake lines from the master cylinder. When you press the brake pedal, the master cylinder sends hydraulic fluid to the rear brake caliper, activating the piston and initiating the braking process.
In addition to the piston, the rear brake caliper also features guide pins. These pins allow the caliper to move freely, ensuring that the brake pads make consistent and even contact with the rotor. Over time, the guide pins may become corroded or stuck, resulting in uneven braking or excessive brake pad wear. Regular inspection and maintenance of the guide pins are necessary to ensure optimal braking performance.
Overall, the rear brake caliper is a critical component of the braking system in a 2007 Dodge Dakota. It works in conjunction with other parts, such as the rotor and brake pads, to provide reliable and efficient braking. Understanding its role and function can help drivers diagnose and address any issues with the rear brakes, ensuring the safety and performance of their vehicle.
Overview of the Rear Brake Rotor and its Importance in the Braking Process
The rear brake rotor is a crucial component of the braking system in a 2007 Dodge Dakota truck. It plays a vital role in slowing down or stopping the vehicle safely and efficiently. Understanding the rear brake rotor’s design, function, and importance is essential for maintaining the vehicle’s braking performance.
The rear brake rotor is a disc-shaped component that is attached to the rear wheel hub. When the driver applies the brakes, the brake pads press against the rotor, creating friction. This friction converts the kinetic energy of the moving vehicle into heat energy, which is then dissipated through the rotor. As a result, the vehicle slows down or comes to a complete stop.
Several factors contribute to the rear brake rotor’s importance in the braking process. Firstly, the rear brake rotor provides a large surface area for the brake pads to make contact with. This ensures effective braking and reduces the stopping distance of the vehicle. Secondly, the rear brake rotor’s material composition and design allow for efficient heat dissipation, preventing overheating and brake fade during prolonged or repeated braking maneuvers.
Additionally, maintaining the rear brake rotor’s integrity is crucial for the overall safety and performance of the braking system. Over time, the rear brake rotor may wear down due to normal usage or develop irregularities, such as grooves or warping. These issues can negatively affect the braking efficiency, causing vibrations, noise, or an uneven braking performance. Regular inspection and maintenance of the rear brake rotor, including resurfacing or replacing when necessary, are essential to ensure optimal braking performance and vehicle safety.
Exploring the Rear Brake Drum and its Function in Vehicles with Drum Brakes
In vehicles equipped with drum brakes, the rear brake drum plays a crucial role in the braking system. It is responsible for slowing down and stopping the vehicle by creating friction with the brake shoes.
The rear brake drum consists of a cylindrical-shaped metal component that is mounted on the rear axles. When the driver presses the brake pedal, hydraulic pressure is applied to the wheel cylinder, which pushes the brake shoes against the inner surface of the drum. This contact creates friction, which results in the slowing down or stopping of the vehicle.
The rear brake drum is designed with cooling fins that help dissipate the heat generated during braking. These fins increase the surface area of the drum, allowing for better heat dispersion. This is crucial because excessive heat can cause the brake shoes to fade, reducing their effectiveness and potentially compromising the vehicle’s stopping power.
It is important to regularly inspect and maintain the rear brake drum to ensure optimal braking performance. Over time, the brake drum may become worn or develop grooves on its surface. This can negatively impact braking performance and require the drum to be resurfaced or replaced. Additionally, the brake shoes should be inspected and replaced if necessary to maintain proper contact and friction with the drum.
In summary, the rear brake drum is an essential component in vehicles with drum brakes. Its function is to create friction with the brake shoes when the brakes are applied, allowing for the vehicle to slow down or stop. Regular inspection and maintenance of the drum and brake shoes are necessary to ensure optimal braking performance and safety on the road.
Essential Maintenance Tips for Ensuring the Optimal Performance of the Rear Brake System
Regular maintenance of your vehicle’s rear brake system is crucial for ensuring optimal performance and safety on the road. By following these essential maintenance tips, you can extend the lifespan of your brakes and prevent costly repairs.
1. Check brake fluid regularly
Brake fluid plays a vital role in the proper functioning of the rear brake system. It transfers the force from the brake pedal to the brake pads, allowing your vehicle to come to a stop. Regularly check the brake fluid level and ensure it is at the recommended level. If the fluid is low or discolored, it may be necessary to flush and replace the fluid.
2. Inspect brake pads and rotors
Check the condition of your brake pads and rotors regularly, as they are essential components of the rear brake system. Look for any signs of wear, such as thinning brake pads or grooved rotors. If the brake pads are worn out or the rotors are damaged, it is necessary to replace them to maintain optimal braking performance.
3. Clean and lubricate slide pins
The slide pins are responsible for the smooth movement of the brake caliper, which ensures even brake pad wear and proper braking. Regularly clean and lubricate the slide pins to prevent rust and corrosion, allowing them to move freely.
4. Check brake lines for leaks
Inspect the brake lines for any signs of leakage, such as wet spots or fluid dripping. Leaking brake lines can lead to a loss of braking power and should be repaired immediately to avoid accidents.
5. Perform regular brake system flush
Brake system flush removes old, contaminated brake fluid and replaces it with fresh fluid. This helps maintain the integrity of the brake system and prevents brake fade. It is recommended to perform a brake system flush every 2-3 years or as recommended by the vehicle manufacturer.
Conclusion
Maintaining the rear brake system of your vehicle is essential for ensuring optimal performance and safety on the road. Regularly checking brake fluid, inspecting brake pads and rotors, cleaning slide pins, checking for brake line leaks, and performing a brake system flush are all crucial maintenance tasks. By following these maintenance tips, you can prolong the lifespan of your rear brakes and enjoy worry-free driving.
Q&A:
What is the rear brake system?
The rear brake system is a component of the braking system in a vehicle that controls and slows down the rotation of the rear wheels.
Why is the maintenance of the rear brake system important?
The maintenance of the rear brake system is important to ensure the optimal performance and safety of the vehicle. Neglecting maintenance can lead to brake failure and accidents.
What are some essential maintenance tips for the rear brake system?
Some essential maintenance tips for the rear brake system include regular inspection of brake pads and shoes, checking brake fluid levels, cleaning and lubricating brake components, and replacing worn-out parts.
How often should the rear brake system be inspected?
The rear brake system should be inspected at regular intervals, ideally every 6 months or 10,000 kilometers, to identify any potential issues and ensure optimal performance.
What are signs of a rear brake system problem?
Signs of a rear brake system problem include squealing or grinding noises, vibrations or pulsations when applying brakes, reduced braking power, and a soft or spongy brake pedal.
How often should rear brake system maintenance be performed?
Rear brake system maintenance should be performed every 12,000 to 15,000 miles or as recommended by the vehicle manufacturer.
What are some signs that indicate the rear brake system needs maintenance?
Some signs that indicate the rear brake system needs maintenance include squealing or grinding noises when braking, a soft or spongy brake pedal, vibrations or pulsations while braking, and the vehicle pulling to one side when braking.