
When it comes to troubleshooting electrical issues in your 2007 Impala, having a clear understanding of the fuse diagram is essential. The fuse diagram provides a visual representation of the various circuits and fuses in your vehicle, making it easier to pinpoint the source of any electrical problems. Whether you’re dealing with a malfunctioning radio, a blown fuse, or a faulty power window, the fuse diagram can help you quickly identify the culprit.
The electrical system in your Impala is composed of various components that require proper functioning fuses to operate. These fuses act as protective devices, preventing excessive current from flowing through the circuit and causing damage. Understanding the function and location of each fuse is crucial for maintaining the electrical integrity of your vehicle. Without a clear understanding of the fuse diagram, troubleshooting electrical problems can become a time-consuming and frustrating task.
Fortunately, the 2007 Impala comes with a comprehensive fuse diagram, which can be found in the owner’s manual or on the fuse box cover. The diagram clearly labels each fuse and its corresponding circuit, allowing you to quickly locate the fuse you need to inspect or replace. Additionally, the fuse diagram provides information on the amperage rating of each fuse, ensuring that you select the correct replacement fuse for your specific electrical issue.
Whether you’re a seasoned mechanic or a novice DIY enthusiast, understanding the 2007 Impala fuse diagram is essential for troubleshooting electrical problems. By familiarizing yourself with the layout and function of the fuses in your vehicle, you’ll be well-equipped to tackle any electrical issue that may arise. So, before you start pulling fuses and checking connections, take the time to study the fuse diagram for your 2007 Impala and gain a clear understanding of your vehicle’s electrical system.
What Is a Fuse Diagram?
A fuse diagram is a visual representation of the fuses and their corresponding circuits in a vehicle’s electrical system. It provides a clear overview of the location and function of each fuse, making it easier to troubleshoot and replace fuses when necessary.
Typically, fuse diagrams are found in the owner’s manual or on the fuse box cover. They are usually organized in a table format, displaying the fuse number, amp rating, and the circuit it protects. Some fuse diagrams may also include additional information such as fuse usage, color-coding, and related relays.
Understanding a fuse diagram is important for several reasons:
- Identifying faulty fuses: By referring to the fuse diagram, you can quickly identify which fuse is responsible for a particular electrical problem. This helps in preventing unnecessary troubleshooting and saves time.
- Replacing blown fuses: When a fuse blows, it disrupts the circuit and cuts off power to certain components. Using the fuse diagram, you can locate the specific fuse and replace it with the correct amp rating. This ensures proper protection of the electrical system and prevents potential damage.
- Modifying electrical circuits: If you plan to add aftermarket accessories or make modifications to the electrical system, a fuse diagram can help you identify an appropriate circuit to tap into. It ensures that you do not overload existing circuits and maintain the integrity of the vehicle’s electrical system.
In summary, a fuse diagram is a valuable tool for understanding and maintaining a vehicle’s electrical system. It provides crucial information about fuses, circuits, and their respective functions, allowing for efficient troubleshooting and maintenance.
Understanding the Basics of a Fuse Diagram
What is a Fuse Diagram?
A fuse diagram, also known as a fuse box diagram or a fuse panel diagram, is a visual representation of the electrical system in a vehicle that shows the location and function of each fuse. It provides a comprehensive overview of the fuses and circuits that protect various electrical components in the vehicle.
A fuse diagram is an essential tool for troubleshooting and maintaining a vehicle’s electrical system. It helps identify the specific fuse that is responsible for controlling a particular electrical component, such as the headlights, radio, or power windows. By referring to the fuse diagram, drivers and mechanics can quickly locate the faulty fuse and replace it to restore function to the affected component.
Understanding the Components of a Fuse Diagram
A typical fuse diagram consists of several key components:
- Fuse Box: The fuse box houses the fuses and relays that control the various electrical systems in the vehicle.
- Fuse Types: Different types of fuses are used to protect different electrical components. Common fuse types include blade fuses, cartridge fuses, and mini fuses.
- Fuse Numbers: Each fuse is assigned a specific number for easy identification. The fuse diagram provides a list of all the fuse numbers and their corresponding functions.
- Fuse Ratings: The fuse rating indicates the amount of current the fuse can handle before it blows. It is essential to use the correct fuse rating to prevent electrical damage or fire hazards.
- Circuit Descriptions: The fuse diagram includes descriptions of the electrical circuits that are protected by each fuse. This information helps identify the circuit associated with a particular fuse.
Using a Fuse Diagram
When faced with an electrical issue, such as a malfunctioning component or a blown fuse, it is crucial to consult the fuse diagram to locate the appropriate fuse. Here are the steps to follow:
- Refer to the Fuse Diagram: Locate the fuse diagram in the vehicle’s owner’s manual or on a fuse box cover. Study the diagram to understand the fuse layout and the corresponding functions.
- Identify the Faulty Component: Determine which electrical component is not working correctly and find its corresponding fuse in the diagram.
- Locate the Fuse: Use the fuse diagram to find the fuse box location and identify the exact position of the fuse associated with the faulty component.
- Inspect the Fuse: Carefully remove the fuse and check if it is blown. A blown fuse will have a broken wire or a burnt appearance.
- Replace the Fuse: If the fuse is blown, replace it with a new fuse of the same rating. Make sure to turn off the corresponding electrical system before replacing the fuse.
By understanding the basics of a fuse diagram and its components, vehicle owners and mechanics can effectively troubleshoot and address electrical problems in their vehicles. Regularly referencing the fuse diagram is an essential step in maintaining a properly functioning electrical system.
Why You Need a Fuse Diagram for Your 2007 Impala
If you own a 2007 Impala, having a fuse diagram is essential for troubleshooting electrical issues and making repairs. The fuse diagram provides a visual representation of the fuse box and the fuses within it, allowing you to easily identify and replace any blown fuses.
One of the primary reasons why you need a fuse diagram is to locate and replace a blown fuse. Electrical issues can arise in your Impala, such as a malfunctioning power window or a non-functional radio, and a blown fuse is often the culprit. With a fuse diagram, you can quickly find the fuse corresponding to the specific component and replace it with a new one.
A fuse diagram also helps in understanding the electrical system of your 2007 Impala. It provides information about which fuse controls which circuit, allowing you to have a better understanding of how the electrical components in your vehicle are connected. This knowledge can be helpful when troubleshooting more complex electrical problems or when attempting to install aftermarket accessories.
Additionally, having a fuse diagram can save you time and money when dealing with electrical issues. Instead of randomly checking each fuse to find a blown one, you can refer to the diagram to pinpoint the likely problem area. This eliminates the need for unnecessary guesswork and helps you quickly identify the issue and fix it efficiently.
In conclusion, having a fuse diagram for your 2007 Impala is crucial for troubleshooting electrical problems, understanding the electrical system, and saving time and money on repairs. It allows you to easily locate and replace blown fuses, as well as provides a visual guide to the electrical connections in your vehicle. Make sure to keep a fuse diagram handy to ensure smooth and efficient electrical maintenance for your Impala.
Locating the Fuse Box
When it comes to troubleshooting electrical issues in your 2007 Impala, one of the first places you should check is the fuse box. The fuse box contains fuses that protect different electrical components in your vehicle, such as the radio, headlights, and power windows. If any of these components are not working properly, it may be due to a blown fuse.
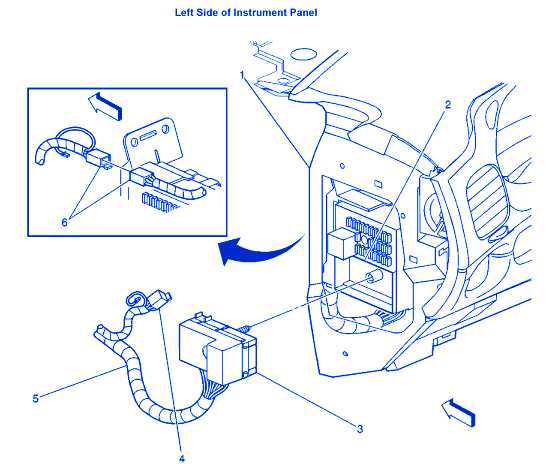
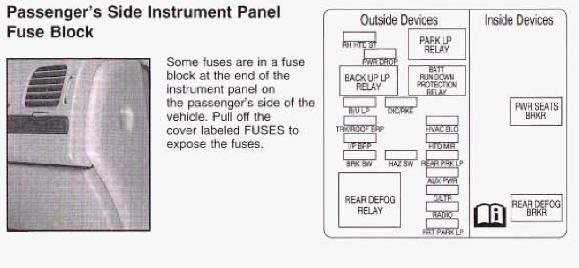
To locate the fuse box in your 2007 Impala, you will need to first open the driver’s side door and look for a small panel on the side of the dashboard. This panel is called the instrument panel fuse block and contains the fuses for most of the interior electrical components. It is important to note that there may be additional fuse boxes located in other parts of the vehicle, such as the engine compartment or trunk.
Once you have located the instrument panel fuse block, you can open it by pulling on the cover. Inside, you will see a diagram that indicates the location and function of each fuse. The diagram will typically list the fuse number, the amp rating, and the electrical component it protects. Refer to this diagram to determine which fuse may be causing the issue you are experiencing.
If you find that a fuse is blown, you can replace it with a new fuse of the same amp rating. It is important to use the correct amp rating to avoid damaging the electrical component or causing further issues. If you are unsure of which fuse to replace or how to replace it, it is recommended to consult the vehicle’s owner’s manual or seek assistance from a professional mechanic.
A Step-by-Step Guide to Finding the Fuse Box in Your 2007 Impala
If you’re experiencing electrical issues or need to replace a blown fuse in your 2007 Impala, it’s essential to know the location of the fuse box. The fuse box contains various fuses that control different electrical components in your vehicle. Here is a step-by-step guide to help you find the fuse box in your 2007 Impala.
Step 1: Locate the Fuse Box

The fuse box in a 2007 Impala is usually located on the driver’s side of the dashboard, near the driver’s door. It is concealed behind a trim panel that can be easily removed with the help of a flat-head screwdriver or a trim panel removal tool.
Step 2: Remove the Trim Panel
To access the fuse box, gently pry off the trim panel using the flat-head screwdriver or trim panel removal tool. Start at one corner and carefully work your way around the panel, releasing the clips that hold it in place. Be cautious not to apply too much force to avoid damaging the trim panel or the clips.
Step 3: Identify the Fuse Box Cover
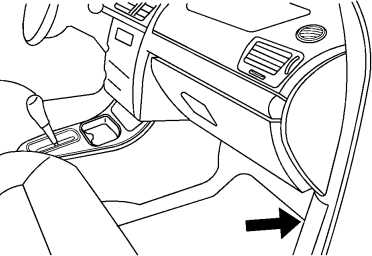
Once the trim panel is removed, you will see a black plastic cover. This cover protects the fuses and relays inside the fuse box. It is labeled with fuse symbols and their respective amperage ratings.
Step 4: Remove the Fuse Box Cover
Using your fingers or a small flat-head screwdriver, carefully lift the tabs or clips securing the fuse box cover. Gently pull the cover towards you to remove it and expose the fuses and relays.
Step 5: Locate the Blown Fuse
Inspect the fuses to find the one that is blown. The blown fuse will have a broken wire inside. If you’re unsure which fuse is blown, consult the diagram on the back of the fuse box cover or refer to your vehicle’s owner’s manual for guidance.
Step 6: Replace the Blown Fuse
Using a fuse puller tool or a pair of needle-nose pliers, carefully remove the blown fuse from its slot. Replace it with a new fuse of the same amperage rating. Ensure that the new fuse is fully seated in the slot and secure.
By following these steps, you should be able to locate the fuse box in your 2007 Impala and replace any blown fuses. If you’re unsure or uncomfortable working with electrical components, it’s always best to consult a professional mechanic or refer to your vehicle’s service manual for further assistance.
Decoding the Fuse Diagram
When it comes to troubleshooting electrical issues in your 2007 Impala, having a fuse diagram can be invaluable. The fuse diagram is a visual representation of the electrical circuits and components that are protected by fuses. By decoding the fuse diagram, you can quickly identify which fuse corresponds to a specific electrical system or component.
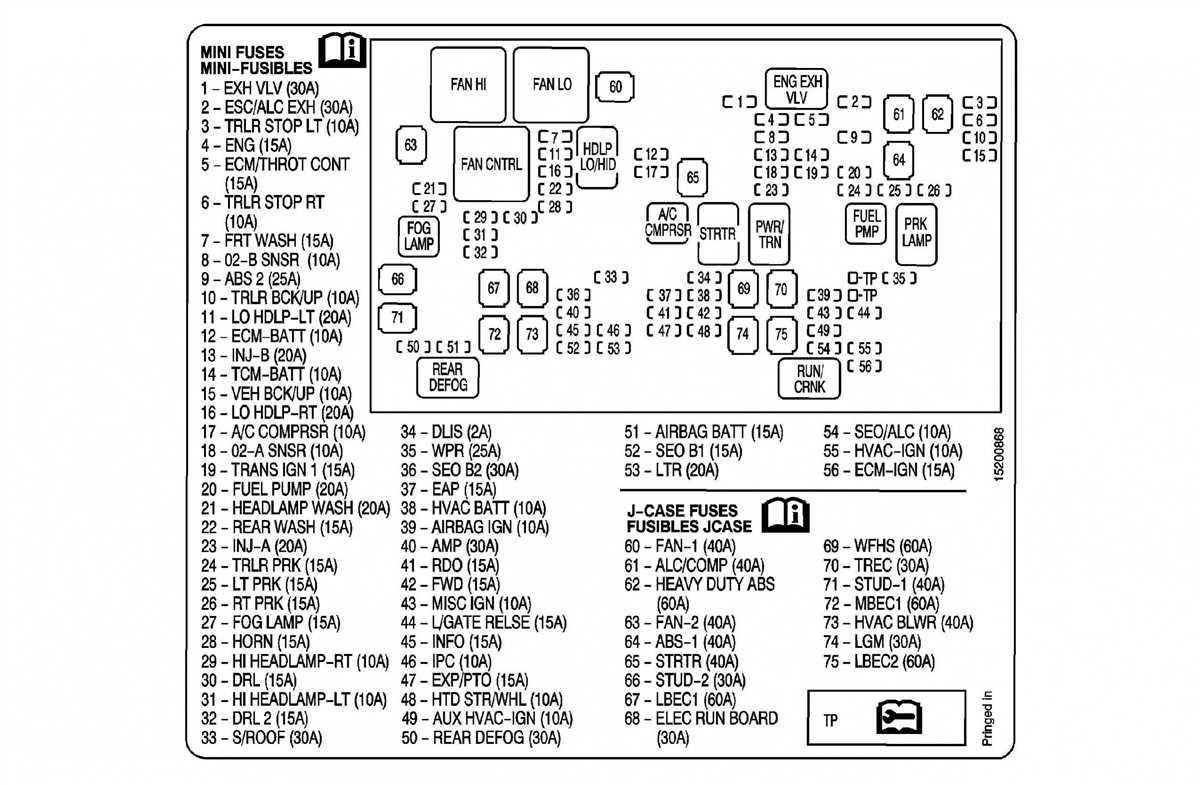
The fuse diagram for the 2007 Impala is typically located on the inside of the fuse box cover. It provides a detailed layout of the fuse box, including the fuse number and its corresponding color-coded rating. The fuse diagram also indicates which electrical systems or components are protected by each fuse, making it easier to identify and check the correct fuse.
Each fuse has a specific rating, which represents the maximum amount of amperage that the fuse can handle before it blows. Blown fuses often lead to electrical issues, such as malfunctioning headlights, power windows, or audio systems. By referencing the fuse diagram, you can quickly locate and replace the blown fuse, restoring power to the affected electrical system.
The fuse diagram may also include additional information, such as the location of relays or circuit breakers that are associated with specific electrical systems. This can be useful when troubleshooting more complex electrical problems or issues that are not easily resolved by replacing a fuse.
Overall, the fuse diagram is an essential tool for any owner of a 2007 Impala. It provides a clear and organized representation of the electrical circuits and components, making it easier to identify and resolve electrical issues. So, if you’re experiencing any electrical problems in your Impala, don’t forget to consult the fuse diagram to help guide you in the right direction.
Exploring the Symbols and Codes on the 2007 Impala Fuse Diagram
When it comes to troubleshooting electrical issues in your 2007 Impala, understanding the symbols and codes on the fuse diagram is crucial. This diagram provides a visual representation of the fuse box and indicates which fuses are responsible for powering specific electrical components in your vehicle. By familiarizing yourself with these symbols and codes, you can quickly identify and replace a blown fuse, helping to restore functionality to the affected system.
One common symbol you may encounter on the 2007 Impala fuse diagram is a solid square box. This symbol represents a fuse being used to protect an electrical circuit. A number within the box indicates the amp rating of the fuse. For example, a fuse labeled “20” means it has a 20-amp rating.
Another symbol you may come across is a solid square box with a diagonal line crossing it. This symbol represents a fuse that has blown and needs to be replaced. When you locate a blown fuse on the diagram, refer to the amp rating indicated next to the symbol to ensure you replace it with the correct fuse.
Additionally, the 2007 Impala fuse diagram may include codes or abbreviations to identify specific electrical systems or components. For example, “RADIO” may be used to represent the fuse responsible for the radio system, while “H/L HI” could indicate the fuse for the high beam headlights. Refer to the vehicle’s owner’s manual or a service manual for a comprehensive list of these codes and their corresponding electrical systems.
By deciphering the symbols and codes on the 2007 Impala fuse diagram, you can effectively troubleshoot and resolve electrical issues in your vehicle. Remember to always use the appropriate amp-rated fuse when replacing a blown fuse, and consult the vehicle’s manual for further guidance if needed. Properly maintaining the electrical system of your 2007 Impala will help ensure a safe and reliable driving experience.
Troubleshooting Common Fuse Issues
Dealing with fuse issues in your 2007 Impala can be frustrating, but with a little troubleshooting, you can often pinpoint the problem and get it fixed. Here are some common fuse issues and steps you can take to troubleshoot them:
Fuse Blown
If a fuse is blown, it will need to be replaced. Start by locating the fuse panel, which is usually located under the dashboard on the driver’s side. Consult the fuse diagram to identify the specific fuse that needs to be replaced. Use a fuse puller or a pair of needle-nose pliers to remove the blown fuse and replace it with a new one of the same amperage rating. If the new fuse continues to blow, there may be an underlying electrical issue that needs to be addressed.
Frequent Fuse Replacement
If you find yourself frequently replacing fuses in your 2007 Impala, it could be a sign of a larger electrical problem. In this case, it is recommended to consult a professional mechanic or electrician to diagnose and repair the issue. They will have the necessary tools and expertise to identify any underlying faults in the electrical system and make the necessary repairs.
Inoperative Electrical Component
If a specific electrical component in your Impala is not working, it could be due to a blown fuse. Refer to the fuse diagram to locate the fuse associated with the affected component. Remove the fuse and inspect it to see if it is blown. If the fuse is intact, the problem may lie elsewhere, such as a faulty switch or wiring issue. In this case, it is best to consult a professional for further troubleshooting and repair.
Summary
Troubleshooting fuse issues in your 2007 Impala can be done by following a few simple steps. Start by identifying the specific fuse that needs to be replaced and ensure that it is the correct amperage rating. If you find yourself frequently replacing fuses, it may indicate a larger electrical problem that requires professional assistance. If a specific electrical component is not working, check the associated fuse first before exploring other potential causes. Remember to always exercise caution when working with the electrical system of your vehicle and consult a professional if needed.