
If you own a 2007 Yamaha YFZ 450 ATV, you know how important it is to have a reliable and accurate wiring diagram. The wiring diagram is a visual representation of the electrical system in your ATV, showing the various wires, connections, and components. It can be used to troubleshoot electrical issues, install aftermarket accessories, or simply gain a better understanding of how the electrical system works.
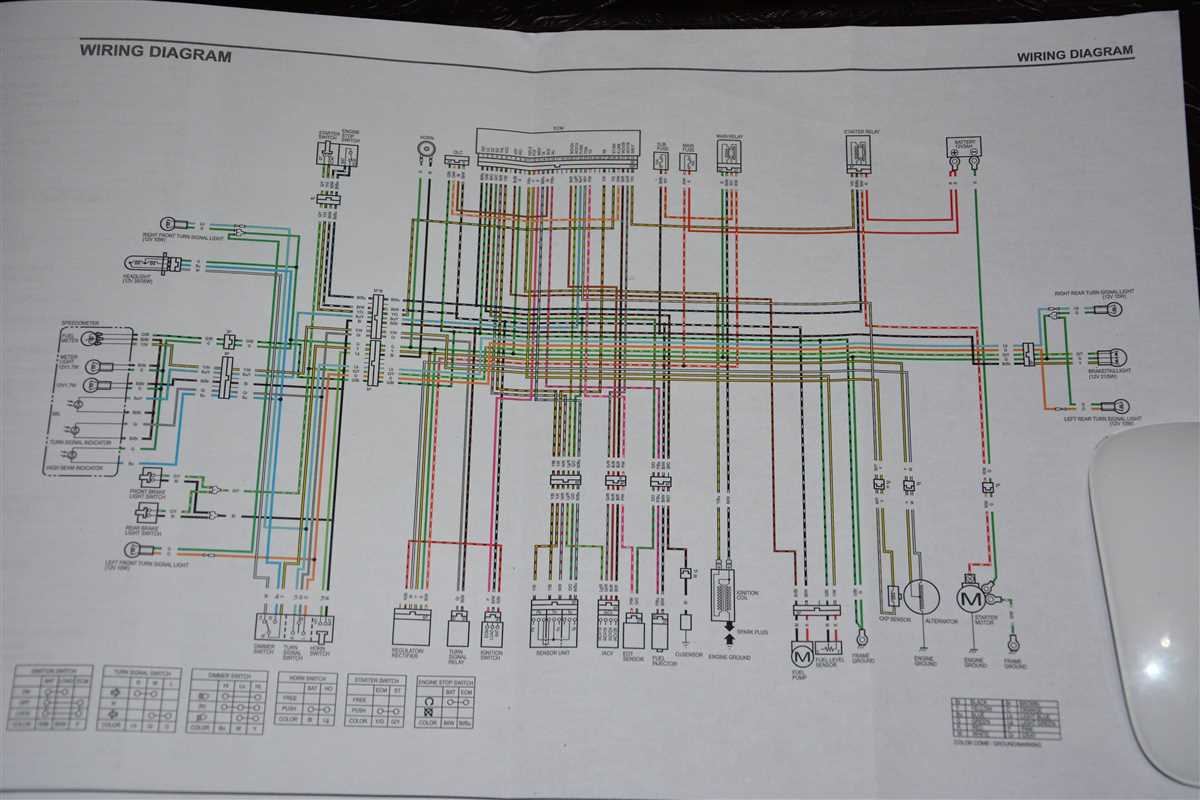
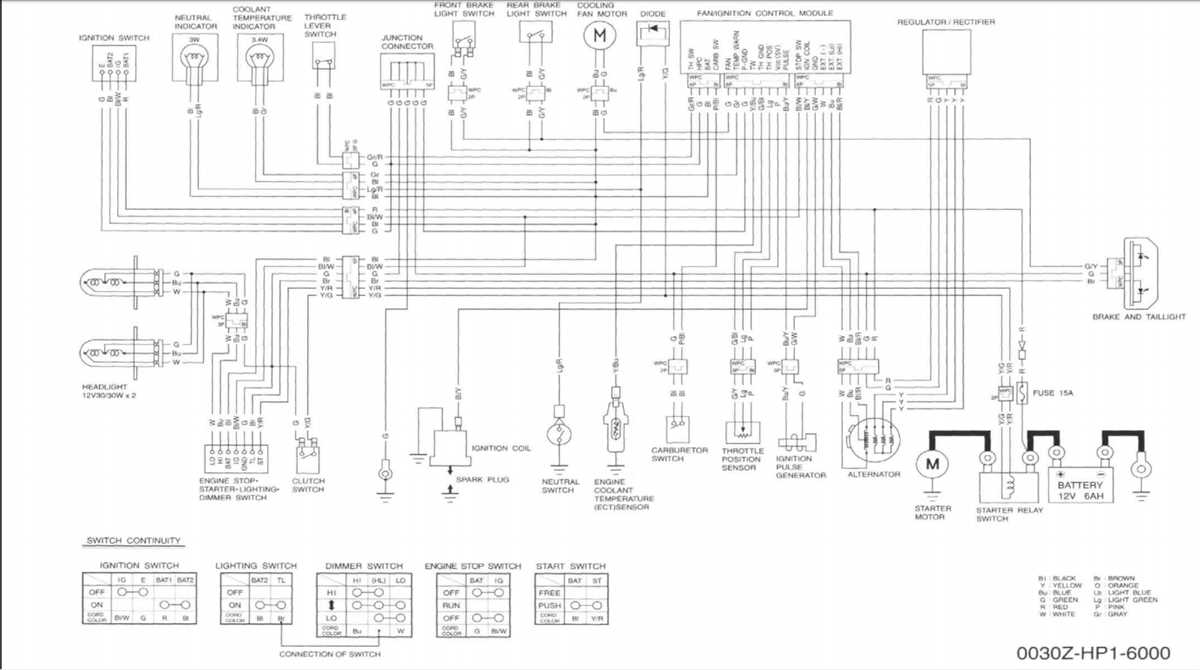
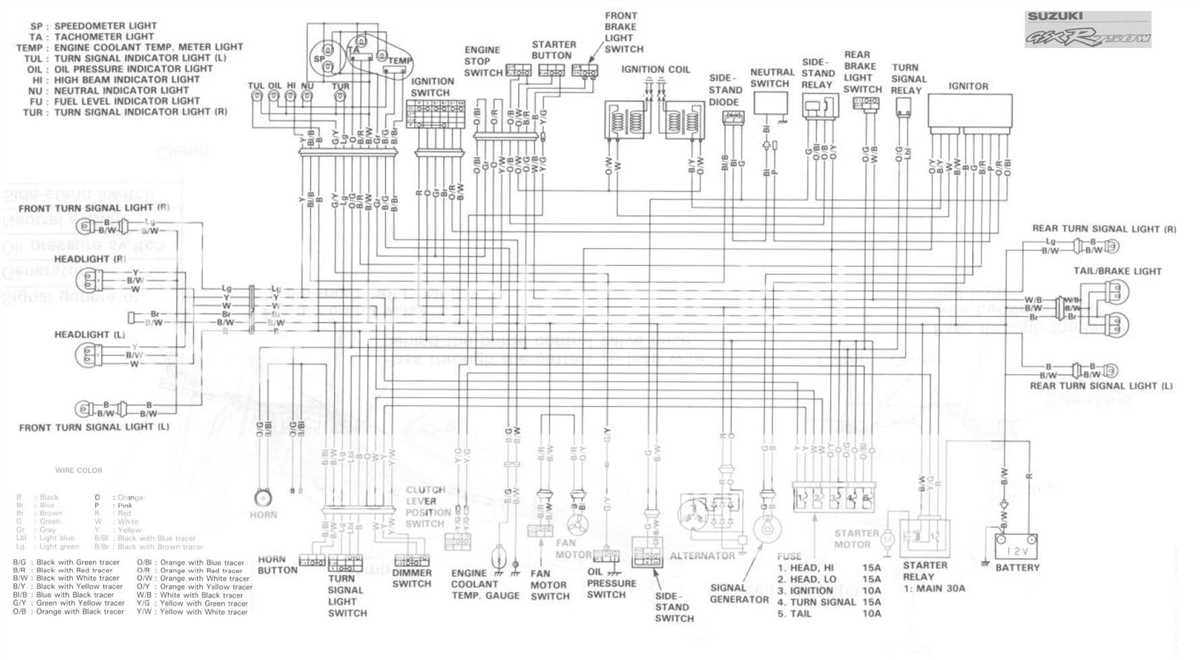
The 2007 YFZ 450 wiring diagram is a valuable resource for ATV enthusiasts and mechanics alike. It provides a detailed overview of the electrical system, including the battery, ignition switch, lights, engine control module, and more. With this diagram, you can easily identify and locate specific wires, connectors, and components within the system.
Whether you’re a professional mechanic or a DIY enthusiast, having a reliable wiring diagram is essential for any electrical work on your ATV. It ensures that you make the correct connections and avoid damaging any components. Additionally, it can help you diagnose and troubleshoot electrical issues, saving you time and money on repairs.
Your Ultimate Guide to the 2007 YFZ 450 Wiring Diagram
The 2007 YFZ 450 is a popular off-road sport ATV manufactured by Yamaha. One important aspect of maintaining and repairing this vehicle is having a comprehensive understanding of its wiring diagram. The wiring diagram provides a visual representation of the electrical system of the ATV, showing how various components are connected and how the electrical current flows through the system.
The 2007 YFZ 450 wiring diagram is an essential tool for diagnosing and fixing electrical issues on the ATV. It can help identify faulty wiring, damaged connectors, or malfunctioning electrical components. With this diagram, ATV owners and mechanics can trace the path of the electrical current, check for continuity, and pinpoint the exact location of any problems.
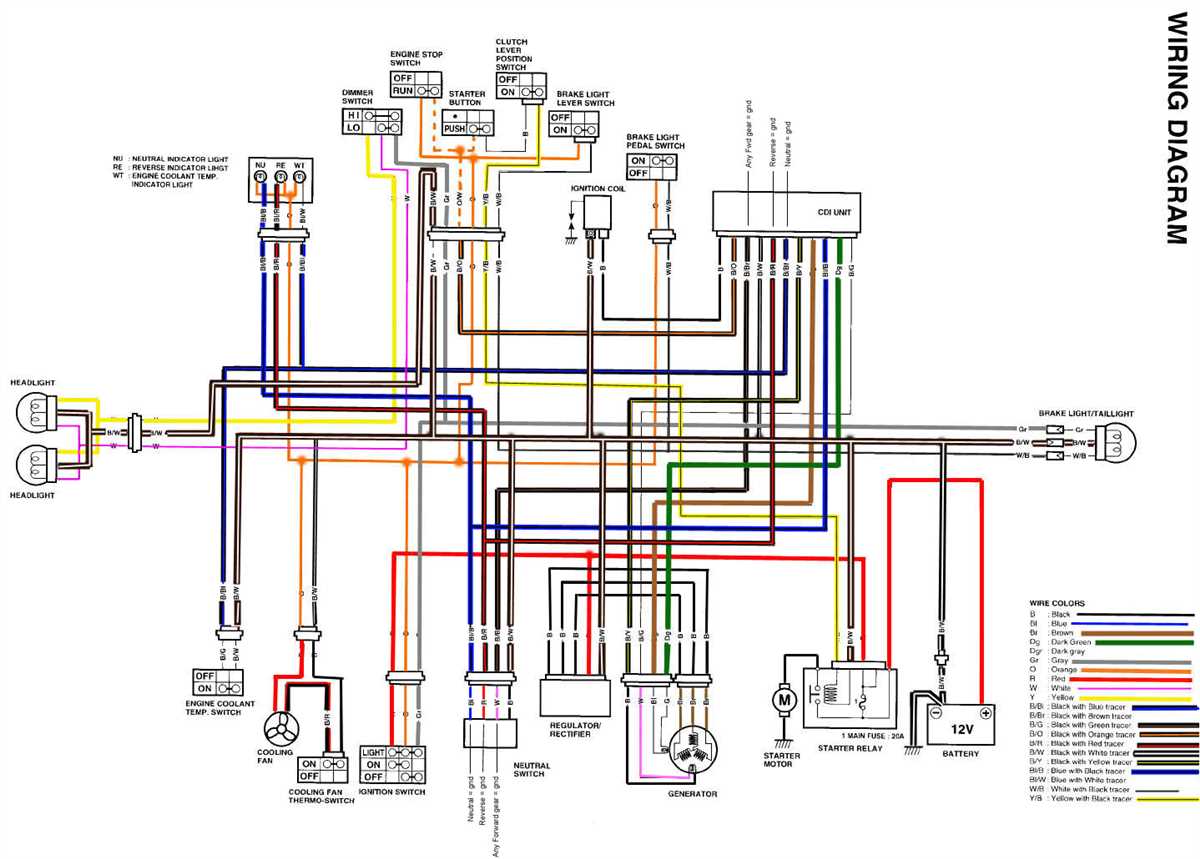
The wiring diagram includes detailed information about the various electrical components on the 2007 YFZ 450, such as the ignition switch, starter motor, battery, lights, and sensors. It also illustrates the different wire colors and their corresponding functions, making it easier to identify and troubleshoot any issues.
When using the 2007 YFZ 450 wiring diagram, it is important to follow the proper safety precautions and disconnect the battery before working on any electrical components. It is also advisable to consult the ATV’s specific service manual for additional information and instructions.
In conclusion, the 2007 YFZ 450 wiring diagram is an invaluable resource for ATV owners and mechanics. By understanding the electrical system and using the diagram to diagnose and fix issues, they can ensure the proper functioning of their vehicle and enjoy a safe and reliable off-road experience.
Understanding the Basics of the 2007 YFZ 450 Wiring System
When it comes to maintaining or troubleshooting a 2007 YFZ 450, it’s essential to have a good understanding of its wiring system. The wiring system is responsible for providing power to various components and ensuring they function correctly. By familiarizing yourself with the basics of the wiring system, you can easily diagnose and fix any electrical issues that may arise.
Key Components:
- Ignition switch: This switch controls the flow of power to the electrical system.
- Battery: The battery is responsible for storing electrical energy and providing it to the system when needed.
- Stator: The stator generates electrical power through the rotation of the engine.
- CDI unit: The CDI (Capacitor Discharge Ignition) unit regulates the timing of the ignition system.
- Rectifier/regulator: The rectifier/regulator converts AC power from the stator to DC power and regulates the voltage to prevent overcharging of the battery.
- Fuses: Fuses are used to protect the wiring system from electrical faults and prevent damage to the components.
Wiring Diagram:
Having a wiring diagram specific to the 2007 YFZ 450 will greatly assist in understanding how the wires are connected and the overall electrical system layout. The diagram will show the color codes of the wires, their connections, and the various components they are connected to. The wiring diagram will also indicate the size of the wires, helping to determine the appropriate gauge to use when making repairs or modifications.
Inspection and Troubleshooting:
Regular inspection of the wiring system is crucial to identify any loose connections, damaged wires, or faulty components. It’s essential to check for any signs of wear, such as frayed wires or burned connectors. If any issues are identified, it’s important to address them promptly to prevent further damage or potential safety hazards.
When troubleshooting electrical problems, it’s important to have a multimeter, which can measure voltage, resistance, and continuity. This tool will help determine if power is reaching a certain component and if there are any open circuits or high resistance areas. By systematically checking each connection and component, you can identify the root cause of the issue and make the necessary repairs.
In conclusion, understanding the basics of the 2007 YFZ 450 wiring system is essential for maintaining and troubleshooting electrical issues. By familiarizing yourself with the key components, referring to a wiring diagram, and conducting regular inspections, you can ensure the electrical system is functioning properly and address any problems promptly.
Identifying and Interpreting the Color-coded Wires in the Diagram
When examining the 2007 YFZ 450 wiring diagram, it is crucial to understand the significance of the color-coded wires. These wires play a vital role in the electrical system of the vehicle, as each color represents a specific function or connection. By decoding the colors, one can easily pinpoint the purpose of each wire and ensure the proper functioning of the ATV.
Black wires: In the wiring diagram, black wires typically indicate ground connections. These wires create a pathway for the electrical current to flow back into the main electrical system and prevent any potential damage caused by excess charges.
Note: Make sure all black wires are securely connected to the appropriate grounding points and check for any signs of corrosion or damage.
Red wires: Red wires are often associated with power supply and can be found in various sections of the diagram. These wires carry electrical current from the battery to different components of the vehicle, such as ignition switches, lights, and other power-consuming parts.
Note: Check for any loose or damaged red wires, as they can disrupt the flow of power and lead to malfunctioning electrical components.
Blue wires: Blue wires are commonly used for connecting lights and other accessories. These wires carry low voltage current and are often present in the lighting circuits, allowing the user to safely navigate in low-light conditions.
Yellow wires: Yellow wires are frequently associated with the charging system and are responsible for transferring electricity from the stator to the battery. They play a crucial role in keeping the battery charged during operation.
Green wires: Green wires are commonly found in diagrams for connecting and controlling various sensors and switches. These wires enable the vehicle’s computer system to receive information from different sensors and regulate engine performance accordingly.
White wires: White wires are often used for connecting audio systems and speakers. They carry the audio signal, allowing riders to enjoy their favorite music while on the go.
- Make sure all connections involving color-coded wires are secure.
- Refer to the wiring diagram for accurate identification of different wire colors.
- Double-check each wire’s purpose before making any modifications or repairs.
- When in doubt, consult a professional or refer to the vehicle’s manual to ensure proper wire identification and interpretation.
Exploring the Functions and Connections of Major Components
In order to understand the wiring diagram of a 2007 Yamaha YFZ 450, it is important to explore the functions and connections of its major components. This will give us a better understanding of how the different parts of the ATV work together to provide a smooth and efficient performance.
1. Battery:
The battery is a vital component of the ATV as it provides the initial power to start the engine. It also stores electrical energy to power the lights, ignition system, and other electrical components. The battery is connected to the starter solenoid, which is responsible for engaging the starter motor to start the engine.
2. Ignition system:
The ignition system is responsible for generating a high-voltage electrical spark at the spark plug, which ignites the air-fuel mixture in the engine cylinder. It consists of various components such as the ignition coil, spark plug wire, spark plug, CDI unit (Capacitor Discharge Ignition), and kill switch. These components work together to ensure a reliable spark and efficient combustion process.
3. Starter system:
The starter system is responsible for starting the engine when the ignition key is turned. It consists of the starter motor, starter solenoid, and starter relay. When the ignition key is turned, the solenoid engages the starter motor, which spins the engine crankshaft to start the engine. The starter relay acts as a switch to control the flow of electrical current to the starter motor.
4. Lights and electrical components:
The wiring diagram also shows the connections for the lights and other electrical components of the ATV. This includes the headlights, taillights, brake lights, turn signals, horn, and various switches and controls. These components are connected to the battery and controlled by the respective switches or relays.
5. Sensors and switches:
The wiring diagram includes various sensors and switches that monitor and control the different functions of the ATV. This includes the throttle position sensor, temperature sensor, neutral switch, reverse switch, and others. These sensors and switches provide vital information to the ECU (Engine Control Unit) for proper operation and performance.
6. Fuse box and wiring harness:
The wiring diagram also shows the location of the fuse box and the wiring harness. The fuse box contains fuses that protect the electrical system from overloads or short circuits. The wiring harness is a bundle of wires that connects all the electrical components of the ATV and ensures proper communication and power distribution.
By understanding the functions and connections of the major components in the wiring diagram of a 2007 Yamaha YFZ 450, we can troubleshoot any electrical issues and make necessary repairs or modifications. It also helps us appreciate the intricate engineering and design that goes into creating a reliable and efficient ATV.
Troubleshooting Common Electrical Issues in the 2007 YFZ 450
Electrical issues are a common problem in the 2007 YFZ 450, but with some troubleshooting, they can be easily resolved. Whether it’s a faulty connection, a blown fuse, or a malfunctioning component, it’s important to diagnose the issue accurately in order to make the necessary repairs.
1. Checking the Battery: One of the first things to do when encountering electrical issues is to check the battery. Make sure it is fully charged and that the terminals are clean and tight. A weak or dead battery can cause various electrical problems, so it’s important to ensure it is in good condition.
2. Testing the Fuses: Another common culprit for electrical issues in the 2007 YFZ 450 is blown fuses. Check all the fuses in the fuse box to see if any have blown. If you find a blown fuse, replace it with a new one of the same amperage rating. Keep in mind that a blown fuse is often a sign of an underlying problem, so if the new fuse blows again, further investigation may be needed.
3. Inspecting the Wiring: Faulty wiring can also cause electrical problems in the YFZ 450. Inspect the wiring harness for any signs of damage such as frayed wires or loose connections. Pay special attention to areas where the wiring is exposed to heat, vibration, or moisture. If you find any damaged wiring, repair or replace it as necessary.
4. Testing the Components: If the battery, fuses, and wiring all appear to be in good condition, the next step is to test the various components. This can include the ignition switch, starter solenoid, CDI box, and other electrical components. Using a multimeter or a specific testing device, check for proper voltage, continuity, and resistance according to the manufacturer’s specifications.
5. Seeking Professional Help: If troubleshooting the electrical issues in the 2007 YFZ 450 becomes too complex or time-consuming, it may be best to seek the assistance of a professional. An experienced mechanic or an authorized Yamaha dealer will have the expertise and specialized equipment to identify and resolve the problem efficiently.
By following these troubleshooting steps, it is possible to fix common electrical issues in the 2007 YFZ 450 and ensure its optimal performance on the track or trail.
Upgrading and Modifying the Wiring System for Enhanced Performance
The wiring system in a 2007 Yamaha YFZ 450 plays a crucial role in the overall performance of the ATV. Upgrading and modifying the wiring system can greatly enhance the ATV’s performance, improving its power output, reliability, and functionality. Whether you are looking to increase the power, optimize the ignition system, or add aftermarket accessories, upgrading the wiring system can provide the necessary foundation for these modifications.
One of the key areas to focus on when upgrading the wiring system is the ignition system. By installing a high-performance ignition coil and upgrading the spark plug wires, you can improve the ATV’s spark intensity and overall ignition efficiency. This can result in improved engine performance, better throttle response, and increased power output. Additionally, upgrading the wiring for the ignition system can help prevent misfires and improve overall engine reliability.
Another area to consider when upgrading the wiring system is the power distribution. Adding a higher capacity battery and upgrading the wiring for the charging system can provide a more stable power supply to the ATV’s electrical components. This can be especially beneficial when adding aftermarket accessories such as lights, winches, or audio systems. Upgrading the power distribution system can prevent voltage drops and ensure that all electrical components receive the necessary power for optimal performance.
In addition to upgrading the ignition system and power distribution, modifying the wiring system can also involve adding new features and functionalities to the ATV. For example, you can install a toggle switch panel to easily control various accessories, or add a USB charging port for charging electronic devices on the go. These additions can enhance the ATV’s functionality and make it more versatile for different riding conditions.
In conclusion, upgrading and modifying the wiring system of a 2007 Yamaha YFZ 450 can greatly enhance the ATV’s performance, reliability, and functionality. By focusing on areas such as the ignition system, power distribution, and adding new features, you can optimize the ATV for increased power output and improved overall performance. Whether you are a recreational rider or a serious racer, upgrading the wiring system can unlock the full potential of the ATV and provide a more enjoyable riding experience.
Tips for Proper Maintenance and Care of the 2007 YFZ 450 Wiring
The 2007 YFZ 450 is a high-performance quad bike that requires regular maintenance and care to ensure its optimal functioning. The wiring system plays a crucial role in the overall performance of the vehicle, and it is essential to take necessary precautions to maintain it properly.
Here are some tips for proper maintenance and care of the 2007 YFZ 450 wiring:
- Inspect the wiring regularly: Regularly inspect the wiring system for any signs of wear, fraying, or damage. Look for loose connections, corroded terminals, or any other issues that may affect the performance of the quad bike.
- Keep the wiring clean: Ensure that the wiring is free from dirt, dust, and debris. Clean the wiring system with a soft cloth or brush, and avoid using water or harsh chemicals that may damage the insulation or connectors.
- Avoid overloading the electrical system: Avoid overloading the electrical system by connecting additional accessories or modifications that may exceed the capacity of the wiring. This can lead to overheating, short circuits, and other electrical issues.
- Secure the wiring properly: Make sure that the wiring is secured properly and does not come into contact with sharp edges, moving parts, or hot surfaces. Use cable ties, clamps, or protective sleeves to secure the wiring and prevent any damage or accidents.
- Follow the manufacturer’s guidelines: Always refer to the manufacturer’s guidelines and instructions for proper maintenance and care of the wiring system. Follow the recommended maintenance schedule and procedures to ensure the longevity and performance of the quad bike.
By following these tips, you can ensure the proper functioning and longevity of the 2007 YFZ 450 wiring system. Regular maintenance and care will not only enhance the performance of the quad bike but also prevent any potential electrical issues or accidents. Remember to always prioritize safety and consult a professional if you encounter any major wiring problems.