
Understanding the vacuum system in your 2009 Mini Cooper S is essential for maintaining its performance and efficiency. The vacuum system plays a crucial role in various aspects of the vehicle’s operation, including fuel economy, emissions control, and overall engine performance. In this article, we will explore the vacuum diagram for the 2009 Mini Cooper S and discuss its components.
The vacuum diagram is a visual representation of the vacuum lines and components of the Mini Cooper S. It shows how the vacuum pressure is distributed throughout the system and how it interacts with different parts of the engine and emissions control system. By studying the diagram, you can better understand how the vacuum system functions and troubleshoot any issues that may arise.
The vacuum system in the 2009 Mini Cooper S includes various components, such as the vacuum pump, vacuum lines, vacuum reservoir, and vacuum control valves. The vacuum pump creates suction, which draws air and fuel mixture into the combustion chambers. The vacuum lines connect the pump to different parts of the engine, such as the intake manifold and brake booster, allowing for proper distribution of vacuum pressure.
The vacuum reservoir serves as a storage container for vacuum pressure, ensuring a steady supply of suction even when engine load varies. The vacuum control valves, located at strategic points in the vacuum system, regulate the flow of vacuum pressure to different parts of the engine and emissions control system, optimizing performance and minimizing emissions.
In conclusion, the vacuum diagram is an essential tool for understanding and maintaining the vacuum system in your 2009 Mini Cooper S. By familiarizing yourself with its components and functions, you can ensure that your vehicle operates at its best performance and efficiency levels. Regular inspection and maintenance of the vacuum system will help prevent issues and prolong the lifespan of your Mini Cooper S.
What is a Vacuum Diagram in a 2009 Mini Cooper S?
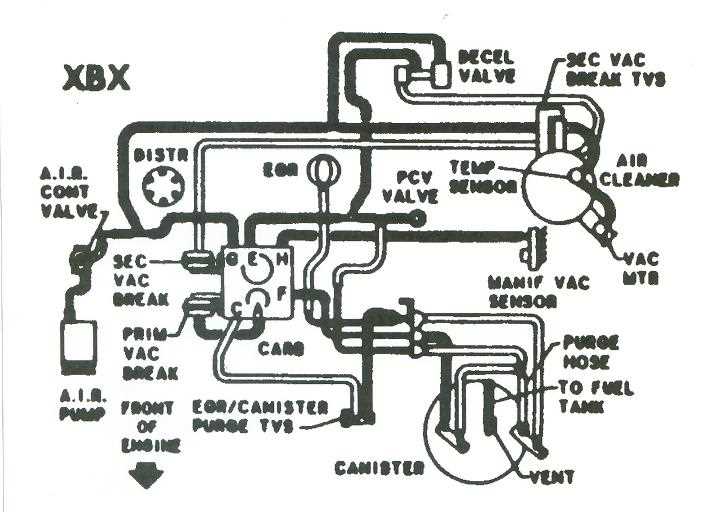
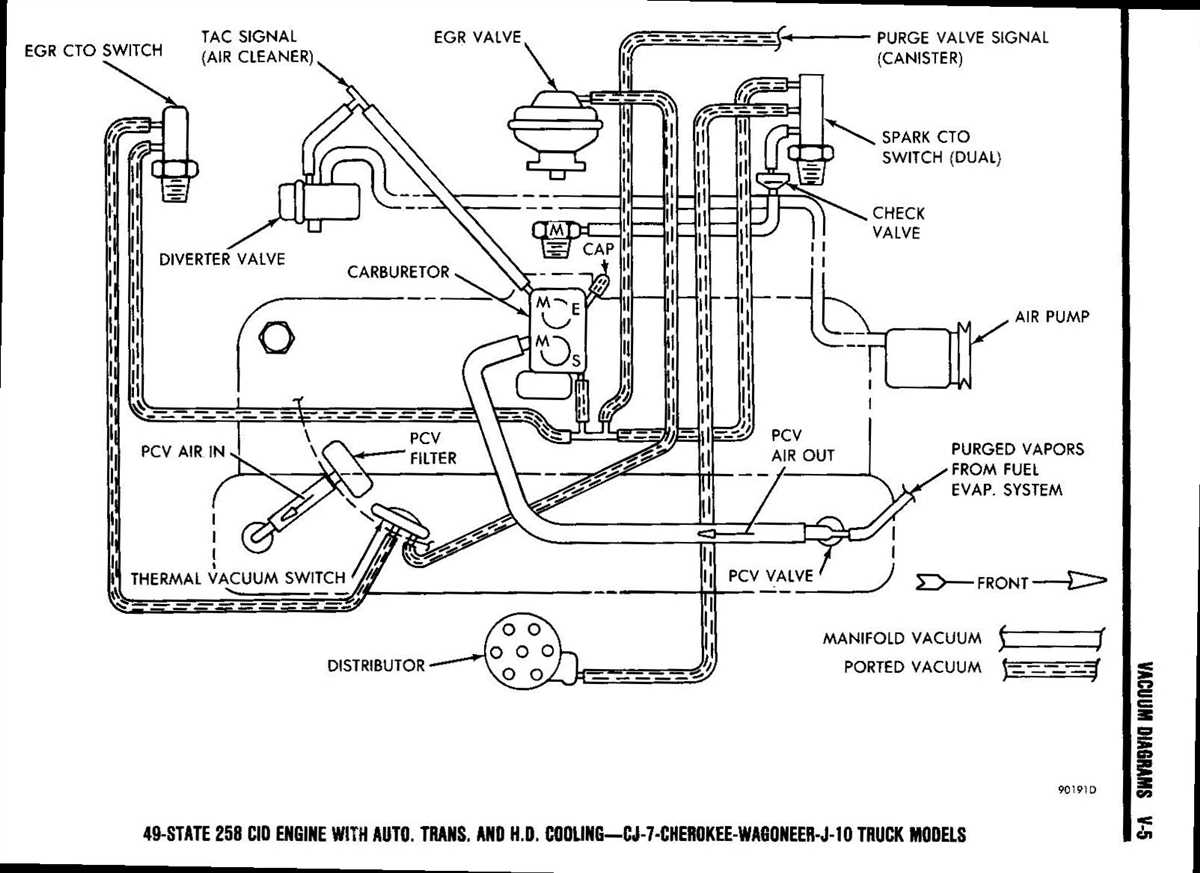
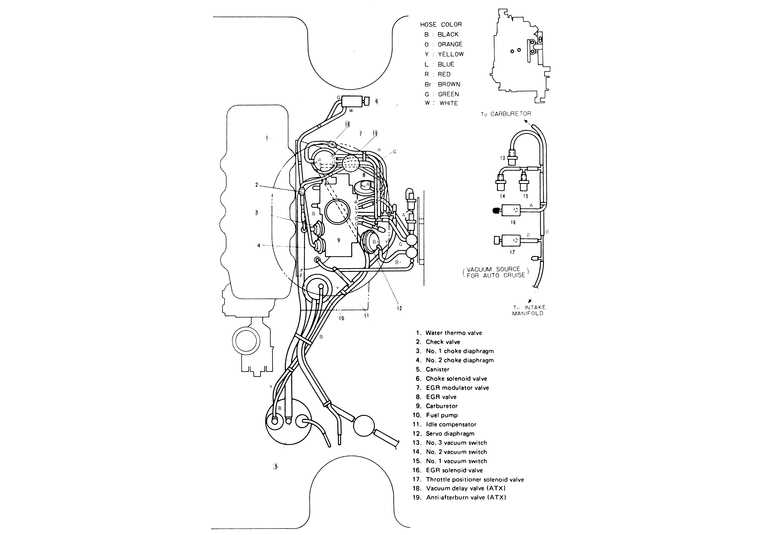
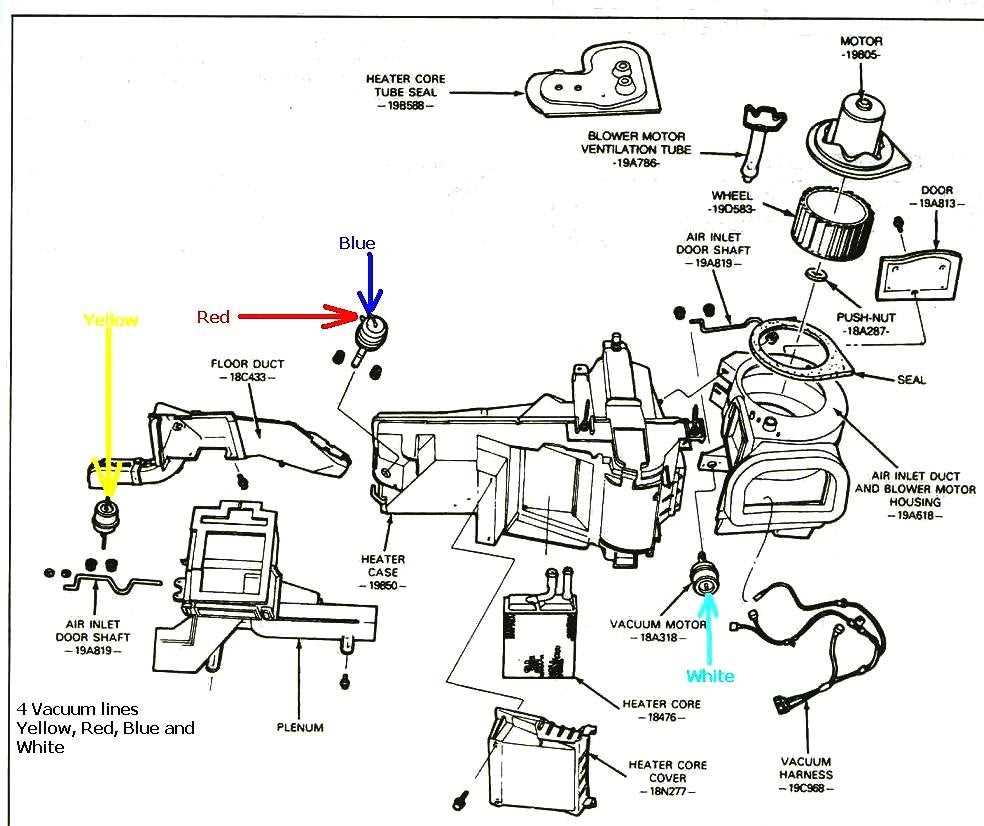
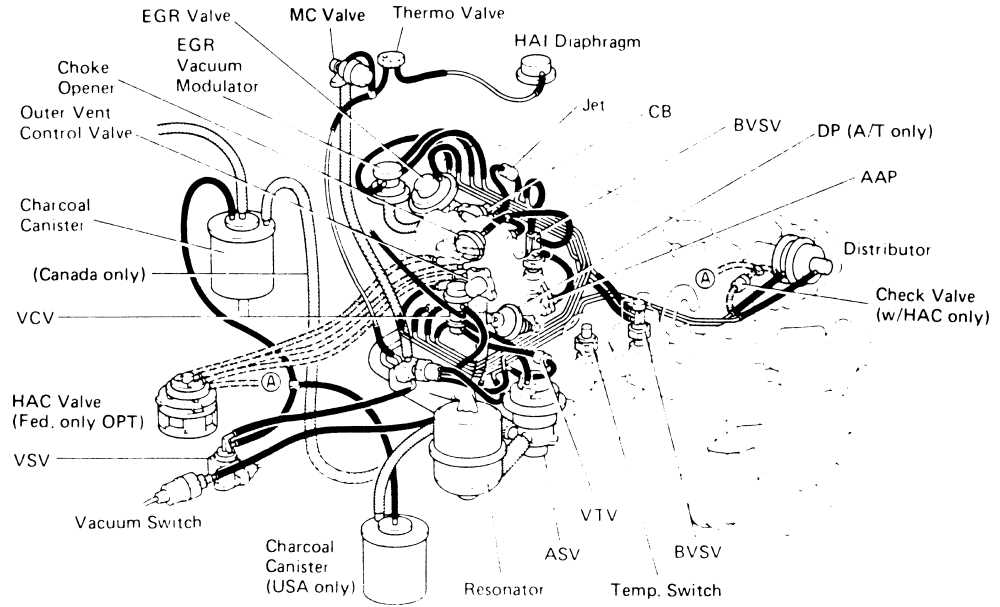
A vacuum diagram in a 2009 Mini Cooper S is a visual representation of the vacuum system in the vehicle. It shows the various components and their connections, as well as the direction of air flow and the presence of any valves or switches. The vacuum system in a car plays an important role in controlling various functions and systems, such as emissions, braking, and climate control.
The vacuum diagram provides valuable information for technicians and car owners, as it helps in diagnosing and troubleshooting problems related to the vacuum system. By referring to the diagram, one can identify potential leaks, blockages, or malfunctions in the system. It can also serve as a reference for understanding how different components interact and function together.
The 2009 Mini Cooper S is equipped with a complex vacuum system that includes components such as the intake manifold, vacuum hoses, vacuum reservoir, vacuum pump, and various valves. The vacuum diagram helps in understanding how these components are connected and how they contribute to the overall functioning of the vehicle.
A vacuum diagram can be found in the service manual or repair guide for the 2009 Mini Cooper S. It can also be obtained from reliable online sources or requested from a dealership or auto repair shop. By having access to the vacuum diagram, car owners and technicians can ensure proper maintenance and repair of the vacuum system, leading to optimal performance and efficiency of the vehicle.
Summary:
- A vacuum diagram in a 2009 Mini Cooper S is a visual representation of the vacuum system in the vehicle.
- It helps in diagnosing and troubleshooting problems related to the vacuum system.
- The vacuum system includes components such as the intake manifold, vacuum hoses, vacuum reservoir, vacuum pump, and valves.
- A vacuum diagram can be found in the service manual or repair guide for the vehicle.
Why is a Vacuum Diagram Important for your 2009 Mini Cooper S?
A vacuum diagram is an essential tool for understanding and maintaining the intricate vacuum system in your 2009 Mini Cooper S. The vacuum system plays a vital role in various engine functions, including emissions control, fuel efficiency, and overall performance. Therefore, having a clear understanding of how the vacuum system works and how the different components are connected is crucial for keeping your Mini Cooper running smoothly.
The vacuum diagram provides a visual representation of the vacuum lines, valves, and connections in the engine compartment. It shows the routing of the vacuum lines, indicating which components they connect to and in what order. This diagram acts as a guide, allowing you to easily locate and inspect the vacuum system components, check for any leaks or blockages, and troubleshoot any issues that may arise.
Understanding the vacuum diagram is important for several reasons:
- Maintaining proper engine performance: The vacuum system is interconnected with various engine components, such as the EGR valve, PCV valve, and brake booster. A vacuum leak or malfunctioning component can disrupt the balance and function of these systems, leading to decreased engine performance and potential damage.
- Emissions control: The vacuum system plays a crucial role in controlling emissions by regulating the flow of gases and air within the engine. A vacuum leak or incorrect vacuum line routing can result in increased emissions, which can lead to a failed emissions test and environmental harm.
- Troubleshooting and diagnosing issues: When you encounter a problem with your Mini Cooper’s performance, having a vacuum diagram allows you to systematically check the vacuum system for any potential issues. By following the diagram, you can isolate the problem area and take appropriate action to fix it.
Overall, the vacuum diagram is a valuable resource that allows you to understand, maintain, and troubleshoot the vacuum system in your 2009 Mini Cooper S. With this knowledge, you can ensure optimal engine performance, emissions control, and overall reliability.
How Does the Vacuum System Work in a 2009 Mini Cooper S?
The vacuum system in a 2009 Mini Cooper S is an important part of the overall engine performance. It helps to regulate the airflow and pressure within the engine, ensuring optimal combustion and efficiency. The vacuum system consists of various components, including hoses, valves, and sensors, that work together to create and maintain the necessary levels of vacuum.
One key component of the vacuum system is the vacuum pump. The vacuum pump is responsible for creating the vacuum that is needed to operate various systems, such as the brake booster and the crankcase ventilation system. It pulls air out of these systems, creating a negative pressure that allows them to function properly. The vacuum pump is driven by a belt connected to the engine, and its operation is controlled by an electronic vacuum control valve.
The vacuum system also includes vacuum hoses, which connect various components together. These hoses are made of durable rubber or silicone material and are designed to withstand the high temperatures and pressures associated with the engine operation. The hoses have specific sizes and shapes to ensure proper fitment and prevent any leaks or blockages that could affect the vacuum system’s performance.
In addition to hoses, the vacuum system incorporates valves and sensors to regulate the vacuum levels. One such valve is the vacuum control valve, which opens and closes to control the amount of vacuum that is being generated. This valve is typically controlled by the engine’s computer system, which monitors various engine parameters to determine the amount of vacuum needed at any given time.
The sensors in the vacuum system are responsible for providing feedback to the engine computer. These sensors measure the vacuum levels, temperature, and pressure within the system, allowing the computer to make adjustments as needed. For example, if the vacuum levels are too low, the computer may increase the amount of vacuum being generated by adjusting the vacuum control valve.
In conclusion, the vacuum system in a 2009 Mini Cooper S plays a crucial role in engine performance and efficiency. It is responsible for creating and maintaining the necessary vacuum levels to operate various systems and components. Through the use of components such as the vacuum pump, hoses, valves, and sensors, the vacuum system ensures optimal combustion and overall engine performance.
Common Problems with Vacuum Systems in a 2009 Mini Cooper S
Vacuum systems play a crucial role in the overall performance and functionality of the 2009 Mini Cooper S. These systems are responsible for controlling various components, such as the turbocharger, brakes, and emission controls. However, over time, vacuum leaks and other issues can arise, causing potential problems for the vehicle’s operation.
One common problem with the vacuum system in a 2009 Mini Cooper S is vacuum leaks. These leaks can occur in hoses, connectors, valves, or any other part of the system. When there is a leak, the vacuum pressure can be compromised, leading to decreased performance and efficiency. It can also result in rough idling, stalling, or even a complete loss of power. Locating and fixing these leaks can be challenging, as they may be hidden or difficult to access.
Another issue that Mini Cooper S owners may encounter with their vacuum systems is a faulty vacuum pump. The vacuum pump is responsible for generating the necessary vacuum pressure for the system to operate correctly. If the pump fails or becomes damaged, it can cause a range of issues, including poor braking performance, misfires, or even engine damage. Replacing the vacuum pump is often the only solution to resolve this problem.
Common Symptoms of Vacuum System Problems in a 2009 Mini Cooper S
- Loss of power
- Rough idling
- Stalling
- Poor braking performance
- Misfires
- Fluid leaks
If you are experiencing any of these symptoms with your 2009 Mini Cooper S, it is essential to address them promptly. Ignoring vacuum system problems can lead to further damage to the vehicle and potentially costly repairs. It is recommended to have the vacuum system inspected by a professional mechanic familiar with Mini Cooper S models to diagnose and resolve the issue effectively.
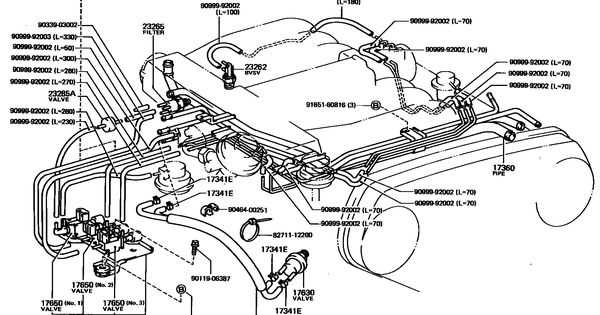
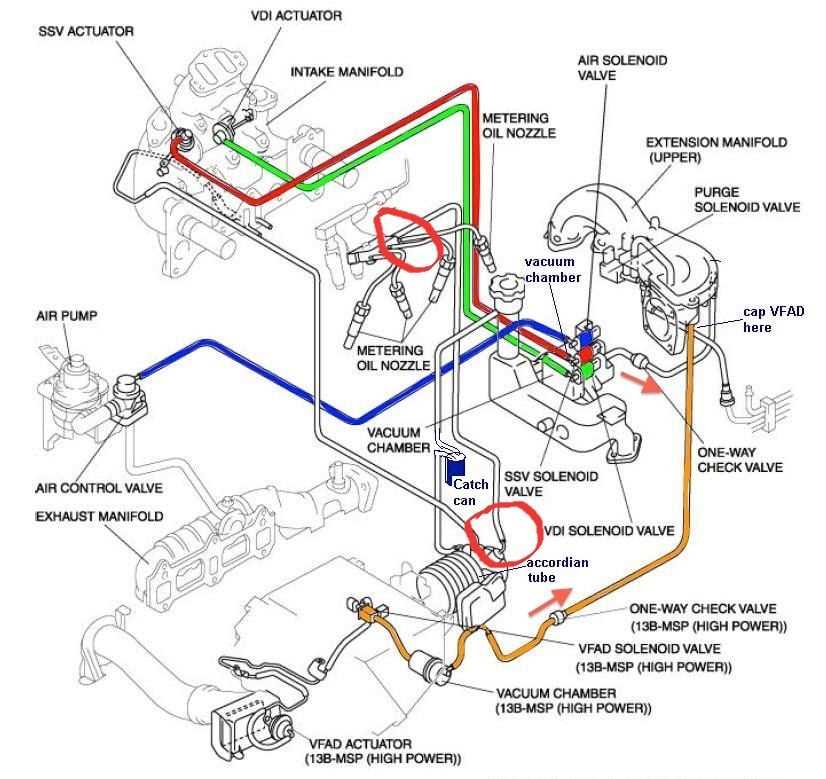
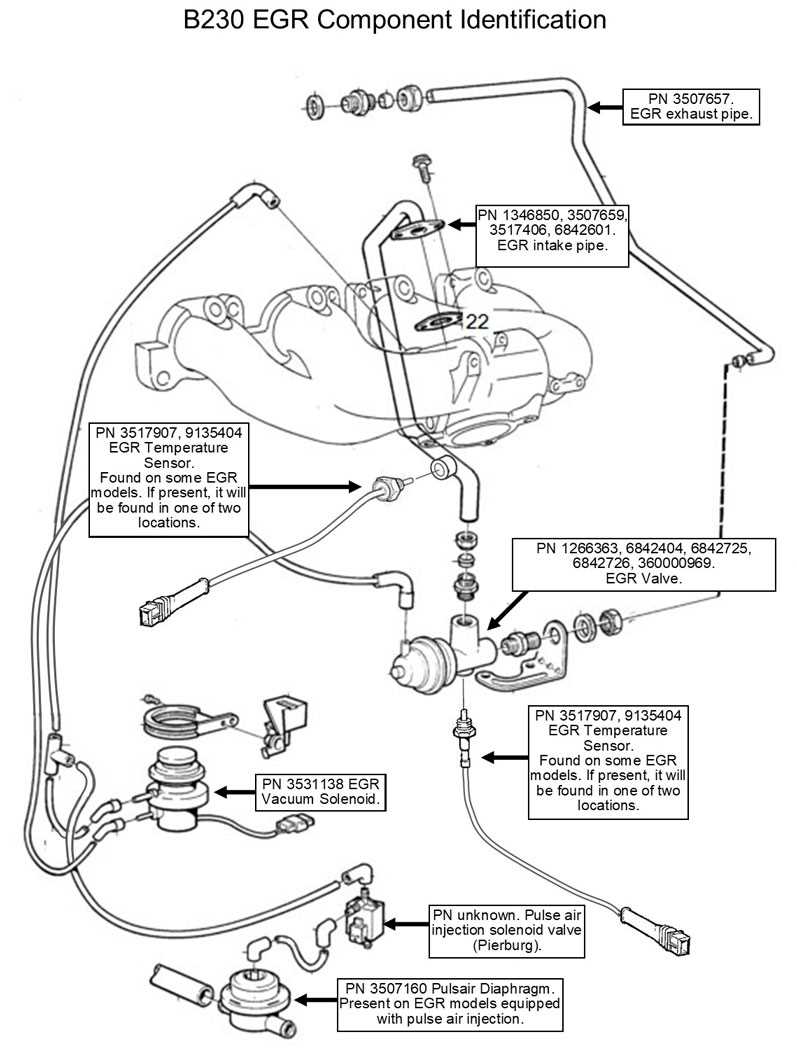
How to Read and Understand the Vacuum Diagram in a 2009 Mini Cooper S
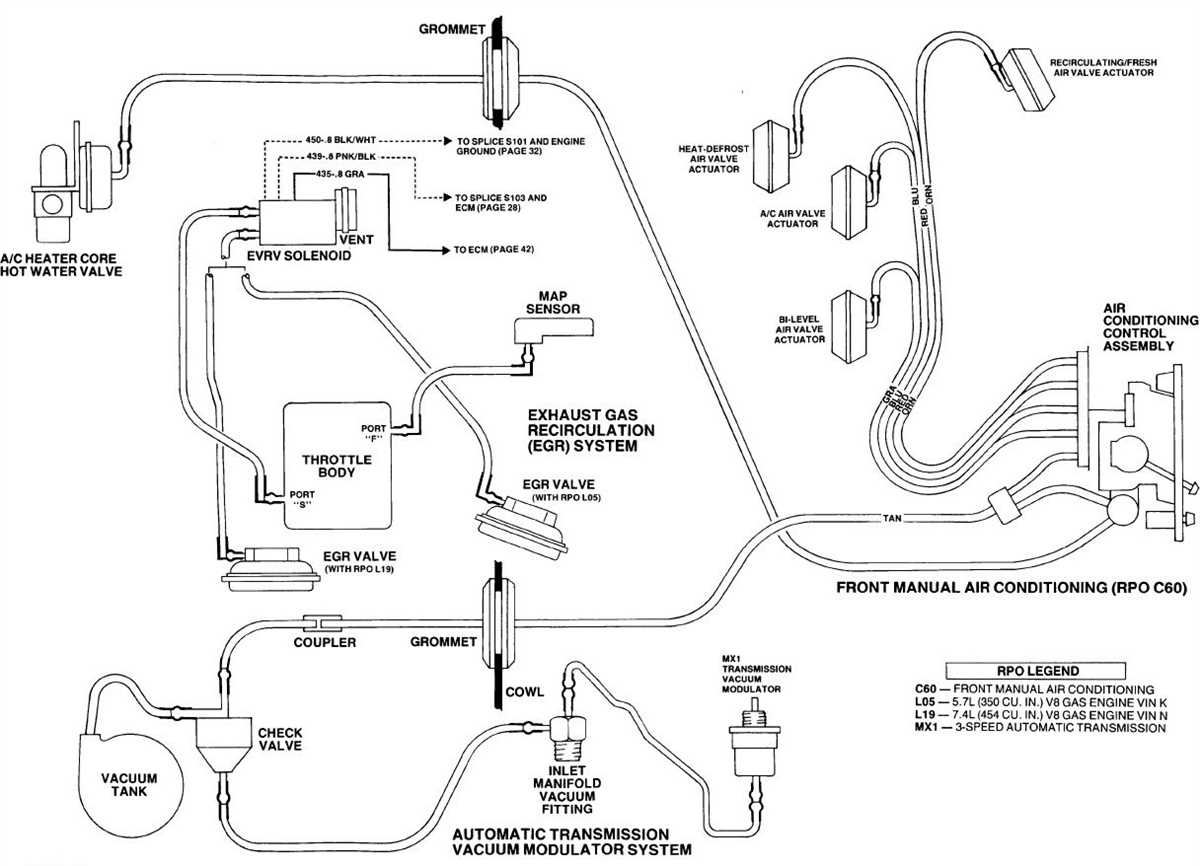
Understanding the vacuum diagram in a 2009 Mini Cooper S is essential for troubleshooting and maintaining the vehicle’s engine performance. The vacuum diagram shows the various hoses and connections that make up the vacuum system, which plays a crucial role in the proper functioning of the engine.
1. Identify the components: Start by familiarizing yourself with the different components shown in the vacuum diagram. These may include the intake manifold, throttle body, vacuum reservoir, vacuum solenoids, and various hoses. Use the legend or key provided on the diagram to understand the symbols and abbreviations used.
2. Follow the lines: Examine the lines drawn between the components. These lines represent the vacuum hoses or passages that connect the different parts of the vacuum system. Each line should be clearly labeled with a number or letter that corresponds to the legend or key. Follow the lines to understand the flow of the vacuum and how it interacts with different components.
3. Check for leaks or blockages: A vacuum leak or blockage can cause poor engine performance or other issues. Use the vacuum diagram to locate the specific hoses or connections that should be checked. Inspect these areas for any signs of damage, wear, or loose connections. If necessary, replace or repair the affected components to restore proper vacuum flow.
4. Consult the repair manual: If you’re having trouble understanding the vacuum diagram or need more detailed information about a specific component or connection, consult the vehicle’s repair manual. The manual will provide more in-depth explanations, diagrams, and troubleshooting steps for the vacuum system.
5. Maintenance and periodic checks: Understanding the vacuum diagram is not only useful for troubleshooting issues but also for regular maintenance. Periodically checking the vacuum hoses, connections, and components can help prevent potential problems. Use the vacuum diagram as a reference to ensure everything is in proper working order.
In summary, the vacuum diagram in a 2009 Mini Cooper S is a valuable resource for understanding the engine’s vacuum system. By familiarizing yourself with the components, following the lines, checking for leaks or blockages, consulting the repair manual, and conducting regular maintenance, you can ensure optimal engine performance and prevent potential issues.
Steps to Troubleshoot and Fix Vacuum System Issues in a 2009 Mini Cooper S
When experiencing problems with the vacuum system in your 2009 Mini Cooper S, it’s essential to take a systematic approach to troubleshooting and fixing the issue. The steps outlined below can help you identify and resolve any vacuum system issues you may be facing.
1. Inspect the Vacuum Lines
Start by visually inspecting all the vacuum lines in the system. Look for any signs of cracks, leaks, or loose connections. Pay close attention to areas where the lines connect to components such as the intake manifold, throttle body, and vacuum pump. If you notice any damage or leakage, replace the affected lines.
2. Check the Vacuum Pump
The vacuum pump is a vital component of the system, responsible for creating vacuum pressure. Inspect the pump for any signs of damage or malfunction, such as excessive noise, oil leaks, or failure to create vacuum pressure. If necessary, replace the vacuum pump to ensure proper functioning of the vacuum system.
3. Test the Vacuum Reservoir
The vacuum reservoir stores vacuum pressure and helps regulate its distribution. Check the reservoir for any leaks or damage. You can perform a simple test by disconnecting the vacuum line connected to the reservoir and applying suction. If the reservoir fails to hold vacuum pressure or you notice air leaks, it may need to be replaced.
4. Verify the Vacuum Control Solenoids
The vacuum control solenoids are responsible for controlling the flow of vacuum pressure to various components in the system. Test each solenoid for proper functioning by applying voltage and verifying that it opens and closes as expected. If any solenoid fails the test, replace it to restore proper vacuum control.
5. Check the Vacuum Check Valve
The vacuum check valve ensures that vacuum pressure flows in one direction only. Inspect the valve for any signs of damage or blockage. You can test its functionality by blowing into one end and verifying that air flow is restricted to only one direction. If the valve is faulty, replace it to prevent any vacuum leaks.
6. Perform a Vacuum Leak Test
If you have not found the source of the problem by this point, it may be necessary to perform a vacuum leak test. This test involves introducing smoke or a specialized leak detection solution into the vacuum system and observing for any signs of leakage. Smoke or solution bubbles can indicate the location of a leak, allowing you to address it appropriately.
Summary
Troubleshooting and fixing vacuum system issues in a 2009 Mini Cooper S can be a challenging task, but following a systematic approach can help pinpoint and resolve the problem effectively. By inspecting vacuum lines, checking the vacuum pump and reservoir, verifying the vacuum control solenoids, testing the vacuum check valve, and performing a vacuum leak test if necessary, you can ensure optimal performance of your Mini Cooper S’s vacuum system.