
The 2012 Honda Civic LX is a popular compact car known for its reliability and fuel efficiency. This model comes with a fuse box that houses various electrical fuses and relays, which are responsible for powering different components of the vehicle. A fuse box diagram is a helpful tool that displays the layout and functions of each fuse, making it easier for owners to identify and replace any blown fuses.
Having a blown fuse can lead to malfunctioning systems such as the headlights, interior lights, power windows, or even the engine. Therefore, it is essential to have a clear understanding of the fuse box layout to quickly resolve any electrical issues that may arise. The 2012 Honda Civic LX fuse box diagram provides a visual representation of the fuse box, including the location and amperage rating of each fuse.
Owners can find the 2012 Honda Civic LX fuse box diagram in the owner’s manual that comes with the vehicle. Alternatively, they can also search for it online or consult a Honda dealership for assistance. With the fuse box diagram, owners can easily identify the fuse that corresponds to a specific system and check its condition to determine if it needs to be replaced. Regularly checking and replacing blown fuses can help maintain the proper functioning of the vehicle’s electrical systems and prevent further damage.
2012 Honda Civic LX Fuse Box Diagram

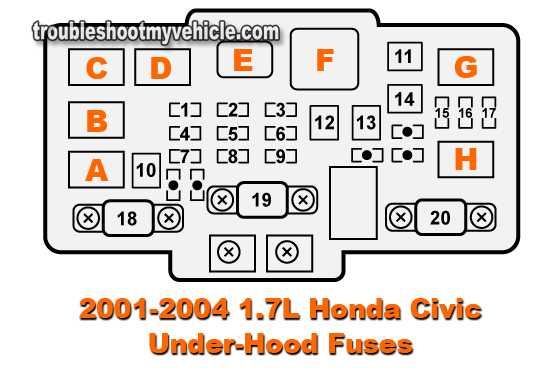
The fuse box diagram for a 2012 Honda Civic LX can be found on the inside cover of the fuse box. The fuse box is located under the dashboard on the driver’s side. It is a rectangular-shaped box with various slots and labels indicating the different fuses and their functions.
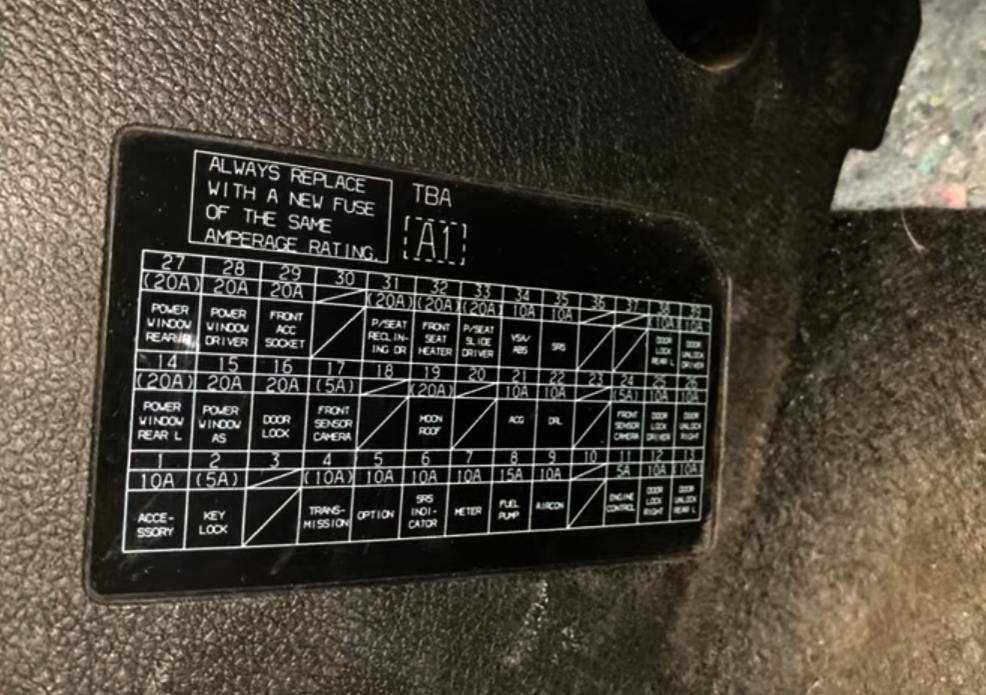
The fuse box diagram provides a detailed layout of the fuses and their locations. Each fuse is numbered and corresponds to a specific electrical component in the vehicle. The diagram also indicates the amp rating of each fuse, which is important for determining the correct replacement fuse if needed.
In addition to the fuse box diagram, it is also important to refer to the owner’s manual for the specific year and model of the Honda Civic LX. The owner’s manual provides additional information on the electrical system and fuse box, including any specific instructions or precautions for replacing fuses.
It is important to regularly check the fuses in a Honda Civic LX to ensure that all electrical components are functioning properly. If a fuse needs to be replaced, it is recommended to use a fuse with the same amp rating as the original fuse to prevent electrical damage.
- Overall, the fuse box diagram for a 2012 Honda Civic LX provides a valuable reference for understanding and troubleshooting the electrical system of the vehicle.
- It is recommended to keep a copy of the fuse box diagram and the owner’s manual in the vehicle for easy access.
What is a Fuse Box?
A fuse box is an important component of an electrical system in a vehicle or a building. It houses fuses, which are safety devices designed to protect the electrical circuits from excessive current flow. As electric current passes through a fuse, it heats up and eventually melts, creating an open circuit and preventing further current flow.
In a vehicle, the fuse box is usually located under the hood or on the driver’s side dashboard. It contains a variety of fuses that control different electrical components, such as the headlights, turn signals, power windows, and radio. Each fuse is labeled with its amp rating and the corresponding electrical component it protects, making it easy to identify and replace a blown fuse.
A fuse box diagram is a visual representation of the fuse box layout, indicating the location and amp rating of each fuse. This diagram is often found on the inside cover of the fuse box or in the owner’s manual. It is essential to refer to the diagram when troubleshooting electrical issues or replacing fuses to ensure the correct fuse is used.
Fuse boxes are designed to protect the electrical system from damage caused by overloading or short circuits. If a fuse blows, it is a sign that there is an underlying issue that needs to be addressed. It is important to identify and fix the cause of the blown fuse before replacing it to avoid further electrical problems.
Key phrases: 2012 Honda Civic LX fuse box diagram
- The 2012 Honda Civic LX fuse box diagram is a helpful reference for troubleshooting electrical issues.
- By referring to the fuse box diagram, one can easily identify the location and amp rating of each fuse in the 2012 Honda Civic LX.
- If a specific electrical component in the 2012 Honda Civic LX is not working, checking the corresponding fuse in the fuse box diagram can help determine if a blown fuse is the cause.
- Replacing a blown fuse in the 2012 Honda Civic LX with the correct amp rating can restore functionality to the affected electrical component.
Identifying the Fuse Box Location
If you are experiencing electrical issues with your 2012 Honda Civic LX, it may be necessary to locate and check the fuse box. The fuse box contains a variety of fuses that protect different electrical components throughout the vehicle. In order to address any potential issues, it is important to know the location of the fuse box.
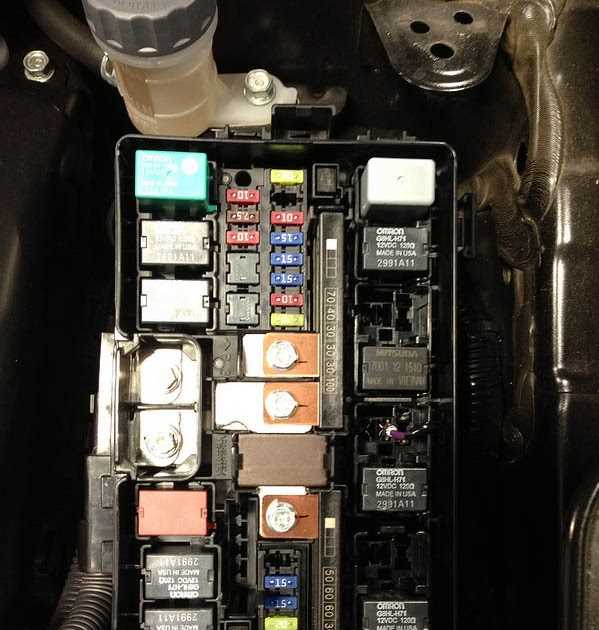
The fuse box in a 2012 Honda Civic LX is typically located in two main areas of the vehicle. The first location is under the hood of the car, near the battery. This is usually referred to as the “engine compartment fuse box.” The second location is inside the cabin of the vehicle, near the driver’s side door. This is commonly known as the “interior fuse box.”
In order to access the engine compartment fuse box, you will need to open the hood of the car and locate the fuse box cover. The cover is typically labeled with the fuse box diagram, which indicates the location and function of each fuse. It is important to consult the diagram to ensure that you are checking the correct fuse for the specific electrical issue you are experiencing.
To access the interior fuse box, you will need to open the driver’s side door and locate the fuse box cover panel. This panel is usually located on the side of the dashboard, near the end of the instrument panel. Similar to the engine compartment fuse box, the interior fuse box cover is also labeled with a diagram that indicates the location and function of each fuse.
- It is important to note that different models and trims of the 2012 Honda Civic may have slightly different fuse box locations and configurations. Therefore, it is always recommended to consult the owner’s manual for the specific model of your vehicle to ensure accurate identification of the fuse box location.
- Before attempting to check or replace any fuses, be sure to turn off the ignition and any electrical devices in the vehicle to prevent electric shock.
Overall, identifying the fuse box location in your 2012 Honda Civic LX is a crucial step in troubleshooting and resolving any electrical issues. Knowing the location of the fuse box will allow you to check and replace any faulty fuses, restoring proper electrical functionality to your vehicle.
Understanding Fuse Types
Fuses are essential components of every electrical system, protecting the circuits from damage caused by excessive current. Understanding the different types of fuses is crucial for maintaining and troubleshooting these systems. In the case of a 2012 Honda Civic LX, it is important to know the fuse box diagram and the types of fuses used to ensure proper maintenance and repairs.
Types of Fuses
Glass Tube Fuses: These fuses are commonly found in older vehicles and have a glass tube with a filament wire inside. When the current exceeds the rated value, the wire melts, breaking the circuit and protecting the electrical components.
Blade Fuses: Blade fuses, also known as plug-in fuses, are the most common type used in modern vehicles. They have a plastic body with metal blades on either end. Blade fuses come in different sizes, distinguished by their amperage rating, and are easily replaceable by pulling them out of their designated slots.
- Mini Blade Fuses: These are the smallest type of blade fuses and are commonly used in newer vehicles. They are color-coded for easy identification of their amperage rating.
- Standard Blade Fuses: These are larger than mini blade fuses and are often used in older vehicles. They have the same rectangular shape but are longer in size.
- Maxi Blade Fuses: Maxi blade fuses are larger and can handle higher current loads. They are generally used for applications that require more power, such as high-powered aftermarket accessories.
Fusible Links: Fusible links are wires with a lower melting point than the rest of the electrical system. They are typically used as protection for high current-carrying circuits, such as the alternator or starter motor. If a fusible link melts, it indicates a fault in the circuit and needs to be replaced.
It is important to consult the fuse box diagram or the owner’s manual to identify the specific fuse types and their amperage ratings for the 2012 Honda Civic LX. This information will help ensure proper replacement and troubleshooting of fuses in case of electrical issues.
Locating the Fuse Box in a 2012 Honda Civic LX
When it comes to troubleshooting electrical issues in your 2012 Honda Civic LX, knowing the location of the fuse box can be extremely helpful. The fuse box is where the fuses for various electrical components are housed, and identifying the correct fuse can often be the first step in resolving any electrical problems you may be experiencing.
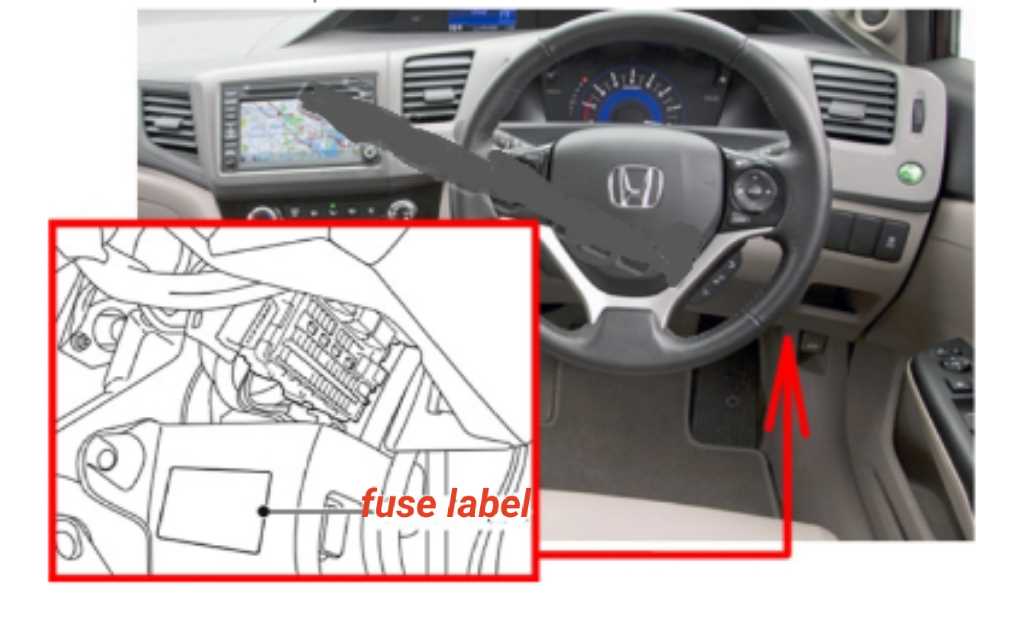
Step 1: Locate the Interior Fuse Box
The interior fuse box is typically located underneath the dashboard on the driver’s side of the vehicle. To access the fuse box, simply open the driver’s side door and look for a removable panel with a diagram or label indicating the location of the fuse box.
- Step 2: Remove the Fuse Box Cover
Once you have located the fuse box, carefully remove the cover. The cover is usually held in place with plastic clips or screws, so use a flathead screwdriver or a suitable tool to gently pry the cover off.
- Step 3: Identify the Correct Fuse
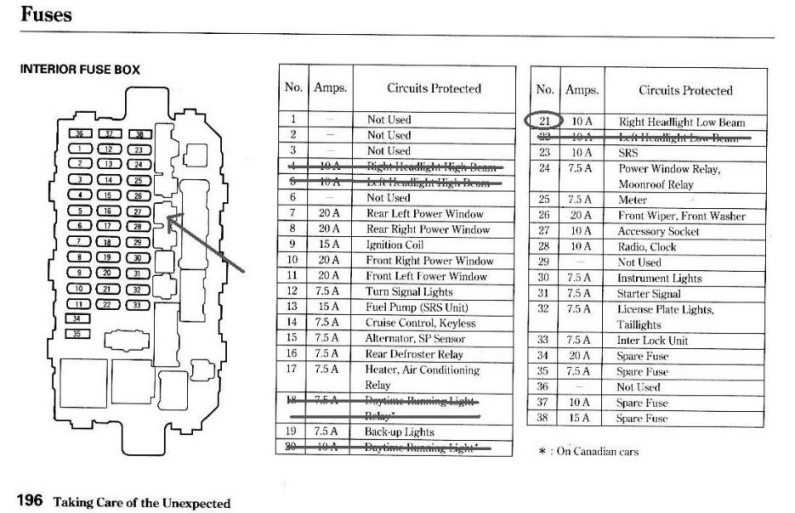
Locate the fuse diagram on the inside of the fuse box cover or consult your vehicle’s owner’s manual to identify the correct fuse for the component you are troubleshooting. The diagram will indicate which fuse is responsible for each electrical component, such as the headlights, radio, or power windows.
- Step 4: Inspect the Fuse
Once you have identified the correct fuse, visually inspect it to check for any signs of damage or a blown fuse. A blown fuse will have a broken filament or appear black and charred. If the fuse is damaged, you will need to replace it with a new one of the same amperage rating.
By following these steps, you can easily locate the fuse box in your 2012 Honda Civic LX and identify the correct fuse for troubleshooting any electrical problems you may encounter. Remember to always refer to your vehicle’s owner’s manual for the most accurate and up-to-date information.
Fuse diagrams are an essential tool for understanding the electrical system of a vehicle. In the case of the 2012 Honda Civic LX, the fuse box diagram provides a visual representation of the different fuses and their respective functions. By referring to this diagram, it becomes easier to identify the fuse responsible for a specific electrical component that may have malfunctioned.
Locating the Fuse Box

To access the fuse box in a 2012 Honda Civic LX, you will need to locate it in the interior of the vehicle. In most cases, the fuse box is located under the dashboard on the driver’s side. Once you find the fuse box, you can refer to the diagram for further guidance.
Understanding the Diagram
The fuse box diagram is typically divided into different sections, each representing a specific electrical system or component. For example, there may be sections for the interior lights, exterior lights, radio, and other electrical systems. Each section will have a corresponding number or letter that corresponds to the fuse that protects that particular system or component.
By referencing the diagram, you can quickly identify the fuse that may be causing a problem. If a specific electrical component is not working, you can check the corresponding fuse and determine if it is blown or damaged. Blown fuses will have a broken filament or appear burnt, indicating that they need to be replaced.
Using the Fuse Diagram
When using the fuse diagram, it’s essential to have a good understanding of your vehicle’s electrical systems. By knowing which fuse corresponds to which component, you can make informed decisions when troubleshooting and repairing electrical issues.
It’s also important to remember that fuses should only be replaced with those of the same rating. Using a higher-rated fuse can potentially damage the electrical system, while using a lower-rated fuse may cause it to blow prematurely.
In conclusion, the fuse box diagram for the 2012 Honda Civic LX is an invaluable resource for understanding and troubleshooting electrical issues. By familiarizing yourself with the diagram and its various sections, you can confidently address any electrical problems that may arise in your vehicle.
Replacing a Blown Fuse
When a fuse in your 2012 Honda Civic LX blows, it is important to replace it promptly to ensure the proper functioning of your vehicle’s electrical systems. Here is a step-by-step guide on how to replace a blown fuse:
- Identify the blown fuse: Locate the fuse box in your Honda Civic, usually found under the dashboard on the driver’s side. Consult your owner’s manual or the fuse box diagram for your specific model to pinpoint the fuse that needs to be replaced.
- Turn off the ignition: Before replacing the fuse, make sure the ignition is turned off to avoid any electrical accidents.
- Remove the blown fuse: Use a fuse puller or a pair of needle-nose pliers to carefully remove the blown fuse from its socket. Be gentle to avoid damaging the fuse or the fuse box.
- Inspect the blown fuse: Check the blown fuse for any signs of damage, such as a broken filament or a burnt appearance. This can help you diagnose any underlying issues that may have caused the fuse to blow.
- Select a replacement fuse: Choose a new fuse of the same amperage rating as the blown fuse. Using a fuse with a lower or higher rating can lead to electrical problems or even damage to your vehicle.
- Install the replacement fuse: Insert the replacement fuse into the appropriate socket, making sure it is securely seated. Give it a gentle tug to ensure it is properly installed.
- Turn on the ignition: Once the replacement fuse is in place, turn on the ignition to test whether the new fuse has resolved the electrical issue. If everything is functioning correctly, you’re good to go!
Remember, if you continue to experience blown fuses in your 2012 Honda Civic LX, it may be indicative of a larger electrical problem that requires professional attention. In such cases, it is best to consult a qualified mechanic.
By following these steps, you can safely and effectively replace a blown fuse in your 2012 Honda Civic LX, ensuring the continued functionality of your vehicle’s electrical systems.