
The serpentine belt is an essential component in the 2014 Ford Explorer V6 engine, as it drives multiple systems such as the alternator, power steering pump, and the water pump. Over time, the serpentine belt may wear out or become damaged, resulting in decreased performance or even engine failure. Therefore, it is important to have a clear understanding of the serpentine belt diagram to ensure proper installation and maintenance.
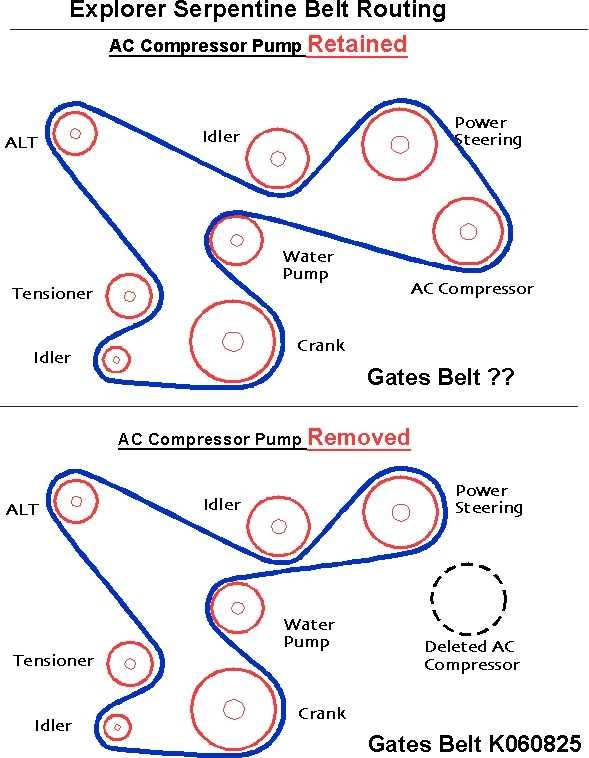
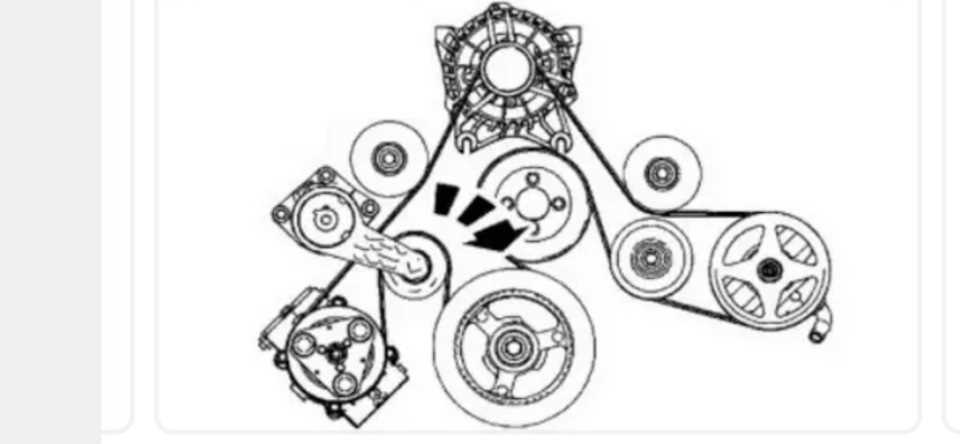
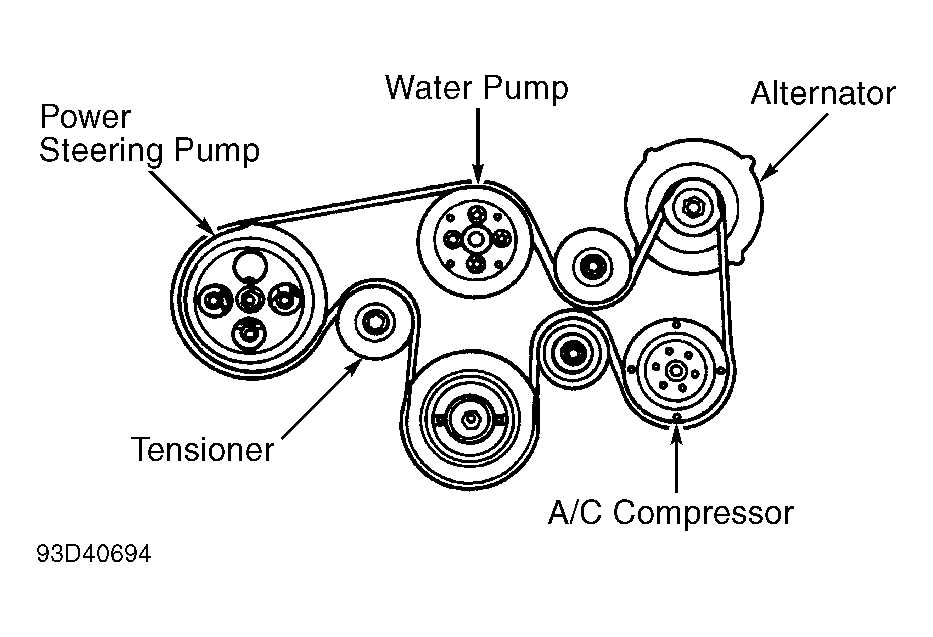
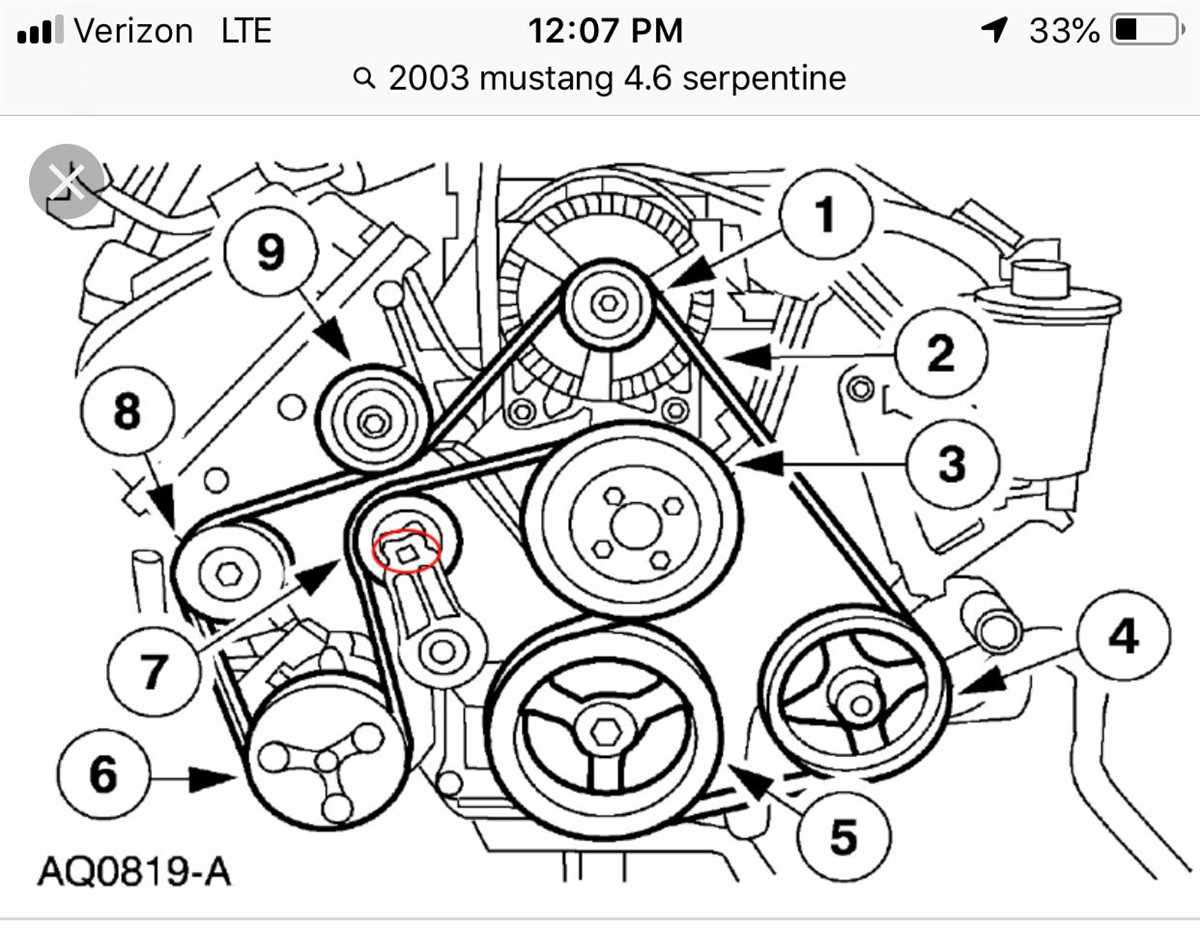
The serpentine belt in the 2014 Ford Explorer V6 engine follows a specific path dictated by the pulleys and accessories it drives. The diagram illustrates this path, including the various pulleys and accessories it connects. Understanding the diagram helps in identifying the correct way to route the belt and ensures that the tension is properly adjusted for optimal performance.
When replacing or inspecting the serpentine belt, it is crucial to follow the recommended guidelines provided by the manufacturer. This typically involves releasing tension on the belt, removing it from the pulleys, and carefully installing a new one by following the correct diagram. Failure to properly install the serpentine belt can cause serious damage to the engine and other components of the vehicle, leading to costly repairs.
How to Replace the Serpentine Belt on a 2014 Ford Explorer V6
The serpentine belt on a 2014 Ford Explorer V6 is an essential component of the engine’s accessory drive system. Over time, the belt may wear out or become damaged, requiring replacement. Fortunately, replacing the serpentine belt on a 2014 Ford Explorer V6 is a relatively straightforward process that can be done with basic tools.
Before starting the replacement process, make sure to gather all the necessary tools and materials. You will need a socket wrench, a suitable-sized socket or belt tensioner tool, and a new serpentine belt that matches the specifications of your 2014 Ford Explorer V6. It’s also a good idea to have a diagram of the belt routing, which can usually be found in the owner’s manual or on a sticker under the hood.
To begin, locate the belt tensioner, which will typically be on the front of the engine. The tensioner is responsible for keeping the serpentine belt tight. Use the socket wrench and appropriate socket or belt tensioner tool to relieve the tension on the belt by rotating the tensioner counterclockwise.
Once the tension has been relieved, carefully remove the old serpentine belt from the pulleys. Make note of the belt routing and compare it to the diagram to ensure the new belt is installed correctly. Then, thread the new belt onto the pulleys, following the proper routing pattern. It’s important to make sure the belt is properly aligned and seated on each pulley.
Once the new serpentine belt is correctly installed, use the socket wrench and socket or belt tensioner tool to rotate the belt tensioner counterclockwise again. This will allow you to slip the belt onto the tensioner pulley. Release the tensioner slowly, allowing it to apply tension to the belt.
Finally, visually inspect the belt to ensure it is properly aligned and seated on all the pulleys. Start the engine and listen for any unusual noises or vibrations. If everything looks and sounds normal, you have successfully replaced the serpentine belt on your 2014 Ford Explorer V6.
Tools and Materials Required
When replacing the serpentine belt on a 2014 Ford Explorer V6, there are several tools and materials that you will need to have on hand. These include:
- Serpentine belt wrench: This specialized tool is designed to make removing and installing the serpentine belt easier and more efficient.
- Ratchet and socket set: You will need a ratchet and socket set with the appropriate size sockets to loosen and tighten the bolts on the tensioner pulley.
- Tensioner pulley wrench: This wrench is used to loosen the tensioner pulley and release the tension on the serpentine belt.
- New serpentine belt: It is important to have a new serpentine belt on hand to replace the old one. Make sure to get the correct size and type of belt for your specific vehicle.
- Gloves: It is always a good idea to wear gloves when working on your vehicle to protect your hands from dirt, debris, and any sharp edges.
- Safety glasses: Safety glasses should be worn to protect your eyes from any potential flying debris or fluids.
- Pen and paper: It is helpful to have a pen and paper on hand to take notes or make a diagram of the belt routing before removing the old one.
Having all of these tools and materials ready before starting the serpentine belt replacement process will ensure that you have everything you need to complete the job efficiently and safely.
Locating the Serpentine Belt and Tensioner
The serpentine belt is an essential component of the engine’s accessory system in a 2014 Ford Explorer V6. It is responsible for powering various auxiliary systems such as the alternator, power steering pump, and air conditioning compressor. Over time, the belt may wear out or become damaged and need to be replaced. To do so, it is crucial to know the precise location of the serpentine belt and its tensioner.
The serpentine belt on a 2014 Ford Explorer V6 is located on the front of the engine, connected to various pulleys. To access it, you will need to open the hood and locate the serpentine belt routing diagram, which is typically affixed to the underside of the hood or on the front of the engine compartment. This diagram provides a visual representation of the belt’s path and the different pulleys it wraps around.
The serpentine belt tensioner is a crucial component that ensures the proper tension of the belt. It is typically located near the top of the engine, above the serpentine belt. The tensioner consists of a spring-loaded arm with a pulley that applies tension to the belt. To release tension and remove the belt, you will need to use a breaker bar or a ratchet with a suitable socket to rotate the tensioner in the opposite direction of the belt’s rotation.
When replacing the serpentine belt, it is essential to inspect the other components it interacts with, such as the pulleys and the tensioner. If any of these components show signs of damage or wear, it is recommended to replace them as well to ensure optimal performance and longevity of the engine’s accessory system.
Overall, locating the serpentine belt and tensioner in a 2014 Ford Explorer V6 is a straightforward process. By referring to the belt routing diagram and identifying the tensioner, you can perform routine maintenance or replace the belt when necessary, keeping your engine running smoothly and efficiently.
Releasing the Tension on the Belt
When it comes time to replace or adjust the serpentine belt on your 2014 Ford Explorer V6, it is important to know how to release the tension on the belt properly. This will allow you to easily remove the belt without causing any damage to the pulleys or other components.
To release the tension on the serpentine belt, you will need to locate the belt tensioner. The belt tensioner is a spring-loaded pulley that keeps the belt tight. It is typically located towards the top of the engine and can be identified by its small size compared to the other pulleys.
To release the tension, you will need to use a serpentine belt tool or a breaker bar with the appropriate sized socket. Insert the tool or bar into the square hole on the belt tensioner and apply pressure in the opposite direction of the belt’s rotation. This will release the tension on the belt and allow you to easily remove it.
Important: Always refer to the belt routing diagram under the hood or in the owner’s manual to ensure that you reinstall the new belt correctly.
Once the tension has been released, you can carefully remove the serpentine belt from the pulleys. Take note of the belt’s routing so that you can properly install the new belt.
When installing the new belt, make sure it is properly aligned with each pulley and the belt tensioner. Use the serpentine belt tool or breaker bar to apply tension to the belt again, until it is properly tight. Double-check the belt routing and make any necessary adjustments before starting the engine.
Note: If you are unsure or uncomfortable with releasing the tension on the serpentine belt, it is always recommended to consult a professional mechanic for assistance.
Removing the Old Serpentine Belt:
When it comes time to replace the serpentine belt on your 2014 Ford Explorer V6, it is important to follow the correct steps to ensure a smooth and successful procedure. Removing the old belt is the first step in this process, and can be done with a few tools and some patience.
To begin, locate the belt tensioner pulley, which is responsible for applying tension to the belt. This pulley is typically located near the front of the engine and is easily identifiable by its smooth surface. Use a wrench or a socket and ratchet to rotate the tensioner pulley counterclockwise. This will relieve the tension on the belt, allowing you to easily remove it from the other pulleys.
Once the tension has been released, carefully slide the old belt off of the pulleys, taking note of the routing and positioning for future reference. It may be helpful to take a picture or draw a diagram of the belt’s path before removing it. This will ensure that the new belt is installed correctly.
Inspect the old belt for any signs of wear or damage, such as cracks, fraying, or excessive stretching. If you notice any of these issues, it is recommended to replace the belt even if it hasn’t completely failed yet. A worn or damaged belt can cause performance issues and may lead to more expensive repairs down the road.
With the old belt removed, now is a good time to inspect the other pulleys and accessories for any signs of damage or wear. Look for any misalignment or play in the pulleys, as this could indicate a larger problem that needs to be addressed. It is also a good idea to rotate each pulley by hand to ensure they move freely and smoothly.
Overall, removing the old serpentine belt on a 2014 Ford Explorer V6 is a relatively straightforward process. By following the correct steps and taking the time to inspect the belt and pulleys, you can ensure a successful belt replacement and maintain the performance and reliability of your vehicle.
Installing the New Serpentine Belt
When it comes time to replace the serpentine belt on a 2014 Ford Explorer V6, it is important to follow the correct procedure to ensure proper installation. Here are the steps to install the new serpentine belt:
- Locate the Belt Routing Diagram: Before removing the old belt, refer to the belt routing diagram. This diagram is typically located on the engine compartment, or it can be found in the owner’s manual. The diagram shows the correct path for the belt around the pulleys.
- Release Tension on the Old Belt: Use a wrench or a tensioner tool to loosen the tension on the old belt. The tensioner will typically be located near the top of the engine. Rotate the tensioner counterclockwise to release tension on the belt, and then slide the belt off the pulleys.
- Position the New Belt: Take the new serpentine belt and position it on the pulleys according to the belt routing diagram. Make sure the belt is sitting properly on each pulley and is aligned correctly.
- Apply Tension to the New Belt: Once the new belt is in position, use a wrench or a tensioner tool to rotate the tensioner counterclockwise again. This will allow you to slide the new belt onto the pulleys while maintaining tension. Make sure the belt is properly seated on each pulley and is not twisted.
- Inspect the Belt: Before closing the hood, double-check that the belt is properly aligned on each pulley and is correctly routed. Make sure there are no twists or slack in the belt. A properly installed serpentine belt should be tight and straight.
Following these steps will ensure a successful installation of the new serpentine belt on a 2014 Ford Explorer V6. It is always recommended to consult the vehicle’s owner’s manual or a trusted mechanic for specific instructions and guidance.
Checking the Belt Tension and Finishing Touches
After installing the new serpentine belt on your 2014 Ford Explorer V6, it’s important to check the belt tension to ensure proper operation. Use a belt tension gauge or your fingers to check the tension. The belt should have a slight give when pressed down on its longest run, but it shouldn’t be too loose or too tight. Adjust the tension if necessary.
Once you’re satisfied with the belt tension, double-check all the pulleys and accessories to make sure they are properly aligned and free of any obstructions. Then, start the engine and visually inspect the belt as it rotates. Listen for any unusual noises or vibrations, and make sure the belt is running smoothly without slipping or jumping off the pulleys.
Finally, take the vehicle for a short test drive to ensure that all the components are working correctly and the belt is functioning as it should. If you notice any issues during the test drive, such as squealing or poor performance, it may be an indication of a problem with the belt or one of the accessories it drives. In this case, you should recheck the belt tension and alignment, and consult a professional mechanic if necessary.
By following these steps and using the 2014 Ford Explorer V6 serpentine belt diagram, you can confidently replace the serpentine belt on your vehicle and ensure its proper functioning. Regularly inspecting and maintaining the serpentine belt will help prevent any potential breakdowns or malfunctions, keeping your vehicle running smoothly and efficiently.