
If you are a proud owner of a Chevy 5.7 engine, it’s important to have a thorough understanding of its belt diagram. The belt diagram plays a crucial role in ensuring that all the various components of the engine work together seamlessly. Without a properly functioning belt diagram, the engine’s performance can be compromised, leading to various issues and potentially costly repairs.
The Chevy 5.7 engine, also known as the 350 engine, is a widely used engine in various Chevy vehicles. It is a powerful and reliable engine that has been around for decades. The belt diagram for the Chevy 5.7 engine shows the routing of the various belts that are responsible for driving important components such as the alternator, power steering pump, water pump, and air conditioning compressor.
Having a clear understanding of the belt diagram allows you to properly maintain and troubleshoot your Chevy 5.7 engine. It enables you to easily identify any belt-related issues and determine if any belts need to be replaced or adjusted. Additionally, knowing the correct belt routing can help you avoid any potential damage to the engine or other components.
Chevy 5.7 Belt Diagram: A Comprehensive Guide
Understanding the belt diagram for a Chevy 5.7 engine is crucial for maintenance and troubleshooting purposes. The belt diagram shows the routing and arrangement of the engine’s belts, highlighting how they connect various pulleys and components.
Key Components
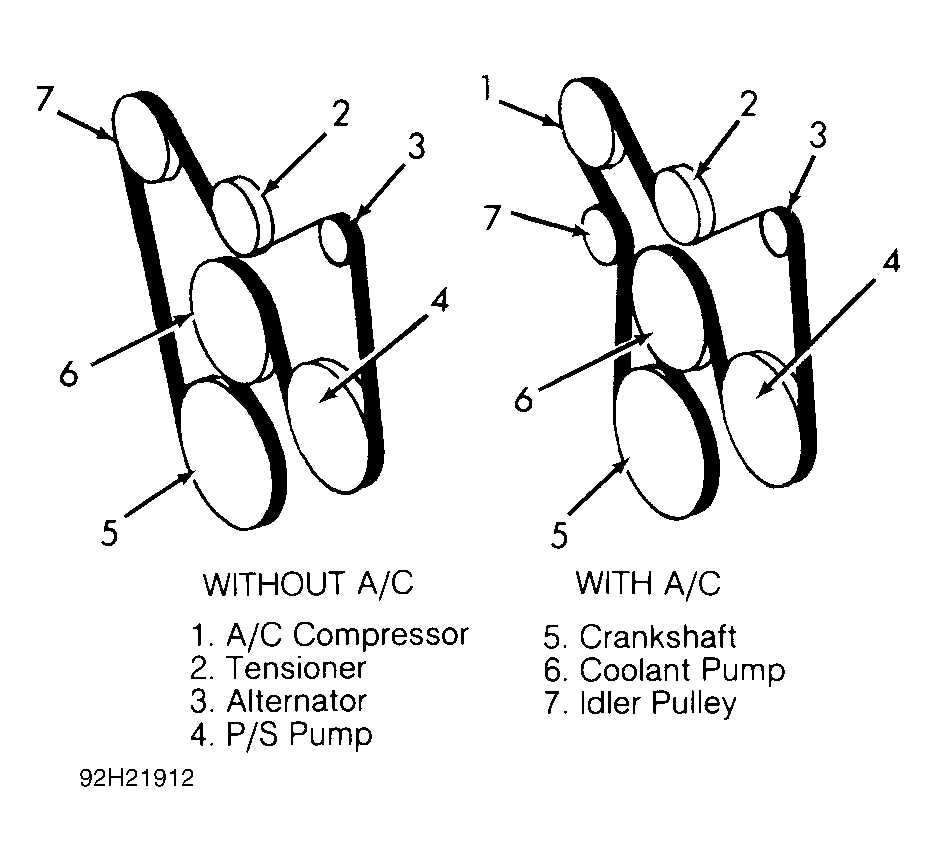
The Chevy 5.7 engine typically has two belts: the serpentine belt and the V-belt. The serpentine belt is responsible for driving multiple accessories, such as the alternator, power steering pump, air conditioning compressor, and water pump. The V-belt operates the crankshaft pulley, which in turn drives the fan and water pump.
Belt Routing
The belt routing for a Chevy 5.7 engine can vary depending on the specific model and year. It is essential to refer to the vehicle’s owner’s manual or a reliable source for the accurate belt routing diagram. However, as a general guide, the serpentine belt typically wraps around various pulleys in a specific sequence, while the V-belt connects the crankshaft pulley to the fan and water pump.
Replacing Belts
Replacing the belts on a Chevy 5.7 engine requires a basic understanding of belt tensioning and pulley alignment. It is crucial to release the tension from the belts before attempting to remove them. This can usually be done by using a wrench or socket to loosen the tensioner pulley and slide the belt off. When installing the new belts, ensure they are routed correctly according to the belt diagram and that they are properly tensioned by adjusting the tensioner pulley.
Troubleshooting
If you notice any unusual noises, slipping, or squealing coming from the belts on a Chevy 5.7 engine, it is important to investigate and address the issue promptly. Common issues include loose or worn belts, misaligned or damaged pulleys, and faulty tensioners. By referring to the belt diagram and visually inspecting the belts and pulleys, you can identify potential problem areas and take appropriate action to prevent further damage.
Overall, understanding the Chevy 5.7 belt diagram is essential for proper maintenance and troubleshooting of the engine’s belts. By following the correct belt routing, replacing belts as needed, and addressing any issues promptly, you can ensure the optimal performance and longevity of your Chevy 5.7 engine.
Understanding the Importance of a Chevy 5.7 Belt Diagram
When it comes to the engine of a Chevy 5.7 vehicle, one crucial component is the belt system. This system is responsible for running various accessories, such as the alternator, power steering pump, and air conditioning compressor. To ensure that these accessories operate smoothly and efficiently, it is essential to have a comprehensive understanding of the Chevy 5.7 belt diagram.
The belt diagram showcases the path that the serpentine belt takes around the various pulleys in the engine. It provides a visual representation of how the belt connects different components and ensures they receive the necessary power from the engine. Without a proper understanding of the belt diagram, it can be challenging to diagnose any issues or perform routine maintenance on the belt system.
One of the primary benefits of the Chevy 5.7 belt diagram is its ability to help identify and troubleshoot problems with the belt system. By referring to the diagram, mechanics and car enthusiasts can easily locate any misaligned or loose belts, worn-out pulleys, or other issues that may affect the performance of the accessories. With this information, they can quickly make the necessary repairs and adjustments to restore the smooth operation of the belt system.
Additionally, the Chevy 5.7 belt diagram is crucial for performing routine maintenance tasks. Regular inspection and replacement of worn-out belts can help prevent unexpected breakdowns and expensive repairs. By following the belt diagram, car owners can easily identify the correct belt size and routing, ensuring a proper fit and alignment. This not only increases the overall lifespan of the belt but also helps maintain the optimal performance of the accessories.
In conclusion, the Chevy 5.7 belt diagram plays a vital role in understanding and maintaining the belt system of the engine. Whether it’s for troubleshooting or routine maintenance, having a clear visual representation of the belt’s path is crucial. It helps to identify and resolve any issues promptly, ensuring the smooth operation of the accessory components and preventing costly repairs in the long run.
Identifying the Components of a Chevy 5.7 Belt Diagram
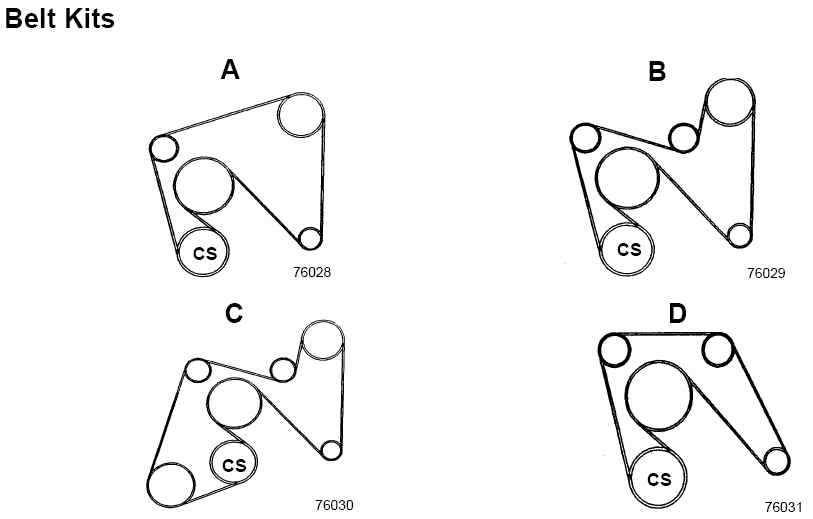
A Chevy 5.7 belt diagram is a visual representation of the routing and arrangement of the various belts in the engine system of a Chevy vehicle equipped with a 5.7-liter engine. This diagram provides a detailed overview of the different components involved in the belt drive system and helps technicians and vehicle owners understand how the belts are positioned and connected.
One of the key components in a Chevy 5.7 belt diagram is the crankshaft pulley. The crankshaft pulley is connected to the engine’s crankshaft and assists in driving the belts. It is typically the largest pulley and is located at the front of the engine. The crankshaft pulley is responsible for transferring the rotational energy from the engine to the belts.
Another important component shown in the belt diagram is the tensioner pulley. The tensioner pulley is responsible for maintaining the proper tension in the belts. It ensures that the belts remain tight and do not slip off the pulleys. The tensioner pulley is typically spring-loaded and applies pressure to the belts to keep them properly tensioned.
The belt diagram also displays the various accessories and components that are driven by the belts. These may include the alternator, power steering pump, water pump, and air conditioning compressor. Each accessory has its own dedicated pulley, which is connected to the corresponding component. The belts transfer the rotational energy from the crankshaft pulley to these accessories, enabling them to perform their respective functions.
The belt diagram may also indicate any idler pulleys present in the system. Idler pulleys are used to change the direction of the belt or to provide additional support. They help guide the belt along its intended path and prevent it from slipping or coming off the pulleys. Idler pulleys are typically smaller in size and may be located at various points along the belt routing.
In summary, a Chevy 5.7 belt diagram provides a visual representation of the components involved in the belt drive system of a Chevy vehicle with a 5.7-liter engine. It showcases the crankshaft pulley, tensioner pulley, accessories, idler pulleys, and their respective connections. This diagram is a valuable reference tool for understanding the routing and arrangement of the belts in the engine system.
Step-by-Step Guide: How to Read and Interpret a Chevy 5.7 Belt Diagram
Understanding a Chevy 5.7 belt diagram is essential for proper maintenance and troubleshooting of the vehicle’s belt system. The belt diagram provides a visual representation of how the various belts are routed and connected to different components of the engine. By following the belt diagram, you can ensure that the belts are installed correctly and functioning optimally.
Here is a step-by-step guide on how to read and interpret a Chevy 5.7 belt diagram:
- Identify the different components: Before reading the belt diagram, familiarize yourself with the different components of the engine that are connected by belts. This includes the alternator, water pump, power steering pump, air conditioning compressor, and other accessories.
- Locate the belt routing diagram: The belt routing diagram is typically located on a decal or sticker under the hood of the vehicle. It may also be available in the vehicle’s owner’s manual. Find the diagram and ensure it matches your specific Chevy 5.7 engine model.
- Follow the path of the belts: Start at the crankshaft pulley and trace the path of each belt as indicated in the diagram. The belt diagram will show you the correct route the belts should take around each accessory pulley. Pay attention to any twists or turns in the belt path.
- Identify the tensioner pulleys: Belt tensioner pulleys are designed to maintain proper tension on the belts. In the belt diagram, they are usually labeled with a “T.” Make sure you locate these pulleys and understand their function in keeping the belts tight.
- Check for proper belt alignment and tension: As you follow the belt diagram, ensure that each belt is correctly aligned with the pulleys and tensioner. The belts should not be loose or excessively tight. Refer to the diagram to verify the correct tension for each belt.
- Refer to the diagram for belt replacement: If you need to replace any of the belts in your Chevy 5.7 engine, the belt diagram will guide you in removing the old belt and installing the new one. Follow the steps provided in the diagram to ensure a proper and secure fitment.
By following this step-by-step guide and using the Chevy 5.7 belt diagram, you can effectively read and interpret the diagram to ensure your vehicle’s belts are installed correctly and functioning properly.
Frequently Asked Questions About Chevy 5.7 Belt Diagrams
If you own a Chevy 5.7 engine and are looking for a belt diagram, you may have some questions. Here are some frequently asked questions about Chevy 5.7 belt diagrams along with answers to help you out.
1. What is a belt diagram?
A belt diagram is a graphical representation of how the belts in an engine are installed and routed. It shows the path that the belts follow around the various pulleys in the engine and helps ensure that the belts are installed correctly.
2. Why do I need a belt diagram for my Chevy 5.7 engine?

A belt diagram is essential for installing and replacing the belts in your Chevy 5.7 engine. It provides a visual guide for correctly routing the belts around the pulleys, preventing any potential damage or malfunction caused by incorrect installation.
3. Where can I find a belt diagram for my Chevy 5.7 engine?
You can find a belt diagram for your Chevy 5.7 engine in various places. One option is to consult the owner’s manual of your vehicle, as it often contains a detailed diagram of the belt routing. Alternatively, you can search online for a Chevy 5.7 belt diagram or visit a Chevrolet dealership for assistance.
4. Can I install the belts without referring to a belt diagram?

While it is possible to install the belts without referring to a belt diagram, it is not recommended. Without a diagram, there is a higher risk of incorrectly routing the belts, which can lead to belt slippage, reduced performance, or even engine damage. It is always best to consult a belt diagram to ensure proper installation.
5. Are belt diagrams the same for all Chevy 5.7 engines?
No, belt diagrams can vary depending on the specific model and year of your Chevy 5.7 engine. It is essential to refer to the correct diagram for your specific vehicle to ensure proper belt installation.
In conclusion, a belt diagram is a crucial tool for correctly installing and replacing the belts in your Chevy 5.7 engine. It provides a visual guide to ensure that the belts are properly routed around the pulleys, preventing any potential damage or malfunction. Make sure to consult the right diagram for your specific vehicle and model to ensure a successful belt installation.
Troubleshooting: Common Issues with Chevy 5.7 Belt Diagrams

In this section, we will discuss some of the common issues that may arise when dealing with Chevy 5.7 belt diagrams and provide troubleshooting solutions for each problem.
1. Belt Misalignment: One common issue with belt diagrams is belt misalignment. This can occur if the belt is not properly installed or if the pulleys are not aligned correctly. To troubleshoot this issue, make sure to carefully follow the belt diagram and double-check the alignment of the pulleys. If necessary, adjust the position of the pulleys to ensure proper alignment.
2. Belt Tension Issues: Another common problem is incorrect belt tension. If the belt is too loose or too tight, it can cause various problems such as slippage, noise, or premature belt wear. To troubleshoot this issue, use a belt tension gauge to measure the tension of the belt and compare it to the specifications provided by the manufacturer. Adjust the tension accordingly to ensure proper belt operation.
3. Belt Damage: Belt damage can occur due to various reasons, such as debris getting trapped between the belt and pulleys or excessive belt wear. If you notice any signs of belt damage, such as cracks, fraying, or excessive wear, it is important to replace the belt as soon as possible. Refer to the belt diagram to ensure proper installation of the new belt.
4. Incorrect Belt Routing: One of the most common issues with belt diagrams is incorrect belt routing. If the belt is routed incorrectly, it can cause the accessories to operate improperly or not at all. To troubleshoot this issue, carefully follow the belt diagram and compare it to the actual routing of the belt. If there are any discrepancies, re-route the belt according to the diagram.
5. Belt Noise: Belt noise, such as squealing or chirping, can be a sign of belt misalignment, incorrect tension, or belt damage. To troubleshoot this issue, inspect the belt for any signs of misalignment or damage. Adjust the belt tension if necessary and ensure proper alignment of the pulleys. If the noise persists, consider replacing the belt to eliminate any potential issues.
- Conclusion:
In conclusion, while Chevy 5.7 belt diagrams are helpful in providing guidance for belt installation, there are common issues that may arise. By troubleshooting these issues, including belt misalignment, tension problems, damage, incorrect routing, and noise, you can ensure proper belt operation and prevent potential problems. It is important to refer to the belt diagram and follow the manufacturer’s guidelines for belt installation and maintenance.