
Installing a dryer in your home requires proper electrical wiring to ensure safe and efficient operation. One crucial aspect of this is the correct wiring of a 220-volt outlet for the dryer. A 220-volt outlet, also known as a 220-volt plug, provides the necessary power for the dryer to function effectively.
Understanding the wiring diagram for a 220-volt dryer outlet is essential for homeowners or enthusiasts who are looking to complete a DIY dryer installation. The diagram outlines the electrical connections and circuits involved in supplying power to the dryer, ensuring proper voltage and current flow to operate the appliance optimally.
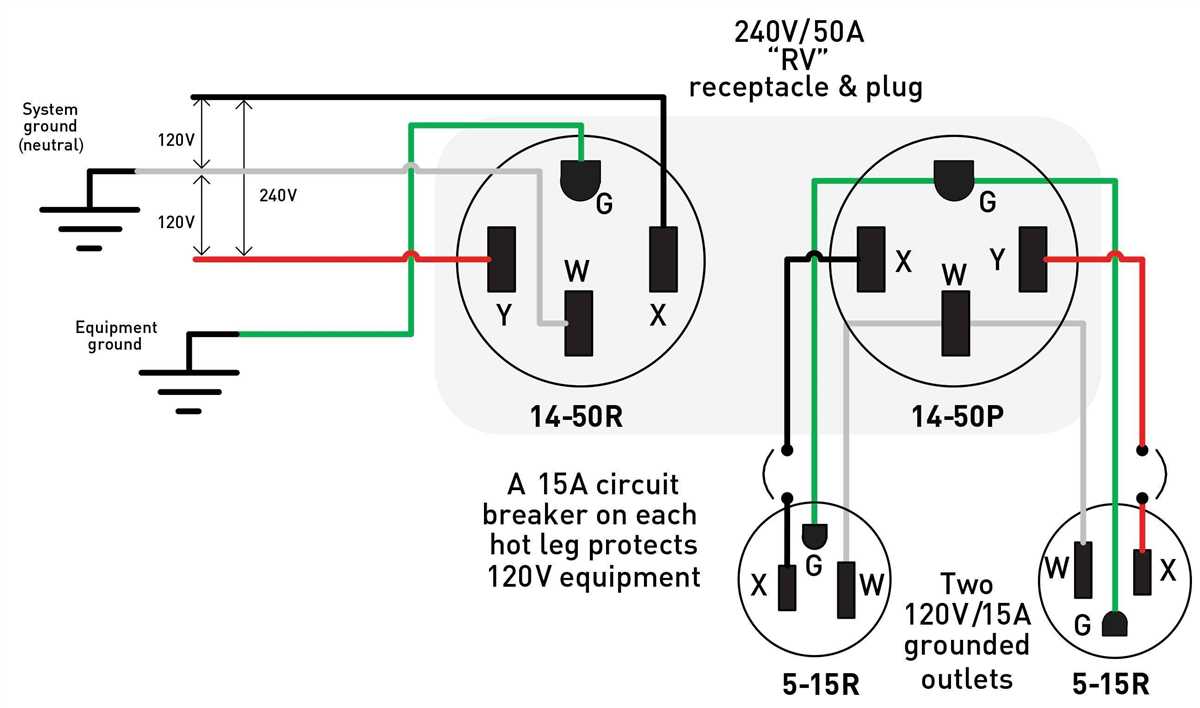
A typical 220 wiring diagram for a dryer outlet will show the necessary wires and connections that need to be made, including the hot wires, the neutral wire, and the grounding wire. It will also indicate the specific voltages and current ratings required for safe operation.
While it is always advisable to consult a professional electrician for any electrical work, having a basic understanding of the 220 wiring diagram for a dryer outlet can be helpful when troubleshooting electrical issues or when discussing a dryer installation with an electrician.
Understanding the Basics of 220 Wiring Diagram for Dryer
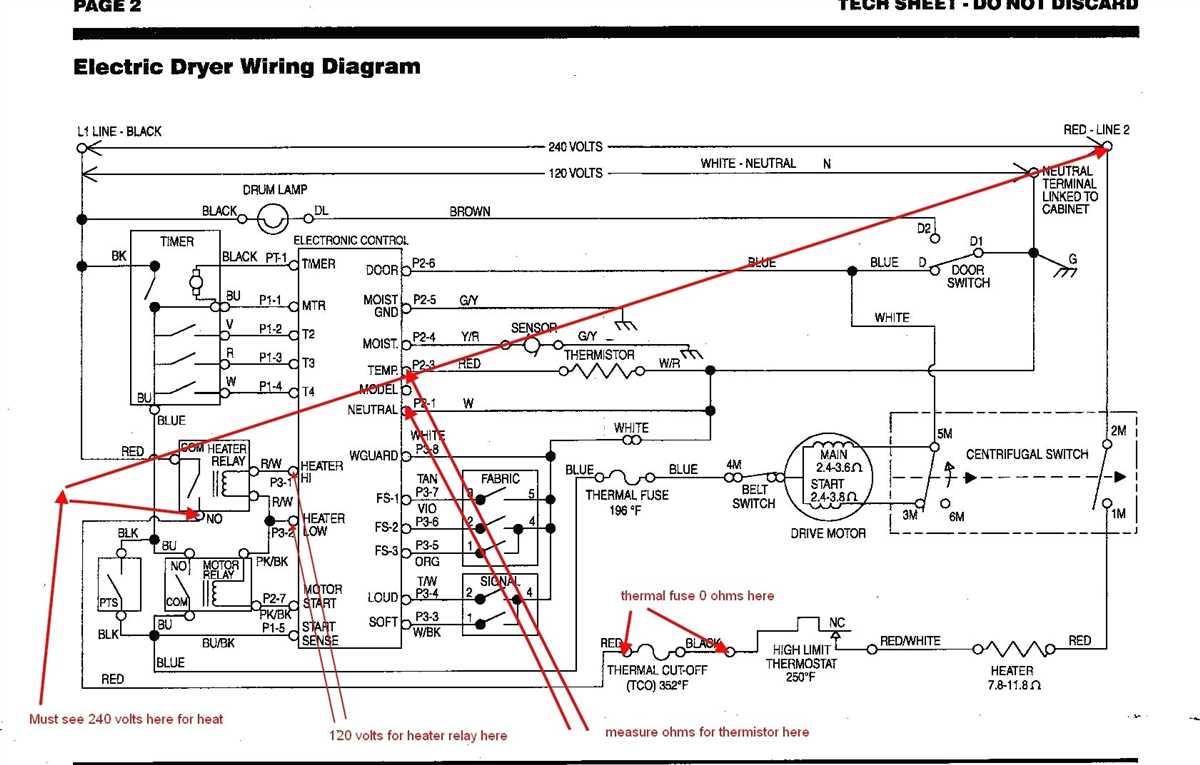
When it comes to installing or repairing a dryer, understanding the basics of 220 wiring is essential. A 220 wiring diagram for a dryer shows the electrical connections required to power the appliance using a 220-volt circuit. This type of wiring diagram provides crucial information on how to properly connect the dryer to the electrical supply, ensuring safety and efficient operation.
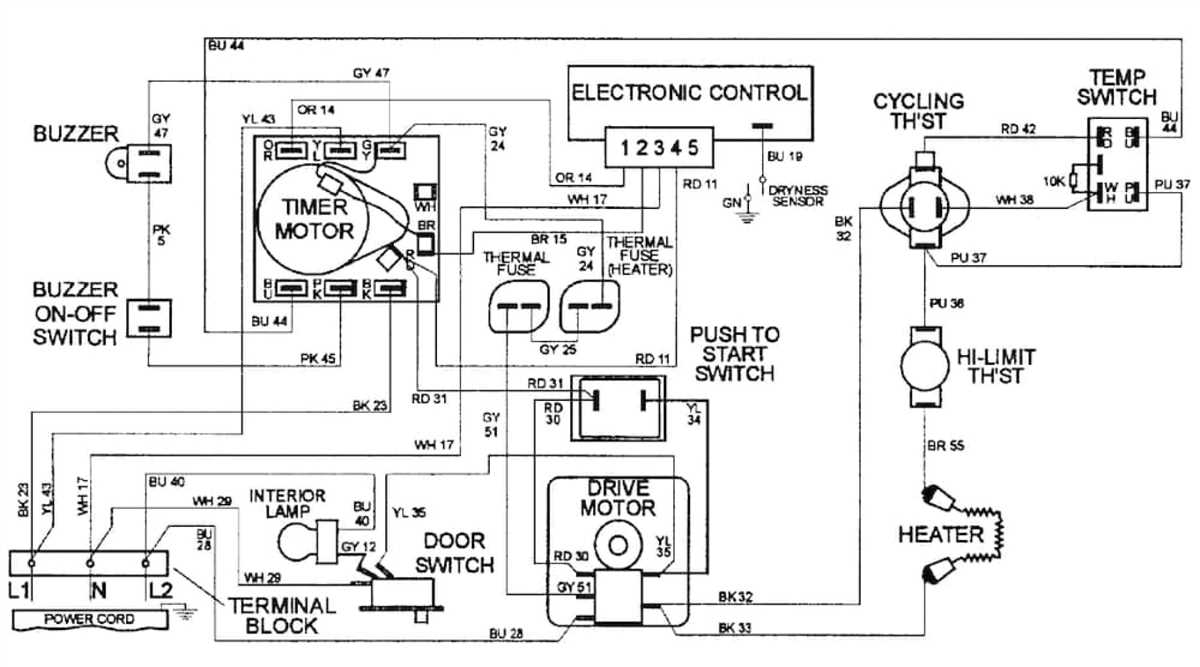
Components: A typical 220 wiring diagram for a dryer includes several key components. These include the circuit breaker or fuse box, the dryer receptacle outlet, the dryer cord, and the dryer plug. Each of these components plays a vital role in the electrical connection and must be properly installed and connected for the dryer to function correctly.
Electrical Connections: The 220 wiring diagram for a dryer illustrates the specific electrical connections required for the appliance. It shows how the circuit breaker or fuse box should be connected to the dryer receptacle outlet, and how the dryer cord should be connected to the dryer plug. Following these connections correctly is crucial for preventing electrical hazards and ensuring the dryer operates safely.
Wire Size and Type: Another important aspect of a 220 wiring diagram for a dryer is the wire size and type required for the electrical connections. The diagram will specify the appropriate wire gauge, typically ranging from 10 to 8 AWG (American Wire Gauge), depending on the specific requirements of the dryer model. Additionally, the diagram will indicate whether copper or aluminum wire should be used, as this can vary depending on local electrical codes.
Proper Grounding: Proper grounding is crucial in 220 wiring for a dryer. The wiring diagram will illustrate how the dryer receptacle outlet should be grounded to ensure electrical safety. This usually involves connecting the grounding wire to a metal grounding rod or other suitable grounding method. Grounding is essential for diverting electrical faults and preventing shock hazards.
Professional Assistance: While understanding a 220 wiring diagram for a dryer is important, it is always recommended to seek professional assistance when dealing with electrical installations or repairs. Electricians are trained to handle these tasks safely and efficiently, ensuring that the dryer is properly connected and operates smoothly.
In conclusion, understanding the basics of a 220 wiring diagram for a dryer is crucial for anyone involved in the installation or repair of this appliance. It provides essential information on the electrical connections, wire size and type, proper grounding, and the necessary components. By following the diagram and seeking professional assistance if needed, you can ensure a safe and efficient electrical connection for your dryer.
Overview of Dryer Electrical Connections
When installing a dryer, it is essential to ensure that the electrical connections are properly set up to ensure safe and efficient operation. The electrical connections for a dryer typically involve a 220-volt circuit, which is commonly used for heavy-duty appliances. Understanding the wiring diagram for a dryer is crucial in making the necessary connections.
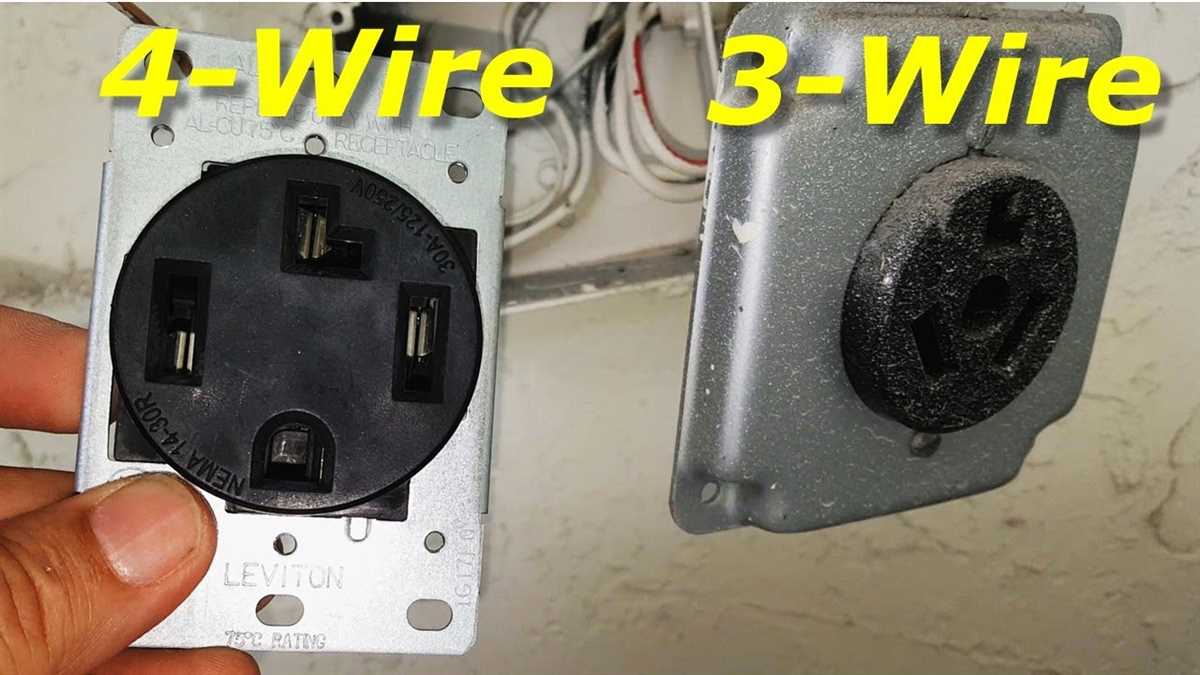
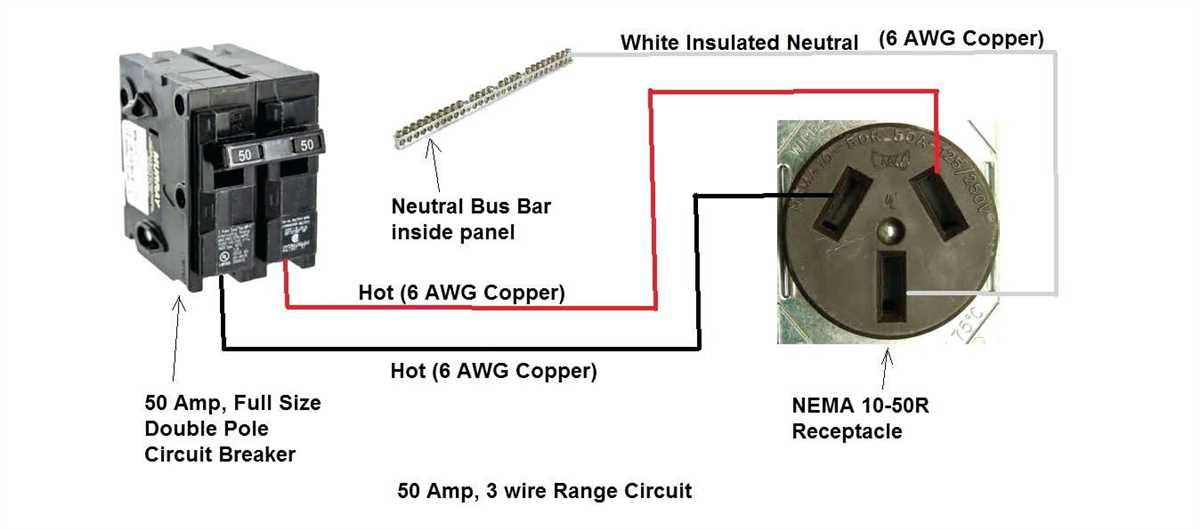
One of the key components in the electrical connections for a dryer is the power cord. The power cord is often made up of three insulated wires: two hot wires and one neutral wire. The hot wires are typically black and red, while the neutral wire is usually white. These wires are responsible for delivering the necessary voltage to the dryer.
The wiring diagram for a dryer will usually illustrate the connections between the power cord and the terminal block located at the back of the dryer. The terminal block is where the wires from the power cord will be connected. It is essential to ensure that the correct wires are connected to the appropriate terminals on the block to avoid any electrical mishaps.
Additionally, the wiring diagram will also indicate the connections for the grounding wire. The grounding wire is an important safety feature that protects against electrical shocks. It is typically a green or bare copper wire that should be securely connected to the dryer’s metal frame or a designated grounding terminal.
Summary:
- The electrical connections for a dryer involve a 220-volt circuit.
- The power cord typically consists of two hot wires (black and red) and one neutral wire (white).
- The wiring diagram illustrates the connections between the power cord and the terminal block.
- The grounding wire is an important safety feature and should be properly connected.
Choosing the Right Wiring Diagram for Your Dryer
When it comes to installing or repairing a dryer, having the correct wiring diagram is essential. A wiring diagram is a visual representation of the electrical connections and circuitry in your dryer, allowing you to understand how the different components are connected. By choosing the right wiring diagram, you can ensure that the installation or repair process goes smoothly and safely.
One important factor to consider when choosing a wiring diagram for your dryer is the voltage and current requirements. Different dryers have different voltage and current ratings, so it’s crucial to select a wiring diagram that matches the specifications of your specific dryer model. By following the correct wiring diagram, you can prevent electrical problems and ensure that your dryer operates efficiently.
The wiring diagram should also indicate the correct wire color codes for your dryer. Each wire is typically color-coded to indicate its purpose, such as power supply, ground, or control signals. By following the correct wire color codes, you can easily identify and connect the wires during installation or repair. This ensures that the electrical connections are made correctly and reduces the risk of electrical malfunctions or accidents.
It’s also important to consider the layout and organization of the wiring diagram. A well-designed wiring diagram should be clear, easy to read, and labeled properly. It should include all the necessary details, such as the location of terminals, connectors, and switches. Additionally, it may be helpful to have a legend or key that explains the different symbols and abbreviations used in the diagram.
- Choose a wiring diagram that matches the voltage and current requirements of your dryer.
- Ensure that the wiring diagram includes the correct wire color codes.
- Select a well-designed wiring diagram with clear labels and proper organization.
By choosing the right wiring diagram for your dryer and following it carefully, you can ensure a safe and successful installation or repair. If you’re unsure about the wiring or electrical connections, it’s always best to consult a professional electrician or seek guidance from the manufacturer to avoid any potential hazards. Remember, electrical work should always be done with caution and attention to detail.
Step-by-Step Guide to Wiring a Dryer with a 220V Circuit
Wiring a dryer with a 220V circuit requires precision and attention to detail. By following these step-by-step instructions, you can ensure a safe and efficient installation process.
1. Turn off the Power: Before starting any electrical work, it is crucial to turn off the power at the main breaker box. This will prevent any potential accidents or electrical shocks.
2. Gather the Necessary Tools and Materials: You will need a few tools and materials to complete the wiring process. These may include wire strippers, electrical tape, wire nuts, a voltage tester, a screwdriver, and the appropriate gauge of electrical wire.
3. Identify the Circuit Requirements: Check the dryer’s specifications and identify the circuit requirements. This will help you determine the correct gauge of wire to use and the amperage of the breaker required.
4. Install the Breaker: Turn off the main power switch and remove the appropriate breaker slot cover. Install the correct amperage breaker into the panel and connect the hot wires to the breaker. Attach the neutral wire to the neutral bar and the ground wire to the ground bar.
5. Run the Electrical Wire: From the breaker panel, run the appropriate gauge of electrical wire through the walls and ceilings to the dryer location. Make sure to secure the wire with staples or cable ties to prevent any accidental damage.
6. Connect the Wiring to the Dryer: At the dryer location, strip the insulation from the ends of the wires and connect them to the appropriate terminals on the dryer. Use wire nuts to secure the connections and wrap them with electrical tape for added protection.
7. Test the Circuit: After completing the wiring, double-check all connections and make sure they are secure. Use a voltage tester to verify that power has been restored to the circuit. If everything is in order, you can turn on the main breaker.
8. Test the Dryer: Plug in the dryer and test it to ensure that it is receiving power and operating correctly. Run a short cycle to verify that the heating elements are functioning as they should.
By following these steps and taking all necessary safety precautions, you can safely wire a dryer with a 220V circuit. If you are not confident in your electrical skills, it is always best to consult a professional electrician for assistance.
Common Mistakes to Avoid when Wiring a Dryer
Wiring a dryer may seem like a simple task, but it is important to avoid certain mistakes to ensure proper installation and safety. Here are some common mistakes to avoid when wiring a dryer:
1. Incorrect wire sizing:
One of the most crucial aspects of wiring a dryer is using the correct wire size. Using a wire that is too small can lead to overheating and fire hazards. Conversely, using a wire that is too large can be a waste of money and may not fit properly in the designated connections. It is essential to consult the manufacturer’s guidelines or consult a professional electrician to determine the appropriate wire size for your dryer.
2. Loose or improper connections:
Another common mistake is making loose or improper connections when wiring a dryer. It is important to ensure that all wires are securely tightened and properly connected to their respective terminals. Loose connections can lead to electrical malfunctions, reduced efficiency, and even electrical shocks. Double-check all connections and use appropriate tools to secure them properly.
3. Lack of proper grounding:
Proper grounding is essential for the safe operation of a dryer. Failure to provide a proper ground connection can result in electrical shocks and damage to the dryer or other electrical equipment. Always make sure to connect the grounding wire to the designated terminal and verify that the grounding circuit is intact and properly functioning.
4. Overloading the circuit:
When wiring a dryer, it is important to consider the electrical load it will draw. Overloading the circuit by connecting too many appliances or devices to the same circuit can lead to circuit breaker trips and even electrical fires. Make sure to check the electrical load capacity of the circuit and ensure that it is suitable for the dryer’s power requirements.
5. Neglecting safety precautions:
Lastly, neglecting safety precautions is a common mistake when wiring a dryer. It is essential to follow all safety guidelines and use appropriate safety equipment, such as gloves and goggles, to protect yourself from potential hazards. Always switch off the power supply before working on any electrical connections and consult a professional if you are unsure about any aspect of the wiring process.
By avoiding these common mistakes and following proper wiring procedures, you can ensure a safe and efficient operation of your dryer. If you are uncertain about any step of the wiring process, it is always best to consult a professional electrician to ensure that the job is done correctly and safely.
Safety Precautions for Wiring a 220V Dryer
Before attempting to wire a 220V dryer, it is crucial to follow proper safety precautions to prevent any accidents or electrical hazards. Working with high voltage electricity can be dangerous, so it is important to prioritize safety throughout the wiring process.
Here are some essential safety measures to consider when wiring a 220V dryer:
- Turn off the power: Before starting any work on the electrical circuit, make sure to turn off the power supply to the area where the dryer will be connected. This can be done by turning off the main circuit breaker or disconnecting the power source.
- Wear protective gear: It is essential to wear appropriate protective gear, such as insulated gloves and safety glasses, to protect yourself from potential electric shocks or injuries. Ensure that your clothing is non-conductive and avoid wearing any metal jewelry.
- Use the correct wire size: When wiring a 220V dryer, it is important to use the correct wire size to handle the higher voltage and current. Using inadequate wire size can lead to overheating and potential fire hazards. Refer to the dryer’s manufacturer guidelines or consult an electrician to determine the appropriate wire size for your specific dryer model.
- Secure the wiring properly: Make sure all wiring connections are securely tightened and properly insulated. Use appropriate wire connectors, such as wire nuts, to secure the connections and prevent any loose wires that could lead to short circuits or electrical arcing.
- Avoid overloading circuits: Ensure that the electrical circuit you are connecting the dryer to can handle the load. Overloading the circuit can cause overheating and trip the circuit breaker. Consider consulting an electrician to assess the circuit’s capacity and make any necessary modifications.
- Test the connections: After completing the wiring, it is crucial to test the connections using a voltage tester or multimeter to ensure proper voltage and continuity. This will help identify any wiring issues or faulty connections that need to be addressed before powering the dryer.
Following these safety precautions when wiring a 220V dryer will help ensure a safe and reliable electrical connection. If you are unsure about any aspect of the wiring process, it is always recommended to consult a qualified electrician for professional assistance.
Final Tips for a Successful 220 Wiring Installation
Installing a 220-volt wiring for a dryer can be a complex task, but with careful planning and attention to detail, it can be done successfully. Here are some final tips to ensure a successful installation:
- Plan and prepare: Before starting the installation, carefully plan out the wiring and ensure you have all the necessary tools and materials. This includes the appropriate gauge of wire, connectors, and circuit breakers.
- Turn off power: Before working on any electrical installation, always turn off the power at the circuit breaker. This will prevent the risk of electrical shock and ensure your safety.
- Follow code and regulations: Make sure to follow all local electrical codes and regulations when installing the 220-volt wiring. These codes are in place to ensure the safety and proper functioning of electrical systems.
- Use proper connectors: Use the correct connectors to join the wires together. This will ensure a secure connection and prevent any loose connections that could pose a safety hazard.
- Label wires: Properly label all wires and connections to make future troubleshooting or repairs easier. This will save you time and effort in the long run.
- Test the installation: After completing the wiring installation, test the circuit to ensure everything is working correctly. Use a voltage tester to check for the presence of electricity and ensure all connections are secure.
Following these final tips will help ensure a safe and successful installation of 220-volt wiring for your dryer. If you are unsure about any aspect of the installation, it is always best to consult a licensed electrician. Remember, safety should always be the top priority when working with electrical systems.