
If you own a 2012 Chrysler 200 and are searching for a belt diagram for the 2.4-liter engine, you’ve come to the right place. The belt diagram is an essential tool for understanding how the various components of the engine are connected and how they work together to keep your vehicle running smoothly.
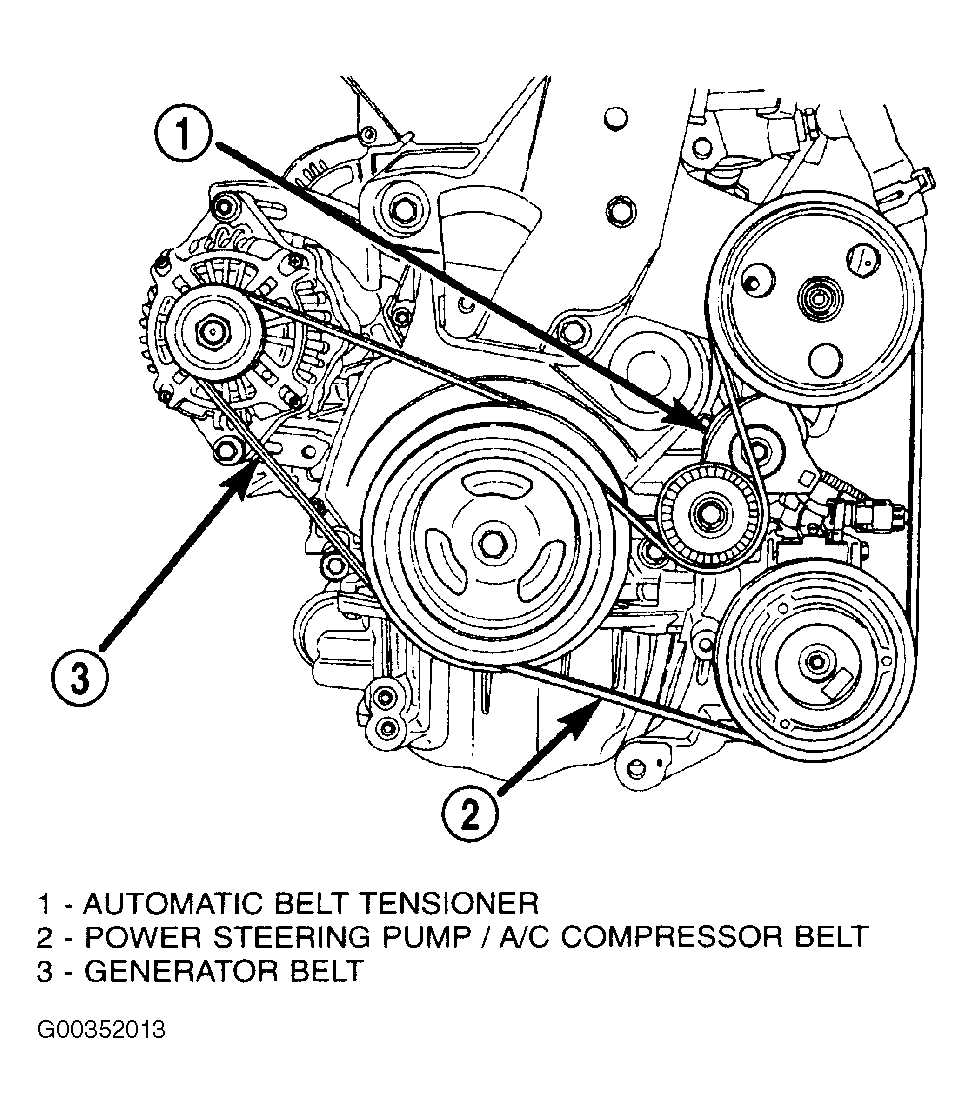
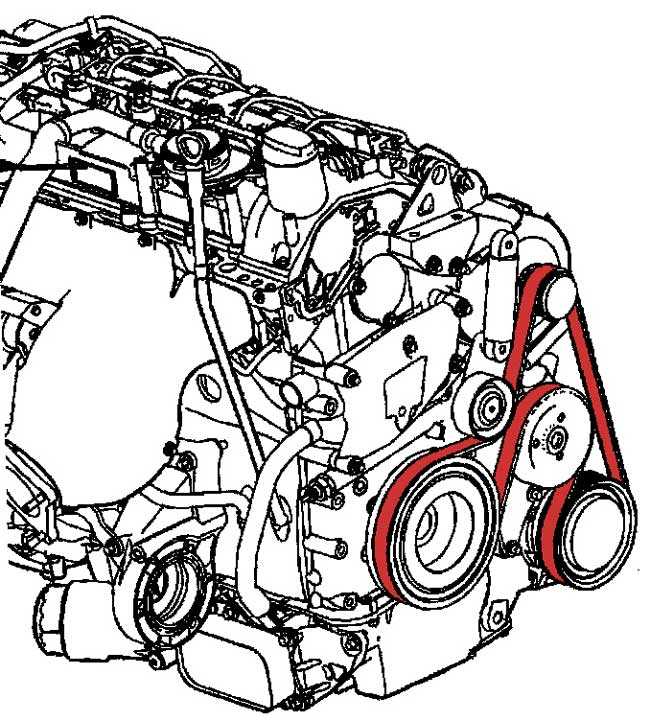
The 2012 Chrysler 200 belt diagram for the 2.4-liter engine shows the routing of the serpentine belt, which is responsible for driving multiple systems of the engine, including the alternator, power steering pump, water pump, and air conditioning compressor. Having a belt diagram on hand can be extremely useful for troubleshooting any issues with these systems and identifying the correct belt tension and alignment.
With the 2012 Chrysler 200 belt diagram for the 2.4-liter engine, you can easily identify the pulleys and belt path, ensuring that you install the belt correctly. This can save you time and frustration during the installation process and help prevent any damage to the belt or other engine components.
Chrysler 200 Belt Diagram 2.4: A Comprehensive Guide
If you own a Chrysler 200 with a 2.4 liter engine, understanding the belt diagram is essential for proper maintenance and troubleshooting. The belt diagram shows the path and tension of each belt in the engine, allowing you to identify any potential issues and ensure the belts are properly aligned and tensioned.
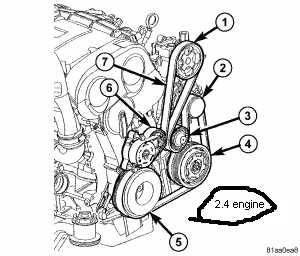
1. Serpentine Belt: The serpentine belt in the Chrysler 200 2.4 engine is a crucial component that drives various accessories, such as the alternator, power steering pump, and air conditioning compressor. The belt diagram illustrates the correct routing of the serpentine belt, ensuring that it is properly installed and functioning correctly.
2. Tensioner Pulley: The tensioner pulley is responsible for maintaining the proper tension of the serpentine belt. The belt diagram indicates the location and position of the tensioner pulley, allowing you to adjust its position to ensure the optimal tension of the serpentine belt for smooth operation.
3. Crankshaft Pulley: The crankshaft pulley is a critical component that helps drive the serpentine belt and other engine accessories. The belt diagram provides an accurate representation of the position and alignment of the crankshaft pulley, enabling you to check for any damage or misalignment that could affect the overall performance of the engine.
4. Other Belts: Apart from the serpentine belt, there may be additional belts in the Chrysler 200 2.4 engine, such as the accessory drive belt. The belt diagram includes all the belts in the engine, allowing you to identify them and ensure their correct installation and functioning.
5. Belt Tensioning: The belt diagram also provides information on the correct tensioning of the belts. Proper tensioning is essential to prevent belt slippage, excessive wear, and premature failure. The diagram guides you on how to adjust the tension of each belt to maintain optimal performance and longevity.
By referring to the Chrysler 200 Belt Diagram 2.4 and understanding its components and routing, you can effectively maintain and troubleshoot any belt-related issues in your vehicle. Regularly inspecting and adjusting the belts based on the diagram’s guidance will help ensure the smooth operation and longevity of your Chrysler 200’s engine.
Understanding the Basics of the Chrysler 200 Belt System
A well-functioning belt system is essential for the proper functioning of a Chrysler 200 engine. The belt system is responsible for driving various engine components, including the alternator, water pump, power steering pump, and air conditioning compressor. Understanding how the belt system works and knowing the proper belt routing is crucial for maintaining and repairing your vehicle.
One important aspect of the belt system is the serpentine belt, which is a single, continuous belt that drives multiple engine components. It is named so because it snakes around various pulleys and loops throughout the engine compartment. The serpentine belt is driven by the crankshaft pulley and is responsible for transferring power from the engine to the various components it drives.
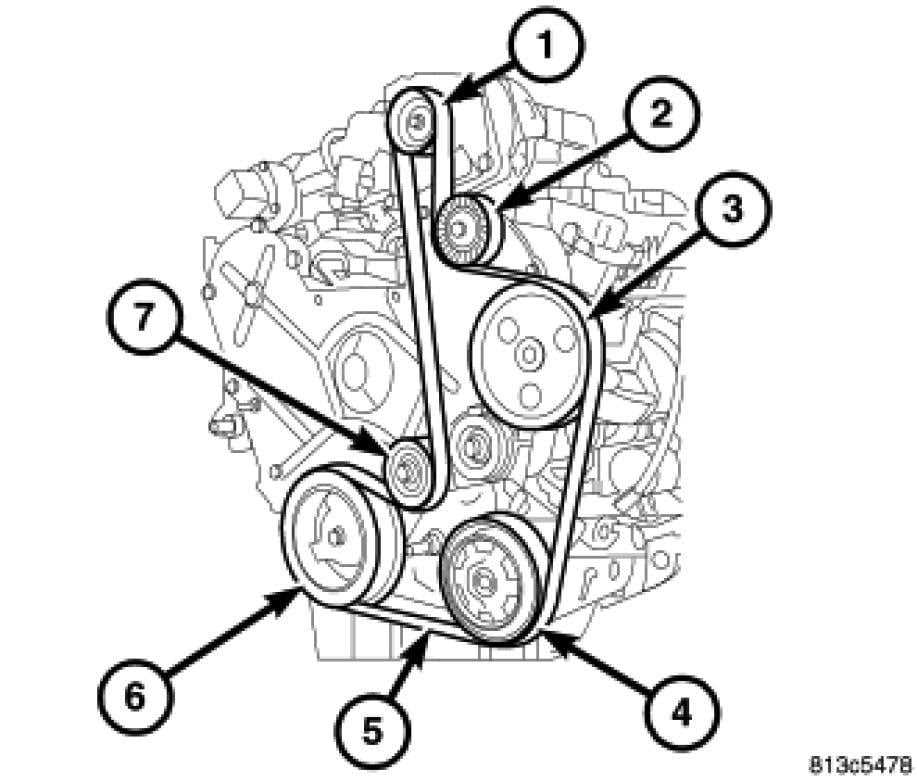
- Belt Routing: The proper belt routing is vital for the optimal performance of the engine. It ensures that each component is driven at the correct speed and receives the necessary power. The belt routing diagram for the 2012 Chrysler 200 with a 2.4L engine is as follows:
| ENGINE COMPONENT | BELT ROUTING |
| Alternator | Underneath the idler pulley, over the A/C compressor and around the water pump |
| Water Pump | Around the tensioner, over the power steering pump, and underneath the idler pulley |
| Power Steering Pump | Around the crankshaft pulley, A/C compressor, and over the tensioner |
| Air Conditioning Compressor | Underneath the tensioner and around the alternator and crankshaft pulley |
It is essential to follow the belt routing diagram precisely to avoid incorrect alignment or tension, which can lead to premature wear or failure of the belt or components it drives. Replace the belt if it shows signs of wear, such as cracks, fraying, or stretching. Additionally, ensure that the belt tension is correct according to the manufacturer’s specifications.
Regular inspection and maintenance of the Chrysler 200 belt system, including proper belt routing and tension, will help ensure the longevity and reliable performance of your vehicle’s engine. It is always recommended to consult the vehicle’s service manual or seek professional assistance if you are unsure about any aspect of the belt system maintenance or repair.
Identifying the Components of the Chrysler 200 Belt System
The Chrysler 200 is equipped with a belt system that includes several components responsible for powering various parts of the vehicle. Understanding these components and their functions is crucial for proper maintenance and troubleshooting. Here is a breakdown of the main components of the Chrysler 200 belt system:
- Drive Belt: The drive belt, also known as the serpentine belt, is the main component of the belt system. It is a single, continuous belt that wraps around several pulleys to power various engine accessories, such as the alternator, power steering pump, and air conditioning compressor.
- Tensioner Pulley: The tensioner pulley is responsible for maintaining the proper tension of the drive belt. It is equipped with a spring-loaded mechanism that automatically adjusts the tension of the belt as needed to ensure efficient and reliable operation.
- Idler Pulley: The idler pulley is another important component of the belt system. It is designed to change the direction of the belt and provide additional tension to ensure proper belt alignment and prevent slipping.
- Water Pump Pulley: The water pump pulley is connected to the water pump, which is responsible for circulating coolant throughout the engine to prevent overheating. The belt powers the water pump, ensuring that the coolant flows efficiently.
- Crankshaft Pulley: The crankshaft pulley, also known as the harmonic balancer, is connected to the engine’s crankshaft. It helps to absorb vibrations and provides power to other engine components, such as the alternator and air conditioning compressor.
Proper maintenance of the Chrysler 200 belt system is essential to prevent belt failure and ensure the smooth operation of the vehicle. Regular inspection of the belt for signs of wear, damage, or improper tension is recommended. If any issues are detected, it is important to address them promptly to avoid further damage to the belt system and other engine components.
Step-by-Step Guide: How to Inspect the Belt System
Regular inspection of the belt system in your 2012 Chrysler 200 with a 2.4-liter engine is crucial to ensure its proper functioning and prevent any potential issues. Here is a step-by-step guide on how to inspect the belt system:
1. Park your vehicle: Start by parking your vehicle in a safe and well-lit area. Make sure the engine is turned off and the keys are removed from the ignition before proceeding with the inspection.
2. Open the hood: Locate the hood release lever inside the vehicle and pull it to open the hood. Secure the hood with the prop rod to keep it open while performing the inspection.
3. Locate the belt system: The belt system is typically located at the front of the engine. It consists of several belts that drive various components, such as the alternator, power steering pump, and air conditioning compressor. Take a moment to familiarize yourself with the layout of the belts.
4. Check for visual damage: Inspect each belt for any signs of visual damage, such as cracks, fraying, or missing chunks. Pay close attention to the belt edges and ensure there are no signs of excessive wear. If you notice any damage, the belt should be replaced immediately.
5. Check belt tension: Press on the middle of each belt with your finger. It should feel firm and have minimal give. If the belt feels loose or has too much play, it may need to be adjusted or replaced. Refer to the vehicle’s manual for specific instructions on how to adjust belt tension.
6. Check belt alignment: Carefully observe the alignment of each belt as it sits on the pulleys. The belts should run smoothly and parallel to each other. If you notice any misalignment, it may indicate an issue with the pulleys or the belt tensioner.
7. Check belt wear patterns: Inspect the belts for any signs of abnormal wear patterns. This may include uneven wear, glazing, or shiny spots. These signs can indicate improper belt tension or misalignment. Address the underlying cause and replace the belt if necessary.
8. Consult a professional: If you are unsure about any aspect of the belt system inspection or if any issues are identified, it is recommended to consult a professional mechanic or refer to the vehicle’s manual for further guidance.
Regular inspection and maintenance of the belt system is essential to ensure the reliable operation of your vehicle. By following these steps and staying vigilant, you can identify and address any potential belt system problems before they become major issues.
Common Belt Problems and How to Solve Them
The belts in a car play a vital role in the proper functioning of various components. They transfer power from the engine to the alternator, water pump, power steering pump, and air conditioning compressor. However, like any other car part, belts can experience problems over time. Here are some common belt problems and how to solve them.
1. Squeaking or chirping noise:
If you hear a squeaking or chirping noise coming from the belt area, it could be due to a loose or worn-out belt. Check the tension of the belt and ensure it is properly tightened. If the belt is worn, it may need to be replaced. Additionally, check for any debris or oil on the belt, as this can also cause noise. Clean the belt thoroughly if necessary.
2. Belt slipping:
A belt that is slipping can result in loss of power to the components it drives. This can lead to ineffective charging, cooling, or power steering. Inspect the belt for signs of wear, such as cracks or fraying. Replace the belt if necessary. If the belt is in good condition, check the tension. It may need to be adjusted.
3. Belt misalignment:
If the belt is not properly aligned with the pulleys, it can cause excessive wear and premature failure. Inspect the alignment of the belt and ensure it is positioned correctly on each pulley. If the belt keeps coming off or is consistently misaligned, there may be an issue with the pulleys or the belt tensioner. Replace any faulty components.
4. Overheating:
If the engine is overheating, it could be due to a malfunctioning belt that is not effectively driving the water pump. Inspect the belt for any signs of damage or wear. Make sure it is properly tensioned. If the belt is in good condition, the issue may lie with the water pump itself. Have it checked and repaired if necessary.
5. Belt breakage:
In rare cases, a belt can break due to excessive wear or sudden damage. If the belt breaks, it will result in the loss of power to the driven components. Inspect the belt regularly for signs of wear and replace it as needed. If a belt breakage occurs, have it replaced immediately to prevent further damage to the engine or other components.
Regular inspection and maintenance of the belts in your car can help prevent these common problems. Make sure to follow the manufacturer’s recommended maintenance schedule and address any issues promptly to ensure the longevity and reliability of your vehicle’s belts.
Replacing the Belt on the Chrysler 200: A Step-by-Step Tutorial
When it comes to maintaining your Chrysler 200, one important aspect to consider is the condition of the belt. The belt in your vehicle is responsible for transferring power from the engine to various components such as the alternator, power steering pump, and air conditioning compressor. Over time, the belt can wear out or become damaged, causing it to lose its effectiveness and potentially leading to the failure of these crucial components. In this tutorial, we will guide you through the process of replacing the belt on your Chrysler 200.
Step 1: Gather the necessary tools and materials. Before starting the replacement process, make sure you have all the required tools and materials at hand. This typically includes a socket wrench, a belt tensioner tool, a new replacement belt that matches the specifications of your Chrysler 200, and a diagram of the belt routing in your vehicle.
Step 2: Locate the belt tensioner. The belt tensioner is a crucial component that allows you to remove and install the belt. It is usually located near the front of the engine and can be identified by its pulley and spring-loaded arm. Use the belt tensioner tool to relieve tension on the belt by rotating the tensioner clockwise.
Step 3: Remove the old belt. Once the tension on the belt has been released, carefully slide it off the pulleys and remove it from the engine. Take note of the belt routing by referring to the diagram, as this will be helpful when installing the new belt.
Step 4: Install the new belt. Using the diagram as a reference, begin installing the new belt onto the appropriate pulleys. Start by placing the belt onto the largest pulley and work your way around, ensuring the belt is properly aligned and seated in each groove. Be careful not to force the belt, as this can cause damage.
Step 5: Apply tension to the belt. Once the new belt is installed, use the belt tensioner tool again to apply tension to the belt. Rotate the tensioner clockwise to tighten the belt until it is properly tensioned. Check the tension by pressing down on the belt with your thumb – it should have a slight give but not be too loose or too tight.
Step 6: Double-check the belt installation. After applying tension to the belt, visually inspect the belt routing to ensure it matches the diagram and that the belt is properly seated on all pulleys. Give the belt a gentle tug to ensure it is securely in place.
Step 7: Test the belt’s operation. Start the engine and let it idle for a few minutes. Listen for any unusual noises or vibrations that could indicate a problem with the belt. Additionally, check the functionality of the various components driven by the belt, such as the alternator, power steering, and air conditioning. If everything is in working order, congratulations – you have successfully replaced the belt on your Chrysler 200!
By following these step-by-step instructions, you can ensure that your Chrysler 200’s belt is properly replaced, helping to maintain the performance and reliability of your vehicle. Regularly inspect and replace the belt as needed to avoid any unexpected failures and costly repairs in the future. Remember to consult your vehicle’s owner’s manual or seek professional assistance if you encounter any difficulties during the replacement process.
Maintenance Tips to Ensure the Longevity of Your Chrysler 200 Belt System
Proper maintenance of your Chrysler 200 belt system is essential for its longevity and reliable performance. The drive belt, also known as the serpentine belt, is responsible for powering various engine accessories such as the alternator, power steering pump, and air conditioning compressor. Here are some maintenance tips to help you keep your Chrysler 200 belt system in top condition:
1. Regularly Inspect the Belt for Signs of Wear
Inspect the belt visually for any signs of cracking, splitting, fraying, or glazing. These are indications that the belt is worn and needs to be replaced. It’s recommended to inspect the belt every 25,000 miles or as specified in your vehicle’s owner’s manual.
2. Check Belt Tension
The belt should have the proper tension to ensure proper operation. If the belt is too loose, it may not be able to efficiently power the engine accessories. If the belt is too tight, it can put excessive strain on the components it powers. Use a belt tension gauge to check the tension and adjust it if necessary.
3. Replace the Belt According to the Manufacturer’s Recommendation
Replace the belt at the recommended intervals specified by the manufacturer. Over time, the belt can stretch and lose its tension, increasing the risk of failure. Keeping up with regular belt replacements can help prevent unexpected breakdowns and costly repairs.
4. Keep the Belt System Clean
Keep the belt system clean and free from debris. Dirt and debris can get trapped in the grooves of the belt, causing excessive wear. Regularly clean the belt with a mild soap and water solution to remove any built-up dirt or grime.
5. Avoid Overloading the Belt System
Avoid overloading the belt system by adding excessive accessories or modifications. This can put additional strain on the belt and the components it powers, leading to premature failure. Stick to the manufacturer’s recommendations for accessory usage.