
Motorized bikes, also known as motorized bicycles or motor bikes, are a popular mode of transportation that combine the convenience of a bicycle with the power of a small engine. These bikes can be a fun and cost-effective way to get around town, but they require some basic wiring knowledge to operate safely and efficiently.
A motorized bike wiring diagram is a visual representation of the electrical system of a motorized bike. It shows how the various components, such as the battery, ignition switch, lights, and sensors, are connected and how they interact with each other. Having a wiring diagram can be helpful when troubleshooting electrical issues or when making modifications to the bike’s electrical system.
The wiring diagram typically includes symbols that represent each component and lines that indicate the connections between them. It may also include information on wire colors and sizes to assist with the installation and maintenance of the electrical system. While the specific wiring diagram may vary depending on the make and model of the motorized bike, the basic principles remain the same.
In conclusion, a motorized bike wiring diagram is an essential tool for anyone working on or riding a motorized bike. It allows for a better understanding of the electrical system and helps ensure that the bike operates safely and efficiently. If you are new to motorized bikes or need assistance with the wiring, it is recommended to consult the manufacturer’s instructions or seek professional help to avoid any potential hazards.
Motorized Bike Wiring Diagram: A Detailed Guide
When it comes to motorized bikes, understanding the wiring diagram is essential for proper installation and troubleshooting. A wiring diagram is a visual representation of how the electrical components of a motorized bike are connected. It provides valuable information on the different wires, colors, and connections involved in the electrical system.
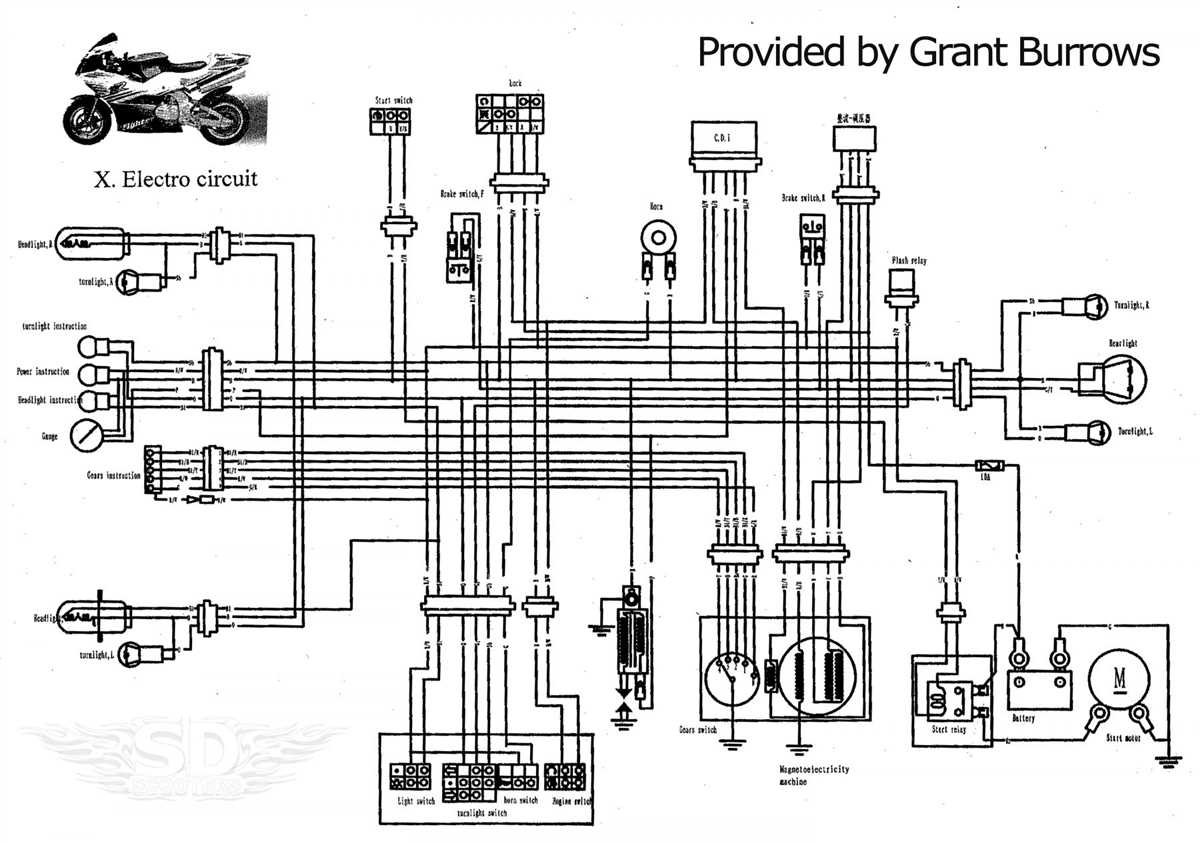
Components: The wiring diagram typically includes components such as the engine, magneto, CDI unit, ignition coil, regulator/rectifier, battery, lights, and switches. Each component has specific wiring connections that need to be properly understood and followed for the motorized bike to function correctly.
Key Wiring Connections:

- Engine: The engine is the heart of the motorized bike and has specific wiring connections for the magneto, ignition coil, and spark plug. These connections must be correctly established to ensure proper ignition and fuel combustion.
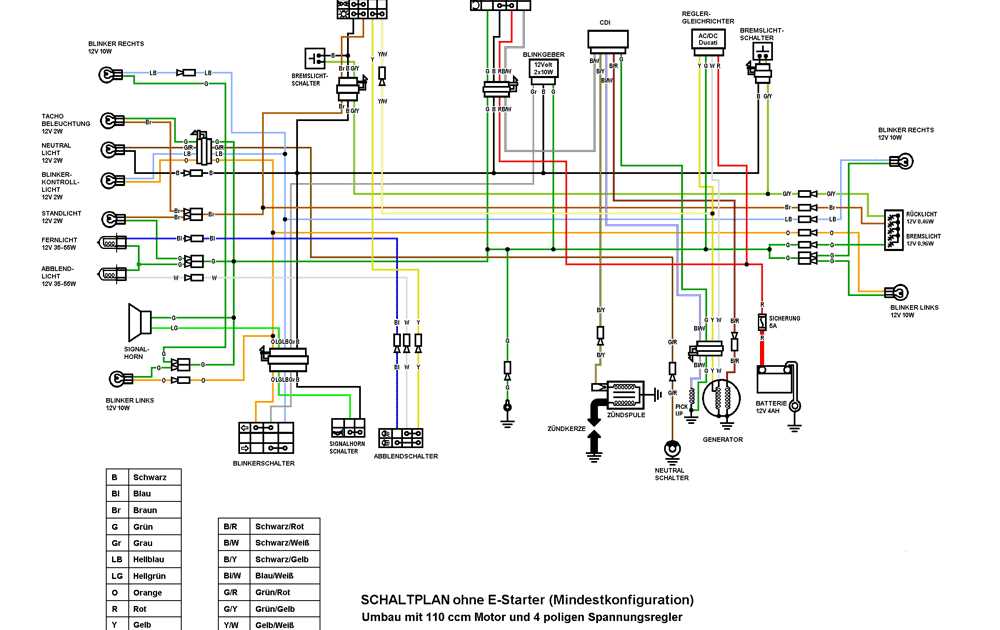
- Magneto: The magneto generates the electrical power required for the engine’s ignition system. It is typically connected to the engine and has wires that go to the CDI unit and ignition coil.
- CDI Unit: The CDI (Capacitor Discharge Ignition) unit is responsible for controlling the ignition timing and spark generation. It receives power from the magneto and sends it to the ignition coil.
- Ignition Coil: The ignition coil is connected to the CDI unit and the spark plug. It transforms the low voltage from the CDI into high voltage necessary for spark generation.
- Regulator/Rectifier: The regulator/rectifier regulates the voltage from the engine’s electrical system and charges the battery. It also converts AC power from the magneto to DC power for the lights and other electrical components.
- Battery: The battery stores electrical energy and provides power to the lights and accessories. It receives charging voltage from the regulator/rectifier.
- Lights and Switches: The wiring diagram also includes connections for the lights and switches on the motorized bike. These connections ensure proper functionality and control of the lights and other electrical accessories.
Understanding the wiring diagram and making accurate connections is crucial for a safe and reliable motorized bike. It helps prevent electrical issues, such as short circuits or component damage. If you are unsure about any aspect of the wiring diagram or the electrical system, it is recommended to consult a professional or refer to the manufacturer’s guidelines for assistance.
Understanding the Basics of Motorized Bike Wiring
When it comes to motorized bike wiring, having a basic understanding of how the different components work together is essential. Whether you are building a custom motorized bike or troubleshooting an existing one, knowing the basics of wiring will help you navigate the electrical system with confidence.
One of the key components in a motorized bike wiring system is the ignition switch. This switch is responsible for controlling the flow of electricity from the battery to the rest of the bike’s electrical components. It typically has multiple positions, including off, on, and sometimes even a start position. Understanding how to properly wire and connect the ignition switch is crucial for the overall functioning of the bike.
- The battery is another vital component in the motorized bike wiring system. It provides the power for the electrical components and needs to be properly connected for the bike to function correctly. Understanding the positive and negative terminals of the battery is essential for the correct wiring.
- The lights and indicators on a motorized bike are also essential for safety and visibility. These components are typically connected to the battery through a lighting relay or switch. Understanding how to wire the lights and indicators correctly will ensure that they function properly and alert other road users of your presence.
- In addition to the ignition switch, battery, and lights, other important components in the motorized bike wiring system include the engine control module, alternator, and various sensors. Each of these components plays a critical role in the overall functioning of the bike, and understanding how they are connected and interact with each other is crucial.
In summary, understanding the basics of motorized bike wiring is essential for anyone building or troubleshooting a motorized bike. From the ignition switch to the battery, lights, and other components, each part plays a crucial role in the electrical system. With this knowledge, you’ll be able to confidently wire and connect your motorized bike, ensuring it functions safely and efficiently.
Tools and Materials Needed for Wiring
When it comes to wiring a motorized bike, there are several tools and materials that you will need to have on hand. These items will help you to properly connect all of the electrical components and ensure that your bike’s wiring is safe and reliable.
Tools:
- Wire Strippers: A good pair of wire strippers is essential for removing the insulation from the ends of the wires.
- Wire Cutters: Wire cutters are necessary for cutting the wires to the appropriate lengths.
- Screwdrivers: You will need a set of screwdrivers for connecting and tightening the various connectors and terminals.
- Crimping Tool: A crimping tool is used to secure the connectors onto the wires.
- Electrical Tape: Electrical tape is used to insulate and protect the exposed wires.
- Multimeter: A multimeter is a handy tool for testing the electrical connections and ensuring everything is working properly.
Materials:
- Wiring Harness: A wiring harness is a pre-assembled set of wires and connectors that simplifies the wiring process.
- Electrical Connectors and Terminals: These connectors and terminals are used to join the different wires together.
- Fuse Holder and Fuses: A fuse holder and appropriate fuses are necessary to protect the electrical system from overload or short circuits.
- Heat Shrink Tubing: Heat shrink tubing is used to insulate and protect the wires and connectors.
- Electrical Grease: Electrical grease helps to prevent corrosion and ensure good electrical connections.
Having the right tools and materials is crucial for a successful wiring job on your motorized bike. By using the right tools and following proper wiring techniques, you can ensure that your bike’s electrical system is safe and reliable.
Step-by-Step Guide to Wiring a Motorized Bike
If you are interested in building your own motorized bike, wiring it properly is an important step in ensuring its functionality. Wiring a motorized bike can be a complex process, but with the right guide, you can easily navigate through it.
1. Gather the necessary materials: Before you start wiring your motorized bike, make sure you have all the necessary materials at hand. This includes wires, connectors, switches, and a wiring diagram for reference. Having all these materials ready will make the wiring process much easier.
2. Understand the wiring diagram: Familiarize yourself with the wiring diagram provided for your motorized bike. The diagram will show you how to connect all the different components of the bike, such as the battery, motor, switches, and lights. Make sure you understand each component and its purpose before proceeding with the wiring.
3. Connect the battery: Start by connecting the battery to the bike’s electrical system. Follow the wiring diagram to determine which wires from the battery need to be connected to the different components of the bike. Use appropriate connectors to ensure a secure and reliable connection.
4. Connect the motor: Once the battery is connected, move on to connecting the motor. Again, consult the wiring diagram to determine how the motor should be wired to the battery and other components of the bike. Ensure that all connections are secure and that the wires are properly insulated to prevent any short circuits.
5. Connect the switches: Depending on the features of your motorized bike, you may have switches for various functions such as turning on the motor, controlling the lights, or activating other accessories. Connect these switches according to the wiring diagram, ensuring that they are properly labeled and easy to access while riding.
6. Test the wiring: Once all the connections are made, it is important to test the wiring to ensure everything is functioning properly. Check all the switches, lights, and other components to see if they are working as intended. If any issues arise, double-check the connections and consult the wiring diagram to troubleshoot the problem.
7. Secure the wiring: Once you are confident that the wiring is functioning correctly, secure all the wires to prevent them from coming loose while riding. Use zip ties or electrical tape to neatly bundle the wires together and secure them to the frame of the bike. This will prevent any vibrations or movement from damaging the connections.
By following this step-by-step guide and using the provided wiring diagram as a reference, you can confidently wire your motorized bike and ensure that it works smoothly and safely.
Troubleshooting Common Wiring Issues
Motorized bikes are a great way to get around, but sometimes they can experience wiring issues that can be frustrating to diagnose and fix. Here are some common wiring issues you may encounter and some troubleshooting tips to help you get back on the road.
1. No power to the ignition:
If your motorized bike is not starting and you’re not getting power to the ignition, there may be a problem with the wiring. First, check the battery connections to make sure they are secure and tight. If they are loose, tighten them and see if that solves the issue. If not, check the fuse connected to the ignition system. If the fuse is blown, replace it and try starting the bike again. If none of these steps work, there may be a problem with the ignition switch or wiring and it may be necessary to seek professional help.
2. Dim or flickering lights:
If your bike’s lights are dim or flickering, it could be a sign of a wiring issue. Start by checking the battery connections to ensure they are secure and tight. Loose connections can cause lights to not receive enough power. If the connections are fine, check the bulbs and replace any that are burned out. If the problem persists, there may be a problem with the wiring harness or a loose connection somewhere along the line. Carefully inspect the wiring for any damage or loose connections and repair or replace as needed.
3. Brake lights not working:
If your motorized bike’s brake lights are not working, first check the brake light bulbs to ensure they are not burned out. If the bulbs are fine, there may be an issue with the wiring. Start by inspecting the wiring harness for any damage or loose connections. Check the brake light switch to make sure it is functioning properly. If the wiring harness and switch are fine, there may be a problem with the brake light relay. Consult the bike’s wiring diagram to locate the relay and test it or replace it if necessary.
Remember, when troubleshooting wiring issues, it’s always important to follow safety precautions and, if needed, seek professional help. Electrical issues can be complicated and potentially dangerous if not handled properly. By taking the time to diagnose and fix any wiring problems, you can ensure your motorized bike is running smoothly and safely.
Safety Precautions for Motorized Bike Wiring
When working on the wiring of a motorized bike, it is important to take certain safety precautions to prevent accidents and ensure a successful installation. Here are some key safety measures to keep in mind:
- Disconnect the Battery: Before starting any work on the wiring, always disconnect the battery to prevent electrical shock or short circuits. This will help ensure your safety during the installation process.
- Wear Protective Gear: It is important to wear appropriate protective gear such as gloves and safety glasses when working on the wiring. This will protect your hands and eyes from any potential hazards, such as sharp edges or electrical sparks.
- Use Insulated Tools: When handling the wiring components, always use insulated tools to minimize the risk of electrical shock. Insulated tools have a protective layer that prevents direct contact with electrical currents.
- Follow Manufacturer Instructions: Make sure to carefully read and follow the manufacturer’s instructions for the motorized bike wiring. This will help ensure that you are installing the components correctly and safely.
- Avoid Overloading the Electrical System: It is important not to overload the electrical system of the motorized bike. Make sure to properly calculate and distribute the power needs of the different components to prevent any potential damages or malfunctions.
- Inspect Wires and Connections: Regularly inspect the wires and connections of the motorized bike wiring for any signs of wear, fraying, or loose connections. Address any issues immediately to prevent electrical hazards or failure of the system.
- Secure Wires Properly: It is crucial to secure the wires properly to prevent them from rubbing against other components or getting caught in moving parts. Make use of zip ties, clamps, or other suitable means of securing the wires in place.
By following these safety precautions, you can ensure a safe and successful installation of the wiring for your motorized bike. Remember to always prioritize your safety and take necessary measures to prevent accidents or damages to the electrical system.
Frequently Asked Questions about Motorized Bike Wiring
Here are some frequently asked questions about motorized bike wiring:
1. Do I need a wiring diagram to install a motorized bike kit?
While it’s not absolutely necessary, having a wiring diagram can make the installation process much easier and faster. A wiring diagram provides a visual representation of the electrical connections and helps you understand how the different components should be wired.
2. What tools do I need to wire a motorized bike?
The tools you will need to wire a motorized bike include wire cutters, wire strippers, electrical tape, a soldering iron, solder, and a multimeter. These tools will help you cut and strip wires, make secure connections, insulate the connections, and test the electrical continuity.
3. Can I use existing wiring on my bicycle for a motorized bike conversion?
It is possible to use the existing wiring on your bicycle for a motorized bike conversion, but it may not be ideal. The existing wiring may not be designed to handle the additional electrical load from the motor and other components. It’s recommended to use thicker gauge wires and follow a proper wiring diagram to ensure safe and reliable operation.
4. How do I test if the wiring on my motorized bike is working correctly?
To test if the wiring on your motorized bike is working correctly, you can use a multimeter to check for continuity and voltage at different connection points. Follow the wiring diagram and use the multimeter to test the continuity of the wires, the voltage at the battery, and the voltage at the key switch, ignition coil, and other components.
5. What should I do if I encounter any electrical issues with my motorized bike?
If you encounter any electrical issues with your motorized bike, the first step is to carefully inspect the wiring for any loose or damaged connections. Check the battery voltage, the fuse, and the connections at the key switch, ignition coil, and other components. If you are not able to identify or fix the issue, it’s recommended to consult a professional or seek help from a knowledgeable bike mechanic.
In summary, having a wiring diagram, using the right tools, and following proper installation guidelines are important for successfully wiring a motorized bike. Regular inspection and maintenance of the electrical system can help ensure safe and reliable operation.