
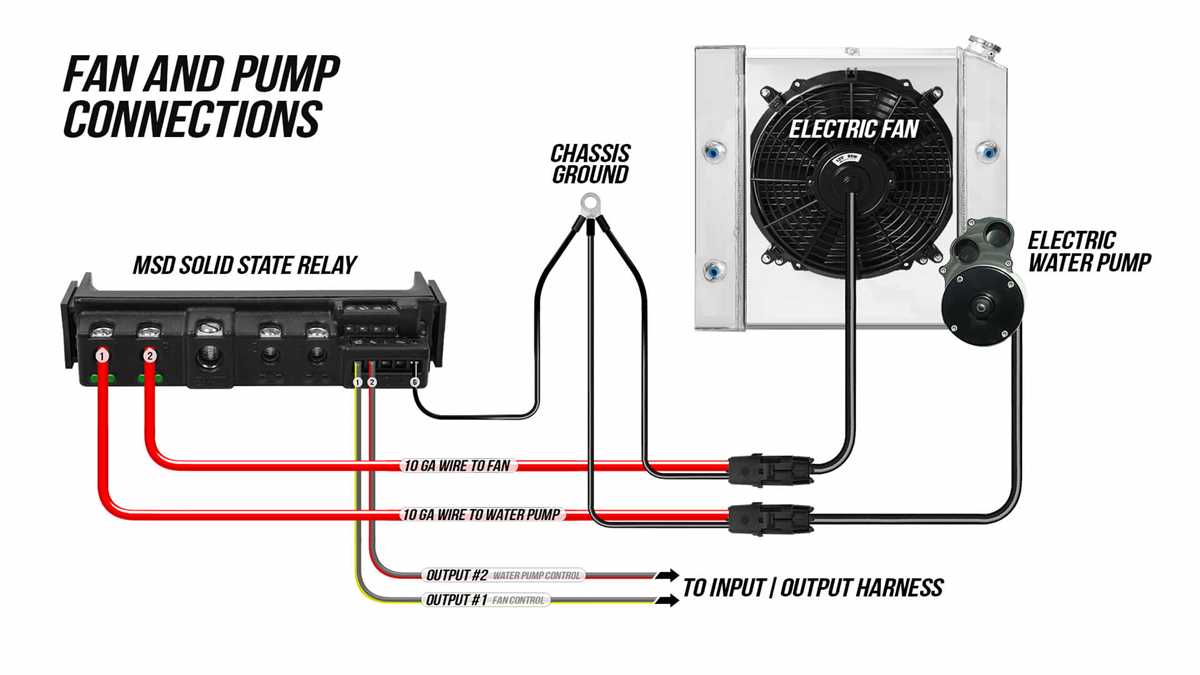
An electric water pump is a device used to circulate and regulate the flow of water in various applications. It is commonly used in automotive systems, irrigation systems, and heating systems. The electric water pump is an essential component that helps to keep these systems running smoothly and efficiently.
Wiring an electric water pump is a crucial step in its installation process. Proper wiring ensures that the pump operates correctly and safely. The wiring of an electric water pump involves connecting the pump to a power source and controlling its operation through a switch or a controller.
When wiring an electric water pump, it is essential to follow the manufacturer’s instructions and adhere to the local electrical codes. This ensures that the wiring is done correctly and minimizes the risk of electrical malfunctions or hazards. Additionally, using the right wire size and type, as specified by the manufacturer, is crucial to ensure the safe and efficient operation of the pump.
In conclusion, wiring an electric water pump requires careful attention to detail and adherence to safety standards. It is recommended to consult a professional electrician if you are not familiar with electrical wiring. Proper wiring ensures that the electric water pump functions properly and safely, contributing to the optimal performance of the system it is installed in.
How to wire an electric water pump: a step-by-step guide
Wiring an electric water pump can seem like a daunting task, but with proper guidance, it can be a straightforward process. In this step-by-step guide, we will outline the necessary steps to wire an electric water pump.
Step 1: Gather the necessary tools and materials
Before getting started, make sure you have all the tools and materials needed for the wiring process. This typically includes electrical wire, wire connectors, a circuit breaker, a power source, and a water pump.
Step 2: Determine the power requirements

It is crucial to determine the power requirements of your specific water pump. This information can usually be found in the manufacturer’s documentation or on the pump itself. Make sure you have the appropriate circuit breaker and power source to match these requirements.
Step 3: Turn off the power
Before starting any electrical work, always ensure that the power source is turned off. This will prevent any potential accidents or shock hazards.
Step 4: Connect the wires
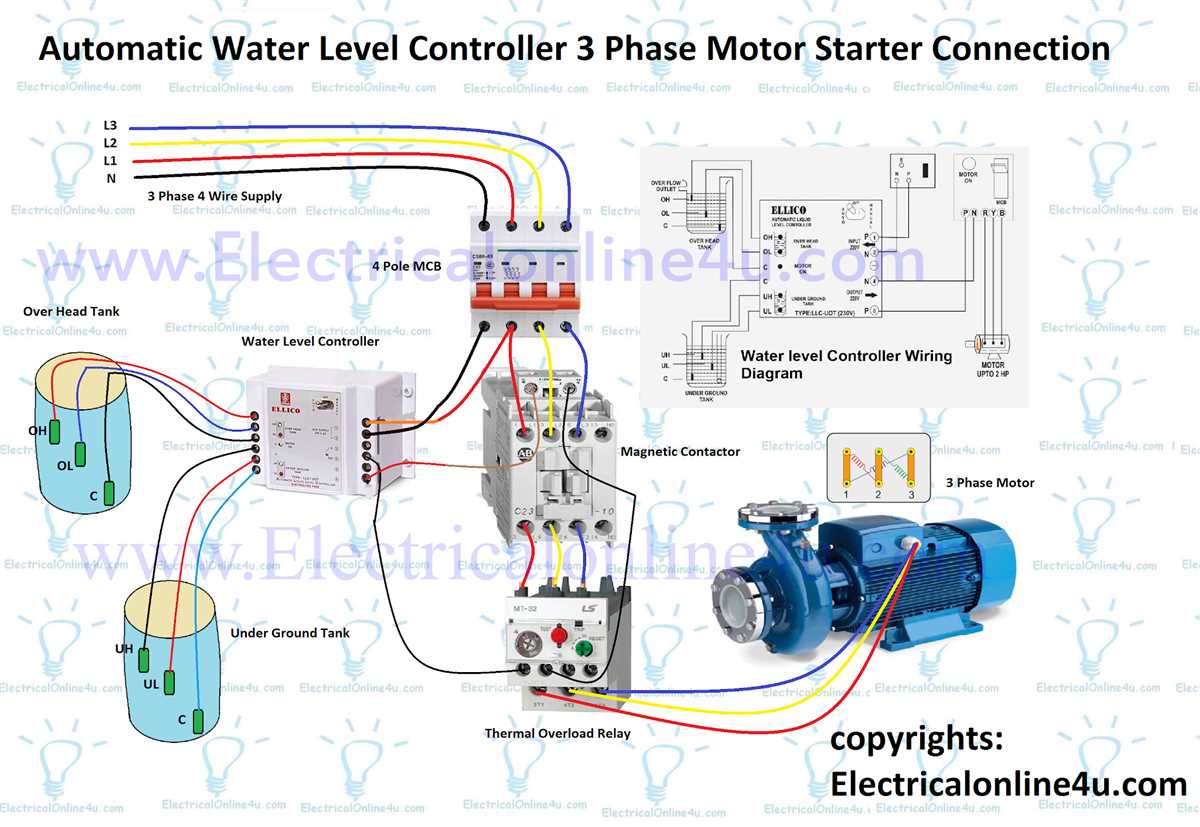
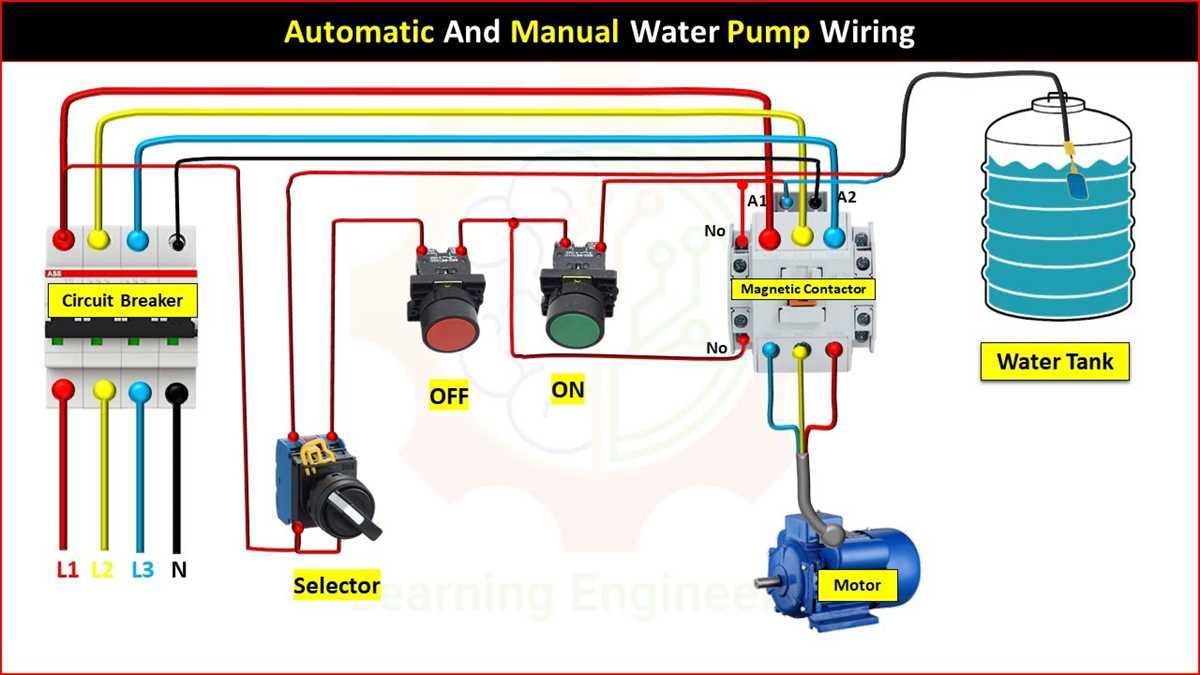
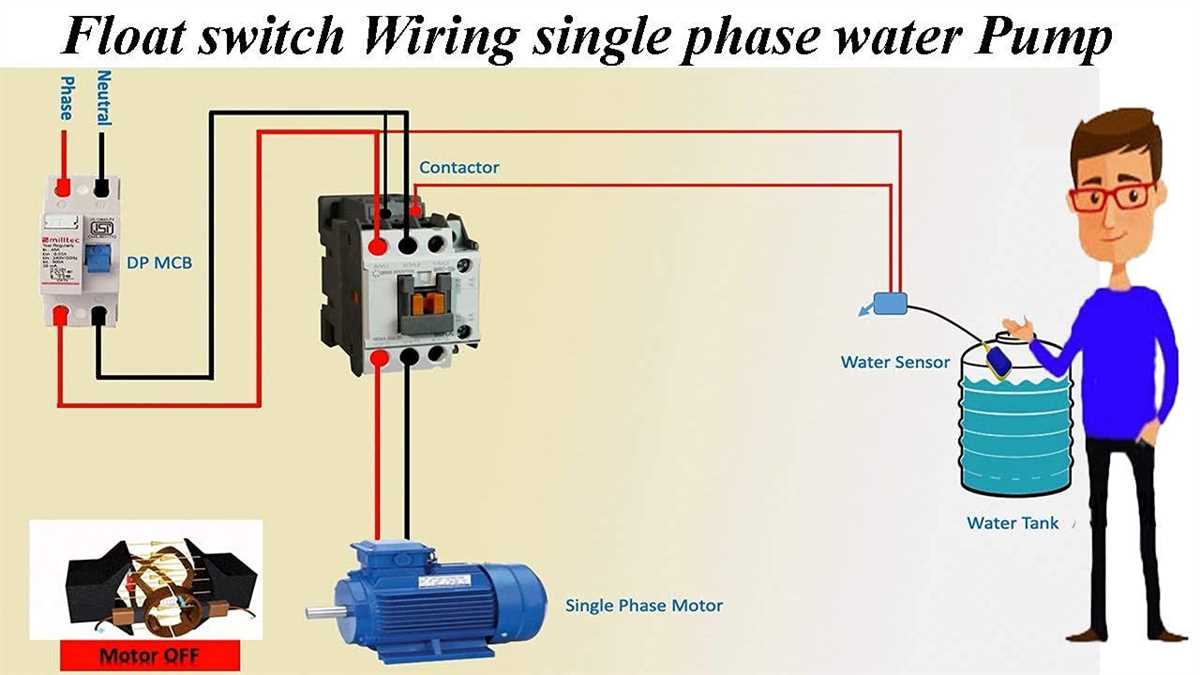
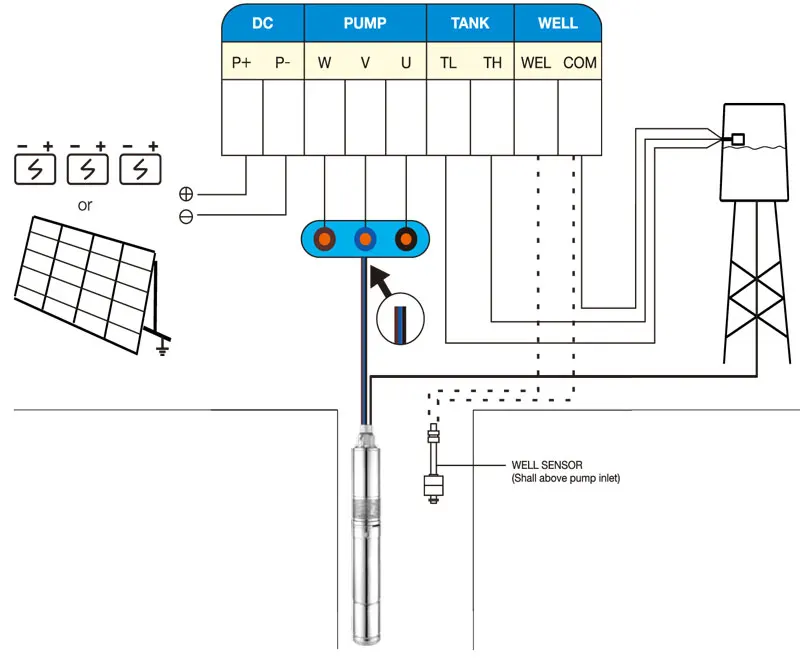
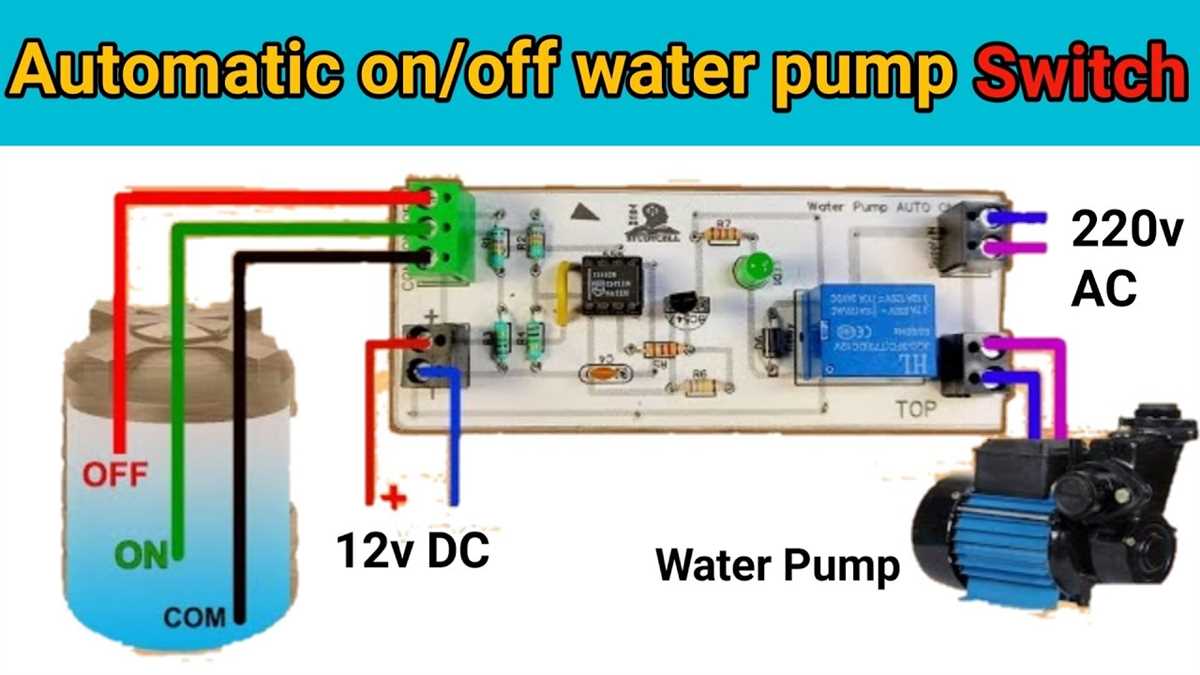
Start by connecting the appropriate wires to their corresponding terminals. Most water pumps have at least three wires – one for power, one for ground, and one for the pump itself. Refer to the manufacturer’s documentation for the specific wiring diagram and follow it accordingly.
Step 5: Secure the connections

After connecting the wires, use wire connectors or electrical tape to secure the connections. This will prevent any loose wires and ensure a safe and reliable connection.
Step 6: Test the pump
Once all the connections are secure, you can proceed to test the water pump. Turn on the power source and check if the pump is functioning properly. Monitor for any leaks or abnormal noises that may indicate a problem.
Step 7: Properly insulate the wiring
After confirming the functionality of the water pump, it is crucial to properly insulate all the wiring. Use electrical tape or wire conduit to cover the exposed wires and protect them from any potential damage.
By following these steps, you can successfully wire an electric water pump. However, it is important to note that electrical work should always be done with caution. If you are unsure or uncomfortable with the process, it is recommended to seek professional assistance.
Understanding the basics of electric water pump wiring
When it comes to electric water pump wiring, it is essential to have a solid understanding of the basics. Electric water pumps are commonly used in various applications, such as automotive cooling systems, swimming pools, aquariums, and household plumbing systems. Proper wiring ensures that the pump functions correctly and safely.
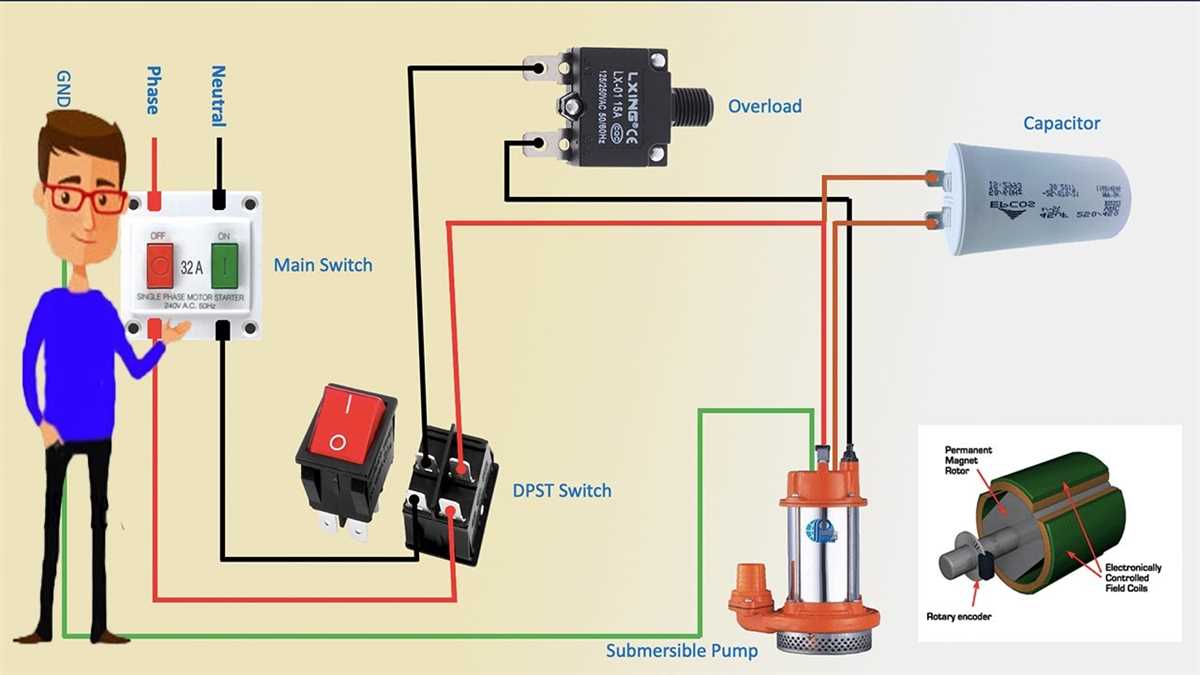
One of the first things to understand is that electric water pumps require a power source, such as an electrical outlet or a battery. The wiring should be designed to handle the voltage and current required by the pump. It is crucial to refer to the manufacturer’s guidelines and specifications to ensure the correct wire gauge and circuit protection.
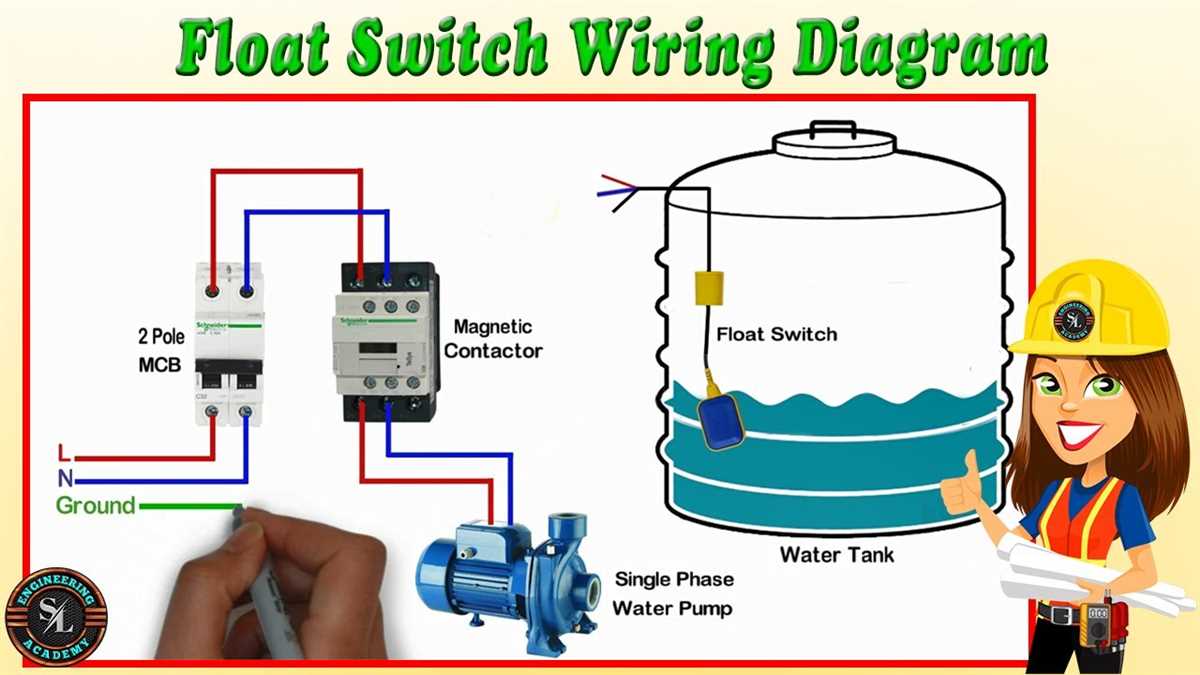
The wiring for an electric water pump typically consists of three main components: the power source, the pump, and the switch. The power source supplies the electrical energy to the pump, which then uses it to push and circulate water. The switch is used to control the on/off function of the pump.
To wire an electric water pump, it is recommended to use stranded copper wire due to its flexibility and conductivity. The wire should be properly insulated to prevent any electrical hazards. It is essential to make secure connections and use appropriate wire connectors, such as crimp connectors or soldering, to ensure a reliable and durable installation.
Before starting the wiring process, it is crucial to turn off the power supply to avoid any electric shocks or accidents. It is also important to double-check the wiring connections and ensure that there are no loose or exposed wires. Once the wiring is complete, it is advisable to test the pump’s functionality before putting it into regular use.
Understanding the basics of electric water pump wiring is essential for anyone working with these devices. Proper wiring techniques and adherence to safety guidelines will ensure that the pump operates efficiently and minimizes the risk of electrical hazards. If unsure about the wiring process, it is always recommended to consult a professional electrician for assistance to ensure a safe and reliable installation.
Gathering the necessary tools and materials for the wiring process
Before starting the wiring process for an electric water pump, it is important to gather all the necessary tools and materials to ensure a smooth and efficient installation. Having the right equipment on hand will not only save time but also help to avoid any potential issues or delays during the process.
Here is a list of essential tools and materials that you will need:
- Wire strippers and cutters: These tools are essential for preparing the wires by removing the insulation and cutting them to the desired length.
- Electrical tape: This is used for insulating the connections and providing an extra layer of protection against short circuits.
- Wire connectors: These connectors are used to join and secure the ends of the wires together.
- Screwdriver: A screwdriver is needed to tighten the screws and secure the electrical components in place.
- Wire nuts: These are used to secure the wire connections and provide insulation.
- Electrical box: An electrical box is used to house the electrical connections and provide protection.
- Circuit breaker: A circuit breaker is essential for protecting the pump and the electrical system from overloads or short circuits.
- Electrical wires: Ensure that you have the correct gauge and length of wires to connect the pump and the power source.
By gathering these tools and materials before starting the wiring process, you can ensure that you have everything you need to properly install and connect your electric water pump. It is also advisable to double-check the manufacturer’s instructions for any specific tools or materials that may be required for your particular pump model.
Step 1: Disconnecting the power supply
Before starting any wiring work on an electric water pump, it is crucial to disconnect the power supply to ensure safety. Follow these steps to properly disconnect the power supply:
- Identify the power source: Locate the circuit breaker or fuse that supplies power to the water pump. It is usually labeled and can be found in the electrical panel of your home or building.
- Switch off the power: Turn off the circuit breaker or remove the fuse supplying power to the water pump. This will ensure that no electricity is running to the pump during the wiring process.
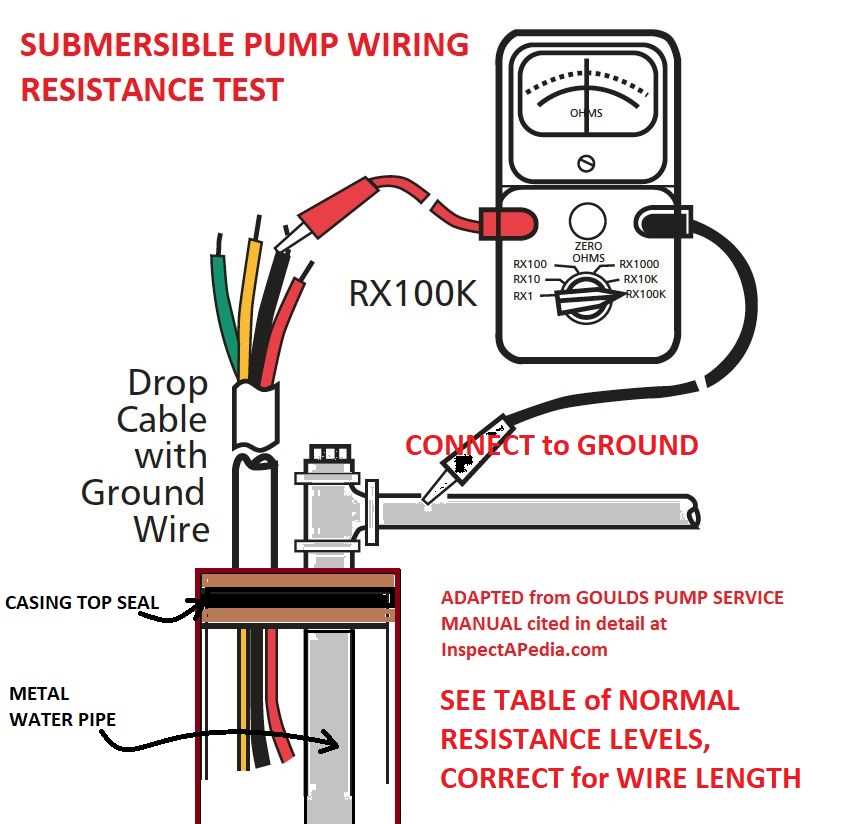
- Verify power disconnection: Use a voltage tester or multimeter to double-check that there is no voltage present in the wires connected to the pump. This step is essential for personal safety.
By taking these precautions and following these steps, you can ensure that the power supply is properly disconnected and that you can proceed with the wiring work on the electric water pump safely. Always prioritize safety when working with electrical systems.
Step 2: Identifying the live and neutral wires
In order to properly wire an electric water pump, it is important to identify the live and neutral wires. The live wire carries the current from the power source to the pump, while the neutral wire provides a path for the current to return.
To identify the live and neutral wires, you will need a voltage tester or a multimeter. Start by turning off the power supply to the water pump. This can be done by switching off the circuit breaker or removing the fuse that powers the pump.
Use the voltage tester or multimeter to test each wire in the pump installation. Place one probe of the tester on the wire and the other probe on a known ground, such as a metal pipe or the ground terminal of an outlet. The live wire will show a voltage reading, while the neutral wire should show no voltage or a very low voltage. It is crucial to ensure that the power supply is turned off before performing this test to avoid electric shock.
Once you have identified the live and neutral wires, you can proceed with the wiring process. Connect the live wire to the appropriate terminal on the pump, typically labeled “L” or “+” (consult the manufacturer’s instructions for specific labeling). Connect the neutral wire to the corresponding terminal, typically labeled “N” or “-“.
Please note that the specific wiring instructions may vary depending on the make and model of the electric water pump. It is always advisable to consult the manufacturer’s instructions or seek professional assistance if you are unsure about the wiring process. Incorrect wiring can result in damage to the pump or pose a safety hazard.
Step 3: Connecting the live wire to the power source
Once you have determined the appropriate location for your electric water pump and have prepared the necessary tools and materials, it’s time to connect the live wire to the power source. This step is crucial for ensuring the pump functions correctly and safely.
1. Ensure that the power source you are connecting to is turned off. This is an important safety precaution to prevent any electrical accidents or shocks while working on the wiring.
2. Strip the insulation off the end of the live wire using wire strippers. This will expose the bare wire that needs to be connected to the power source.
3. Identify the live wire from the power source, which is typically color-coded or labeled. It is important to match the live wire from the pump to the live wire from the power source to ensure proper functionality.
4. Use wire connectors or terminal blocks to connect the live wire from the pump to the live wire from the power source. Make sure to firmly secure the connection to prevent any loose wires or potential electrical hazards.
5. Double-check all connections to ensure they are secure and properly insulated. Inspect the wiring for any signs of damage or exposed wires, as these can lead to short circuits or other electrical issues.
Step 4: Connecting the neutral wire to the power source
After connecting the positive wire to the power source in the previous step, the next and final step is to connect the neutral wire. The neutral wire is typically color-coded as blue or black and is responsible for completing the circuit and returning the flow of electricity back to the power source.
Before connecting the neutral wire, make sure that the power source is turned off to avoid any electrical hazards. You can do this by either switching off the main power supply or by removing the corresponding fuse or circuit breaker.
Once you have ensured the power is off, locate the neutral wire connection point in your power source. This may be a terminal strip, a dedicated neutral wire connector, or a neutral bus bar in your electrical panel.
Take the stripped end of the neutral wire and insert it into the appropriate connector. Make sure the wire is securely fastened and there is no exposed copper wire. If necessary, use a wire connector or a screwdriver to fasten the wire tightly.
After connecting the neutral wire, double-check all the connections to ensure they are secure and properly insulated. This is important to prevent any loose wires or exposed connections that could lead to electrical accidents or short circuits.
Once you have completed all the steps and ensured that all connections are secure, you can safely turn on the power source and test the electric water pump to ensure it is functioning correctly.
Congratulations! You have successfully connected the neutral wire to the power source and completed the wiring of your electric water pump. Always remember to follow safety guidelines and consult a professional if you are unsure about any aspect of the wiring process.