
When it comes to installing a new ecobee thermostat, it’s crucial to have a clear understanding of the wiring diagram. The wiring diagram will provide you with a visual representation of how the thermostat should be connected to your HVAC system. This ensures that the thermostat functions properly and you can enjoy all the benefits of an energy-efficient home.
Ecobee thermostats are known for their user-friendly interfaces and advanced features, but the installation process can be a bit intimidating for some homeowners. That’s why having a detailed wiring diagram is essential. It will guide you through the installation process step by step, making it easier to connect the ecobee thermostat to your heating and cooling system.
The wiring diagram will typically include labels for each wire, indicating where they should be connected. These labels may vary depending on the specific model of ecobee thermostat you have. However, there are some common connections you can expect to see, such as the R wire for power and the C wire for common. Other wires may include W for heating, Y for cooling, and G for fan control.
By following the wiring diagram for your specific ecobee thermostat model, you can ensure a safe and successful installation. Remember to turn off the power to your HVAC system before starting the installation process, and consult the ecobee thermostat installation manual for any additional instructions specific to your system.
Understanding the basics of ecobee thermostats
The ecobee thermostat is a popular choice for homeowners looking to improve their energy efficiency and optimize their home climate control. Understanding the basics of how the ecobee thermostat works can help you make the most of this advanced technology and enjoy a more comfortable and cost-effective living environment.
One of the key features of ecobee thermostats is their ability to learn and adapt to your lifestyle. Using built-in sensors and algorithms, the thermostat can track occupancy patterns and adjust temperature settings accordingly. This means that you can come home to a comfortable house without having to manually adjust the settings each time.
Remote access: Another advantage of ecobee thermostats is their remote access feature. By connecting your thermostat to your smartphone or tablet, you can control the temperature of your home from anywhere. This allows you to make adjustments on the go, ensuring your home is always at the desired temperature when you arrive.
Schedule customization: Ecobee thermostats also offer schedule customization options, allowing you to set different temperature settings for different times of the day or days of the week. This feature is especially useful if you have a consistent daily routine or if you want to save energy during certain hours.
Integration with smart home systems: One of the unique advantages of ecobee thermostats is their compatibility with various smart home systems, such as Amazon Alexa and Apple HomeKit. This integration allows you to control your thermostat with voice commands or through other devices connected to your smart home system.
In conclusion, ecobee thermostats offer advanced features and flexibility that can significantly improve your home’s energy efficiency and comfort. With features like learning capabilities, remote access, schedule customization, and smart home integration, ecobee thermostats provide homeowners with a convenient and intuitive way to control their home climate.
Gathering the necessary tools and materials
Before you begin wiring your ecobee thermostat, it is important to gather all the necessary tools and materials. This will ensure that you have everything you need to complete the installation without any interruptions or delays. Below is a list of the essential items you will need:
- Screwdriver: A Phillips screwdriver will be required to secure the thermostat to the wall and to remove any existing thermostats or covers.
- Wire strippers: Wire strippers are necessary to remove the protective insulation from the wires, enabling you to connect them properly to the thermostat terminals.
- Wire labels: These labels will help you identify the different wires and make the installation process easier to follow.
- Electrical tape: Electrical tape is used to secure the wires together and to insulate any exposed parts to prevent electrical hazards.
- Level: A level is essential to ensure that the thermostat is properly aligned and mounted horizontally on the wall.
- Masking tape (optional): You can use masking tape to mark the locations of the existing wires on the wall before removing the old thermostat.
Additionally, it is important to familiarize yourself with the wiring diagram provided by ecobee. This diagram will illustrate the specific wiring connections and color codes for your particular system. Make sure to have it readily available during the installation process.
Identifying the existing wiring setup
Before installing an ecobee thermostat, it is crucial to identify the existing wiring setup in your home. Understanding the wiring setup will help ensure a successful installation and proper functioning of the thermostat.
The first step in identifying the existing wiring setup is to locate the current thermostat. It is usually mounted on a wall and connected to the HVAC system. Carefully remove the thermostat cover to access the wiring terminals and wires behind it.
Next, examine the wires and terminals, taking note of their color and labeling. Each wire is typically connected to a specific terminal labeled with a letter or a combination of letters, such as R, C, Y, G, W, and O. These labels indicate the purpose of each wire and help determine how the ecobee thermostat should be wired.
To ensure accurate identification, refer to the wiring diagram provided by the HVAC system manufacturer. It will give you a clear understanding of the purpose of each wire and its corresponding terminal. You can also consult the ecobee thermostat’s installation guide, which provides detailed instructions on wiring configurations for various HVAC systems.
Once you have identified the existing wiring setup, you can proceed with the installation of the ecobee thermostat. Follow the manufacturer’s instructions and use the labeled wires to connect them to the appropriate terminals on the thermostat. Ensure that all connections are secure and properly seated to avoid any electrical issues.
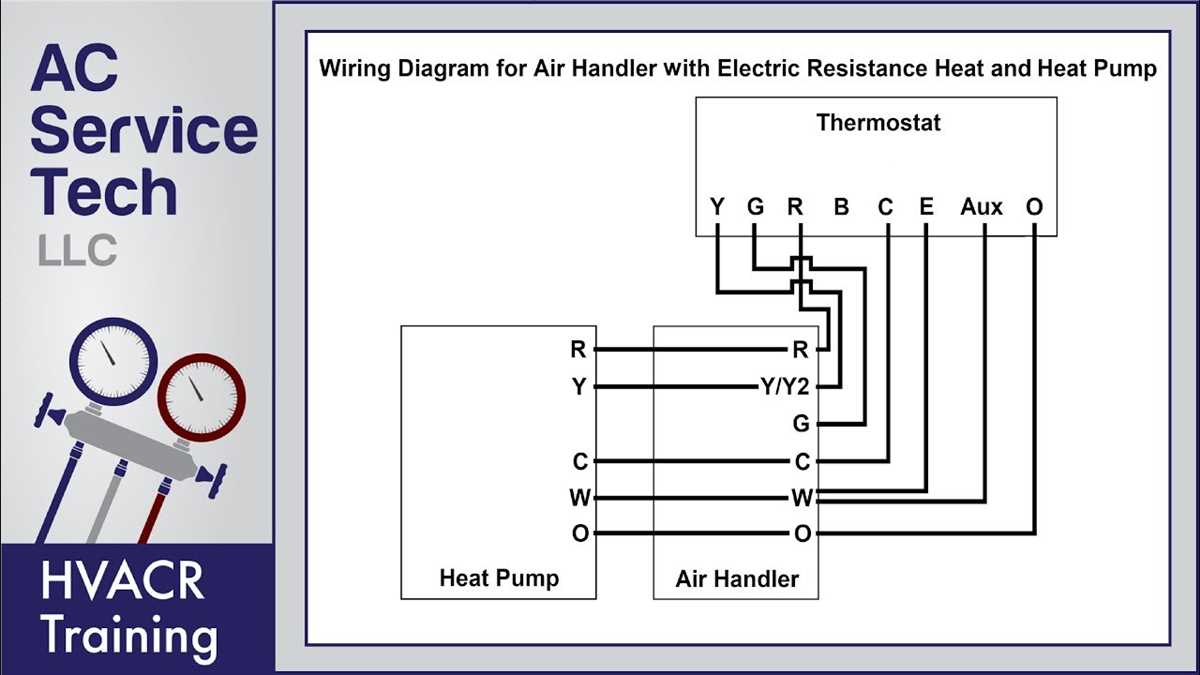
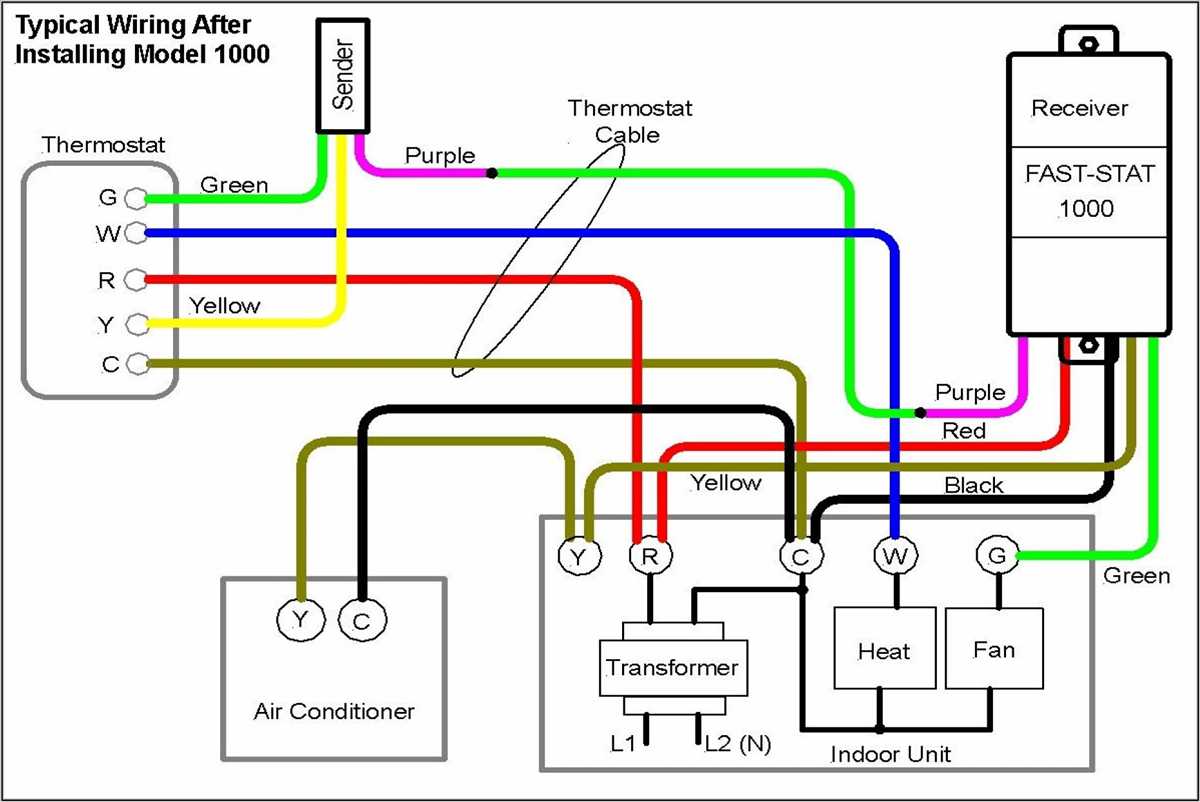
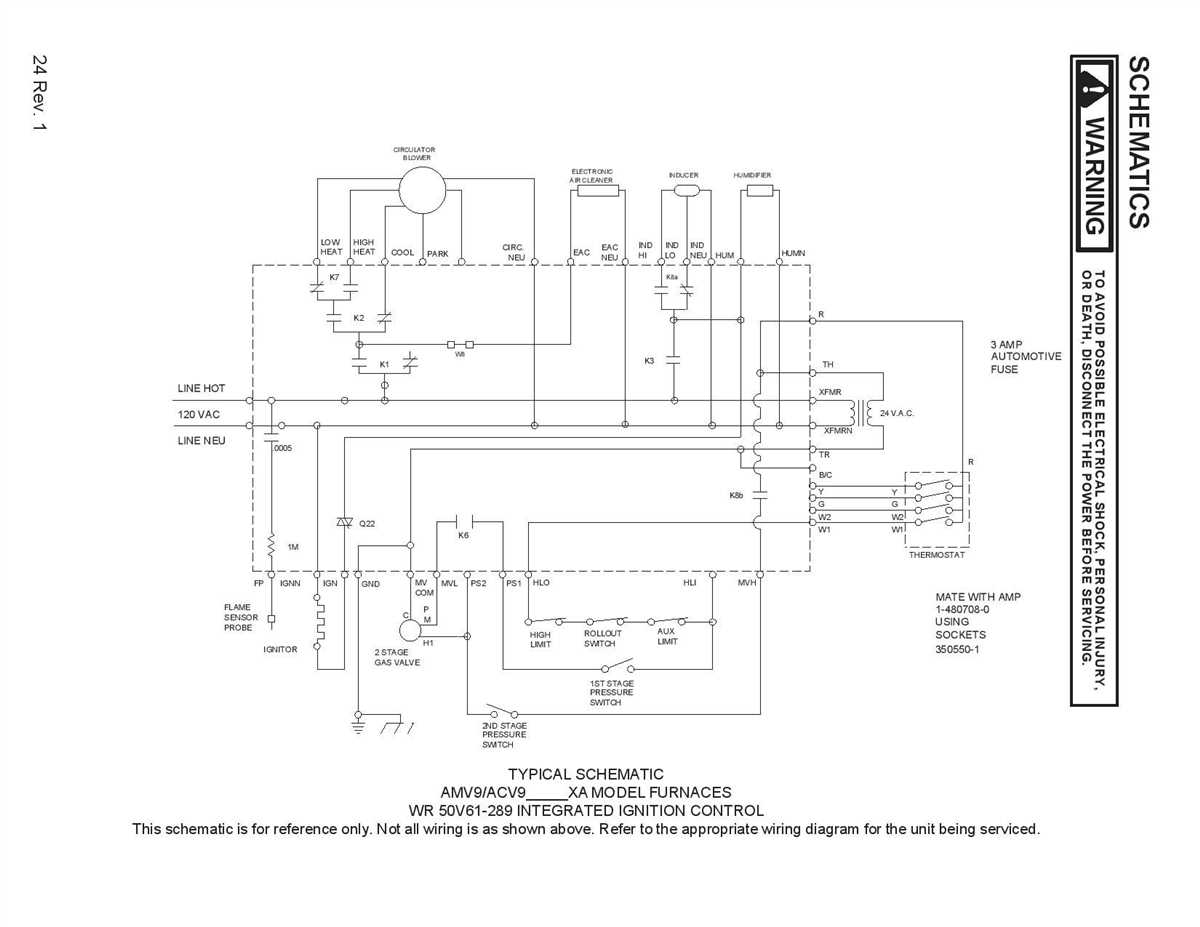
Mapping out the ecobee thermostat wiring
The wiring diagram for an ecobee thermostat is an essential tool when it comes to the installation and troubleshooting of the device. It provides a clear and organized representation of how the thermostat should be wired to the HVAC system, ensuring proper functioning and optimal performance. Understanding the various components and connections depicted in the diagram is crucial for homeowners and technicians alike.
One of the key elements in the ecobee thermostat wiring diagram is the labeled terminals. These terminals indicate where the different wires should be connected to ensure effective communication between the thermostat and the HVAC system. Commonly labeled terminals include R (power), C (common), Y (cooling), W/W1/W2 (heating stages), O/B (heat pump reversing valve), G (fan), and more. Following the terminal labels correctly is essential for proper functionality.
The wiring diagram also showcases the various wires used in the installation, which are color-coded for easy identification. Understanding the significance of each wire color is crucial for correctly connecting them to the appropriate terminals. Common wire colors include red (power), blue (common), yellow (cooling), white (heating), orange (heat pump), green (fan), and more. Checking the wire colors and ensuring they match the diagram is essential for a successful installation.
Wiring Example:
Here’s an example of a wiring diagram for an ecobee thermostat:
| Terminal | Wire Color |
|---|---|
| R | Red |
| C | Blue |
| Y | Yellow |
| W1 | White |
| G | Green |
In this example, the red wire connects to the R terminal, the blue wire to the C terminal, the yellow wire to the Y terminal, the white wire to the W1 terminal, and the green wire to the G terminal. Following this wiring pattern and referring to the wiring diagram for specific HVAC system requirements will ensure a successful installation of the ecobee thermostat.
It’s important to note that the specific wiring configuration may vary depending on the HVAC system and the needs of the user. Consult the ecobee thermostat’s installation guide and the HVAC system documentation for accurate and up-to-date wiring information.
Connecting the ecobee thermostat
When it comes to connecting your ecobee thermostat, there are a few steps you need to follow to ensure a successful installation. Here are the key points to keep in mind:
1. Power off the HVAC system
Before starting the installation process, it’s essential to power off your HVAC system. This will help prevent any electrical mishaps or damage during the connection process.
2. Identify the wiring terminals
Take a look at your existing thermostat’s wiring terminals and identify the corresponding labels. Common labels include R, C, W, Y, G, and O/B. These labels represent different functions like power, cooling, heating, fan control, and more.
3. Disconnect the existing thermostat
Once you’ve identified the wiring terminals, disconnect the existing thermostat from the wall. Make sure to label each wire according to its corresponding terminal. This step will help you connect the wires correctly to the ecobee thermostat later.
4. Connect the ecobee thermostat
Now it’s time to connect the ecobee thermostat. Start by connecting the wires to the corresponding terminals on the ecobee baseplate. Make sure each wire is securely tightened. Refer to the wiring diagram provided with your ecobee thermostat for specific instructions based on your HVAC system.
5. Attach the ecobee thermostat to the wall
Once the wiring is complete, attach the ecobee thermostat baseplate to the wall. Ensure it is securely mounted and levelly aligned. Insert the ecobee thermostat onto the baseplate, making sure it locks into place.
6. Power on and configure
Now you can power on your HVAC system and the ecobee thermostat. Follow the on-screen instructions to configure the thermostat settings, connect it to your Wi-Fi network, and customize your preferences for temperature control and scheduling.
By following these steps, you’ll have your ecobee thermostat connected and ready to enhance the efficiency and comfort of your home’s heating and cooling system.
Testing and troubleshooting the installation
Once the wiring is complete and the ecobee thermostat is powered on, it is important to test and troubleshoot the installation to ensure everything is functioning properly. Here are some steps to follow:
1. Check the power
Make sure that the ecobee thermostat is receiving power. Check the circuit breaker or fuse to ensure that power is flowing to the thermostat. If there is no power, check the wiring connections and make sure they are properly secured.
2. Verify the connections
Double-check the wiring connections to ensure they are accurate and secure. Verify that each wire is connected to the correct terminal on the ecobee thermostat and the HVAC system. Use the wiring diagram provided by ecobee as a reference.
3. Perform a system test
Test the system by turning on the heating or cooling and verify that the ecobee thermostat is correctly communicating with the HVAC system. Check for any error messages or warning signs on the thermostat display. Monitor the temperature to make sure it is reaching the desired setpoint.
4. Check for connectivity issues
If the ecobee thermostat is connected to Wi-Fi, make sure it is successfully connecting to the network. Verify that the ecobee app or web portal is able to control and monitor the thermostat remotely. If there are any connectivity issues, check the Wi-Fi settings and re-enter the network credentials if necessary.
5. Troubleshoot any problems
If there are any issues or malfunctions during the testing process, consult the troubleshooting guide provided by ecobee. This guide will help diagnose common problems and provide step-by-step instructions for resolving them. If the issue persists, consider reaching out to ecobee customer support for further assistance.
Overall, testing and troubleshooting the ecobee thermostat installation is crucial to ensure a successful and functional setup. By following these steps and being diligent in checking for any issues, users can enjoy the benefits of an efficient and smart thermostat system.