
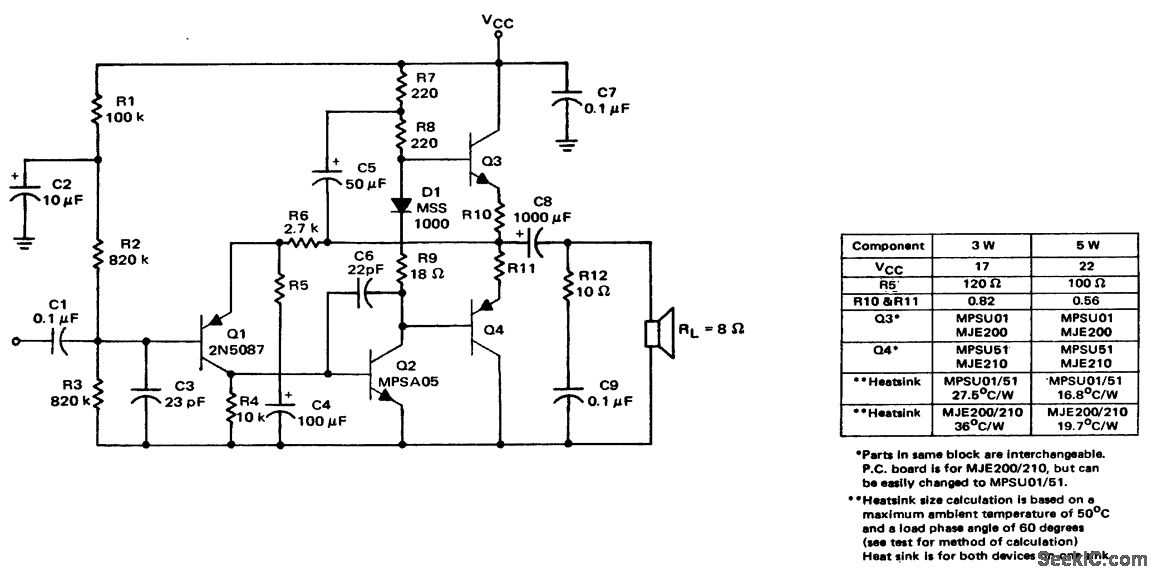
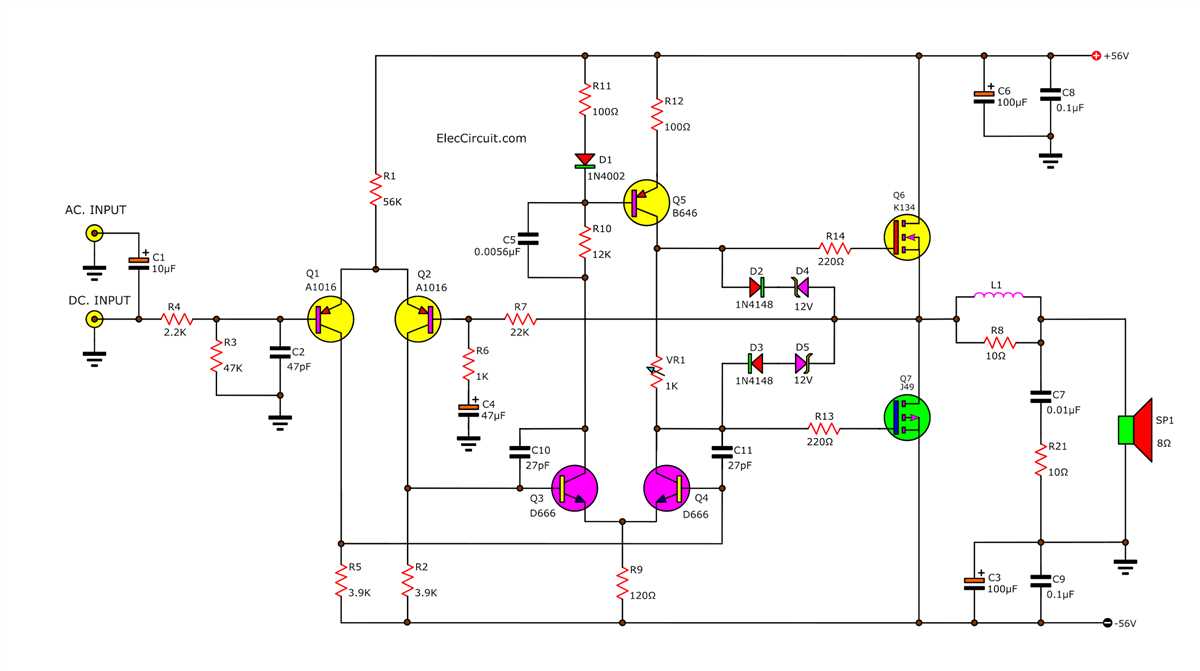
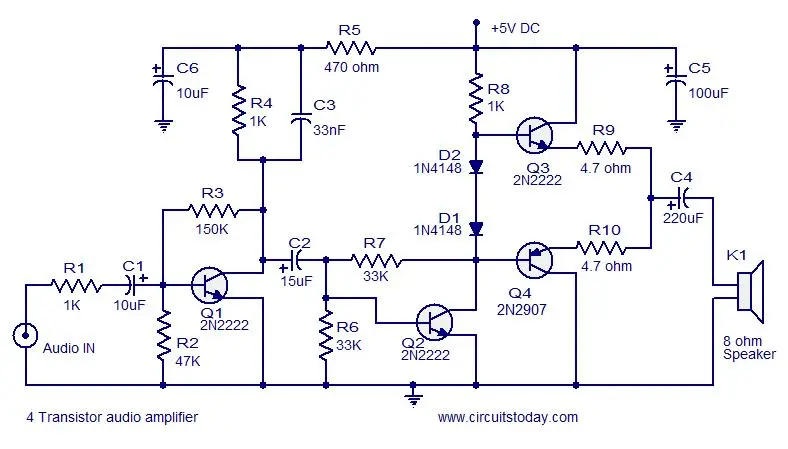
When it comes to amplifying audio signals for various applications, from music players to home theater systems, the audio amplifier circuit diagram plays a crucial role. This diagram depicts the electrical connections and components used to boost the low-level audio signal to a level suitable for driving speakers or headphones.
Basic Components
The audio amplifier circuit diagram typically consists of several key components. These include a power supply, input stage, amplification stage, and an output stage. The power supply provides the necessary voltage and current to operate the amplifier circuit. The input stage is responsible for receiving the audio signal from the source device and preparing it for amplification. The amplification stage, often in the form of transistors or integrated circuits, increases the amplitude of the audio signal. Lastly, the output stage drives the speakers or headphones to produce sound.
Understanding the Basics of Audio Amplifier Circuits
Audio amplifier circuits are essential components in audio systems as they help amplify the weak audio signals to a level suitable for driving speakers or headphones. These circuits utilize a combination of electronic components to transform the input audio signal into a higher-power output signal without distorting the original audio quality. Understanding the basics of audio amplifier circuits is crucial for designing and troubleshooting audio systems.
One of the key components in an audio amplifier circuit is the transistor. Transistors, such as bipolar junction transistors (BJTs) or field-effect transistors (FETs), are used to amplify the audio signal. They have a three-terminal design – the base, emitter, and collector for BJTs, or the gate, source, and drain for FETs. The input audio signal is applied to the base or gate terminal, and the amplified signal is obtained at the collector or drain terminal. The choice of transistor type depends on the specific requirements of the audio system.
Another important element of audio amplifier circuits is the coupling capacitor. This capacitor allows only the AC component of the amplified audio signal to pass through while blocking the DC component. It prevents any DC bias from affecting the output audio quality or damaging the speakers. The value of the coupling capacitor needs to be chosen appropriately to ensure proper frequency response and signal integrity.
Furthermore, audio amplifier circuits may also incorporate feedback networks to improve the overall performance. These networks typically use resistors and capacitors to provide stability and adjust the gain of the amplifier. The feedback network helps control the linearity, distortion, and frequency response of the amplifier, ensuring accurate reproduction of the input audio signal.
In summary, audio amplifier circuits are fundamental in audio systems, allowing weak audio signals to be amplified and driving speakers or headphones. Transistors, coupling capacitors, and feedback networks are key components in these circuits, playing critical roles in amplification, signal isolation, and overall performance optimization.
What is an audio amplifier?

An audio amplifier is an electronic device that increases the amplitude of audio signals, allowing them to be played through a loudspeaker or other audio output device. It takes a low-level input signal, such as from a microphone or audio source, and boosts it to a higher level that is suitable for driving a speaker.
The primary function of an audio amplifier is to amplify the low-power audio signal and provide enough power to drive the speaker or headphones. It is an essential component in audio systems, ranging from small portable devices to professional audio equipment. Audio amplifiers can be found in various applications, including music players, home stereo systems, car audio systems, and PA (public address) systems.
Most audio amplifiers operate in the analog domain, using transistors or vacuum tubes to amplify the audio signals. However, there are also digital amplifiers that use digital signal processing techniques to amplify the audio signals. Regardless of the technology used, the goal of an audio amplifier is to faithfully reproduce the input audio signal without distortion or coloration.
Audio amplifiers are typically classified based on their power output, such as watts per channel, or their application, such as stereo amplifiers or mono amplifiers. They can also be classified based on their circuit design, such as class A, class AB, class D, or class G amplifiers, each with its own advantages and disadvantages.
In conclusion, an audio amplifier is a crucial component in audio systems that amplifies low-power audio signals to drive speakers or headphones. It plays a vital role in delivering high-quality sound reproduction and is available in different types and designs to suit various applications.
How does an audio amplifier work?
An audio amplifier is an electronic device that increases the strength or power of an audio signal. It takes a low-level audio signal as input and produces a higher-level signal as output. The main purpose of an audio amplifier is to amplify the sound signal so that it can be heard clearly and loudly through speakers.
An audio amplifier typically consists of several components, including transistors, resistors, capacitors, and inductors. These components work together to amplify the audio signal. The input audio signal is first converted into an electrical signal by a microphone or other audio input device. This electrical signal is then amplified by the amplifier circuit. The amplified signal is then outputted to speakers, headphones, or other audio output devices to produce sound.
The amplifier circuit works by using the properties of the amplifying components to increase the amplitude or voltage of the input audio signal. The amplifier circuit can be designed in different configurations, such as common emitter, common base, or common collector, depending on the desired characteristics of the amplifier. The amplifying components, such as transistors, are biased to operate in a specific region of their characteristic curves, ensuring that the input signal is accurately reproduced without distortion.
Various amplifier designs and configurations exist, including Class A, Class B, Class AB, and Class D amplifiers, each with different strengths and weaknesses. Class A amplifiers, for example, provide high-quality audio reproduction but are less efficient and generate more heat. Class D amplifiers, on the other hand, are highly efficient and generate less heat but may introduce some distortion to the audio signal.
In conclusion, an audio amplifier is a crucial component in audio systems as it amplifies the weak audio signal to a level suitable for driving speakers or other audio output devices. It achieves this by utilizing various electronic components and circuit configurations to accurately reproduce the input audio signal with high fidelity and power.
Types of audio amplifier circuits
There are several types of audio amplifier circuits, each designed to meet specific requirements and deliver different levels of performance. Some common types include:
1. Class A Amplifier
A Class A amplifier is known for delivering high-quality sound reproduction with low distortion. It operates by conducting current throughout the entire input signal cycle, resulting in a clean and faithful reproduction of the audio signal. However, it is not very efficient and tends to generate a significant amount of heat.
2. Class B Amplifier
A Class B amplifier overcomes the inefficiency of a Class A amplifier by using two transistors to handle the positive and negative halves of the input signal. Each transistor is responsible for amplifying only one-half of the signal, resulting in improved efficiency. However, Class B amplifiers have a higher level of distortion compared to Class A amplifiers.
3. Class AB Amplifier
A Class AB amplifier combines the characteristics of Class A and Class B amplifiers by using both transistors to amplify the input signal. It is more efficient than Class A amplifiers and produces less distortion than Class B amplifiers. Class AB amplifiers are commonly used in audio applications where a balance between efficiency and sound quality is required.
4. Class D Amplifier
A Class D amplifier, also known as a digital amplifier, uses pulse-width modulation (PWM) to convert the audio signal into a series of pulses. These pulses are then amplified and filtered to reconstruct the audio signal. Class D amplifiers are highly efficient and are commonly used in applications where compact size and energy efficiency are crucial, such as portable speakers and car audio systems.
- Class A amplifiers deliver high sound quality but are not very efficient.
- Class B amplifiers are more efficient, but have a higher level of distortion.
- Class AB amplifiers strike a balance between efficiency and sound quality.
- Class D amplifiers are highly efficient and commonly used in portable and car audio systems.
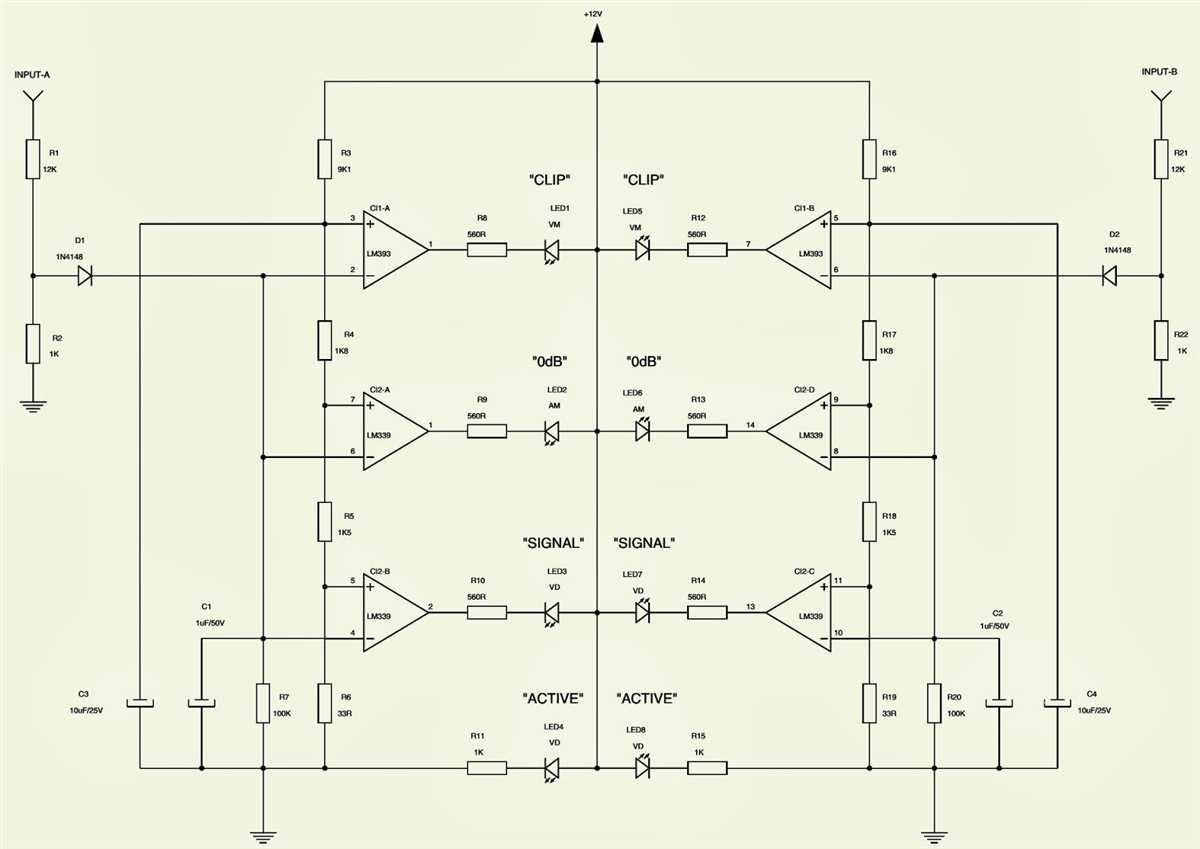
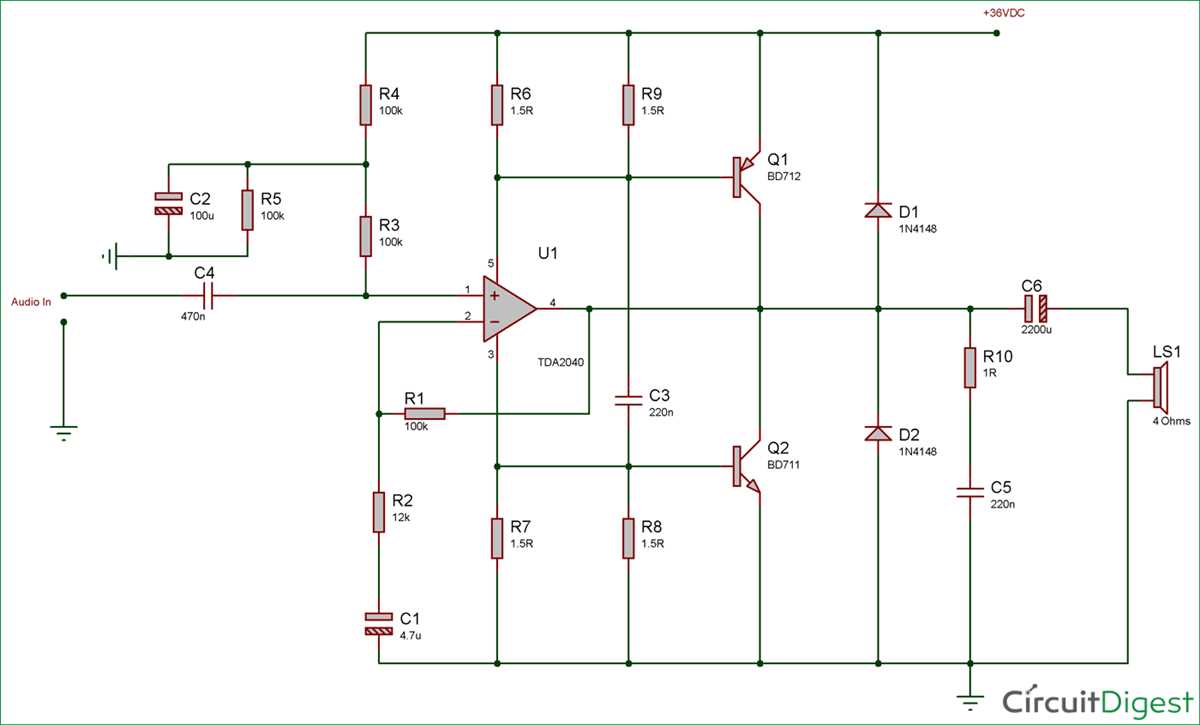
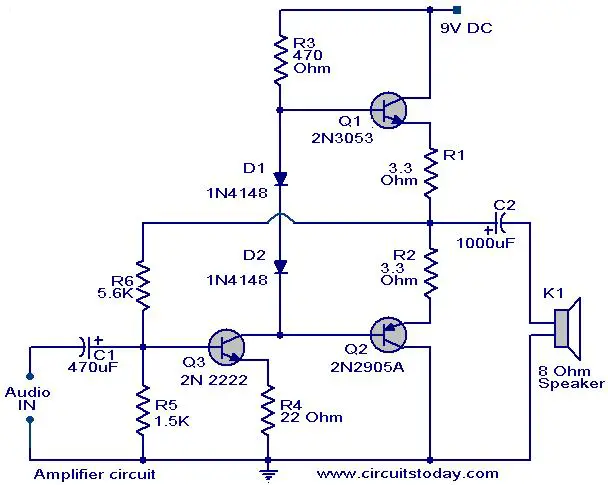
Key components of an audio amplifier circuit

An audio amplifier circuit is an electronic device that is used to amplify the low-power audio signals from a source and produce a higher power output signal, which can then be used to drive speakers or headphones. It is composed of several key components that work together to achieve this amplification process.
1. Voltage amplifier
The voltage amplifier is the main component of an audio amplifier circuit. It is responsible for increasing the voltage level of the input audio signal. This is achieved by using transistors or operational amplifiers (Op-Amps) that provide a high gain, allowing for a significant increase in amplitude.
2. Power supply
The power supply is another crucial component of an audio amplifier circuit. It provides the necessary electrical energy to the amplifier to function properly. The power supply converts the alternating current (AC) input voltage from the mains to a direct current (DC) voltage that is suitable for powering the amplifier circuit.
3. Input and output coupling capacitors
Coupling capacitors are used to connect the different stages of the amplifier circuit and ensure the transfer of audio signals while blocking any DC component. An input coupling capacitor is placed at the input stage to block the DC component of the input signal, allowing only the AC component to pass through. Similarly, an output coupling capacitor is placed at the output stage to remove any DC offset, providing a clean audio signal to the speakers or headphones.
4. Resistors and capacitors for biasing and feedback
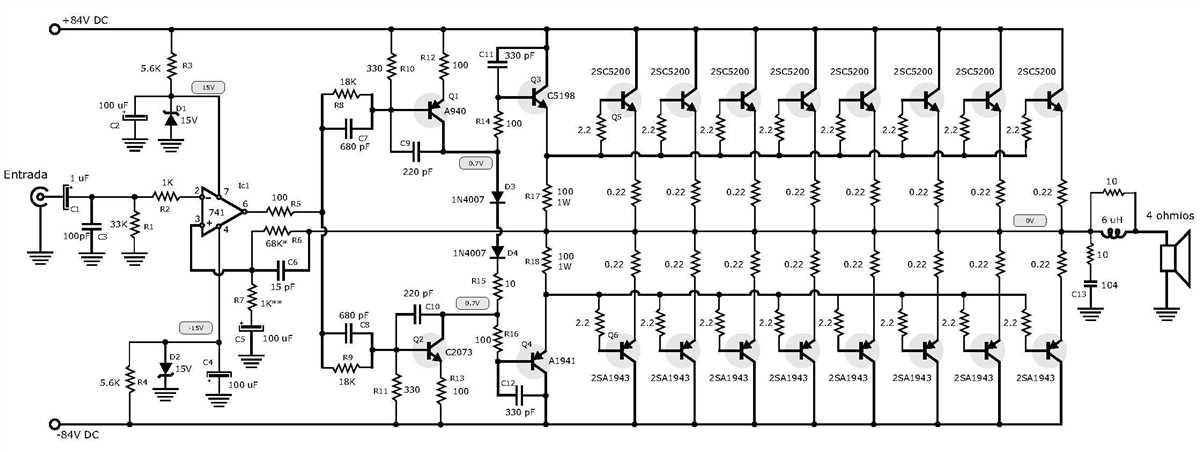
Resistors and capacitors are used for biasing and feedback purposes in an audio amplifier circuit. Biasing resistors are used to set the operating point of the transistors or Op-Amps, ensuring proper amplification. Feedback resistors and capacitors are used to provide negative feedback, which helps stabilize the amplifier, reduces distortion, and improves overall performance.
5. Output stage and load
The output stage of an audio amplifier circuit is responsible for delivering the amplified audio signal to the speakers or headphones. It typically consists of power transistors or integrated circuits capable of driving high currents. The load, which is the speaker or headphones, acts as the final output device and converts the electrical signal into sound.
In conclusion, an audio amplifier circuit is a complex electronic device that requires various key components to function effectively. These components, including the voltage amplifier, power supply, coupling capacitors, resistors, and capacitors for biasing and feedback, as well as the output stage and load, work together to amplify the input audio signal and deliver it to the output device.
Step-by-step guide: Building an audio amplifier circuit
Building an audio amplifier circuit can be a rewarding project for electronics enthusiasts and audio enthusiasts alike. By following a step-by-step guide, you can create a functional amplifier that can enhance the sound quality of your audio devices.
Gather the components
Before you start building the circuit, you will need to gather all the necessary components. This includes an audio amplifier integrated circuit (IC), capacitors, resistors, a power supply, and various connecting wires. Make sure to check the datasheet of the IC to ensure you have the correct components.
Create the circuit diagram
Next, you will need to create a circuit diagram for your audio amplifier. This diagram will serve as a guide for connecting the components together. You can use software or draw the diagram by hand. Include all the necessary connections, such as the input and output terminals, power supply connections, and any additional components required by the IC.
Connect the components
Once you have the circuit diagram, it’s time to start connecting the components. Begin by connecting the IC to the appropriate pins on the circuit board. Pay close attention to the orientation of the IC to ensure it is inserted correctly. Then, connect the capacitors, resistors, and power supply as indicated in the diagram. Use a soldering iron to make secure connections and trim any excess wire.
Test the amplifier
After connecting all the components, it’s important to test the amplifier to ensure it works properly. Connect an audio source, such as a smartphone or MP3 player, to the input terminals and a speaker to the output terminals. Power on the amplifier and play some audio. If you hear sound coming from the speaker, then the amplifier is functioning correctly.
Enclose the circuit
Once you have verified that the amplifier is working, you can enclose the circuit in a suitable case. This will protect the components from damage and provide a neat and professional appearance. Use a drill to create holes for the input and output jacks, power supply connector, and any other necessary openings. Mount the circuit board and secure the case. Ensure that there is proper ventilation to prevent overheating.
Enjoy your audio amplifier
With the circuit built and enclosed, you can now enjoy your audio amplifier. Connect it to your audio devices and experience enhanced sound quality. Experiment with different speakers and audio sources to find the best combination that suits your preferences. With your newly built audio amplifier, you can bring your audio experience to a whole new level.
Troubleshooting common issues with audio amplifier circuits
Building and testing audio amplifier circuits can sometimes be challenging, as there are several potential issues that can arise. Here are a few common problems and troubleshooting tips to help you identify and resolve them:
No sound or weak output:
- Check the power supply: Ensure that the amplifier is receiving the correct voltage and that the power supply is functioning properly.
- Inspect the connections: Make sure all the connections are secure and properly soldered. Look for loose wires or cold solder joints.
- Test the input signal: Verify that the audio source is working properly and providing a strong enough signal.
- Check the components: Look for any damaged or faulty components, such as capacitors or resistors, and replace them if necessary.
Distorted or noisy sound:
- Check the grounding: Ensure that the amplifier is properly grounded to minimize interference and noise.
- Inspect the input/output connections: Make sure there are no loose or damaged cables or connectors that could cause interference.
- Adjust the gain: If the gain is set too high, it can result in distortion. Try reducing the gain and see if the sound improves.
- Test the audio source: Try connecting a different audio source to isolate if the issue is with the amplifier or the source itself.
Short circuit or overheating:
- Check for short circuits: Look for any accidental solder bridges or loose wires that could be causing a short circuit.
- Inspect the heat sinks: Make sure the heat sinks are properly sized and mounted to dissipate heat effectively. Apply thermal paste if necessary.
- Check the ventilation: Ensure that the amplifier has enough airflow to prevent overheating. Consider adding additional cooling fans if needed.
- Test the load impedance: Make sure the amplifier is matched with the appropriate load impedance, as mismatched impedance can lead to overheating.
Remember, troubleshooting audio amplifier circuits requires patience and attention to detail. By following these tips and carefully inspecting and testing the various components, you should be able to identify and resolve most common issues. Good luck!
Q&A:
What should I do if my audio amplifier circuit is producing distorted or fuzzy sound?
There are few potential reasons for distorted or fuzzy sound in an audio amplifier circuit. First, check the input source to ensure it is not the cause of the problem. If the source is fine, check the connections between the amplifier circuit and the speakers for loose or damaged cables. Additionally, inspect the amplifier circuit for any faulty components, such as capacitors or resistors, and replace them if necessary. Finally, ensure the power supply to the circuit is stable and sufficient for its operation.
Why is my audio amplifier circuit not producing any sound?
If your audio amplifier circuit is not producing any sound, there are several potential causes to investigate. First, check the input source to ensure it is functioning properly and delivering signal. Next, inspect the connections between the amplifier circuit and the speakers to make sure they are properly connected and not damaged. Additionally, check the power supply to the circuit to ensure it is sufficient and stable. Finally, inspect the amplifier circuit itself for any faulty components, such as transistors or integrated circuits, and replace them if necessary.
What should I do if my audio amplifier circuit is overheating?
If your audio amplifier circuit is overheating, it is important to address the issue promptly to prevent further damage. First, check the ventilation around the circuit and ensure it is not obstructed, as insufficient cooling can cause overheating. If the ventilation is fine, inspect the circuit for any faulty components, especially the power transistors, as they are often the main source of heat. Replace any faulty components and ensure proper heat sinking if necessary. Additionally, check the power supply to the circuit to ensure it is stable and not causing excessive heat.
Why is my audio amplifier circuit producing a humming noise?
A humming noise in an audio amplifier circuit can be caused by several factors. First, check the grounding of the circuit and ensure it is properly connected. Poor grounding can introduce noise into the system. Next, inspect the input source and cables for any interference or grounding issues. Noise can be introduced if the source or cables are not shielded properly. Additionally, check the power supply to the circuit for stability and noise. Finally, inspect the amplifier circuit for any faulty components, such as capacitors or op-amps, and replace them if necessary.
What should I do if my audio amplifier circuit is producing low volume?
If your audio amplifier circuit is producing low volume, there are several factors to consider. First, check the input source and ensure it is delivering a strong signal. Weak or low-level signals can result in low volume output. Next, inspect the connections between the amplifier circuit and the speakers to ensure they are properly connected and not damaged. Additionally, check the power supply to the circuit to ensure it is stable and sufficient. Finally, inspect the amplifier circuit for any faulty components, such as resistors or potentiometers, and replace them if necessary.
Why is my audio amplifier circuit not producing any sound?
There could be several reasons for this issue. First, check if your audio source is connected properly to the amplifier circuit. Ensure that the volume is turned up and the audio source is playing. Next, inspect the connections between the amplifier circuit and the speakers. Make sure all wires are securely connected and that the speakers are functioning properly. Additionally, check if the power supply for the amplifier circuit is delivering the correct voltage. If none of these solutions work, there may be a problem with the amplifier circuit itself, such as a faulty component or a wiring issue.