
When it comes to maintaining your pressure washer, having a clear understanding of its different parts is essential. One crucial component of the pressure washer is the gun. The Bit 115 pressure washer gun is known for its durability and reliability, making it a popular choice among professionals and homeowners alike.
The Bit 115 pressure washer gun is made up of several key parts that work together to deliver a powerful and controlled stream of water. One of the most important parts of the gun is the trigger, which allows you to control the flow of water. The handle provides a comfortable grip, while the nozzle is responsible for delivering the water in a precise and effective manner.
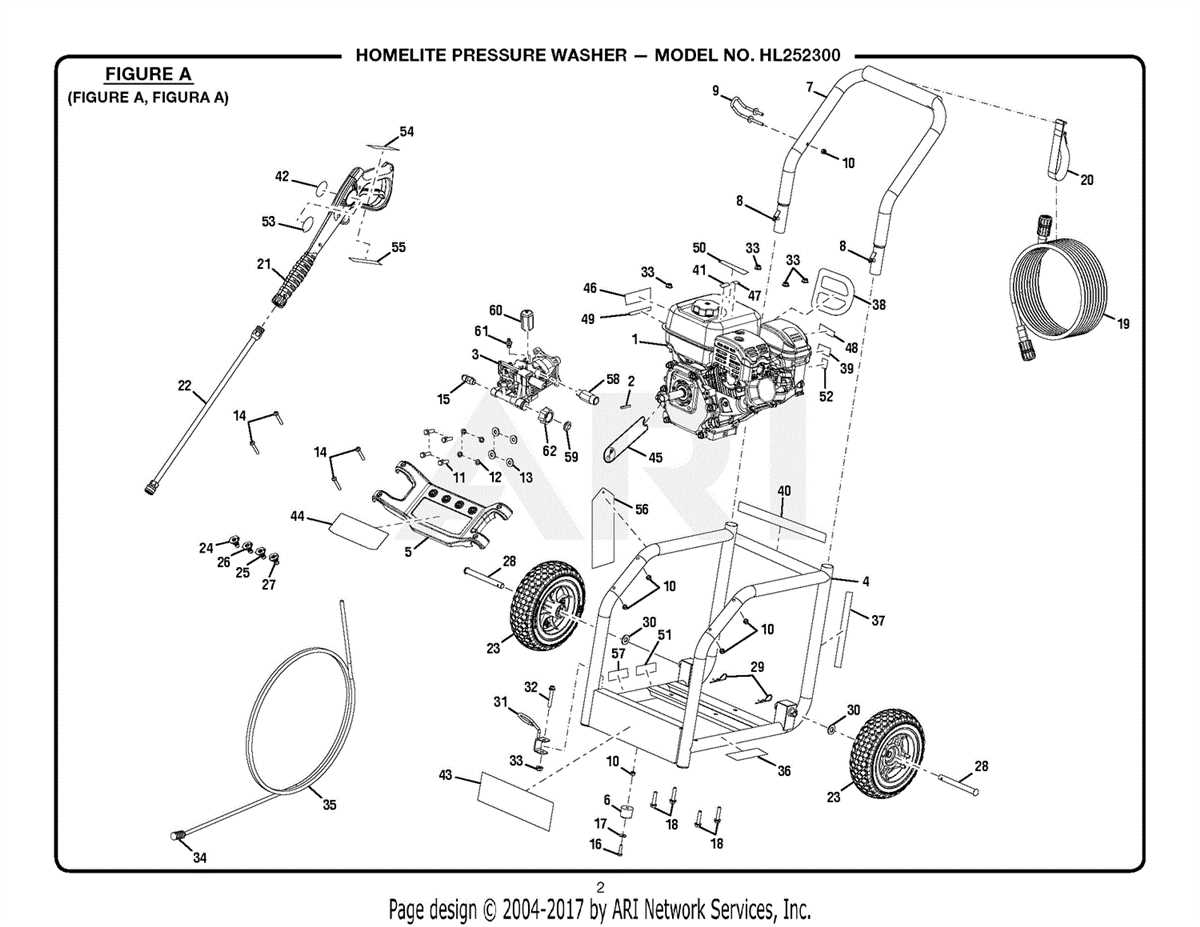
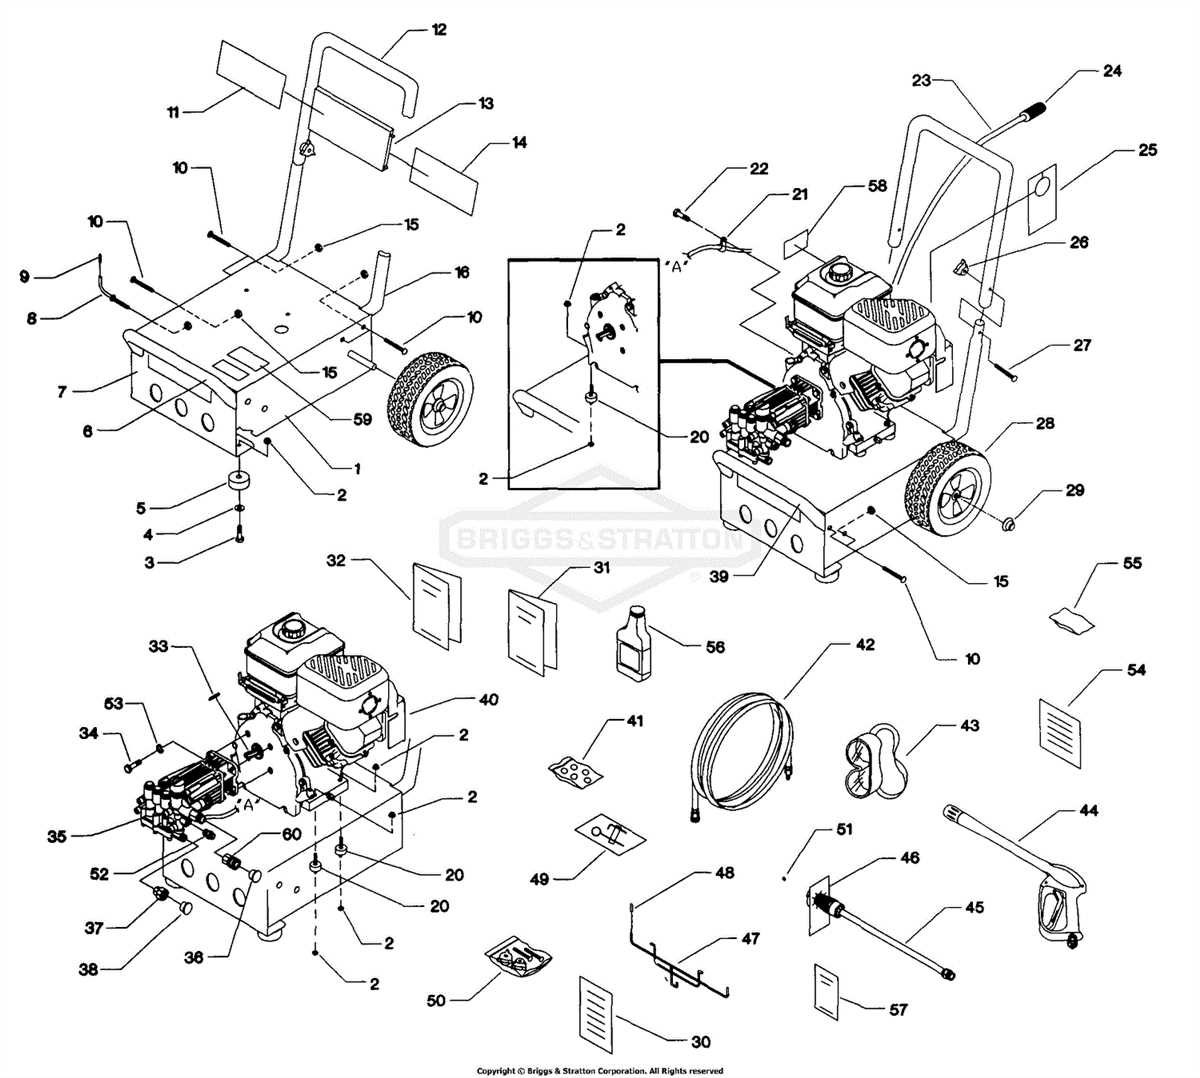
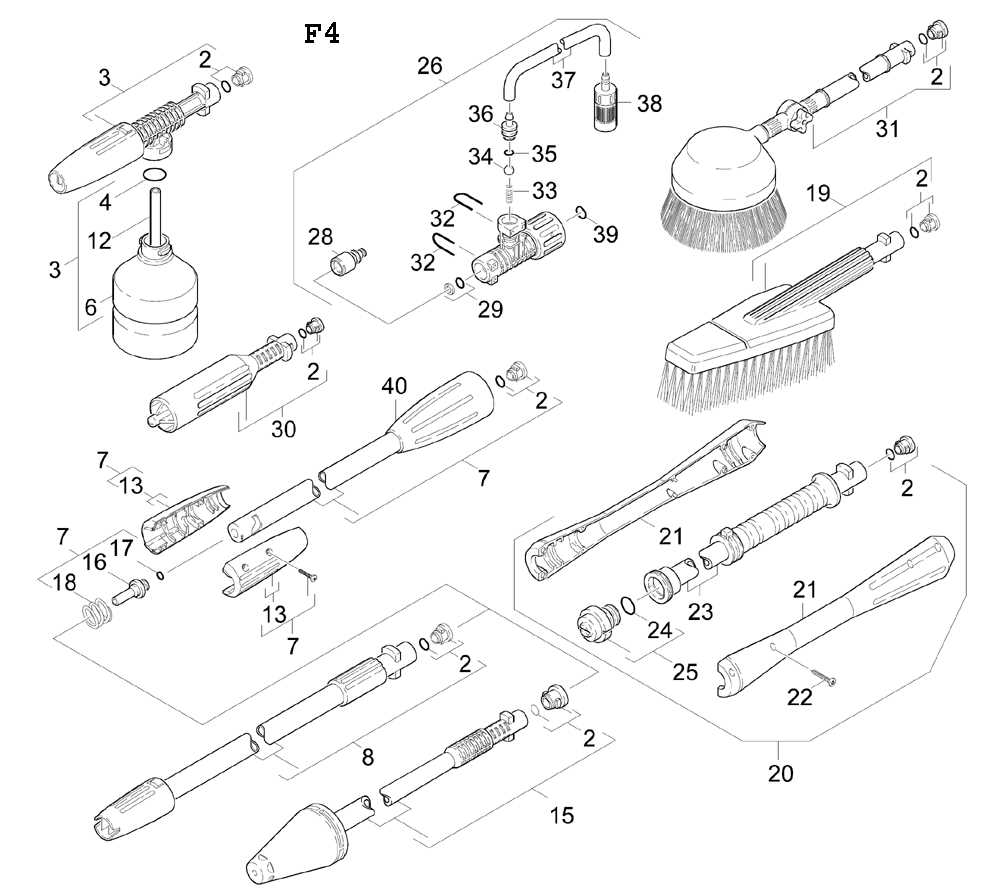
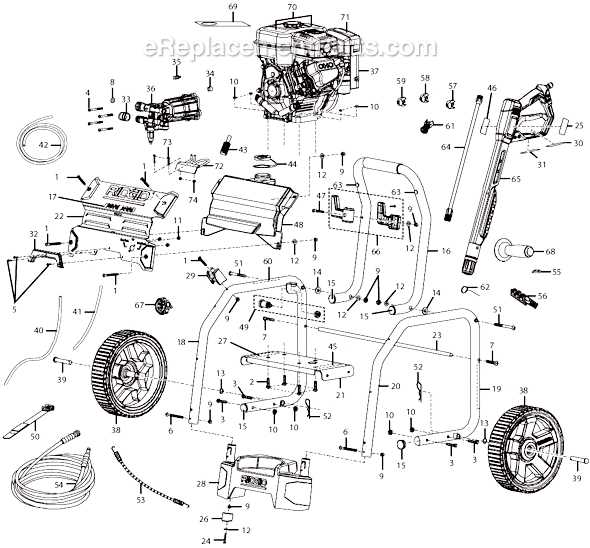
In order to better understand the different parts of the Bit 115 pressure washer gun, a diagram is often used. This diagram provides a visual representation of the gun and its various components, making it easier for users to identify and replace specific parts when necessary. Whether you’re looking to repair your pressure washer gun or simply learn more about its inner workings, a parts diagram can be a valuable resource.
By familiarizing yourself with the different parts of the Bit 115 pressure washer gun, you can ensure proper maintenance and prolong its lifespan. Regularly checking and cleaning these parts, as well as replacing any damaged or worn components, will help keep your pressure washer working at its best. With the help of a parts diagram, you can easily identify and locate the specific parts you need, making the repair process efficient and hassle-free.
Overview of the Bit 115 Pressure Washer Gun Parts Diagram
The Bit 115 pressure washer gun is a crucial component of any pressure washer setup. It is responsible for controlling the flow and direction of the high-pressure water that is used to clean surfaces. To understand how the gun works and how to maintain or repair it, it is helpful to have a parts diagram that shows the various components and their interactions.
The Bit 115 pressure washer gun parts diagram provides a detailed overview of the different parts of the gun. It highlights the crucial components such as the trigger, valve, nozzle, and wand. The trigger is the part of the gun that is pulled to activate the flow of water. It is connected to the valve, which controls the on/off function and regulates the water pressure. The nozzle is the part that attaches to the end of the wand and determines the spray pattern and intensity of the water.
The parts diagram also shows other important elements of the Bit 115 pressure washer gun, including the safety lock, swivel connector, and O-rings. The safety lock is a mechanism that prevents accidental triggering, providing an extra layer of safety during operation. The swivel connector allows for easy rotation and maneuverability of the gun, making it more convenient to use in different cleaning scenarios. The O-rings are rubber seals that prevent leaks and ensure a tight connection between the various components.
By referring to the Bit 115 pressure washer gun parts diagram, users can identify specific parts and understand how they fit together. This knowledge is valuable for troubleshooting issues, replacing worn or damaged parts, and performing regular maintenance to keep the gun in optimal working condition. Whether you are a professional cleaner or a homeowner, having a clear understanding of the pressure washer gun’s components is essential for efficient and effective cleaning.
The Bit 115 pressure washer gun is an essential tool for anyone who needs to clean various surfaces with high pressure water. Whether you need to clean your car, driveway, or outdoor furniture, this gun is designed to deliver a powerful stream of water to remove dirt, grime, and other debris. With its durable construction, ergonomic design, and easy-to-use features, the Bit 115 pressure washer gun is a reliable companion for all your cleaning needs.
One of the key components of the Bit 115 pressure washer gun is its trigger, which allows you to control the flow of water. By squeezing the trigger, you can start the flow of water, and by releasing it, you can stop the flow. This feature makes it easy to control the intensity of the water stream, allowing you to adjust it based on the surface you are cleaning. The gun also has a safety lock feature to prevent accidental spraying.
Another important part of the Bit 115 pressure washer gun is the nozzle. The gun comes with different types of nozzles that can be easily interchanged to adjust the width and intensity of the water stream. The nozzles are color-coded to easily identify the spray pattern they produce. For example, the red nozzle provides a narrow, concentrated stream, while the green nozzle provides a wider, fan-shaped spray. This versatility allows you to choose the most appropriate nozzle for each cleaning task.
In addition to the trigger and nozzle, the Bit 115 pressure washer gun also has other important parts, such as the gun body, the hose connection, and the inlet for detergent. The gun body is made of high-quality materials to ensure durability and long-lasting performance. The hose connection is designed to securely attach the gun to the pressure washer, while the detergent inlet allows you to easily add cleaning solutions to enhance the cleaning power of the water.
In conclusion, the Bit 115 pressure washer gun is an indispensable tool for anyone in need of a powerful and versatile cleaning device. With its ergonomic design, easy-to-use features, and interchangeable nozzles, this gun allows you to clean various surfaces with precision and efficiency. Whether you are a professional cleaner or a homeowner looking to maintain the cleanliness of your property, the Bit 115 pressure washer gun is a reliable choice that will meet all your cleaning needs.
Exploring the Primary Components
The Bit 115 pressure washer gun is a versatile tool that consists of several primary components, each serving a specific purpose in the operation of the gun. Understanding these components is crucial for maintaining and repairing the gun effectively. Let’s take a closer look at each of these primary components:
The Handle
The handle is the part of the gun that the user holds onto while operating the pressure washer. It is designed to provide a comfortable grip and control during use. The handle is typically made of durable materials like plastic or metal to withstand the rigors of pressure washing.
The Trigger

The trigger is the mechanism that controls the flow of water or cleaning solution from the gun. When the user squeezes the trigger, it opens a valve and allows the water to flow out of the gun at a high pressure. Releasing the trigger shuts off the flow instantly. The trigger is an essential component for controlling the pressure and precision of the cleaning process.
The Nozzle
The nozzle is the tip of the gun that determines the spray pattern and pressure of the water coming out. Different nozzles can be attached to the gun to achieve different cleaning results, such as a pinpoint stream for stubborn stains or a wide spray for large surface areas. The Bit 115 pressure washer gun typically comes with multiple interchangeable nozzles for versatility.
The Inlet and Outlet
The inlet and outlet are the connections for the water supply and pressure hose, respectively. The inlet is where the water enters the gun from the main water source, while the outlet is where the high-pressure water exits the gun and flows through the pressure hose. These connections need to be securely attached to ensure a steady flow of water and prevent any leaks or damage.
The Safety Lock
The safety lock is a feature that prevents accidental triggering of the gun. It is a button or switch that needs to be pressed or activated before the trigger can be squeezed. This safety mechanism helps to avoid any unwanted spray and protects the user and surrounding objects from potential harm.
By familiarizing yourself with these primary components of the Bit 115 pressure washer gun, you can better understand how the gun functions and perform necessary maintenance and repairs when needed. Always refer to the manufacturer’s instructions and diagrams to ensure proper handling and operation of the gun.
The Grip and Trigger Assembly
The grip and trigger assembly is an essential part of the Bit 115 pressure washer gun. It is responsible for controlling the flow of water and ensuring a comfortable and ergonomic grip for the user.
The assembly consists of several components that work together to provide a seamless user experience. At the core is the trigger mechanism, which allows the user to start and stop the flow of water with a simple press of a finger. The trigger is spring-loaded, ensuring smooth operation and quick response.
Surrounding the trigger is the grip, which is designed to fit comfortably in the user’s hand. It is made of a durable and non-slip material to provide a secure grip, even when wet. The grip may also feature ergonomic contours or ridges to enhance user comfort and reduce hand fatigue during extended use.
Additionally, the grip and trigger assembly may include safety features such as a lock or latch mechanism. This allows the user to lock the trigger in place to prevent accidental spraying and provides an added layer of safety when operating the pressure washer.
Overall, the grip and trigger assembly of the Bit 115 pressure washer gun plays a crucial role in the functionality and usability of the tool. It combines user comfort with precise control to ensure an efficient and enjoyable pressure washing experience.
Disassembling and Cleaning the Nozzle
In order to maintain the functionality and effectiveness of your Bit 115 pressure washer gun, it is important to regularly disassemble and clean the nozzle. Over time, dirt, debris, and mineral deposits can accumulate in the nozzle, potentially clogging it and reducing the pressure of the water stream. Follow the steps below to disassemble and clean the nozzle for optimal performance.
1. Turn off the pressure washer and release any remaining pressure.
Before starting the disassembly process, make sure to turn off the pressure washer and release any remaining pressure in the system. This will ensure your safety during the cleaning process.
2. Locate the nozzle on the tip of the pressure washer gun.
The nozzle is usually located at the end of the pressure washer gun, where the water stream is emitted. It is often attached by a screw or clip mechanism.
3. Remove the nozzle from the pressure washer gun.
Using the appropriate tools, unscrew or unclip the nozzle from the pressure washer gun. Be careful not to damage or lose any small parts during the removal process.
4. Inspect the nozzle for any visible dirt, debris, or mineral deposits.
Once the nozzle is removed, visually inspect it for any visible dirt, debris, or mineral deposits. These can usually be seen as dark or whitish build-ups on the surface of the nozzle.
5. Clean the nozzle with a soft brush and mild detergent.
Dip a soft brush into a mixture of mild detergent and water and gently scrub the surface of the nozzle. Pay extra attention to the areas with visible dirt or deposits. Avoid using harsh abrasives that could damage the nozzle.
6. Rinse the nozzle thoroughly with clean water.
After cleaning, rinse the nozzle thoroughly with clean water to remove any residual detergent or loosened dirt. This will ensure that the nozzle is free from any chemical residue that could potentially affect its performance.
7. Reassemble the nozzle onto the pressure washer gun.
Once the nozzle is clean and dry, reassemble it onto the pressure washer gun using the same screw or clip mechanism you used for removal. Make sure it is securely fastened to prevent any leaks or water loss during operation.
8. Test the pressure washer with the cleaned nozzle.
After reassembly, test the pressure washer with the cleaned nozzle to ensure that it is functioning properly. If you notice any issues with the water stream or pressure, repeat the cleaning process or seek professional assistance if needed.
By regularly disassembling and cleaning the nozzle of your Bit 115 pressure washer gun, you can maintain its optimal performance and prolong its lifespan. This simple maintenance task can help ensure that your pressure washer continues to deliver a powerful and efficient water stream for all your cleaning needs.
Replacement Parts for the Bit 115 Pressure Washer Gun
The Bit 115 pressure washer gun is a powerful tool for cleaning various surfaces, from driveways to patio furniture. However, with regular use, certain parts of the gun may wear out or break. In such cases, it is important to have access to replacement parts to ensure the uninterrupted operation of the pressure washer gun. Here are some essential replacement parts for the Bit 115 pressure washer gun:
- Nozzle Kit: The nozzle of the pressure washer gun is responsible for controlling the spray pattern and intensity. Over time, the nozzle may become clogged or damaged. The Bit 115 pressure washer gun comes with a nozzle kit that includes different spray patterns for various cleaning tasks. It is crucial to have a spare nozzle kit on hand to quickly replace a worn-out or malfunctioning nozzle.
- Trigger Handle: The trigger handle is the main control mechanism of the pressure washer gun. With constant use, the trigger handle may lose its functionality or break. Having a replacement trigger handle ensures that you can easily operate the gun without any inconvenience. It is recommended to choose a trigger handle that is compatible with the Bit 115 pressure washer gun to ensure a proper fit.
- Hose Connector: The hose connector is responsible for connecting the pressure washer gun to the hose, allowing water flow to the gun. This connector may wear out over time, leading to leaks or improper water flow. It is important to have a replacement hose connector that fits the Bit 115 pressure washer gun’s specifications to maintain efficient operation and prevent any water leakage.
- Spray Wand: The spray wand is an essential component of the pressure washer gun, providing an extension for reaching distant or hard-to-reach areas. If the spray wand gets damaged or broken, it may compromise the versatility and effectiveness of the pressure washer gun. Having a spare spray wand ensures that you can continue cleaning with ease, without any limitations.
By keeping these replacement parts on hand, you can quickly address any issues that may arise during the use of the Bit 115 pressure washer gun. It is recommended to regularly inspect and maintain the gun to identify any worn-out or malfunctioning parts, so they can be replaced promptly. This ensures that the pressure washer gun remains in optimal condition and delivers consistent performance for your cleaning needs.
Maintaining and Troubleshooting the Gun
Proper maintenance is essential for keeping your Bit 115 pressure washer gun in optimal condition. Here are some tips to help you maintain and troubleshoot the gun:
Cleaning
Regularly clean the gun after each use to remove any dirt or debris that may have accumulated. Use a soft cloth or sponge with mild soap and water to gently wipe down the exterior of the gun. Avoid using harsh chemicals or abrasive materials that could damage the gun’s surface.
Lubrication
Apply a small amount of lubricant to the moving parts of the gun, such as the trigger and nozzle, to ensure smooth operation. Use a lubricant specifically designed for pressure washer guns, and follow the manufacturer’s instructions for application.
Inspect and Replace Parts
Regularly inspect the gun for any signs of wear or damage, such as cracks, leaks, or loose fittings. If you notice any issues, it is important to replace the damaged parts as soon as possible to prevent further damage and maintain the gun’s performance. Refer to the Bit 115 pressure washer gun parts diagram for help identifying the specific parts that may need replacing.
Troubleshooting
If you encounter any issues with the gun, such as low pressure or a malfunctioning trigger, there are a few troubleshooting steps you can try:
- Check the water supply to ensure it is adequately connected and turned on.
- Inspect the gun and nozzle for any clogs or blockages, and clean them if necessary.
- Ensure that all connections are secure and tightened properly.
- If the issue persists, consult the manufacturer’s instructions or contact customer support for further assistance.
By following these maintenance tips and troubleshooting steps, you can prolong the life of your Bit 115 pressure washer gun and ensure it continues to operate effectively. Remember to always prioritize safety when using the gun and consult the manufacturer’s instructions for specific maintenance guidelines.