
If you are a proud owner of a Hunter fan, you may have encountered the need to understand its motor wiring diagram at some point. The wiring diagram is an essential tool that helps you understand the electrical connections within the fan motor. Whether you are installing a new fan or troubleshooting an existing one, having a clear understanding of the wiring diagram can save you time and frustration.
In this article, we will provide you with a comprehensive guide to Hunter fan motor wiring diagram. We will break down the different components of the wiring diagram and explain their functions. Additionally, we will discuss common wiring configurations and provide step-by-step instructions for connecting the wires correctly.
Before getting into the specifics of the wiring diagram, it is important to understand the basic components of a Hunter fan motor. The motor is responsible for spinning the fan blades and creating airflow. It consists of various wires and terminals that connect to different parts of the fan, such as the capacitor and the speed control switch.
By familiarizing yourself with the Hunter fan motor wiring diagram, you will be equipped with the knowledge to troubleshoot any wiring issues that may arise. Whether you are a DIY enthusiast or a professional electrician, this guide will help you navigate through the wiring diagram with ease and confidence.
Hunter Fan Motor Wiring Diagram: A Complete Guide
If you are planning to install or repair a Hunter ceiling fan in your home, it is essential to have a clear understanding of the fan motor wiring diagram. A Hunter fan motor wiring diagram provides a complete guide on how to wire and connect the various components of the fan motor.
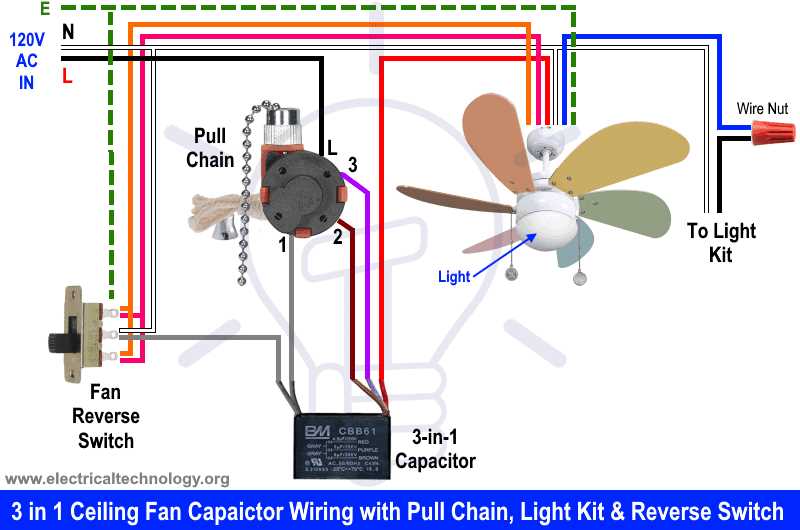
The Hunter fan motor wiring diagram typically includes the wiring connections for the fan motor, capacitor, speed switch, reverse switch, and the power source. It is crucial to follow the wiring diagram closely to ensure proper installation and prevent any electrical hazards.
Things You Will Need:
- Wire cutters
- Wire strippers
- Electrical tape
- Screwdriver
- Voltage tester
Before starting the wiring process, make sure the power to the fan is turned off at the circuit breaker. Once you have confirmed that the power is off, you can begin the wiring process by following these steps:
- Identify the wires and terminals in the fan motor. The wiring diagram will provide a clear illustration of the different wires and their corresponding terminals.
- Strip the insulation off the ends of the wires using wire strippers. Make sure to strip just enough insulation to expose the conductor without damaging it.
- Connect the wires according to the wiring diagram. This may involve connecting the motor wires to the corresponding terminals, connecting the capacitor, and connecting the speed and reverse switches.
- Secure the connections using wire nuts and electrical tape. Make sure all connections are tight and insulated to prevent any loose or exposed wires.
- Double-check all connections and ensure they match the wiring diagram. Use a voltage tester to verify that there is no electric current present before turning on the power.
It is important to note that the specific wiring diagram may vary depending on the model and type of Hunter fan motor you are working with. Always refer to the manufacturer’s instructions and wiring diagram for your specific fan model to ensure proper installation.
By following a Hunter fan motor wiring diagram and taking the necessary safety precautions, you can successfully wire and install a Hunter ceiling fan in your home. However, if you are unsure or uncomfortable with the wiring process, it is always best to hire a professional electrician to ensure the job is done safely and correctly.
Understanding the Basics of Hunter Fan Motor Wiring
If you are looking to install or repair a Hunter fan motor, it is important to understand the basics of its wiring. Hunter fans are known for their quality and durability, but like any electrical device, they can experience issues over time. By familiarizing yourself with the wiring diagram and understanding how the motor is wired, you can troubleshoot and fix problems more effectively.
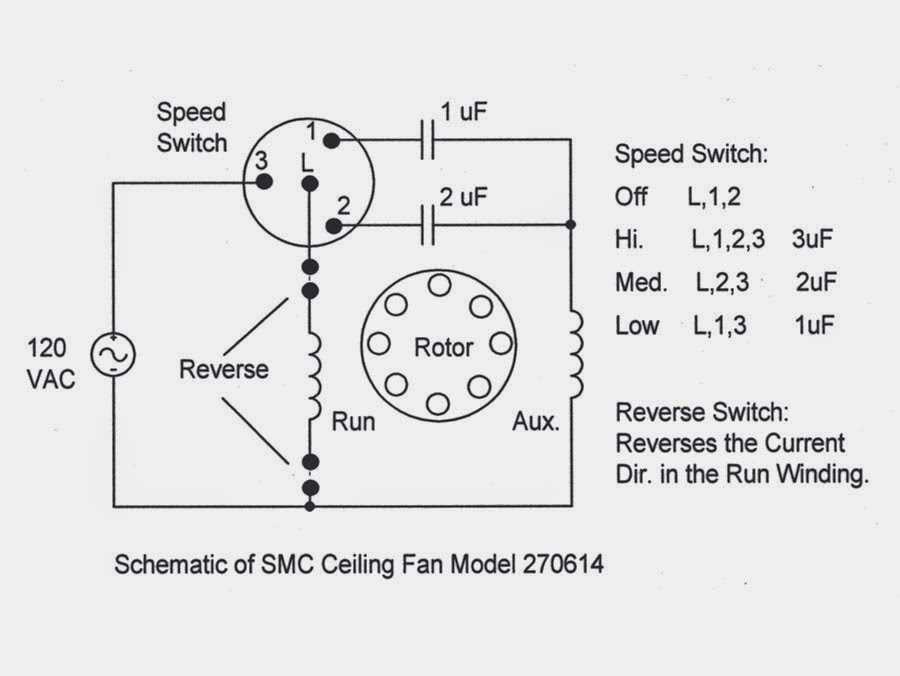
Wiring diagram: The wiring diagram is a visual representation of the electrical connections in the fan motor. It shows the various components of the motor, such as the power supply, capacitor, switches, and motor winding. The diagram also includes the color codes for the wires, which are essential for correctly connecting the different components.
Power supply: The fan motor receives power from the electrical system of your home. The power supply wires are typically black and white, with the black wire carrying the hot (live) current and the white wire carrying the neutral current. These wires need to be properly connected to the corresponding terminals in the motor.
Capacitor: The capacitor is an essential component in the fan motor, as it helps start and regulate the motor’s speed. It stores electrical energy and releases it to the motor when needed. The capacitor is usually connected between the power supply and the motor winding. Its wiring depends on the specific model of the Hunter fan motor.
Switches: Hunter fans often have multiple speed settings, which are controlled by switches. These switches are usually located on the fan’s housing or remote control. The wiring of the switches determines how the power flows to the motor winding, allowing you to select the desired speed.
Motor winding: The motor winding is made up of several coils of wire that create a magnetic field when an electric current passes through them. This magnetic field interacts with the fan’s rotor, causing it to turn. The wiring of the motor winding is crucial, as it determines the direction and speed of the fan.
By understanding the basics of Hunter fan motor wiring and consulting the wiring diagram, you can effectively install, repair, or troubleshoot any issues that may arise with your fan motor. It is important to follow the manufacturer’s instructions and safety guidelines when working with electrical components to ensure proper functionality and avoid accidents or damage.
Identifying the Different Wires in a Hunter Fan Motor

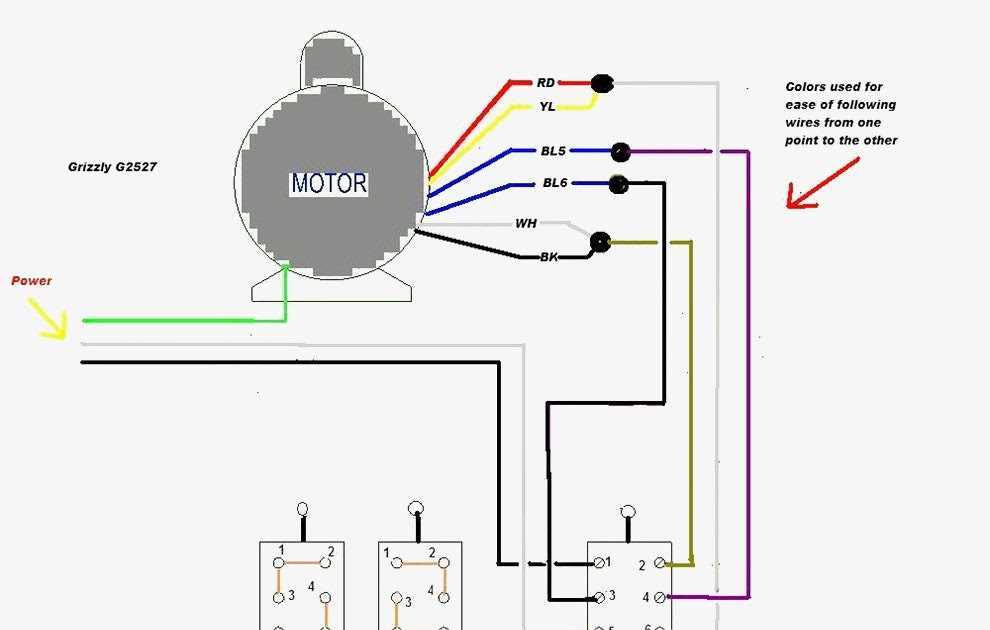
When it comes to wiring a Hunter fan motor, it is crucial to identify the different wires correctly to ensure proper installation and functionality. The wires in a Hunter fan motor can vary depending on the specific model and features, but there are some common wires that can be found in most motors.
Power wires: One of the most important wires to identify in a Hunter fan motor is the power wire. This wire is responsible for carrying electrical power from the source to the motor. It is usually colored black or marked with a “L” for line. It is essential to connect the power wire to the corresponding power supply line to power the motor correctly.
Neutral wire: Another important wire to identify is the neutral wire. This wire is responsible for completing the electrical circuit and providing a return path for the electrical current. It is typically colored white or marked with an “N.” The neutral wire should be connected to the corresponding neutral line for proper functioning of the motor.
Ground wire: The ground wire is a safety feature that protects against electrical shocks. It provides a path for electricity to flow safely into the ground in case of a fault or short circuit. The ground wire is usually colored green or marked with a “G” and should be connected to the grounding line to ensure proper grounding of the motor.
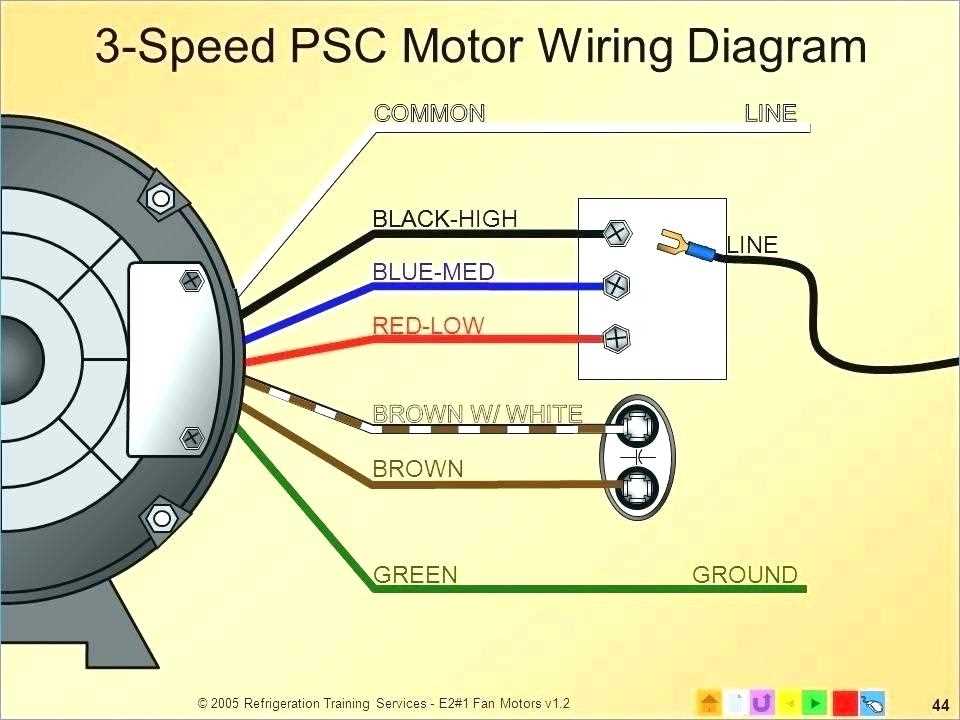
Speed control wires: In some Hunter fan motors, there may be additional wires for speed control. These wires are usually colored differently, such as red, blue, or yellow, and may be labeled with speed levels such as “low,” “medium,” and “high.” These wires are used to control the fan’s speed by connecting them to the corresponding speed control switch or module.
Additional wires: Depending on the specific model and features of the Hunter fan motor, there may be additional wires for controlling functions such as lighting, reverse rotation, or remote control operation. These wires should be identified and connected accordingly, following the manufacturer’s instructions and wiring diagrams.
It is important to read the manufacturer’s instructions and consult the wiring diagram specific to your Hunter fan model to accurately identify and connect the different wires in the fan motor. Improper wiring can result in malfunctioning or even damage to the motor. If you are unsure or uncomfortable with the wiring process, it is recommended to seek professional assistance to ensure a safe and proper installation of your Hunter fan motor.
Connecting the Power Supply to the Hunter Fan Motor
When it comes to connecting the power supply to the Hunter fan motor, it is important to follow the wiring diagram provided by the manufacturer. This diagram will show the proper connections for the different components of the fan motor, including the power supply wires.
The first step in connecting the power supply is to locate the main electrical panel in your home. This panel should contain the circuit breakers or fuses that control the power to the fan motor. Make sure to turn off the power to the circuit that will be supplying the fan motor to ensure safety during the installation process.
Once the power is turned off, you can then begin connecting the power supply wires to the fan motor. The wiring diagram will indicate which wires are the hot (black), neutral (white), and ground (green or bare) wires. Connect the hot wire from the power supply to the hot wire on the fan motor, and the neutral wire to the neutral wire. Ensure proper connections by using wire connectors or wire nuts and securing them tightly.
It is also important to connect the ground wire to the grounding screw or terminal on the fan motor. This wire helps to prevent electrical accidents and provide a safe operating environment for the fan motor. Ensure that the ground wire is securely connected and tightened to the grounding point.
After all the power supply wires are connected to the fan motor, double-check all connections to ensure they are secure and properly connected. Once you are confident that all connections are correct, you can restore power to the circuit by turning on the circuit breaker or replacing the fuse and test the fan motor to ensure it is functioning properly.
Remember, it is always recommended to consult the manufacturer’s wiring diagram and follow proper safety precautions when connecting the power supply to the Hunter fan motor. If you are unsure or uncomfortable with the process, it is best to seek the assistance of a qualified electrician.
Wiring the Hunter Fan Motor to the Switches
When it comes to wiring the Hunter fan motor to the switches, there are a few important steps to follow. The motor of the fan usually has several wires that need to be connected correctly for the fan to function properly. It is important to refer to the wiring diagram provided by Hunter for your specific fan model to ensure accurate wiring.
The first step in wiring the Hunter fan motor is to identify the wires. The most common wires found in a Hunter fan motor are the black (hot), white (neutral), green (ground), and blue (light) wires. In some cases, there may be additional wires for dual switch operation or remote control setup.
Here is a general guide on how to wire the Hunter fan motor:
- Start by turning off the power to the fan at the circuit breaker.
- Remove the cover plate from the fan motor to access the wiring.
- Identify the wires in the fan motor and refer to the wiring diagram provided by Hunter.
- Connect the black wire from the fan motor to the black wire from the power supply. Secure the connection with a wire nut.
- Connect the white wire from the fan motor to the white wire from the power supply. Secure the connection with a wire nut.
- If your fan has a light, connect the blue wire from the fan motor to the blue wire from the power supply. Secure the connection with a wire nut.
- If your fan has a green wire for grounding, connect it to the green or bare copper wire from the power supply. Secure the connection with a wire nut.
- Follow the specific instructions in the wiring diagram for any additional wires, such as dual switch wiring or remote control setup.
- Once all the connections are made, carefully tuck the wires into the fan motor and reattach the cover plate.
It is crucial to double-check all the connections before restoring power to the fan. If you are unsure about the wiring or encounter any difficulties, it is recommended to consult a licensed electrician for assistance to ensure safe and proper installation of the Hunter fan motor.
Common Mistakes to Avoid in Hunter Fan Motor Wiring
When it comes to installing or repairing a Hunter fan motor, there are a few common mistakes that can easily be avoided. These mistakes can lead to improper wiring and potentially cause damage to the motor or other components of the fan. By being aware of these mistakes, you can ensure a proper and safe installation or repair process.
1. Incorrect wire connections
One of the most common mistakes is connecting the wires incorrectly. Each wire has a specific purpose and should be connected accordingly. It is important to carefully read and follow the wiring diagram provided by Hunter to ensure the correct wire connections. Failure to do so can result in a malfunctioning fan or even electrical hazards.
2. Overloading the circuit
Another mistake to avoid is overloading the circuit. Hunter fans usually require their own dedicated circuit to avoid overloading. If you try to connect the fan to an existing circuit that already has multiple appliances or devices, it can cause the circuit to trip or the fan to not operate properly. It is recommended to consult with a professional electrician to determine if a dedicated circuit is needed.
3. Ignoring safety precautions
Safety should always be a priority when working with electrical components. Ignoring safety precautions can lead to serious accidents or injuries. Always remember to turn off the power before starting any wiring work, use insulated tools, and wear protective gear. Additionally, make sure to follow any specific safety guidelines provided by Hunter for their fan motors.
4. Not testing the fan after wiring
Once the wiring is complete, it is crucial to test the fan before finishing the installation. Failure to do so can result in discovering issues later on, which can be more difficult to fix. Testing the fan can ensure that all connections are secure and the motor is functioning properly. If any issues are detected, it is easier to address them before fully installing the fan.
By avoiding these common mistakes, you can ensure a successful and safe installation or repair of a Hunter fan motor. Following the provided wiring diagram, dedicating a separate circuit, prioritizing safety, and testing the fan after wiring are all important aspects to keep in mind. With proper attention to detail, you can enjoy the benefits of a properly functioning Hunter fan motor.
Troubleshooting Common Issues in Hunter Fan Motor Wiring
In this article, we have discussed the wiring diagram for a Hunter fan motor and the various components involved in the wiring process. While Hunter fans are known for their durability and reliability, there can be some common issues that may arise in the motor wiring. Here, we will address some of these issues and provide troubleshooting tips to help you resolve them.
1. Fan not turning on:
One of the common issues faced by users is the fan not turning on. This can be caused by a few factors:
- Check if the power source is connected properly and if there is power supply to the fan.
- Verify that the wiring connections are secure and not loose.
- Inspect the capacitor for any damages or defects.
- Make sure the wall switch or remote control is functioning correctly.
By addressing these potential issues, you can usually resolve the problem of the fan not turning on.
2. Fan running at a slow speed:
If your Hunter fan is running at a slower speed than normal, it could be due to the following reasons:
- Check if the capacitor is damaged or worn out and needs replacement.
- Inspect the wiring connections to ensure they are secure and not loose.
- Check if the fan blades are clean and free from any obstructions that may be affecting the air circulation.
Addressing these issues can help restore your fan to its normal operating speed.
3. Fan making unusual noises:

If your Hunter fan is making unusual noises, it could signify a problem with the motor wiring. Here are some possible causes:
- Check if the motor bearings are worn out and need lubrication or replacement.
- Inspect the wiring connections for any loose or damaged wires that may be causing the noises.
- Ensure that all the screws and bolts in the fan assembly are properly tightened.
By addressing these potential issues, you can typically eliminate the unusual noises in your Hunter fan.
In conclusion, troubleshooting common issues in Hunter fan motor wiring involves checking the power supply, wiring connections, capacitor, switches, and addressing any potential problems with the motor or fan assembly. By following these troubleshooting tips, you can resolve most of the common problems associated with Hunter fan motors and ensure optimal performance and longevity of your fan.