
When it comes to electrical systems and equipment, proper wiring is crucial for safe and efficient operation. An essential component in many industrial and commercial setups is the contactor, particularly those manufactured by Furnas. To ensure that the contactor is wired correctly, it is important to understand the basics of a Furnas contactor wiring diagram.
A contactor is an electromechanical switch that controls the flow of electricity in an electrical circuit. It is commonly used to control motors, heating elements, and other high-power devices. Furnas contactors, known for their reliability and durability, are a popular choice in various industries.
A Furnas contactor wiring diagram provides a visual representation of how the contactor should be connected to the electrical system. It illustrates the proper placement and connection of various terminals, connectors, and wires, ensuring that electricity flows through the contactor correctly.
By referring to a Furnas contactor wiring diagram, electricians and technicians can easily identify the appropriate terminals for power input, load output, control voltage, and other necessary connections. This helps to prevent any potential damage to the contactor or the electrical system as a whole, and ensures the smooth operation of the equipment.
Furnas Contactor Wiring Diagram
Furnas contactors are widely used in electrical circuits to control the flow of electricity. They are commonly found in motor control systems, lighting circuits, and heating systems. Understanding the wiring diagram for a Furnas contactor is essential for proper installation and maintenance of these devices.
A typical Furnas contactor wiring diagram consists of several components, including the contactor itself, a power source, control switches, and load devices. The contactor is the main component responsible for controlling the flow of electricity. It connects and disconnects the power supply to the load devices based on the signals received from the control switches.
The wiring diagram provides a visual representation of how these components are connected. It shows the power source connected to the contactor’s terminals, along with the control switches and load devices. The wiring diagram also indicates the required electrical connections, such as the neutral, ground, and phase lines. It may include additional components, such as overload relays or interlocks, depending on the specific application.
To properly wire a Furnas contactor, it is important to follow the diagram carefully and ensure that all connections are made securely. It is recommended to use appropriate connectors, terminals, and wire gauges to ensure reliable and safe operation. Any deviations from the wiring diagram should be done in consultation with an experienced electrician or in accordance with the manufacturer’s guidelines.
In conclusion, understanding the Furnas contactor wiring diagram is crucial for the proper installation and operation of electrical circuits. Following the diagram accurately and using the correct components and wiring techniques will help ensure the reliability and safety of the system. It is always advisable to consult with professionals when dealing with complex wiring configurations or unfamiliar components.
What is a Furnas contactor?
A Furnas contactor is an electromechanical device that is used for controlling an electrical circuit by making or breaking the contact between two electrodes. It is commonly used in industrial applications to control the operation of motors, compressors, and other electrical equipment.
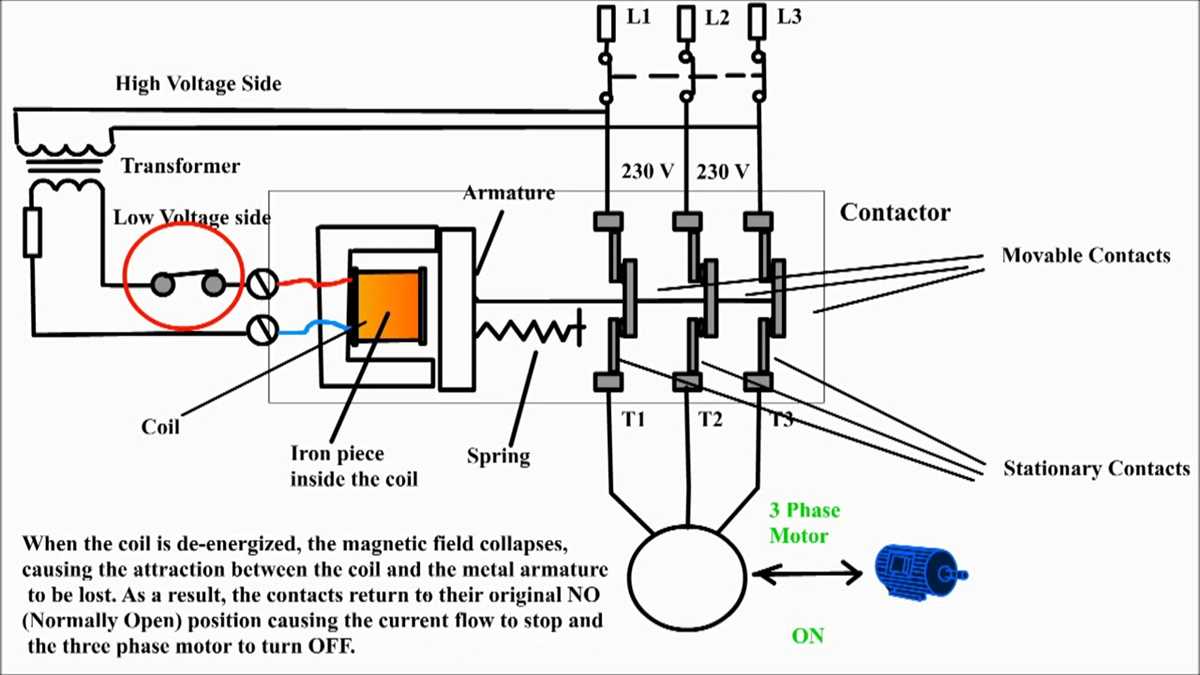
The contactor consists of a coil, contacts, and an armature. When an electrical current is applied to the coil, it creates a magnetic field that attracts the armature and closes the contacts. This allows the electricity to flow through the circuit and power the connected equipment. When the coil is de-energized, the magnetic field dissipates, and the contacts open, interrupting the power flow.
Furnas contactors are known for their durability and reliability. They are designed to handle high current loads and can withstand harsh operating conditions. They are often used in heavy-duty applications where frequent switching is required.
In terms of wiring, Furnas contactors typically have multiple terminals for connecting the power supply, load, and control circuit. The specific wiring diagram for a Furnas contactor will depend on the specific model and application. It is important to refer to the manufacturer’s instructions or consult an electrical professional to ensure proper wiring and installation.
Understanding the wiring diagram of a Furnas contactor is essential for proper installation and operation of the device. The wiring diagram provides a visual representation of the electrical connections between various components of the contactor.
The wiring diagram typically includes labels and symbols that represent the different terminals, wires, and components of the contactor. This helps the installer or electrician understand the correct wiring connections and ensure that the contactor functions correctly.
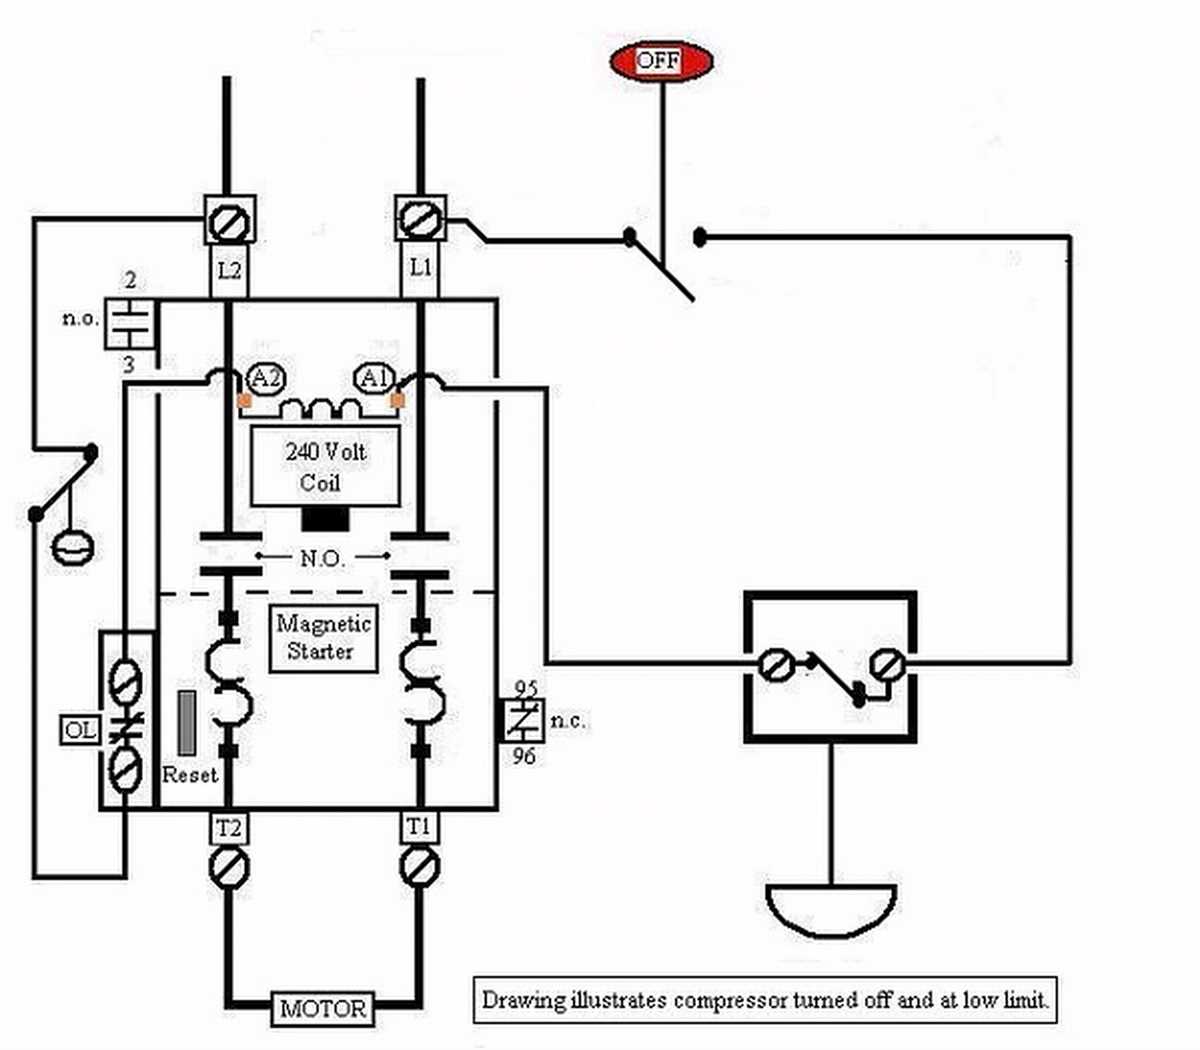
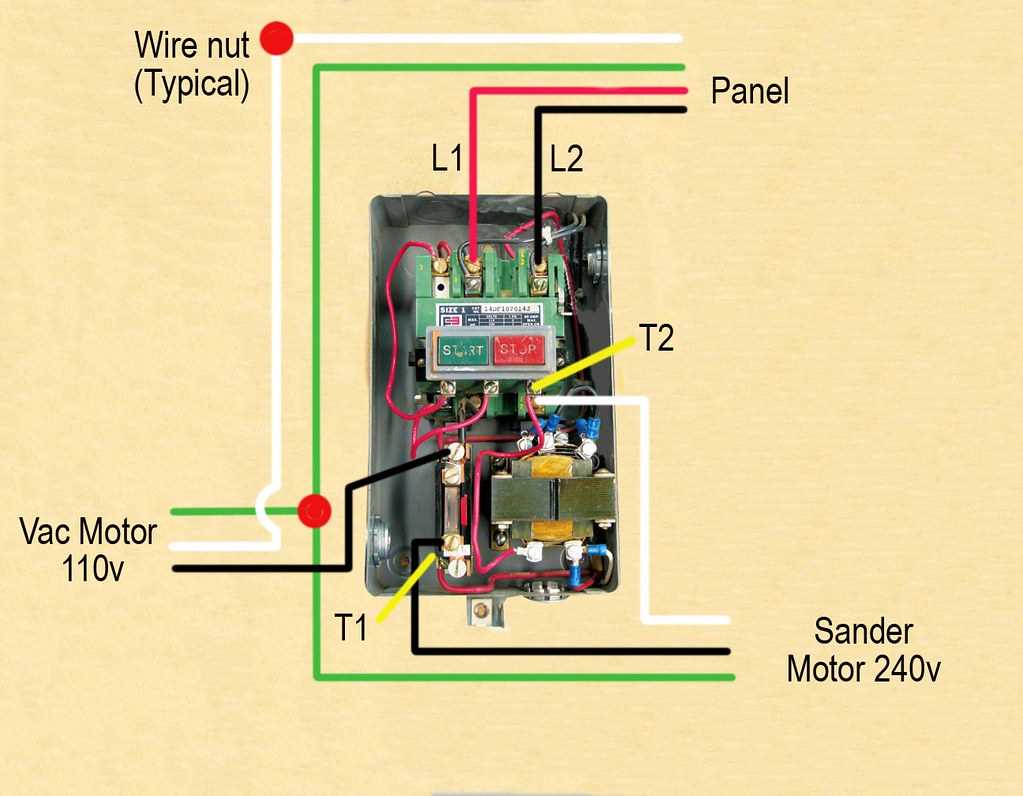
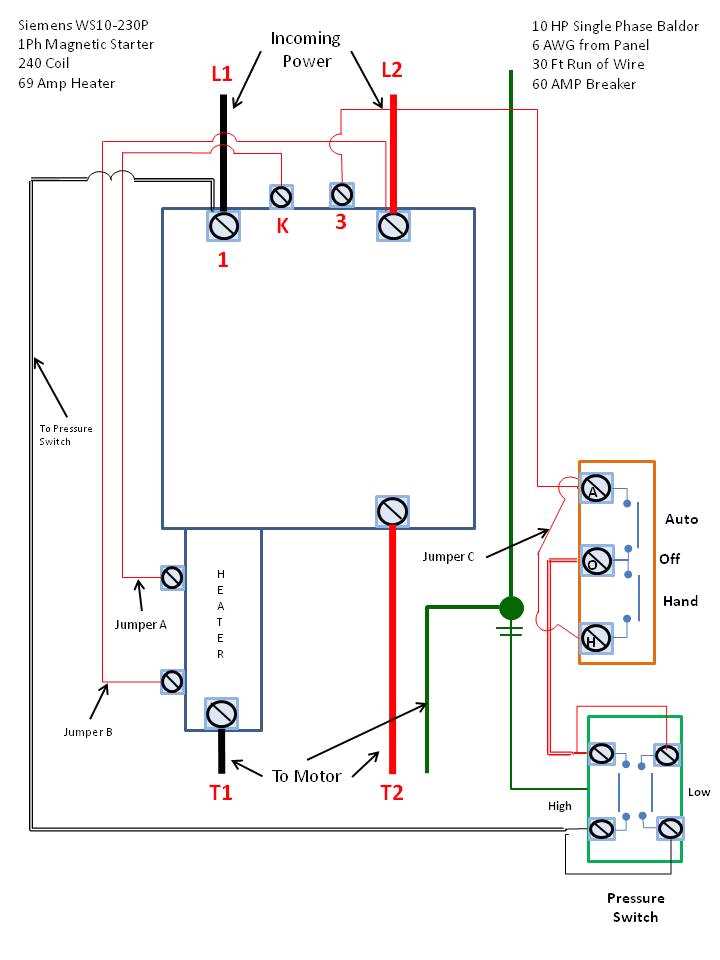
The diagram may show the power supply connections, control circuit connections, and other relevant information such as coil and auxiliary contacts. The power supply connections typically include lines for the incoming power source, such as L1, L2, and L3, which are connected to terminals on the contactor.
The control circuit connections may include terminals for the control voltage source, such as R, S, and T, which are connected to the control circuit components. These components may include push buttons, selector switches, and control relays.
The wiring diagram may also show the connections for the coil, which is the electromagnet that controls the opening and closing of the contactor. The coil terminals are typically labeled A1 and A2, and they are connected to the control voltage source to energize the coil.
In addition to the basic wiring connections, the diagram may include information about auxiliary contacts, which are additional contacts that can be used for monitoring or controlling other devices. These contacts may be labeled as NO (normally open) or NC (normally closed) and they can be connected to other electrical devices as needed.
Understanding the wiring diagram allows the installer to correctly wire the contactor and ensure that all connections are made properly. It also enables troubleshooting and maintenance by providing a reference for the electrical connections.
Components of a Furnas Contactor
A Furnas contactor is an electrical device that is used to control the flow of electricity in a circuit. It is commonly used in motor starter applications to control motors, switches, solenoids, and other electrical components. The contactor is made up of several key components that work together to ensure the safe and efficient operation of the circuit.
One of the main components of a Furnas contactor is the coil. The coil is an electromagnet that attracts the contacts when it is energized. It is typically made of copper wire wound around an iron or steel core. When an electric current passes through the coil, it generates a magnetic field that pulls the contacts together, allowing the electricity to flow.
Another important component is the contacts. The contacts are the points where the electrical current flows through the contactor. They are usually made of high-quality silver or silver-alloy materials, which provide excellent conductivity and durability. The contacts are designed to withstand high currents and frequent switching, ensuring reliable operation over an extended period of time.
The contactor also contains an overload relay, which protects the circuit from excessive current. The overload relay monitors the current flowing through the contactor and disconnects the circuit if the current exceeds a certain limit. This helps prevent damage to the motor or other connected devices in case of a fault or overload condition.
In addition to these main components, a Furnas contactor may also include auxiliary contacts, which are used for control and signaling purposes. These auxiliary contacts are separate from the main contacts and can be connected to other devices, such as push buttons, pilot lights, or other contactors, to provide additional control and feedback signals.
Step-by-step guide for wiring a Furnas contactor
Wiring a Furnas contactor is a relatively simple process that can be completed by following a few steps. By correctly connecting the necessary components, you can ensure that your contactor functions properly and provides the desired control over your electrical system.
Here is a step-by-step guide for wiring a Furnas contactor:
- Gather the necessary materials: Before beginning the wiring process, gather all the necessary materials. This includes the Furnas contactor, electrical cables, wire strippers, and a screwdriver.
- Turn off the power: Before starting any electrical work, it is crucial to turn off the power to the circuit where the contactor will be installed. This can be done by switching off the corresponding circuit breaker in the electrical panel.
- Mount the contactor: Choose a suitable location to mount the contactor. Ensure that it is securely attached to a surface using screws or other appropriate fasteners.
- Connect the power supply: Strip the ends of the electrical cable, and connect them to the power supply terminals on the contactor. Follow the manufacturer’s instructions for the specific wiring diagram of your Furnas contactor.
- Connect the control circuit: Strip the ends of another electrical cable and connect one end to the control circuit terminals on the contactor. The other end of the cable should be connected to the control device, such as a switch or a sensor, depending on the intended operation of the contactor.
- Test the wiring: After completing the connections, it is important to carefully test the wiring before restoring power to the circuit. Double-check all the connections to ensure they are secure and properly installed.
Following these steps will help you correctly wire a Furnas contactor. However, it is always recommended to consult the manufacturer’s instructions and seek guidance from a qualified electrician if you are unsure about any aspect of the wiring process.
Troubleshooting common wiring issues
In industrial settings, electrical wiring issues are not uncommon. It is important to identify and resolve these issues promptly to ensure the proper functioning of equipment and to maintain a safe working environment. Here are some common wiring issues that may occur with Furnas contactors and how to troubleshoot them.
1. Loose or faulty connections
One common issue that arises is loose or faulty connections. This can lead to voltage drop, overheating, and potential equipment failure. To fix this problem, start by checking all the connections to ensure they are tightened properly. If any connections are loose, tighten them using a screwdriver or appropriate tool. If a connection appears to be faulty or has signs of damage, such as burning or discoloration, it may need to be replaced.
2. Incorrect wire sizing
Another issue that can occur is using incorrect wire sizing. Using wires that are too small for the current load can cause overheating and potentially lead to a fire hazard. On the other hand, using wires that are too large can be wasteful and may not fit properly in the contactor terminals. It is important to consult the manufacturer’s documentation or an electrician to determine the appropriate wire size for the specific current load.
3. Short circuits
Short circuits occur when there is a direct connection between the live and neutral wires, bypassing the load. This can cause excessive current flow and can damage the contactor or other electrical components. To troubleshoot a short circuit, visually inspect the wiring for any signs of damage or exposed wires. Insulate any exposed wires using electrical tape or replace damaged wires. Additionally, using a multimeter, carefully measure the resistance between live and neutral wires to pinpoint the location of the short circuit. Once identified, the faulty wiring should be repaired or replaced.
4. Insufficient insulation
If the wiring insulation is insufficient, it can result in leakage of current and potentially lead to electric shock or short circuits. Inspect the wiring for any signs of fraying, cracking, or damage to the insulation. If any such damage is found, it is crucial to replace the affected section of the wiring with properly insulated wires. Additionally, ensure that the wiring is installed and routed correctly to avoid any sharp edges or areas where the insulation may rub against other surfaces.
By troubleshooting and addressing these common wiring issues, it is possible to ensure the safe and efficient operation of Furnas contactors and other electrical equipment. Regular maintenance, inspection, and adherence to safety guidelines are key to identifying and resolving wiring issues promptly.
Safety precautions when working with a Furnas contactor
Before starting any work with a Furnas contactor, it is essential to follow certain safety precautions to ensure a safe working environment. These precautions are necessary to protect yourself and others from potential hazards. This section highlights some of the important safety measures to keep in mind when working with a Furnas contactor.
1. Electrical Safety
- Always turn off the power: Before working with a Furnas contactor, disconnect the power supply to the circuit and ensure it is switched off. This will prevent any electrical shock or short circuits.
- Wear appropriate protective gear: Use insulated gloves, safety glasses, and other personal protective equipment (PPE) to protect yourself from electrical hazards.
- Check for damaged wires and components: Inspect all the wires, cables, and contactor components for any signs of damage or wear. Replace any faulty or damaged parts before proceeding with the installation or repair.
2. Mechanical Safety
- Ensure proper grounding: Make sure the contactor is properly grounded to prevent any potential electrocution or equipment damage.
- Avoid overloading: Refer to the contactor’s specifications and ratings to determine its maximum load capacity. Do not exceed this limit to prevent overheating or damage to the contactor.
- Disconnect power sources: Always disconnect the power supply to the contactor before attempting to work on or modify the circuit. This will prevent any accidental starts or injury.
3. General Safety
- Work in a well-ventilated area: Ensure that there is adequate ventilation in the working area to prevent the buildup of hazardous gases or fumes.
- Follow manufacturer instructions: Always refer to the Furnas contactor’s user manual and follow the recommended guidelines and procedures provided by the manufacturer.
- Seek professional assistance if needed: If you are unsure about any aspect of handling the contactor or dealing with electrical systems, it is advisable to seek help from a qualified professional or electrician.
By following these safety precautions, you can minimize the risks associated with working on Furnas contactors and ensure a safe working environment. Always prioritize safety and take necessary precautions to protect yourself and others from potential hazards.