
If you own a 2012 Ford F250 truck, and you’re planning on installing additional equipment or accessories that require power, then you’ll need to know about the upfitter switch wiring diagram. The upfitter switches are factory-installed switches located on the instrument panel that can be used to control aftermarket accessories and equipment. These switches provide a way to connect and control accessories such as lights, winches, or a horn without having to splice into the truck’s wiring harness.
The 2012 F250 upfitter switch wiring diagram is a useful tool that can help you understand how to correctly connect your accessories to the upfitter switches. It provides information on the pin-out of each switch, as well as the wire color codes and functions. This diagram can be especially helpful if you’re not familiar with automotive wiring or if you’re planning on installing multiple accessories and need to keep track of which switch controls which accessory.
Using the 2012 F250 upfitter switch wiring diagram, you can easily determine which pins on the switches correspond to which circuits. This can prevent potential damage to your truck’s electrical system and ensure that your accessories are properly powered and controlled. It’s important to follow the wiring diagram carefully and use the appropriate gauge of wire for your accessories to ensure safe and reliable operation.
Overall, the 2012 F250 upfitter switch wiring diagram is a valuable resource for anyone who owns a 2012 Ford F250 truck and wants to install additional accessories. By understanding how the upfitter switches are wired, you can confidently and safely add aftermarket equipment to your truck without compromising its electrical system. So, whether you’re planning on installing lights for off-roading adventures or a winch for towing, having access to the upfitter switch wiring diagram can make the installation process much easier.
Understanding the 2012 F250 Upfitter Switch Wiring Diagram
The 2012 F250 Upfitter Switch Wiring Diagram is a crucial tool for individuals who want to install aftermarket accessories or perform modifications to their Ford F250 truck. This diagram provides a clear visual representation of the electrical connections and wiring setup for the upfitter switches, which are designed to control additional equipment such as lights, winches, or power outlets.
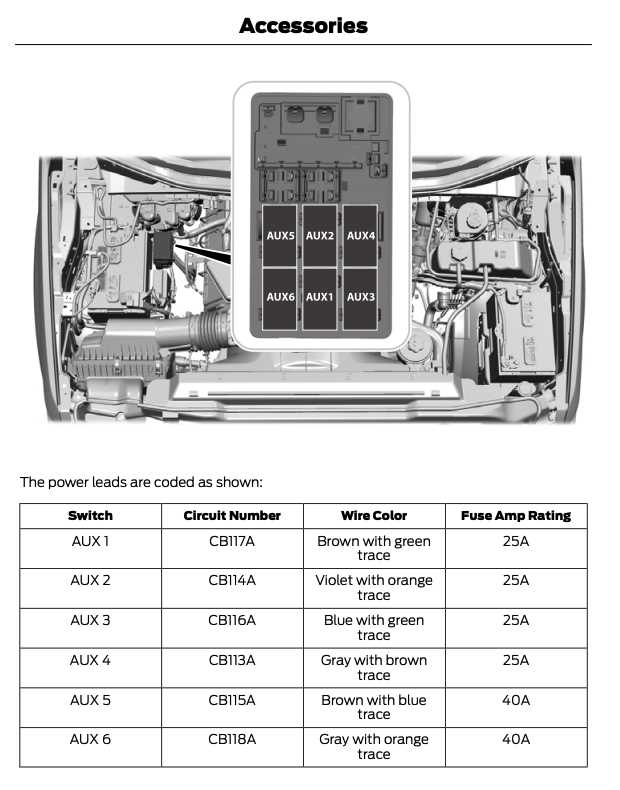
Each 2012 F250 is equipped with up to four upfitter switches that can be connected to various accessories or equipment. The wiring diagram shows the connection points for each switch and the corresponding terminals on the truck’s electrical system. It also includes information on the fuse and relay locations necessary for powering the upfitter switches.
The 2012 F250 Upfitter Switch Wiring Diagram provides detailed instructions on how to tap into the truck’s electrical system and connect additional equipment. It shows the recommended wire gauges, color codes, and pin assignments for each switch, ensuring proper and safe installation. Additionally, the diagram specifies the maximum amperage for each switch, allowing users to determine if their desired accessories can be safely powered.
When using the 2012 F250 Upfitter Switch Wiring Diagram, it is important to carefully follow the instructions and pay attention to the details. Incorrect wiring connections or failure to follow the recommended practices could result in electrical issues, equipment malfunction, or even damage to the vehicle. Therefore, it is always recommended to consult the diagram and any accompanying documentation when performing any modifications or installations on the upfitter switches of a 2012 F250.
What are upfitter switches?
Upfitter switches are a feature found in many Ford F-250 trucks, including the 2012 model. They are a set of auxiliary switches that can be used to control aftermarket accessories or equipment that is added to the vehicle. These switches are factory-installed and provide a convenient way to power on and off additional lights, winches, or other electrical devices.
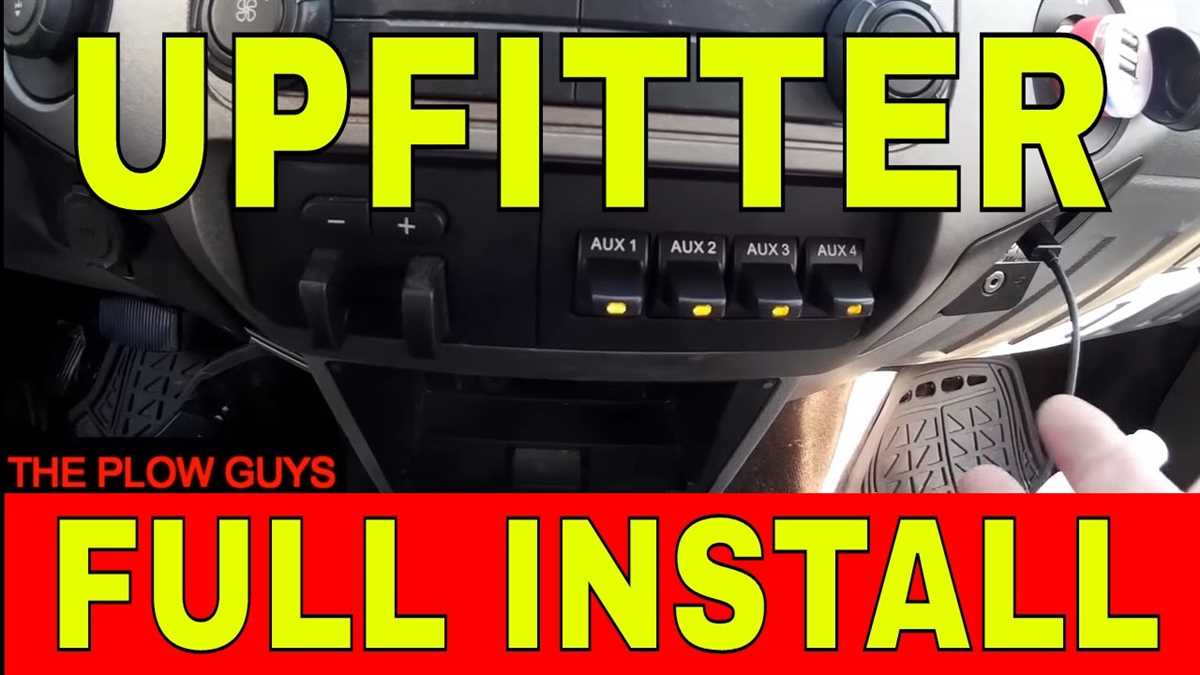
In the 2012 F-250, there are four upfitter switches located on the center console, near the driver’s side. Each switch is labeled with a specific function, such as “Aux 1,” “Aux 2,” etc. These labels correspond to specific wires that are pre-wired in the vehicle’s electrical system, making it easier to connect and control aftermarket add-ons.
The wiring diagram for the upfitter switches in the 2012 F-250 can be helpful when installing additional equipment. It shows the specific wire colors and locations where these wires can be tapped into, as well as any necessary fuses or relays. This diagram is important to ensure a proper and safe installation, as it helps prevent electrical issues or damage to the vehicle’s electrical system.
Overall, upfitter switches are a valuable feature for individuals who frequently modify their trucks with aftermarket accessories. They provide a convenient and organized way to control these add-ons, making it easier to customize the vehicle to meet specific needs or preferences.
Step-by-step guide to installing upfitter switches in a 2012 F250
Installing upfitter switches in a 2012 F250 can provide added convenience and functionality for various electrical accessories or equipment in your truck. The upfitter switches allow you to control and power additional devices, such as lights or an air compressor, directly from the vehicle’s electrical system.
To install upfitter switches in your 2012 F250, follow these steps:
- Identify the upfitter switch locations: The 2012 F250 has up to four pre-wired upfitter switch slots located on the center of the instrument panel. These slots are labeled with an embossed graphic on the switch trim cover.
- Prepare the upfitter switch harness: If the upfitter switches were not pre-installed in your truck, you will need to obtain an upfitter switch harness kit from a Ford dealership or an aftermarket supplier. The harness kit will include the necessary switches, wiring, and connectors. Follow the instructions provided with the kit to assemble the harness.
- Install the upfitter switch harness: Once the harness is ready, locate the upfitter switch wire harness connector in the passenger compartment fuse panel and connect the upfitter harness to it. Ensure that the connections are secure and properly aligned.
- Mount the upfitter switches: Remove the switch trim cover from the instrument panel by gently prying it off. Insert the upfitter switches into the appropriate slots, aligning the switches with the embossed graphic on the trim cover. Press the switches firmly into place until they are secure.
- Connect the upfitter switches to accessories: Depending on the specific accessories or equipment you want to control with the upfitter switches, you will need to route additional wiring from the switches to these devices. Ensure that all wiring connections are properly secured and insulated to prevent any potential issues.
- Test the upfitter switches: Before using the upfitter switches in regular operation, test each switch and accessory to ensure they are functioning correctly. Turn on each switch and verify that the corresponding accessory is receiving power and operating as intended.
By following these steps, you can successfully install upfitter switches in your 2012 F250 and enjoy the added convenience and control over electrical accessories or equipment in your truck.
The Importance of a Wiring Diagram for Upfitter Switches
When it comes to installing additional accessories or equipment in a vehicle, such as upfitter switches in a 2012 F250, having a wiring diagram is crucial. Upfitter switches are pre-wired switches that allow users to control and connect additional electronic devices or features to their vehicle. A wiring diagram specific to the upfitter switches is essential for a successful installation and proper functioning.
One of the key benefits of a wiring diagram for upfitter switches is that it provides a visual representation of the electrical connections and circuitry involved. This helps ensure that the installation is done correctly, preventing any potential issues or malfunctions due to incorrect wiring. It allows users to easily identify which wires need to be connected and where they need to be connected to in order to operate the desired features.
A wiring diagram also helps in troubleshooting any issues that may arise after the installation. If a problem occurs with the upfitter switches or the connected devices, the wiring diagram can serve as a reference point to identify the possible cause. This can save time and effort in diagnosing and resolving the problem, as users can easily trace the wiring and connections to check for any faults or errors.
Furthermore, a wiring diagram allows for customization and modification of the upfitter switches and their connected devices. With a clear understanding of the electrical layout and connections, users can make changes or additions to the system as needed. They can easily integrate new features or devices into the existing setup, ensuring compatibility and proper wiring.
In summary, a wiring diagram for upfitter switches is invaluable in ensuring a successful installation, proper functioning, troubleshooting, and customization. It provides a visual guide to the electrical connections, allowing users to make informed decisions and avoid any potential issues or complications. Whether it’s for adding lights, a winch, or any other electronic device, a wiring diagram is a must-have tool for any upfitter switch installation in a 2012 F250 or similar vehicle.
Interpreting the 2012 F250 Upfitter Switch Wiring Diagram
If you are working on installing additional electrical equipment in your 2012 F250 truck, it is important to refer to the upfitter switch wiring diagram. This diagram provides a visual representation of how the upfitter switches are connected to the electrical system of the vehicle. By properly interpreting the diagram, you can ensure that the wiring is done correctly and avoid any potential electrical issues.
The upfitter switch wiring diagram for the 2012 F250 is typically divided into different sections, each representing a specific switch or set of switches. Each switch will have a corresponding wire that needs to be connected to the desired electrical component or circuit. The diagram will usually indicate the wire color, as well as the pin number or connector that the wire needs to be connected to.
To interpret the upfitter switch wiring diagram, start by identifying the specific switch or switches you are working with. This information can usually be found in the owner’s manual or on the switch panel itself. Once you have identified the switch, locate it on the diagram and follow the corresponding wire to determine where it needs to be connected.
It is important to note that the upfitter switch wiring diagram may vary depending on the specific configuration of your vehicle. Some F250 trucks may have different options or additional switches, so it is crucial to refer to the diagram that matches your specific vehicle model and options. If you are unsure, it is recommended to consult a professional or refer to a reliable wiring diagram resource.
Common Issues and Troubleshooting Tips for Upfitter Switch Wiring
When it comes to upfitter switch wiring in a 2012 F250, there can be several common issues that arise. Here are a few troubleshooting tips to help you diagnose and fix any problems you may encounter:
Inoperable Switches
If one or more of the upfitter switches in your F250 are not functioning, there are a few things to check. First, ensure that the switches are properly connected to the appropriate circuits. Each switch should be connected to its corresponding relay or device. Check the wiring connections to ensure they are secure and properly seated.
Next, check the fuses related to the upfitter switches. The fuse box location and layout can vary, so consult your owner’s manual for the specific fuse locations. If you find any blown fuses, replace them with the correct amperage rating.
Intermittent Power Loss
If you are experiencing intermittent power loss to the upfitter switches, it could be due to a loose or faulty connection. Check all wiring connections and ensure they are tight and secure. Pay special attention to any connections that may be exposed to the elements, as moisture or corrosion can cause issues. Clean any corroded connections and apply dielectric grease to prevent future corrosion.
It’s also possible that the upfitter switch module itself is faulty. If you’ve checked all the wiring connections and verified that power is reaching the module, but the switches still do not work consistently, replacing the module may be necessary.
Overloaded Circuits
If you are experiencing issues with the upfitter switches not working or blowing fuses, it could be an indication that the circuits are overloaded. Each upfitter switch has a maximum amperage rating, and exceeding this rating can cause damage to the switches or other electrical components.
Check the load requirements for the devices or accessories you have connected to the upfitter switches. Ensure that the total combined load does not exceed the rating of the switches. If necessary, redistribute the load across multiple switches or consider installing a separate relay for high-current devices.
By following these troubleshooting tips, you should be able to identify and resolve common upfitter switch wiring issues in your 2012 F250. Always consult your vehicle’s owner’s manual and wiring diagrams for specific information and guidance.
Upgrading and customizing your 2012 F250 with upfitter switches
Adding upfitter switches to your 2012 F250 can greatly enhance its functionality and versatility. These switches give you the ability to control aftermarket accessories like lights, winches, and other electronic devices, allowing you to customize your vehicle to suit your specific needs.
If you’re looking to upgrade your 2012 F250 with upfitter switches, it’s important to have a clear understanding of the wiring diagram. The wiring diagram will guide you on how to connect the switches to the various electrical components in your vehicle. With the right wiring, you can ensure that the switches operate smoothly and safely.
By following the correct wiring diagram, you can also avoid damaging your vehicle’s electrical system or causing any potential hazards. It’s essential to double-check your connections and ensure that all wires are securely connected before using your newly installed upfitter switches.
Once you have successfully installed the upfitter switches, you can start customizing your 2012 F250 to fit your specific needs. Whether you want to add auxiliary lighting for off-roading adventures or control a winch for towing purposes, upfitter switches provide you with the ability to easily control and manage these electronic devices.
Remember to always use high-quality switches and components when upgrading your vehicle to ensure long-lasting performance and reliability. Additionally, consult the owner’s manual or seek professional assistance if you’re unsure about the installation process or need further guidance.
In conclusion, upgrading and customizing your 2012 F250 with upfitter switches is an excellent way to enhance its functionality and tailor it to your specific needs. With the right wiring diagram and careful installation, you can enjoy the added convenience and control that these switches provide. So go ahead and start exploring the possibilities of upfitter switches for your vehicle!