
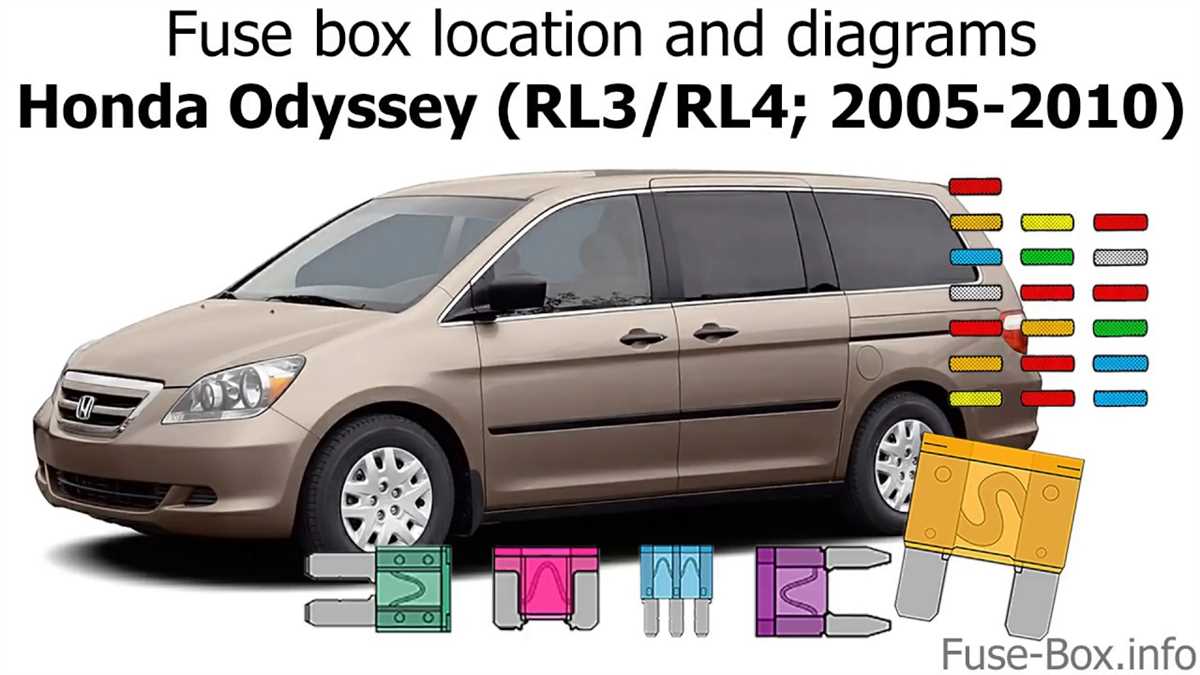
The Honda Odyssey is a popular minivan that has been in production since 1994. The 2007 model year brought several updates and improvements to the Odyssey, including a new fuse diagram.
A fuse diagram is a helpful tool that shows the location and function of each fuse in a vehicle’s electrical system. It can be useful for diagnosing electrical issues and troubleshooting problems with various components.
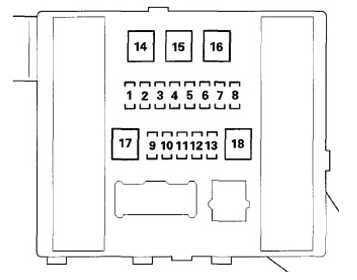
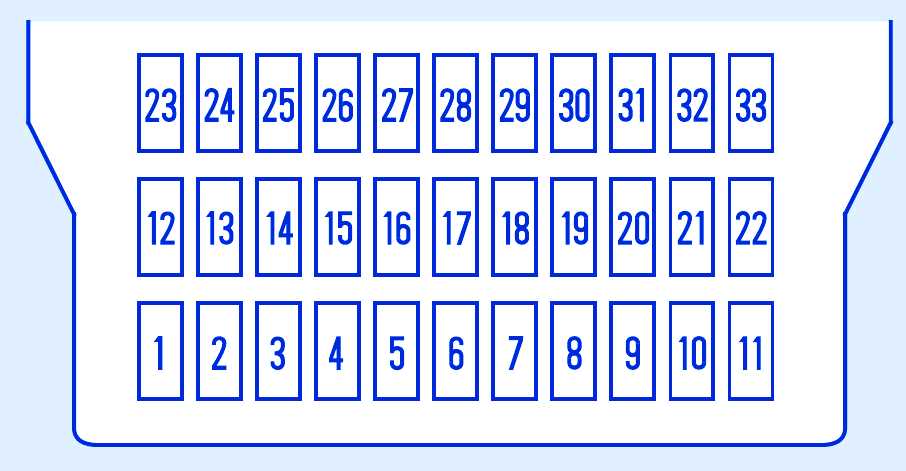
In the 2007 Honda Odyssey, the fuse box is located on the passenger side of the dashboard. To access the fuse box, you will need to open the passenger side door and remove the side panel. Inside the fuse box, you will find a diagram that indicates which fuse corresponds to each electrical component.
For example, if you are experiencing issues with your headlights, you can refer to the fuse diagram to identify the fuse that controls the headlight circuit. This can help you determine if the fuse is blown and needs to be replaced, or if there is another issue causing the problem.
Understanding the 2007 Honda Odyssey Fuse Diagram
The fuse diagram is an essential tool for understanding the electrical system in your 2007 Honda Odyssey. It provides a visual representation of the different fuses and their corresponding functions. By referring to the diagram, you can easily identify which fuse is responsible for a specific electrical component in your vehicle.
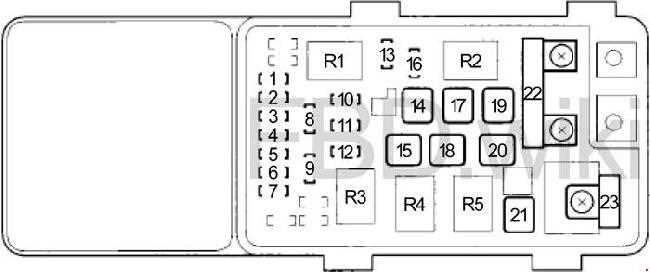
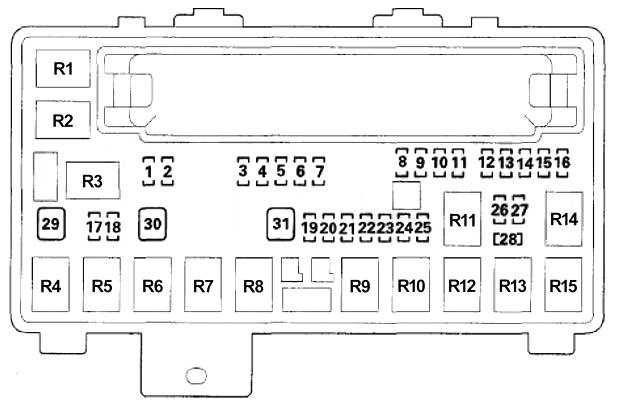
The fuse diagram is usually located in the owner’s manual or on the inside of the fuse box cover. It is organized in a way that makes it easy to identify each fuse’s purpose and amp rating. The diagram may also indicate the location of the fuse box, allowing you to quickly locate it in case you need to change a fuse.
Here are some key components that may be included in the 2007 Honda Odyssey fuse diagram:
- Radio fuse: This fuse is responsible for powering the radio and audio system in your vehicle.
- Power window fuse: This fuse controls the power windows, allowing them to open and close.
- Headlight fuse: The headlight fuse controls the headlights, enabling you to drive safely in low-light conditions.
- Brake light fuse: This fuse is responsible for powering the brake lights, indicating when you are slowing down or stopping.
- Air conditioning fuse: The air conditioning fuse controls the air conditioning system, keeping you cool during hot summer days.
It’s important to familiarize yourself with the fuse diagram and keep it handy for reference. Knowing the location and function of each fuse can save you time and frustration when troubleshooting electrical issues in your 2007 Honda Odyssey.
Importance of the Fuse Diagram
When it comes to troubleshooting electrical issues in your 2007 Honda Odyssey, having a fuse diagram is essential. The fuse diagram provides a detailed visual representation of the different fuses and their corresponding functions within the vehicle’s electrical system. This allows you to quickly identify which fuse controls a specific component or system, making it easier to diagnose and resolve any electrical problems.
1. Identifying the Correct Fuse: The fuse diagram helps you locate the specific fuse that needs to be checked or replaced. By referring to the diagram, you can easily identify the fuse’s location in the fuse box, as well as its amp rating. This saves you time and effort in finding the correct fuse, especially in situations where multiple fuses are present.
2. Understanding the Electrical System: The fuse diagram also provides valuable information about the different components and systems that are linked to the fuses. This allows you to better understand how the electrical system is organized and how each component is connected. With this knowledge, you can make more informed decisions when troubleshooting and repairing electrical issues in your Honda Odyssey.
3. Avoiding Further Damage: A blown fuse can indicate an underlying electrical problem. When a fuse blows, it protects the circuit from further damage by cutting off the electrical flow. By referencing the fuse diagram, you can quickly identify the components or systems that may be causing the issue. This allows you to take the necessary steps to address the problem and avoid further damage to the electrical system.
4. Ensuring Safety: The fuse diagram helps you to work safely with the electrical system in your Honda Odyssey. By understanding the location and function of each fuse, you can avoid accidental damage to the vehicle’s electrical components or even potential hazards, such as short circuits or electrical fires. Following the fuse diagram ensures that you take the appropriate precautions when working with the vehicle’s electrical system.
Locating the Fuse Box
When it comes to troubleshooting electrical issues in your 2007 Honda Odyssey, one of the first places to check is the fuse box. The fuse box is responsible for protecting the electrical components in your vehicle by providing a controlled path for electric current. If a fuse blows, it will interrupt the flow of electricity to the corresponding component, preventing any potential damage or short circuits.
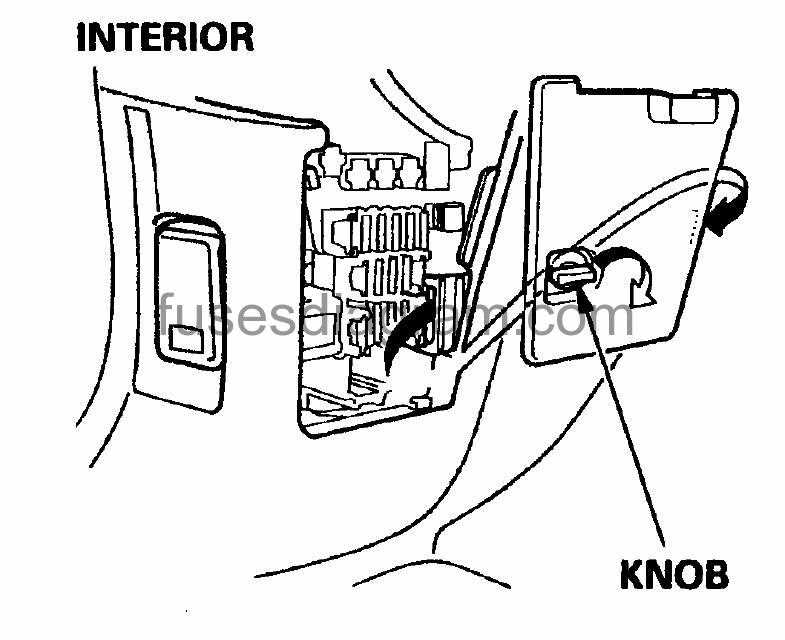
The fuse box in the 2007 Honda Odyssey is located in two different places. The main fuse box is located under the hood, near the battery. To access it, you will need to remove the plastic cover by pressing the tabs and lifting it off. Once the cover is removed, you will see a diagram indicating the location and function of each fuse. The diagram is typically printed on the inside of the cover for easy reference.
In addition to the main fuse box, there is also a secondary fuse box located under the dashboard on the driver’s side. To access this fuse box, you will need to open the driver’s side door and locate a small panel on the side of the dashboard. Remove the panel by pulling it away, and you will see a diagram indicating the location and function of each fuse.
When troubleshooting electrical issues in your 2007 Honda Odyssey, it is important to check the fuse box for any blown fuses. If you find a blown fuse, you can replace it with a new one of the same amperage. However, it is important to note that a blown fuse is usually a symptom of an underlying issue. If you replace a blown fuse and it blows again, it is recommended to have your vehicle inspected by a professional mechanic to determine the cause of the electrical issue.
Understanding the Fuse Diagram
When it comes to electrical issues in your 2007 Honda Odyssey, it’s important to have a good understanding of the fuse diagram. The fuse diagram is a visual representation of the different fuses and their corresponding functions in your vehicle’s electrical system. It can help you identify which fuse is responsible for a specific electrical component or system.
The fuse diagram is usually located in the owner’s manual or on the inside cover of the fuse box. It consists of a chart or table that lists the fuse number, its rating, and its corresponding function. The rating indicates the amount of current the fuse can handle before it blows, protecting the electrical system from damage.
Using the fuse diagram, you can easily locate the fuse that needs to be checked or replaced. For example, if the radio in your Honda Odyssey is not working, you can refer to the fuse diagram to find the fuse responsible for the radio. Once you locate the fuse, you can check if it’s blown by looking at the metal strip inside the fuse. If the metal strip is broken, it means the fuse is blown and needs to be replaced.
It’s important to note that the fuse diagram may vary depending on the model and trim level of your Honda Odyssey. Therefore, it’s crucial to refer to the correct fuse diagram for your specific vehicle. If you’re unsure about any aspect of the fuse diagram or how to check or replace a fuse, it’s always recommended to consult the vehicle’s owner’s manual or seek assistance from a professional mechanic.
By understanding the fuse diagram and knowing how to use it, you can quickly troubleshoot electrical issues in your 2007 Honda Odyssey and potentially save time and money on repairs. Regularly inspecting the fuses and replacing any blown ones can help maintain the optimal performance of your vehicle’s electrical system.
Common Fuse Issues in the 2007 Honda Odyssey
Fuses are an essential component in any vehicle’s electrical system, including the 2007 Honda Odyssey. They protect various circuits and prevent damage from electrical surges. However, just like any other electrical component, fuses can sometimes fail or blow out. It is important to be aware of the common fuse issues that can occur in the 2007 Honda Odyssey to ensure the smooth operation of the vehicle.
1. Blown Fuse: One of the most common fuse issues in the 2007 Honda Odyssey is a blown fuse. A blown fuse can occur due to a variety of reasons, including a short circuit, overloading of electrical components, or a faulty component. When a fuse blows, it disrupts the flow of electricity to the corresponding circuit, causing the affected component to stop working. To fix this issue, the blown fuse needs to be replaced with a new one of the same rating.
2. Fuse Box Problems: Another common issue with fuses in the 2007 Honda Odyssey is related to the fuse box. The fuse box houses all the fuses and provides protection to the electrical system. However, over time, the fuse box can develop issues such as corrosion, loose connections, or damaged wiring. These problems can lead to poor electrical conductivity and cause fuses to blow frequently. If fuse box problems are suspected, it is recommended to have it inspected and repaired by a professional technician.
3. Incorrect Fuse Replacement: Sometimes, an incorrect fuse replacement can be the cause of fuse issues in the 2007 Honda Odyssey. Each electrical circuit in the vehicle requires a specific fuse with a designated rating to protect it. Using a wrong or higher-rated fuse can lead to electrical failures or even damage to the vehicle. It is crucial to consult the owner’s manual or a professional technician to ensure the correct fuse replacement.
To summarize, common fuse issues in the 2007 Honda Odyssey include blown fuses, problems with the fuse box, and incorrect fuse replacement. It is important to address these issues promptly to avoid further electrical problems and ensure the safe operation of the vehicle. If you are experiencing any fuse-related problems with your 2007 Honda Odyssey, it is advised to seek professional assistance from a qualified technician.
Troubleshooting Tips for Fuse Problems
Fuse problems can be frustrating and inconvenient, but they can often be resolved with a little troubleshooting. Here are some tips to help you diagnose and fix common fuse issues:
1. Check the Fuse Box
The first step in troubleshooting a fuse problem is to locate the fuse box in your vehicle. In a 2007 Honda Odyssey, the fuse box is typically located under the dashboard on the driver’s side. Open the fuse box and inspect the fuses for any signs of damage or blown fuses.
2. Inspect Fuses

Look for any fuses that are discolored, melted, or have a broken wire. These are signs of a blown fuse and will need to be replaced. Use the fuse diagram provided by the manufacturer to identify the specific fuse that corresponds to the malfunctioning component.
3. Replace Blown Fuses
Once you have identified the blown fuse, use a pair of needle-nose pliers to carefully remove it from the fuse box. Replace it with a new fuse of the same amperage rating. Make sure to properly seat the fuse in the socket and close the fuse box securely.
4. Test the Circuit
If the new fuse blows immediately or shortly after replacement, it may indicate a more significant electrical issue. In this case, it is best to consult a professional mechanic or an authorized Honda service center to diagnose and fix the problem.
5. Regularly Check Fuses

To prevent future fuse problems, it is a good idea to regularly check the fuses in your vehicle. Inspect them visually for any signs of wear or damage. It is also a good practice to keep a spare fuse kit in your vehicle for emergencies.
By following these troubleshooting tips, you can identify and resolve common fuse problems in your 2007 Honda Odyssey. If you are unable to fix the issue on your own, it is recommended to seek professional assistance to ensure proper repair and avoid further damage to your vehicle.
Q&A:
What are some common signs of a blown fuse?
Some common signs of a blown fuse include the loss of power to certain electrical devices, such as lights or appliances, and the inability to reset a tripped circuit breaker.
How can I check if a fuse is blown?
To check if a fuse is blown, you can use a multimeter or a test light. Set the device to the “continuity” or “ohms” setting, touch both ends of the fuse with the probes, and if there is no continuity or the test light does not light up, the fuse is blown.
What should I do if I find a blown fuse?
If you find a blown fuse, you should first disconnect the power to the affected circuit. Then, remove the blown fuse from its holder and replace it with a new fuse of the same rating. Make sure to follow the correct fuse replacement procedure and dispose of the blown fuse properly.
Why do fuses blow?
Fuses blow to protect the electrical circuit from overcurrent conditions. This can happen due to a variety of reasons, such as a short circuit, an overloaded circuit, or a faulty electrical device. When a fuse blows, it interrupts the flow of electricity and prevents further damage to the circuit or electrical devices.
Can I use a higher rated fuse to replace a blown fuse?
No, you should never use a higher rated fuse to replace a blown fuse. Fuses are designed to protect the circuit and electrical devices by breaking the circuit when the current exceeds a certain limit. Using a higher rated fuse can lead to overloading the circuit and causing damage or even a fire hazard.
Why is my fuse blowing frequently?
A fuse may blow frequently for a few reasons. The most common reason is that the circuit is overloaded, meaning that there are too many devices or appliances connected to the circuit. Another possible reason is a short circuit, which occurs when there is a connection between two points that should not be connected. Finally, a blown fuse could indicate a faulty or damaged electrical component that is causing an excessive amount of current to flow through the circuit.