
When it comes to installing a ceiling fan, having a clear wiring diagram is essential. One popular brand that offers a wide range of ceiling fans is Arlec. Arlec ceiling fans are known for their durability, energy efficiency, and stylish designs. Whether you are installing a new fan or replacing an old one, having a wiring diagram handy will make the installation process much easier.
A wiring diagram is a visual representation of the electrical connections needed to properly install a ceiling fan. It shows the different wires and their corresponding connections, making it easier to understand how to connect everything correctly. The Arlec ceiling fan wiring diagram will typically include information about the main power source, the wires for the fan motor, the light kit (if applicable), and any additional features or accessories.
By referring to the Arlec ceiling fan wiring diagram, you can ensure that you connect the wires properly and avoid any potential electrical hazards. It is important to follow the instructions closely, as incorrect wiring can not only cause the fan or light to not work properly, but it can also be a safety risk. The wiring diagram will provide clear guidance on which wires to connect, where to connect them, and any necessary grounding connections.
Arlec Ceiling Fan Wiring Diagram
When it comes to installing or repairing an Arlec ceiling fan, having the correct wiring diagram is essential. The wiring diagram provides a visual representation of how the various components of the fan connect to each other and to the power source. This helps ensure that the fan is wired correctly and can operate safely.
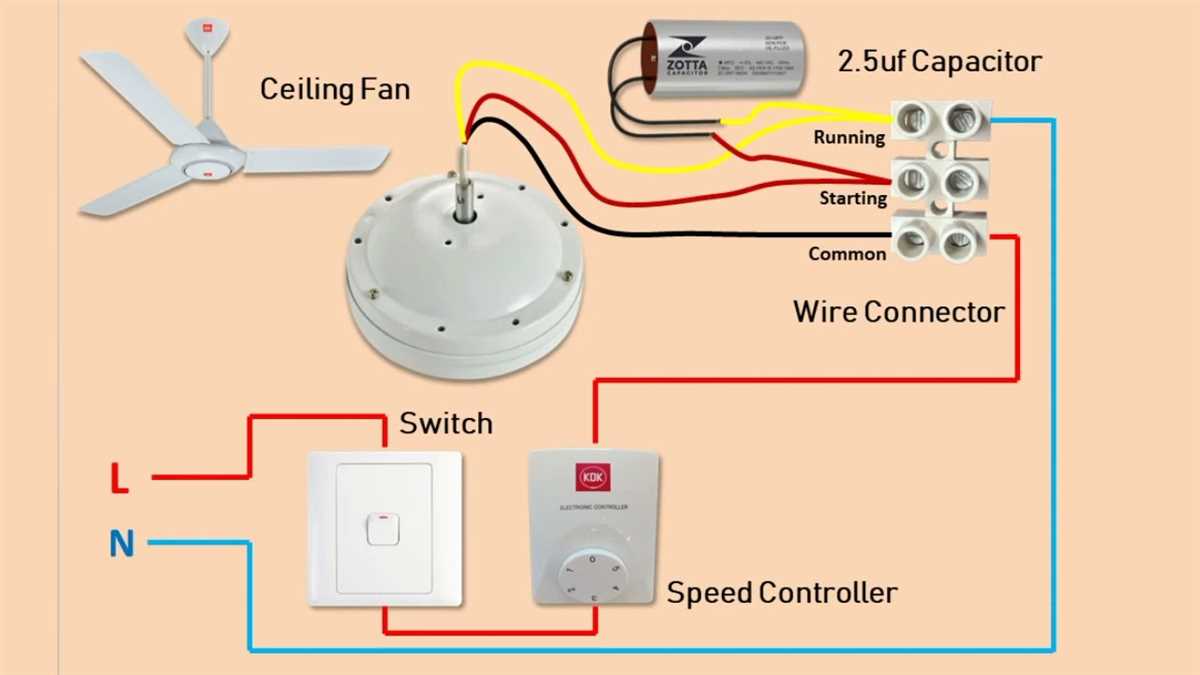
Key components: Before diving into the wiring diagram, it’s important to familiarize yourself with the key components of an Arlec ceiling fan. These include the fan motor, the fan blades, the capacitor, the speed switch, and the light kit (if applicable). Understanding how these components work together will make it easier to follow the wiring diagram.
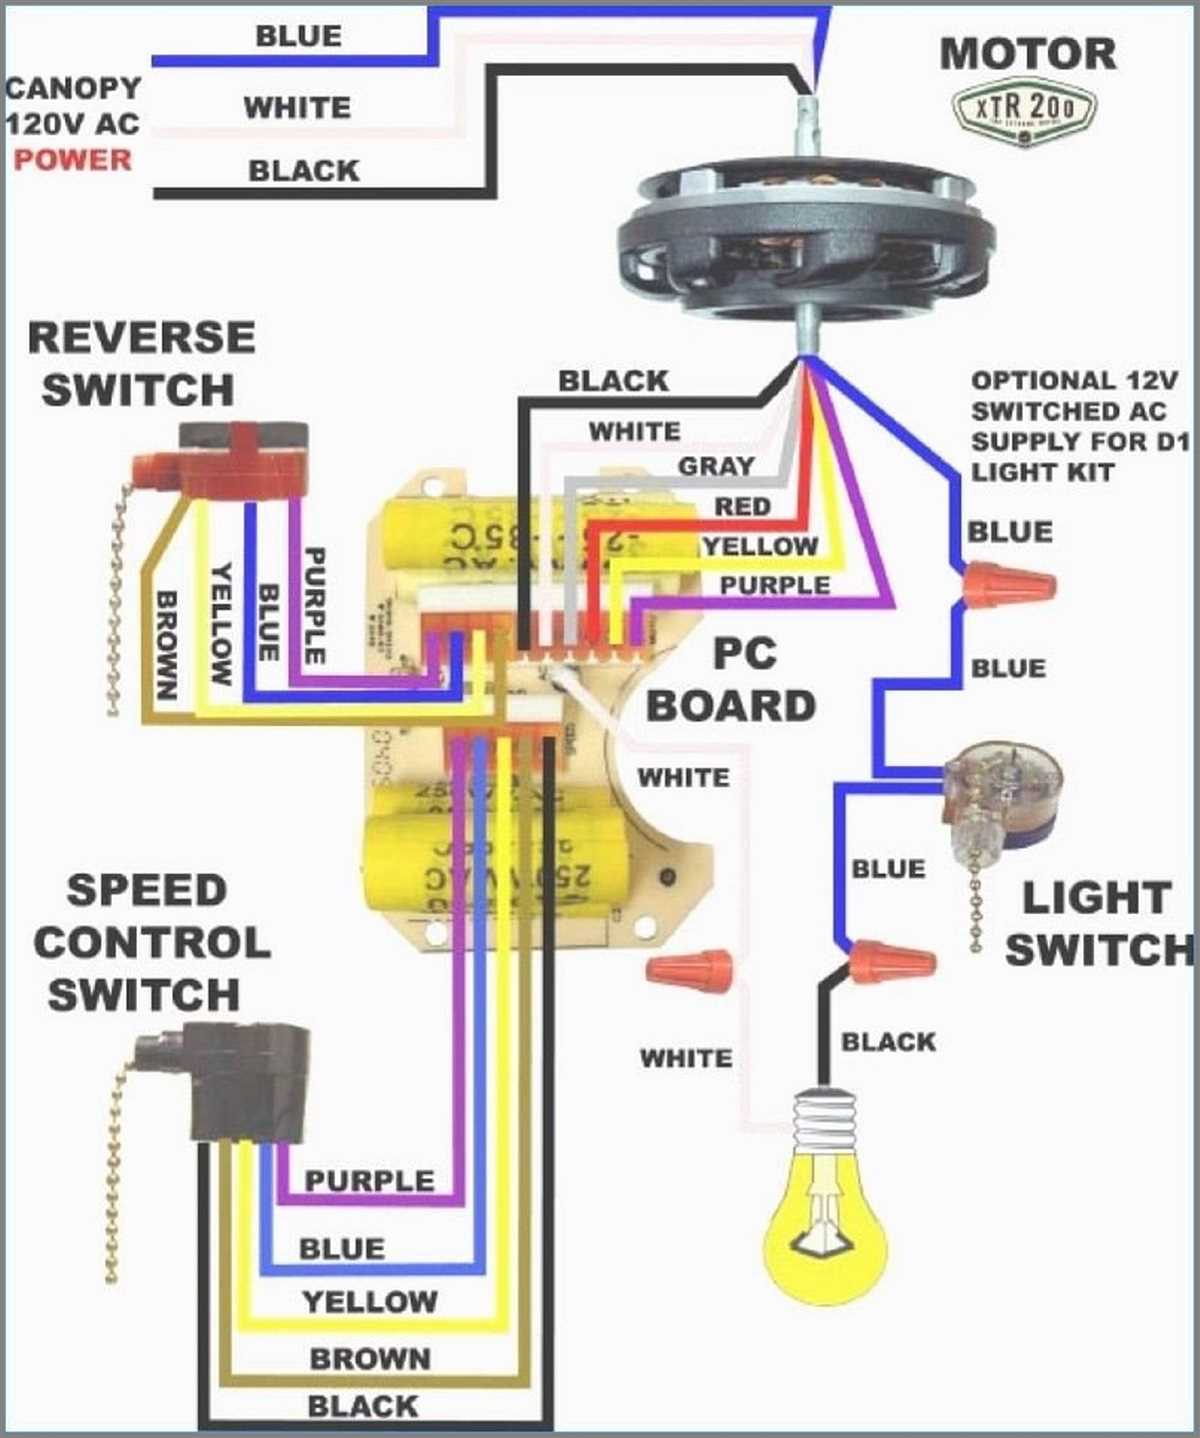
Wiring diagram: The Arlec ceiling fan wiring diagram typically consists of a series of lines and symbols that represent the electrical connections. It will indicate which wires should be connected to which terminals on the fan motor, capacitor, speed switch, and power source. The diagram may also include notes or additional information to clarify the wiring process.
Installation steps: To use the wiring diagram effectively, it’s recommended to follow a step-by-step installation guide provided by Arlec or consult a professional electrician. Typically, the installation process involves connecting the wires from the fan motor to the appropriate terminals on the speed switch and capacitor, as well as connecting the power supply wires. The light kit, if applicable, will have its own wiring connections.
By referring to the Arlec ceiling fan wiring diagram during installation or repair, you can ensure that the fan operates properly and safely. It’s important to adhere to the manufacturer’s instructions and any local electrical codes when working with electrical wiring.
Summary:
- An Arlec ceiling fan wiring diagram is a visual representation of how the fan’s components connect to each other and to the power source.
- Understanding the key components of an Arlec ceiling fan is crucial before referring to the wiring diagram.
- Following the wiring diagram and a step-by-step installation guide will help ensure a correct and safe installation.
- Adhering to the manufacturer’s instructions and local electrical codes is important when working with electrical wiring.
The Basics of Arlec Ceiling Fans
Arlec ceiling fans are a popular choice for many households due to their sleek design and efficient cooling capabilities. These fans not only provide a refreshing breeze during hot summer days but also help distribute heat evenly in the winter months. Understanding the basic components and wiring of an Arlec ceiling fan can help homeowners troubleshoot any issues and make installation or repairs easier.
Components of an Arlec Ceiling Fan
An Arlec ceiling fan typically consists of several components, including the motor, blades, light kit (optional), and remote control or wall switch for operation. The motor is the heart of the fan and is responsible for rotating the blades to create airflow. The blades, usually made of wood or metal, come in different sizes and shapes, which can affect the amount of air moved by the fan.
The light kit is an optional feature that provides both lighting and fan functionality in one unit. This allows homeowners to save space and reduce clutter in their rooms. The remote control or wall switch allows users to control the fan’s speed, direction, and lighting from a distance.
Wiring Diagram of an Arlec Ceiling Fan
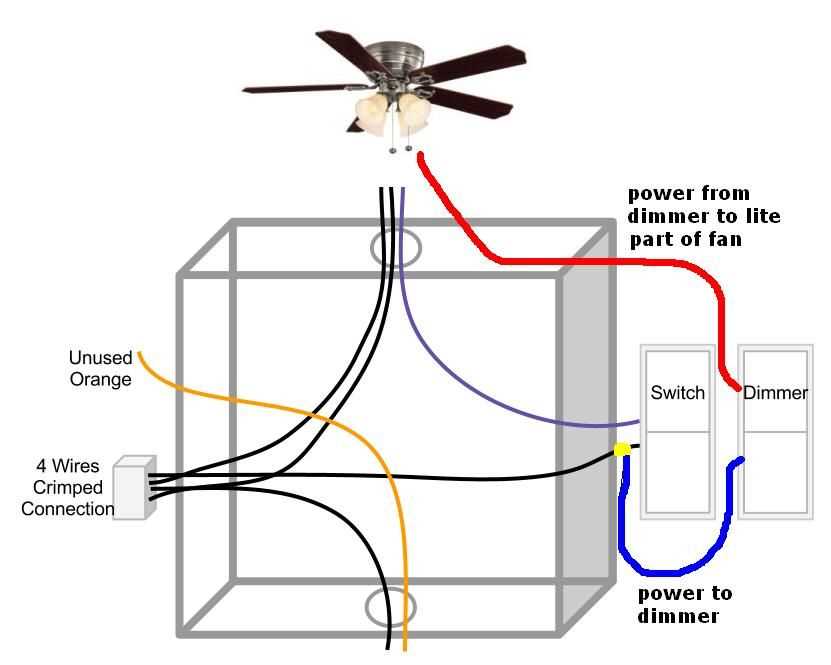
When installing or repairing an Arlec ceiling fan, it is essential to refer to the wiring diagram provided by the manufacturer. The diagram shows the proper connections between the fan’s components, including the motor, light kit, remote control, and power source. It indicates the color-coded wires and their corresponding terminals, ensuring a safe and correct installation.
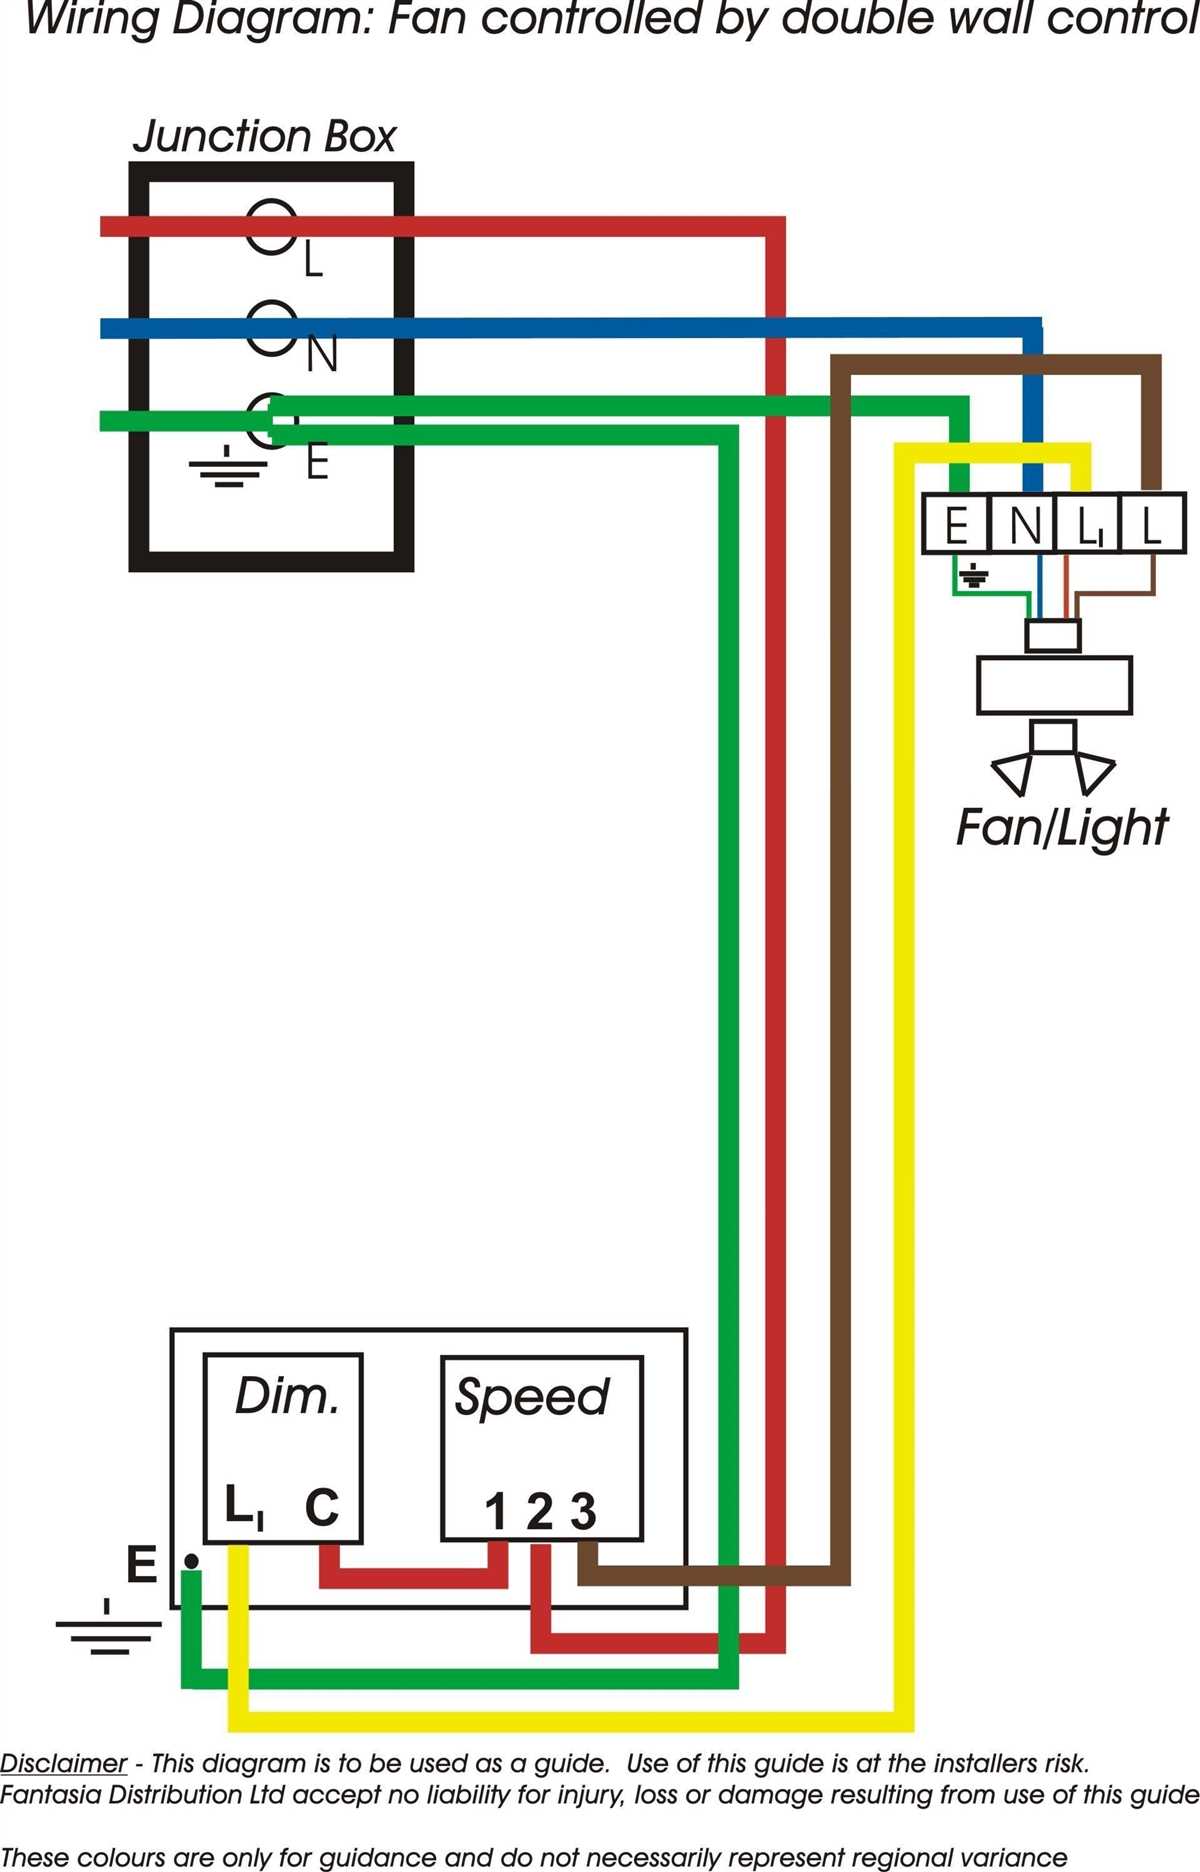
The wiring diagram will typically include information on connecting the power supply, earth grounding, and any additional features such as wall switches or dimmers. Following the wiring diagram carefully and using the correct wire connectors and tools will help ensure a successful installation or repair process.
Troubleshooting Arlec Ceiling Fan Issues
If an Arlec ceiling fan is not operating as expected, troubleshooting can help identify and resolve the issue. Common problems include a fan not turning on, not spinning at the desired speed, or the light kit not functioning. Checking the wiring connections, verifying the power supply, and inspecting the remote control or wall switch are some steps to take during the troubleshooting process.
In conclusion, Arlec ceiling fans are efficient and stylish cooling solutions for any home. Understanding the basic components and wiring of these fans can help homeowners make informed decisions, troubleshoot issues, and ensure a safe and proper installation or repair process.
Understanding the Different Wires in Arlec Ceiling Fans
Arlec ceiling fans are popular choices for cooling and enhancing the airflow in homes and offices. To ensure proper installation and functionality, it is important to understand the different wires used in these fans. When working with Arlec ceiling fans, you will often encounter three types of wires: the power supply wires, the control wires, and the grounding wires.
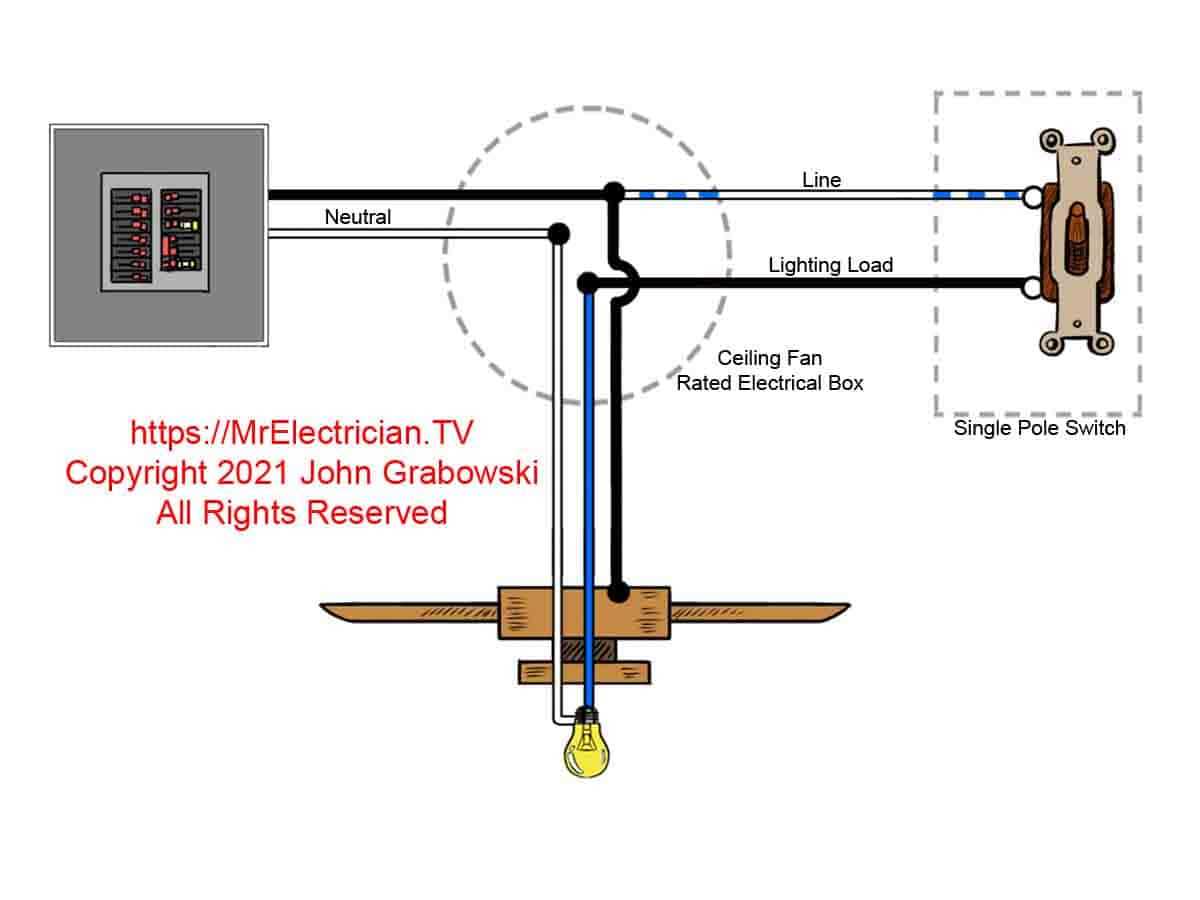
Power supply wires: These wires are responsible for delivering electricity to the fan. Typically, you will find two power supply wires in Arlec ceiling fans: one black wire and one white wire. The black wire is the live or hot wire, which carries the current from the power source to the fan motor. The white wire is the neutral wire, which completes the electrical circuit and returns the current to the power source.
Control wires: Arlec ceiling fans often feature control wires that allow you to adjust the fan’s speed and turn it on or off. These control wires are typically color-coded: black for fan speed control, blue for the light kit control, and red for the remote control. Connecting these wires correctly is crucial to ensure smooth operation and avoid any electrical issues.
Grounding wires: The grounding wires in Arlec ceiling fans are usually green or bare copper wires. These wires are essential for safety as they provide a safe path for electrical current in case of a fault or short circuit. It is important to properly connect and secure the grounding wires to prevent electrical shocks and ensure the fan’s safety.
In conclusion, understanding the different wires in Arlec ceiling fans is vital for successful installation and operation. Familiarize yourself with the power supply wires, control wires, and grounding wires to ensure a safe and efficient electrical connection. When in doubt, it is always recommended to consult the manufacturer’s wiring diagram or seek professional assistance to ensure proper installation and avoid any potential hazards.
Step-by-Step Guide: Wiring an Arlec Ceiling Fan
Wiring an Arlec ceiling fan can be done with relative ease by following a few simple steps. Whether you are installing a new fan or replacing an old one, this step-by-step guide will help you correctly wire your Arlec ceiling fan.
Before starting the wiring process, it is important to gather all the necessary tools and materials. You will need a screwdriver, wire strippers, electrical tape, wire nuts, and of course, your Arlec ceiling fan. Once you have everything ready, follow these steps:
1. Turn off the power
Begin by turning off the power to the circuit you will be working on. Locate the circuit breaker and switch off the power to ensure your safety.
2. Remove the old fan (if applicable)
If you are replacing an old fan, remove it carefully by unscrewing the mounting plate and disconnecting the wires. Make sure to note the colors and connections of the existing wires for reference.
3. Assemble the Arlec ceiling fan
Follow the instructions provided with your Arlec ceiling fan to assemble it properly. This usually involves connecting the fan blades, attaching the motor housing, and installing the light kit (if applicable).
4. Connect the wiring
Refer to the wiring diagram provided in the Arlec ceiling fan’s instruction manual. Connect the wires from the fan to the corresponding wires in your ceiling junction box. This typically involves connecting the black wire to the “hot” or “live” wire, the white wire to the neutral wire, and the green or bare wire to the grounding wire.
5. Secure the connections
Once the wires are connected, use wire nuts to secure the connections. Twist the wires together and cover them with a wire nut, making sure they are tightly fastened and insulated. You can also use electrical tape to further secure the connections if desired.
6. Attach the fan to the ceiling
With the wiring complete, attach the Arlec ceiling fan to the ceiling according to the manufacturer’s instructions. This usually involves screwing the mounting bracket onto the electrical box and hanging the fan onto the bracket.
7. Test the fan
Before finishing the installation, turn the power back on and test the fan to ensure it is working properly. Check the fan’s different functions, such as the speed settings and the light (if applicable), to make sure everything is functioning as intended.
Following these steps and referring to the wiring diagram provided by the manufacturer will help you successfully wire your Arlec ceiling fan. Remember to always prioritize safety and consult a professional if you are unsure about any part of the wiring process.
Troubleshooting Common Wiring Issues with Arlec Ceiling Fans
Arlec ceiling fans are a popular choice for many households due to their functionality and stylish design. However, like any electrical appliance, issues can arise with the wiring of these fans. Here are some common wiring issues you may encounter with Arlec ceiling fans and how to troubleshoot them:
1. Fan not turning on
If your Arlec ceiling fan is not turning on, the first thing to check is the power supply. Make sure the fan is properly connected to a working electrical outlet and that the circuit breaker hasn’t tripped. If the power supply is fine, the next step is to check the wiring connections. Ensure that the wires are securely connected to both the fan and the electrical box. If any of the wires are loose or damaged, they may need to be replaced.
2. Fan not operating at different speeds
If your Arlec ceiling fan is only operating at one speed or not responding to speed changes, there may be an issue with the wiring of the fan’s speed control switch. First, check the switch itself to ensure it is functioning properly. If the switch seems fine, you may need to check the wiring connections between the switch and the fan motor. Look for any loose or damaged wires and reattach or replace them as necessary.
3. Lights not working
If your Arlec ceiling fan has built-in lights that are not turning on, there could be several reasons. First, check the light bulbs to ensure they are not burnt out and properly screwed in. If the bulbs are fine, check the wiring connections between the lights and the fan. Look for any loose or damaged wires and reattach or replace them as necessary. Additionally, check if there is a separate switch or control for the lights and make sure it is turned on.
Overall, troubleshooting wiring issues with Arlec ceiling fans involves checking the power supply, inspecting wiring connections for any loose or damaged wires, and ensuring that switches and controls are working properly. If you are unsure or uncomfortable working with electrical wiring, it is always best to consult a professional electrician to avoid any safety hazards. Following these steps should help you resolve common wiring issues and get your Arlec ceiling fan up and running again.
The Importance of Following Safety Precautions During Wiring
Wiring, whether it is for a simple DIY project or a more complex electrical installation, should always be approached with caution. Ignoring safety precautions can lead to serious accidents, injuries, or even fatalities. It is crucial to understand the potential risks associated with electrical work and take the necessary steps to ensure a safe environment. This is especially true when dealing with devices like ceiling fans, which require proper wiring to function correctly.
1. Protecting Yourself: Safety should always be the top priority when working with electricity. Before starting any wiring project, make sure to turn off the power at the circuit breaker and use a voltage tester to ensure that the circuit is indeed de-energized. It is also essential to wear appropriate protective gear, such as insulated gloves and safety goggles, to minimize the risk of electrical shock or other injuries.
2. Quality Materials: Using high-quality wiring materials is crucial for the safety and longevity of any electrical installation. Cheap or faulty wiring can lead to short circuits, sparks, or fires. Always choose reputable brands and ensure that all wires, connectors, and switches are in good condition and compatible with the electrical load they will be subjected to.
3. Proper Installation: It is essential to follow the manufacturer’s instructions and wiring diagrams accurately when installing devices like ceiling fans. Improper installation can lead to a malfunctioning fan, electrical issues, or even damage to the wiring system. If you are unsure about any aspect of the installation process, it is better to seek professional help rather than risking your safety.
4. Testing and Maintenance: Once the wiring is complete, it is crucial to test the system thoroughly before re-energizing it. Use a circuit tester to ensure that all connections are secure and functioning correctly. Regular maintenance, such as cleaning and inspecting the wiring system, can also help identify any potential issues before they become a safety hazard.
5. Compliance with Electrical Codes: Following local electrical codes and regulations is essential to ensure the safety and legality of any wiring project. Codes are in place to protect homeowners and professionals from potential hazards. Make sure to research and understand the requirements specific to your area before starting any electrical work.
In conclusion, electrical wiring can be a hazardous task if not approached with caution. By following safety precautions, using quality materials, proper installation techniques, conducting regular maintenance, and complying with electrical codes, you can create a safe and functional electrical system. Remember, the safety of yourself and others should always be the top priority when working with electricity.
Tips for Properly Maintaining and Cleaning Arlec Ceiling Fans
Ceiling fans are a great addition to any room, providing both comfort and style. Arlec ceiling fans are known for their quality and durability, but like any appliance, they require regular maintenance to keep them running smoothly and efficiently. Here are some tips for properly maintaining and cleaning your Arlec ceiling fan:
- Regular dusting: Dust can accumulate on the blades and motor of your ceiling fan, affecting its performance. Use a soft cloth or a feather duster to remove dust from the blades and motor housing. Avoid using harsh chemicals or abrasive materials, as they can damage the finish of the fan.
- Clean the blades: Over time, the blades of your ceiling fan may become dirty or stained. Mix a solution of mild dish soap and water, then dampen a cloth or sponge with the solution. Gently wipe down each blade, removing any dirt or stains. Be sure to dry the blades thoroughly to prevent water damage.
- Tighten loose screws: Over time, the vibrations of a ceiling fan can cause screws to become loose. Regularly check all screws and tighten any that are loose. This will help prevent noise and ensure the stability of the fan.
- Lubricate the motor: A well-lubricated motor will run more smoothly and quietly. Consult the instruction manual or contact Arlec for the appropriate lubricant to use on your fan. Apply the lubricant according to the manufacturer’s instructions to ensure optimal performance.
- Check for any signs of damage: Regularly inspect your ceiling fan for any signs of damage, such as frayed wires, loose parts, or excessive wobbling. If you notice any issues, it’s important to address them promptly to prevent further damage and ensure the safety of your fan.
- Follow the manufacturer’s instructions: It’s important to always refer to the manufacturer’s instructions for any specific maintenance or cleaning recommendations for your Arlec ceiling fan. Following these instructions will help you maintain the warranty and ensure proper care of your fan.
By following these maintenance and cleaning tips, you can help prolong the lifespan of your Arlec ceiling fan and keep it operating efficiently. Regular maintenance will also help keep your fan looking clean and new, enhancing the overall aesthetics of your space. With proper care, your Arlec ceiling fan can provide you with years of comfort and enjoyment.