
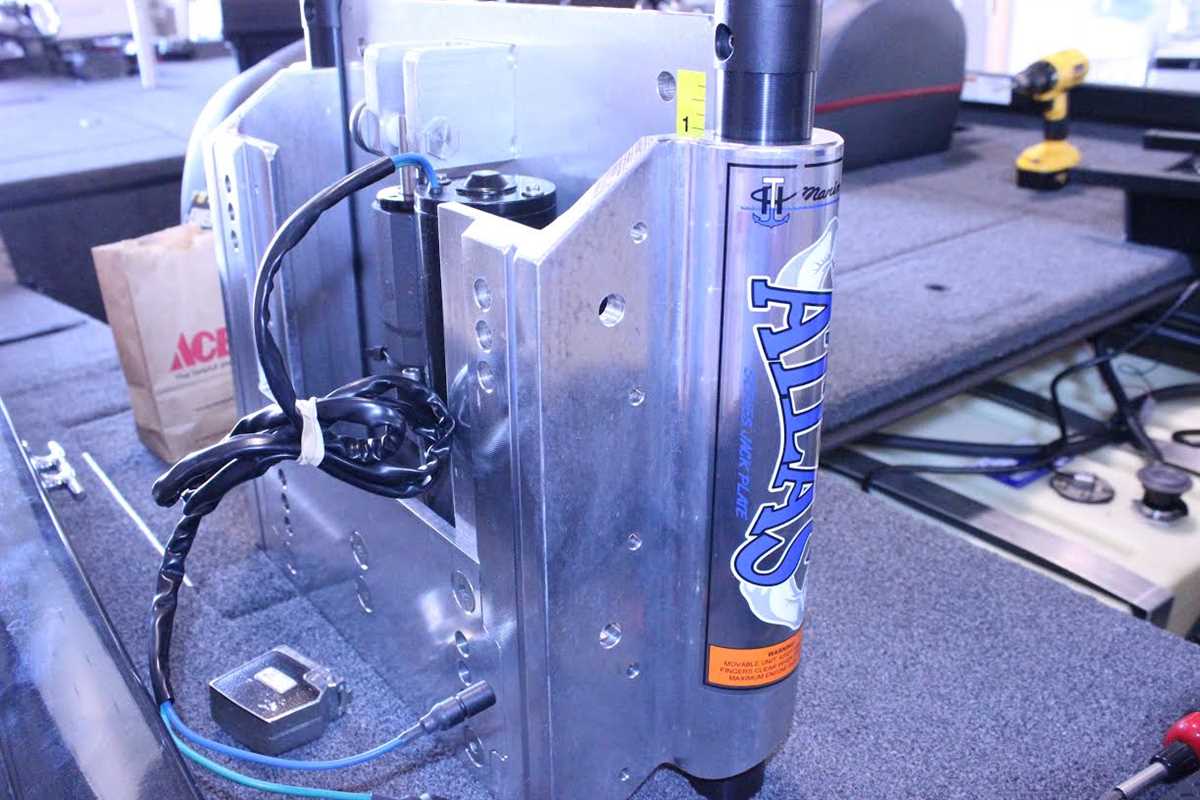
The Atlas Jack Plate is a popular hydraulic outboard motor bracket used to lift and lower the engine on a boat. It is designed to improve the performance and versatility of your boat by allowing you to adjust the height of the outboard motor. The Atlas Jack Plate also provides extra clearance in shallow water, reduces hull drag, and improves fuel efficiency.
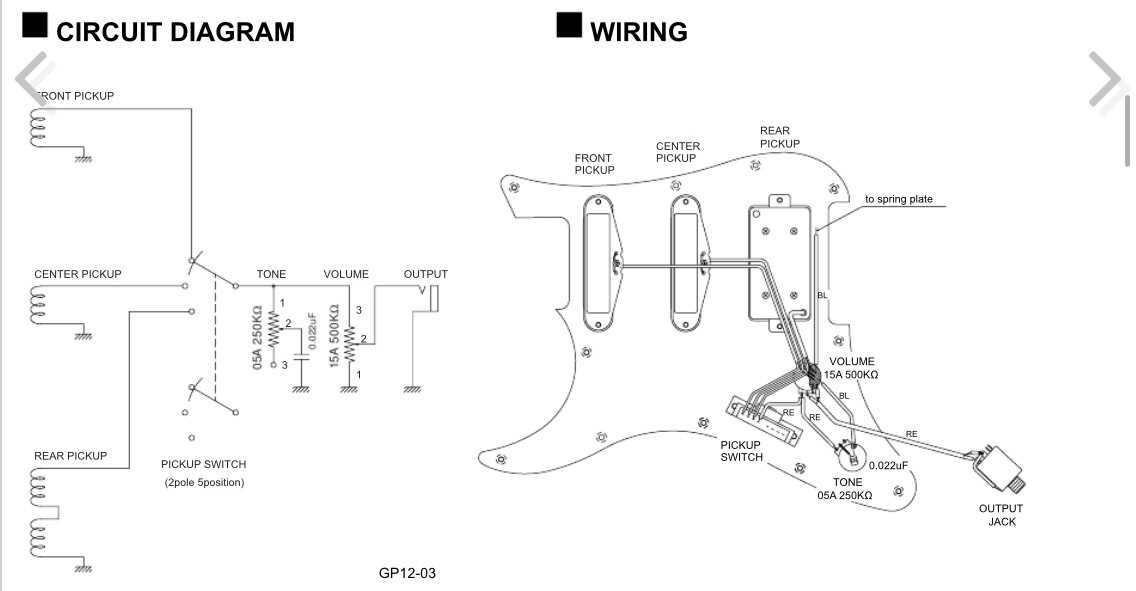
Proper wiring is essential for the smooth operation of the Atlas Jack Plate, and a wiring diagram is necessary to ensure correct installation. The wiring diagram provides a visual representation of the electrical connections and components involved in the jack plate system. This includes the hydraulic pump, control switches, relays, and wiring harnesses.
Following the wiring diagram is crucial to avoid potential damage to the jack plate system and to ensure the safety of the operator. It is recommended to consult the manufacturer’s instructions and guidelines when wiring the Atlas Jack Plate to ensure proper installation and functionality. Additionally, it is important to use high-quality electrical components and to follow standard electrical wiring practices.
In conclusion, the Atlas Jack Plate is an essential accessory for boat owners who want to optimize the performance of their outboard motor. A wiring diagram is necessary to ensure proper installation and operation of the jack plate system. By following the wiring diagram and using high-quality electrical components, boat owners can enjoy the benefits of improved performance, versatility, and fuel efficiency provided by the Atlas Jack Plate.
What is an Atlas Jack Plate?
An Atlas Jack Plate is a device that is used to adjust the height and angle of a boat’s outboard motor. It is typically installed between the boat’s transom and the outboard motor, and provides a tilt and trim feature to improve the performance and efficiency of the motor.
The Atlas Jack Plate is typically made of high-strength aluminum or stainless steel, and is designed to withstand the harsh marine environment. It is equipped with hydraulic or electric actuators that allow the user to adjust the angle of the outboard motor, raising or lowering it as needed.
The main purpose of an Atlas Jack Plate is to optimize the performance of the boat by allowing the user to adjust the motor’s height and angle. By raising or lowering the motor, the user can fine-tune the boat’s trim to achieve maximum speed, fuel efficiency, and handling. This is especially useful in shallow water conditions, where the motor needs to be lifted to prevent damage from hitting the bottom.
In addition to its performance benefits, an Atlas Jack Plate also offers convenience and versatility. It allows the user to easily remove and install the outboard motor, making maintenance and repairs much easier. Some models even come with built-in gauges and control switches, further enhancing the user experience.
Overall, an Atlas Jack Plate is a valuable accessory for boat owners who want to improve their boat’s performance, maneuverability, and convenience. By allowing precise adjustments of the outboard motor’s height and angle, it helps optimize the boat’s overall performance and enhances the boating experience.
Function of an Atlas Jack Plate
An Atlas jack plate is a device used on boats to adjust the height of the outboard motor. It is typically mounted between the boat transom and the motor and can be controlled using hydraulic or electric mechanisms. The main function of an Atlas jack plate is to raise or lower the motor, allowing boaters to optimize the performance and handling of their vessel in different water conditions and situations.
One of the key benefits of using an Atlas jack plate is its ability to improve a boat’s overall performance. By adjusting the motor height, boaters can fine-tune the boat’s trim and reduce drag, resulting in increased speed, better fuel efficiency, and improved handling. This is particularly useful in shallow waters where the motor needs to be raised to prevent damage to the propeller and lower unit.
The Atlas jack plate also provides boaters with the flexibility to control the boat’s balance and weight distribution. By raising or lowering the motor, boaters can adjust the center of gravity, allowing them to achieve optimal weight distribution for better stability and maneuverability. This is especially important when carrying heavy loads or when navigating rough or choppy waters.
In addition to performance and handling benefits, an Atlas jack plate can also help in protecting the boat and motor from damage. By allowing the motor to be raised, boaters can avoid hitting rocks, stumps, or other underwater obstacles that may cause significant damage to the motor’s propeller and lower unit. This not only helps to extend the life of the motor but also reduces the risk of costly repairs or replacements.
In summary, the Atlas jack plate serves an important function in boat operation by allowing boaters to adjust the height of the outboard motor. By providing the ability to fine-tune the boat’s trim, weight distribution, and motor height, the Atlas jack plate helps optimize performance, fuel efficiency, and handling. It also helps to protect the boat and motor from damage in shallow waters and rough conditions.
Why Should You Install an Atlas Jack Plate?
An Atlas jack plate is a useful addition to any boat, providing several benefits and advantages. Whether you are an avid angler or simply enjoy boating, installing an Atlas jack plate can enhance your boating experience and improve the performance of your boat.
1. Improved Performance: One of the main reasons to install an Atlas jack plate is to achieve better performance on the water. A jack plate raises the outboard motor, allowing it to be positioned higher above the boat’s transom. This provides several advantages, including increased speed, improved fuel efficiency, and better handling. By adjusting the motor height with the jack plate, you can optimize your boat’s performance for different conditions, such as shallow water or rough seas.
2. Increased Maneuverability: Another benefit of installing an Atlas jack plate is increased maneuverability. By raising the outboard motor, a jack plate reduces the amount of drag and resistance that the boat experiences. This allows for easier turning, sharper cornering, and improved overall control of the boat. Whether you need to navigate tight spots, make quick maneuvers, or perform precise docking, an Atlas jack plate can make a noticeable difference in your boat’s maneuverability.
3. Shallow Water Capability: If you frequently boat in shallow water or areas with submerged obstacles, an Atlas jack plate is a must-have accessory. By raising the outboard motor, you can safely navigate through shallow areas without damaging the propeller or lower unit. The increased motor height provided by a jack plate allows you to traverse shallow water with confidence, expanding your boating horizons and opening up new fishing or recreational opportunities.
4. Easy Installation and Adjustability: Installing an Atlas jack plate is relatively straightforward, and most models come with detailed instructions and wiring diagrams. The adjustability of the jack plate allows you to fine-tune the motor height to your specific needs and preferences. This flexibility is especially beneficial for anglers who fish in various water conditions and need to adapt their boat setup accordingly.
In conclusion, an Atlas jack plate is a valuable addition to any boat, offering improved performance, increased maneuverability, the capability to navigate shallow water, and easy installation. Investing in an Atlas jack plate can significantly enhance your boating experience and provide you with more control and versatility on the water.
Understanding the Wiring Diagram

When it comes to the Atlas jack plate wiring diagram, it is important to have a clear understanding of how the different components are connected. The wiring diagram provides a visual representation of the electrical connections and can be a valuable tool in troubleshooting any potential issues.
One key component in the wiring diagram is the solenoid, which is responsible for controlling the movement of the jack plate. The solenoid acts as a switch, allowing power to flow to the jack plate motor when activated. Understanding the connections to the solenoid is essential for proper operation of the jack plate.
Additionally, the wiring diagram will also show the connections to the control switch. The control switch serves as the user interface for raising or lowering the jack plate. By understanding the wiring connections to the control switch, one can diagnose any problems with the switch itself or the wiring leading to it.
In summary, the Atlas jack plate wiring diagram provides a visual representation of the electrical connections involved in the operation of the device. Understanding this diagram is crucial for troubleshooting and maintaining the jack plate system. By studying the wiring diagram and familiarizing oneself with the different components and connections, one can ensure the proper functioning of the jack plate.
Components of the Atlas Jack Plate Wiring System
The Atlas Jack Plate Wiring System consists of several key components that work together to provide reliable and efficient operation. These components include:
Main Wiring Harness

The main wiring harness is the central component of the Atlas Jack Plate Wiring System. It is responsible for connecting all of the other components together and delivering power and signal throughout the system. The main wiring harness is typically made up of multiple wires, connectors, and terminals that are designed to handle the electrical demands of the jack plate.
Control Switch

The control switch is the user interface for the Atlas Jack Plate Wiring System. It allows the operator to raise and lower the jack plate, as well as control other functions such as trim adjustment. The control switch is typically installed on the boat’s console or dashboard for easy access while operating the vessel.
Relays
Relays are electro-mechanical switches that are used to control the flow of electricity in the Atlas Jack Plate Wiring System. They serve as a bridge between the control switch and the power source, allowing the switch to activate or deactivate various functions of the jack plate. Relays help to protect the control switch and other components from excessive power draw and provide a reliable connection between the different parts of the system.
Motor

The motor is one of the most important components in the Atlas Jack Plate Wiring System as it is responsible for raising and lowering the jack plate. The motor receives signals from the control switch through the wiring harness and converts electrical energy into mechanical motion. It is typically a powerful, high-torque motor designed to handle the weight and load of the jack plate.
Wiring Connectors
Wiring connectors are used to facilitate the connection between different components in the Atlas Jack Plate Wiring System. These connectors are designed to be easy to install and provide a secure and reliable connection. Common types of wiring connectors used in the system include butt connectors, spade connectors, and bullet connectors.
In conclusion, the Atlas Jack Plate Wiring System is comprised of various components that work together to provide smooth and efficient operation. The main wiring harness, control switch, relays, motor, and wiring connectors are all crucial elements in ensuring the reliable and safe functioning of the jack plate system.
Step-by-Step Guide to Wiring an Atlas Jack Plate
Wiring an Atlas jack plate can be a straightforward process if you follow these steps. By properly wiring your jack plate, you can ensure that it functions properly and can easily adjust the height of your boat’s outboard motor.
Step 1: Gather the Necessary Tools

Before you begin wiring your Atlas jack plate, make sure you have all the necessary tools and materials. These may include wire strippers, electrical tape, a soldering iron, solder, a power drill, drill bits, and zip ties. It’s also important to have the wiring diagram for your specific Atlas jack plate model.
Step 2: Disconnect the Battery
Prior to starting any electrical work, always disconnect the boat’s battery to prevent any accidental electrical shocks or damage to the wiring system.
Step 3: Lay Out the Wiring
Refer to the wiring diagram for your specific Atlas jack plate model. Lay out the wiring according to the diagram, ensuring that you have the correct length and gauge of wires for each connection. This will help you stay organized and avoid confusion during the wiring process.
Step 4: Make the Connections
Using the wire strippers, strip the insulation off the ends of the wires according to the recommended length in the wiring diagram. Connect each wire to its designated terminal, ensuring a secure and tight connection. You may need to use a soldering iron and solder for some connections, depending on the specific wiring requirements.
Step 5: Secure and Route the Wires
After making all the necessary connections, secure the wires using zip ties or other appropriate methods. Make sure the wires are neatly routed and avoid any potential hazards or sources of friction that could lead to damage or malfunction.
Step 6: Test the Jack Plate
Once all the wiring is complete and secure, reconnect the boat’s battery and test the jack plate to ensure it functions properly. Make sure the jack plate raises and lowers the outboard motor smoothly and without any issues. If any problems arise, refer to the troubleshooting section of the user manual or contact Atlas jack plate customer support for assistance.
Step 7: Safety Check
After successfully wiring and testing the Atlas jack plate, perform a safety check. Double-check all connections, ensuring they are secure and free from any loose or exposed wires. Inspect the wiring for any signs of damage or wear and repair or replace as needed. Finally, verify that the boat’s electrical system is functioning correctly before taking it out on the water.
In conclusion, wiring an Atlas jack plate requires careful attention to detail and following the specific instructions provided by the manufacturer. By following this step-by-step guide, you can wire your Atlas jack plate properly and ensure optimal performance for your boat’s outboard motor adjustment.