
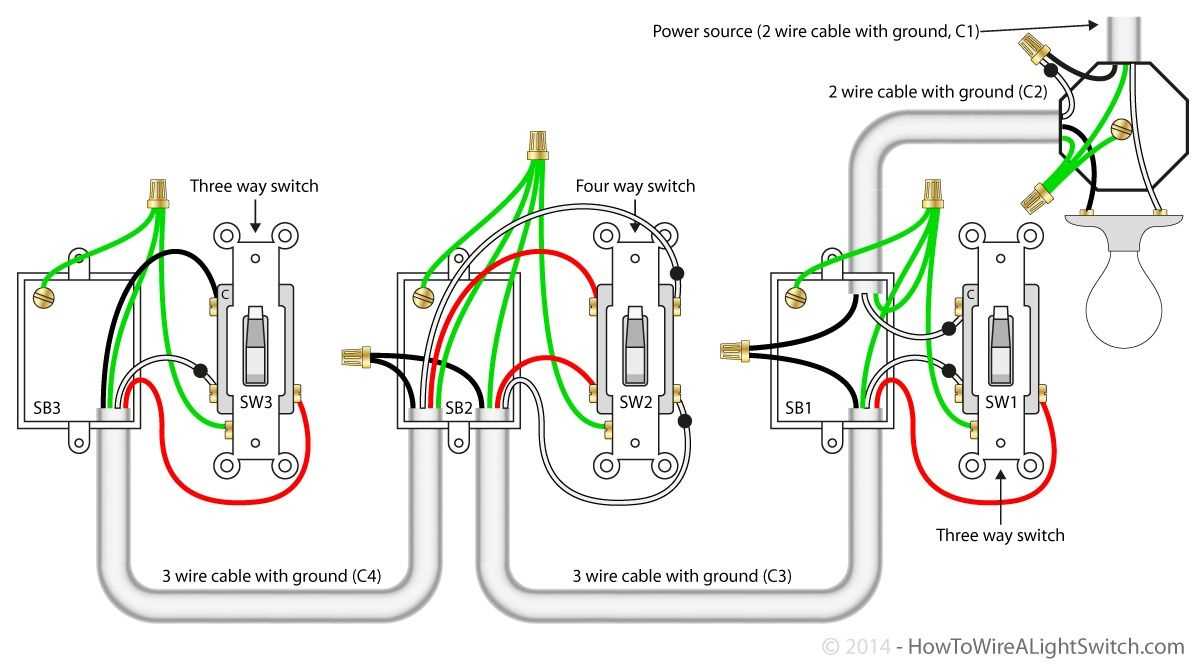
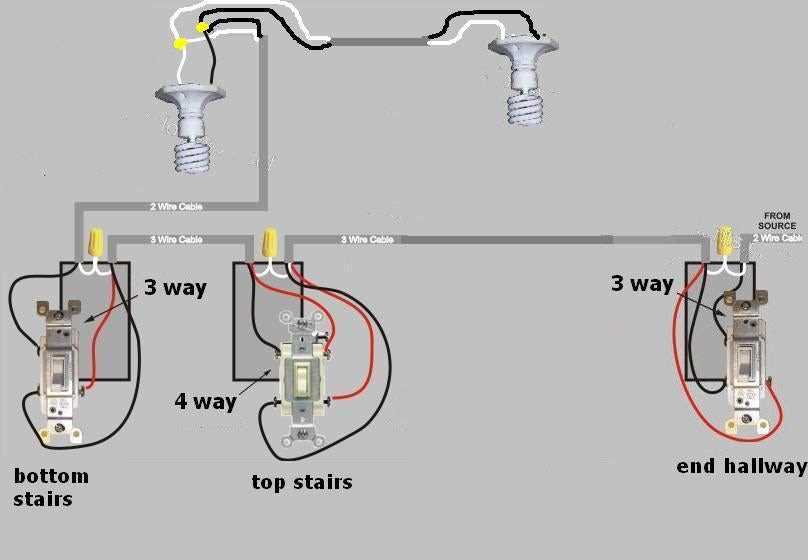
Understanding the basics of electrical wiring is essential for homeowners and aspiring electricians alike. One common electrical component found in many homes is the 3-way switch. This type of switch is used to control a light fixture from two different locations, such as a hallway with switches at either end. In this article, we will provide a basic 3-way switch wiring diagram to help you understand how this wiring configuration works.
The 3-way switch wiring diagram involves three wires: the hot wire, the traveler wire, and the common wire. The hot wire is typically colored black and carries the electrical current from the power source to the light fixture. The traveler wire is typically colored brass or silver and connects the two 3-way switches together. The common wire is typically colored white and carries the electrical current back from the light fixture to the power source.
To wire a basic 3-way switch configuration, you will need two 3-way switches and a light fixture. Connect the hot wire from the power source to the common terminal on the first 3-way switch. Then, connect the traveler wire from the first 3-way switch to the traveler terminal on the second 3-way switch. Finally, connect the common wire from the light fixture to the common terminal on the second 3-way switch. This wiring diagram allows you to control the light fixture from either switch location.
Understanding the Basics of 3-Way Switch Wiring
When it comes to electrical wiring, understanding the basics is key to successfully installing and troubleshooting any circuit. One common wiring configuration is the 3-way switch, which allows for control of a light or multiple lights from two different locations. This type of setup is commonly found in hallways, stairs, and large rooms where multiple light switches are needed. By understanding the basic principles and wiring diagram for a 3-way switch, you can confidently tackle any electrical project.
A 3-way switch wiring diagram refers to the electrical connections and circuitry involved in a 3-way switch setup. The diagram typically includes three terminals: one common terminal (usually colored black), and two traveler terminals (usually colored brass or silver). The common terminal is connected to the power source, while the traveler terminals are connected to the light fixtures or other switches.
When wiring a 3-way switch, it’s important to note that one of the traveler terminals will always be hot, or carrying live electrical current. This hot traveler wire connects the two switches together, allowing for the interchangeability of control. The other traveler wire is used to carry the switched power to the light fixtures. By flipping either switch, the hot traveler becomes the switched power, turning the lights on or off depending on its position.
The 3-way switch wiring diagram can be a bit confusing at first, but by breaking it down into smaller components, it becomes easier to understand. Start by identifying the power source and the light fixture. The power source should be connected to the common terminal of the first switch, and the hot traveler wire should be connected to one of the traveler terminals of the second switch.
From there, connect the other traveler terminal of the first switch to the other traveler terminal of the second switch. Finally, connect the switched power wire from the light fixture to the common terminal of the second switch. By following this wiring diagram, the 3-way switch setup should function properly, allowing for control of the lights from either location.
In conclusion, understanding the basics of 3-way switch wiring is essential for any electrical project involving multiple light switches. By familiarizing yourself with the wiring diagram and the role of each terminal, you can confidently wire a 3-way switch setup in your home or workspace. Remember to always turn off the power before working on any electrical circuit, and consult a professional electrician if you’re unsure about any aspect of the installation or troubleshooting process.
What is a 3-way switch?
A 3-way switch is a type of electrical switch that is commonly used in households to control lighting fixtures from two different locations. It allows for convenient control of lights or other devices from multiple places, such as switches at the top and bottom of a staircase or at opposite ends of a hallway.
This type of switch is called a 3-way switch because it has three terminals or connection points. The three terminals are typically labeled as “common,” “traveler,” and “traveler.” The common terminal is usually colored differently or marked in some way to distinguish it from the traveler terminals. The switch is designed to allow electricity to flow between the common terminal and one of the traveler terminals, depending on the position of the switch.
The wiring configuration of a 3-way switch involves connecting it to a power source and the light fixture in a specific manner. The common terminal is connected to the power supply, while the two traveler terminals are connected to the light fixture. When one switch is turned on, it completes the circuit and allows electricity to flow through one of the traveler terminals to the light. When the other switch is turned on, it changes the connection and allows electricity to flow through the other traveler terminal to the light.
Overall, a 3-way switch provides flexibility and convenience in controlling lights or devices from multiple locations. It is a common feature in modern homes and is relatively easy to install and wire, following the appropriate wiring diagrams and guidelines.
The Purpose of a 3-Way Switch
A 3-way switch is a crucial component in electrical circuits, allowing control of a single light or set of lights from two different locations. It is commonly used in hallways, staircases, and large rooms where multiple switches are needed for convenient access. The purpose of a 3-way switch is to provide flexibility and convenience in controlling lights from different entry points.
How does a 3-way switch work?
A 3-way switch has three terminals, known as the common terminal, and the two traveler terminals. The common terminal is connected to the power source, while the traveler terminals are connected to the light fixture(s). When both switches are in the off position, there is no connection between the common and traveler terminals. However, when one switch is turned on, it completes the circuit and allows electricity to flow from the power source to the light fixture(s).
Advantages of using a 3-way switch:
- Convenience: With a 3-way switch, you can control the lights from multiple locations without having to walk back and forth. This is particularly useful in larger homes or areas where ease of access is important.
- Enhanced safety: Having multiple control points helps improve safety as it allows you to turn on or off the lights from different areas, reducing the risk of accidents in dimly lit areas or when carrying heavy objects.
- Energy efficiency: A 3-way switch gives you the flexibility to switch off lights that are not needed, thereby saving energy and reducing utility bills.
- Aesthetic appeal: Using multiple switches in a space can enhance the overall design and functionality by providing balanced lighting and options for different lighting configurations.
In conclusion, a 3-way switch plays a vital role in controlling lights from different locations, offering convenience, safety, energy efficiency, and aesthetic appeal. It is a fundamental component in modern electrical systems and is widely used in residential and commercial applications to provide flexibility and ease of use.
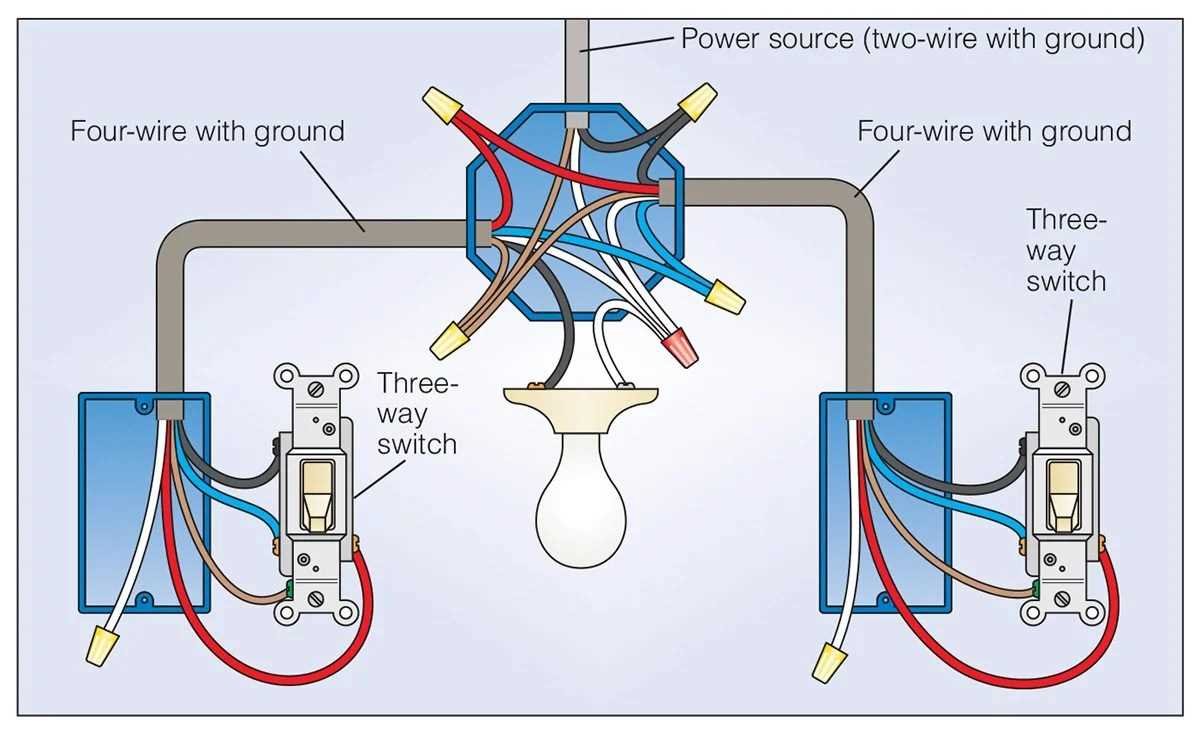
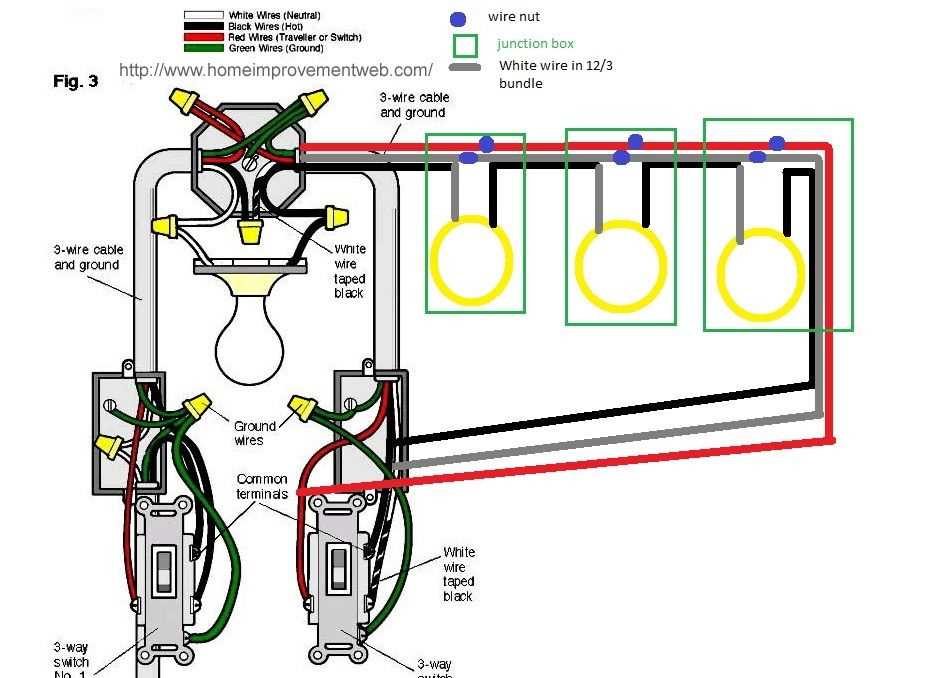
Key components of a 3-way switch wiring diagram
A 3-way switch wiring diagram is a schematic representation of the electrical connections and components involved in a three-way switch circuit. This type of circuit allows for control of a single electrical fixture or outlet from two different locations, usually with a switch at both ends of a hallway or staircase. The diagram helps electricians and DIY enthusiasts understand and visualize the connections necessary to achieve this functionality.
Here are some key components that are typically included in a 3-way switch wiring diagram:
- Switches: The switches themselves are an integral part of the diagram and are usually represented by their corresponding symbols. The diagram will indicate which switch is the “common” switch and which ones are the “traveler” switches.
- Wiring connections: The diagram shows the various wires and their connections between the switches and the electrical fixture or outlet. This includes the neutral wire, hot wire, ground wire, and traveler wires. The diagram may also indicate the color-coding of the wires.
- Terminal screws: Terminal screws are used to secure the wires to the switches. The diagram may include labels or indications of which wires should be connected to which terminal screws.
- Grounding: Grounding is an important safety feature in electrical circuits. The diagram will typically show how to properly ground the switches and the electrical fixture or outlet.
By following a 3-way switch wiring diagram, electricians and DIY enthusiasts can ensure that the circuit is wired correctly, allowing for convenient control of a single electrical fixture or outlet from multiple locations. It is important to consult the specific diagram for the desired circuit configuration and to follow all safety guidelines to avoid electrical hazards.
Wiring a 3-Way Switch: Step-by-Step Instructions
Installing a 3-way switch allows you to control a single light or set of lights from two different locations. This is commonly used for staircases, hallways, and rooms with multiple entrances. It requires basic electrical knowledge and tools to complete the installation. Here is a step-by-step guide to help you wire a 3-way switch:
Step 1: Gather the necessary materials
Before starting the installation, make sure you have all the required materials. This includes a 3-way switch, electrical wire, wire connectors, a screwdriver, pliers, and a voltage tester. Ensure that the power to the circuit is turned off at the breaker panel.
Step 2: Identify the electrical wiring
Identify the electrical wiring in the switch box. You should have three wires: a hot wire (usually black), a neutral wire (usually white), and a traveler wire (usually red or black). Use a voltage tester to verify that the power is off and the wires are not live.
Step 3: Connect the wires to the switch
Connect the hot wire to the common terminal of the switch. This terminal is usually identified by a different color or labeled “COM”. Connect the traveler wires to the remaining terminals, typically labeled “1” and “2”. Use wire connectors to secure the connections.
Step 4: Install the switch
Install the switch into the electrical box, following the manufacturer’s instructions. Attach the switch securely using screws, making sure not to overtighten. Double-check all your connections and ensure that the wires are properly inserted.
Step 5: Test the switch
After completing the installation, turn on the power at the breaker panel and test the switch. Flip the switch at both locations to verify that the light or lights turn on and off as desired. If the switch does not function correctly, double-check your wiring and connections.
Remember to always exercise caution when working with electricity. If you are unsure about any step of the process, consult a licensed electrician for assistance.
Troubleshooting common issues with 3-way switch wiring
3-way switch wiring can sometimes cause issues, resulting in malfunctioning switches or lights that won’t turn on or off properly. Understanding the common problems that can occur with this type of wiring can help troubleshoot the issue and ensure proper functionality.
1. Improper wiring connections

One of the most common issues with 3-way switch wiring is improper wiring connections. This can occur if the wires are not connected to the correct terminals on the switches or if the wires are not properly secured in the terminals. To troubleshoot this issue, it is important to check all the wiring connections and ensure they are tight and secure.
2. Faulty switches
Another common problem with 3-way switch wiring is faulty switches. Switches can wear out over time or become damaged, leading to issues with the circuit. To determine if the switches are faulty, it is important to test them using a multimeter to check for continuity. If a switch is not functioning properly, it will need to be replaced to resolve the issue.
3. Miswired traveler wires
Traveler wires are essential in 3-way switch wiring, as they carry the electrical current between the switches. If the traveler wires are miswired or connected to the wrong terminals, it can cause problems with the circuit. To troubleshoot this issue, it is necessary to check the wiring diagram for proper configuration and ensure that the traveler wires are connected correctly.
4. Damaged or worn out wiring
Over time, wiring can become damaged or worn out, leading to issues with the 3-way switch circuit. This can result in intermittent connections or complete failure of the circuit. To check for damaged wiring, it is important to visually inspect the wires for any signs of fraying or damage. If damaged wiring is found, it will need to be replaced to resolve the issue.
5. Overloaded circuit
If the circuit is overloaded with too many lights or appliances connected to the switches, it can cause issues with the 3-way switch wiring. This can result in flickering lights, circuit breaker trips, or switches that do not work properly. To troubleshoot this issue, it is important to reduce the load on the circuit by disconnecting unnecessary lights or appliances.
Overall, troubleshooting common issues with 3-way switch wiring involves checking for improper wiring connections, faulty switches, miswired traveler wires, damaged or worn out wiring, and overloaded circuits. By identifying and resolving these issues, it is possible to ensure proper functionality of the 3-way switch circuit.
Safety precautions when working with 3-way switches
Working with electrical wiring can be dangerous if proper safety precautions are not taken. When working with 3-way switches, it is important to keep the following safety tips in mind to ensure a safe and successful installation.
1. Turn off the power
Before starting any electrical work, it is crucial to turn off the power to the circuit you will be working on. This can be done by switching off the breaker at the main electrical panel. It is also recommended to use a circuit tester to confirm that the power is indeed off before proceeding.
2. Use appropriate tools and equipment
When working with electrical components, it is important to use the right tools and equipment. This includes using insulated screwdrivers, pliers, and wire strippers. Using tools with insulated handles can help prevent electrical shocks.
3. Follow proper wiring techniques
It is essential to follow proper wiring techniques when installing 3-way switches. This includes making sure all connections are secure and properly tightened, and using wire nuts or electrical tape to cover exposed wires. Additionally, it is important to avoid overcrowding the electrical box with too many wires, as this can increase the risk of a short circuit.
4. Test the circuit before finalizing the installation
After completing the installation, it is vital to test the circuit to ensure everything is working properly. This can be done by turning the power back on and testing the switches to see if they are functioning correctly. If any issues are found, it is important to address them before finalizing the installation.
Working with 3-way switches can be a rewarding DIY project, but it is important to prioritize safety. By following these safety precautions and using common sense, you can ensure a safe and successful installation of your 3-way switches.