
The Bosch oxygen sensor is an essential component for monitoring the air-to-fuel ratio in an engine’s exhaust system. It provides critical feedback to the engine control unit (ECU) to ensure optimal fuel efficiency and reduce harmful emissions. Proper wiring of the Bosch oxygen sensor is crucial to ensure accurate readings and efficient engine performance.
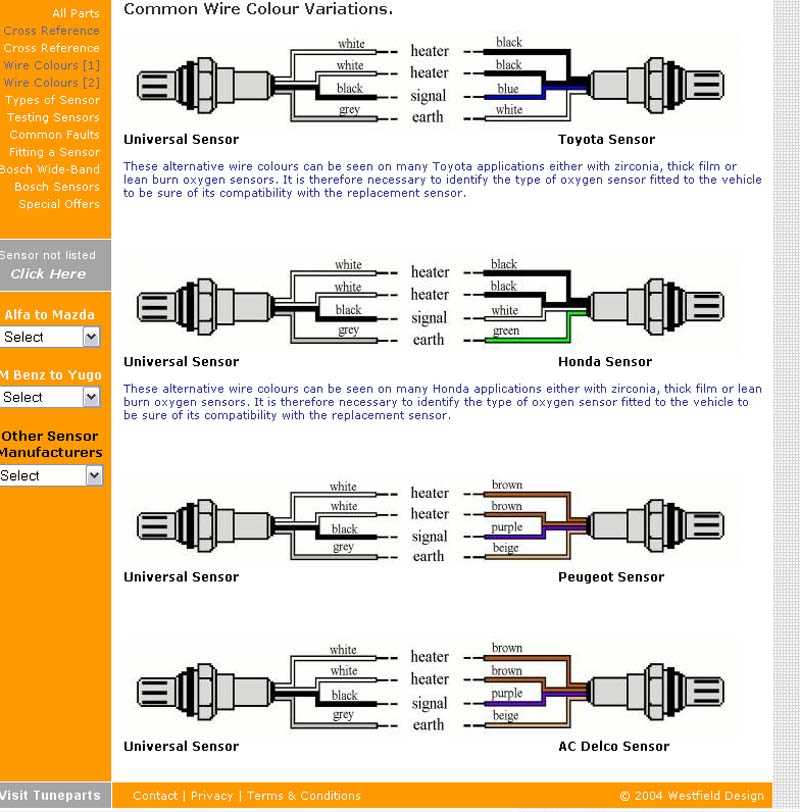
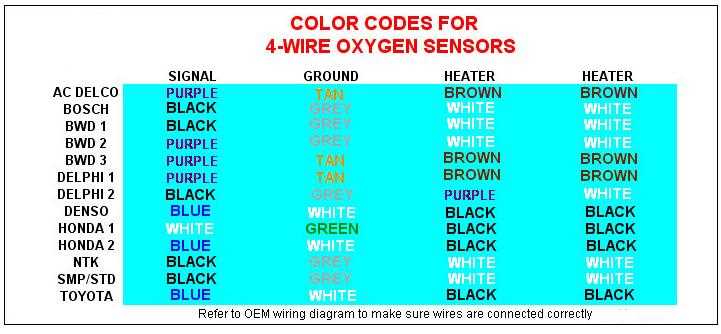
When it comes to wiring the Bosch oxygen sensor, there are a few key considerations to keep in mind. Firstly, it is important to understand the sensor’s wiring color codes. Bosch sensors typically have a standardized color-coding system, with the most common being two white wires, one black wire, and one grey wire. These wires are used for the sensor’s various functions, such as heating, signal output, and ground.
Secondly, it is important to ensure proper placement and routing of the sensor’s wiring. The Bosch oxygen sensor should be installed as close to the engine’s exhaust manifold as possible, and the wiring should be routed away from the exhaust system to prevent damage from heat or vibrations. Additionally, it is essential to avoid any sharp bends or kinks in the wiring, as these can cause signal interference or even breakage.
In conclusion, the proper wiring of the Bosch oxygen sensor is crucial for accurate readings and efficient engine performance. Understanding the sensor’s color-coding system and ensuring proper placement and routing of the wiring are key factors to consider. By following these guidelines, vehicle owners can ensure their engine’s air-to-fuel ratio is carefully monitored, leading to improved fuel efficiency and reduced emissions.
Bosch Oxygen Sensor Wiring
The Bosch oxygen sensor is a critical component in a vehicle’s exhaust system. It measures the oxygen level in the exhaust gases and sends this information to the engine control unit (ECU) to help optimize fuel efficiency and reduce emissions. Proper wiring of the Bosch oxygen sensor is essential to ensure accurate readings and proper functioning of the vehicle.
When wiring a Bosch oxygen sensor, it is important to follow the manufacturer’s instructions and use the correct wiring diagram for the specific sensor model. In most cases, the Bosch oxygen sensor will have four wires – two for the sensor signal and two for the heater circuit. The sensor signal wires are usually colored black and white, while the heater circuit wires are typically colored black and gray.
The sensor signal wires transmit the voltage signal from the sensor to the ECU, which then uses this information to adjust the air-fuel mixture. It is important to connect the sensor signal wires correctly to avoid any signal interference or incorrect readings. The heater circuit wires, on the other hand, are responsible for heating up the sensor to its optimal operating temperature. This ensures that the sensor can accurately measure the oxygen level in the exhaust gases.
When wiring the Bosch oxygen sensor, it is recommended to use high-quality connectors and ensure proper insulation to prevent any electrical failures or short circuits. It is also important to check for any damage or corrosion in the wiring harness and replace any faulty components. Regular maintenance and inspection of the Bosch oxygen sensor wiring can help prolong its lifespan and ensure the vehicle’s optimal performance.
- Proper wiring of the Bosch oxygen sensor is crucial for accurate readings and optimal vehicle performance.
- Follow the manufacturer’s instructions and use the correct wiring diagram for the specific sensor model.
- Connect the sensor signal wires correctly to avoid signal interference or incorrect readings.
- Ensure the heater circuit wires are properly connected to heat the sensor to its optimal operating temperature.
- Use high-quality connectors and proper insulation to prevent electrical failures or short circuits.
- Regularly inspect and maintain the Bosch oxygen sensor wiring to ensure its longevity and optimal performance.
Understanding Bosch Oxygen Sensors

If you are familiar with automotive maintenance, you may have come across the term “Bosch oxygen sensor.” These sensors play a crucial role in monitoring and optimizing the fuel-air mixture in a vehicle’s engine. By providing real-time feedback to the engine control unit (ECU), Bosch oxygen sensors help ensure that the engine runs efficiently and emits fewer pollutants.
How do Bosch oxygen sensors work?
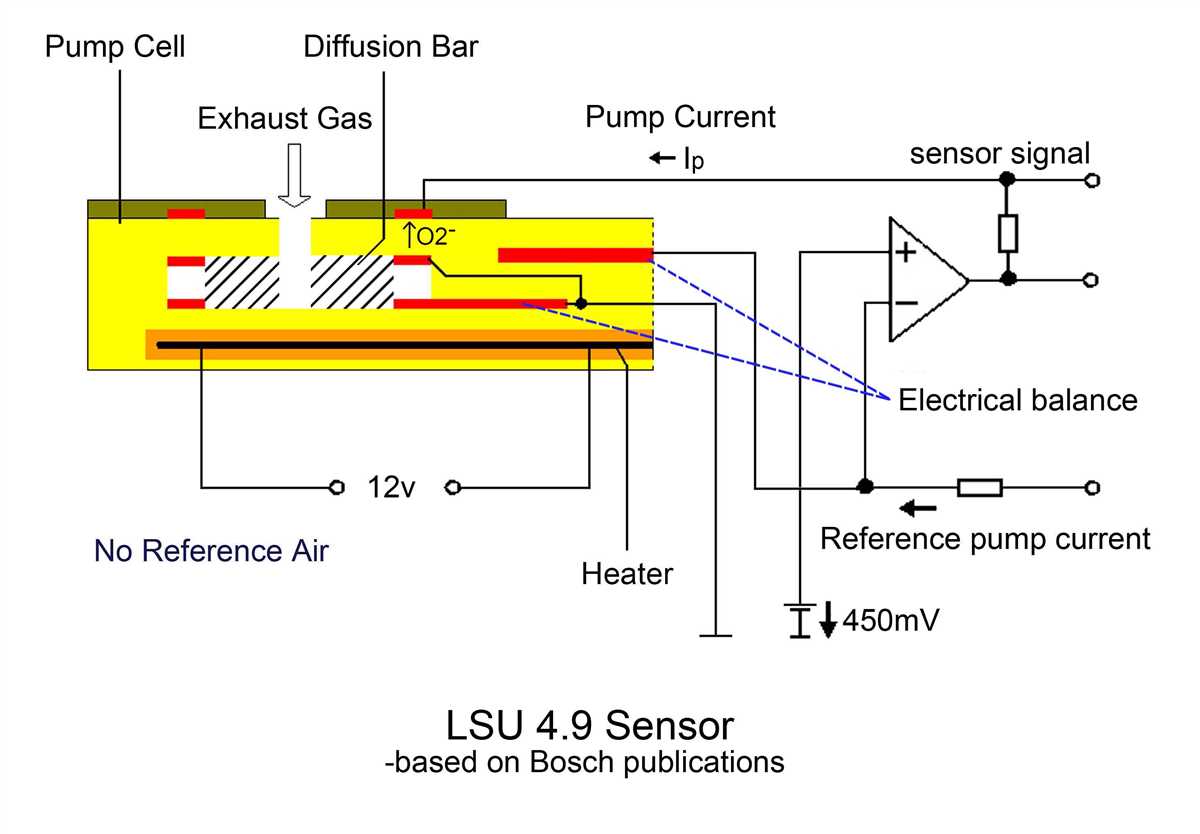
Bosch oxygen sensors, also known as lambda sensors, rely on a scientific principle called the Nernst effect. The sensor contains a ceramic element coated with a layer of platinum and zirconium oxide. This ceramic element acts as a gas-sensitive resistor, and when exposed to exhaust gases, it generates a voltage signal that corresponds to the oxygen content in the exhaust stream.
- The oxygen sensor compares the oxygen concentration in the exhaust gas with the oxygen concentration in the ambient air.
- Based on this comparison, the sensor produces a voltage signal that indicates whether the fuel-air mixture is too rich (excess fuel) or too lean (excess oxygen).
- The ECU uses this voltage signal to make adjustments to the fuel injection and ignition timing, ensuring the engine operates within optimal parameters.
Why are Bosch oxygen sensors important?
Bosch oxygen sensors are crucial for maintaining fuel efficiency and reducing harmful emissions. They help the ECU continuously monitor the combustion process, making necessary adjustments to achieve optimal fuel-air mixture. This not only improves fuel economy but also reduces the production of pollutants, such as nitrogen oxides (NOx) and carbon monoxide (CO).
What are the common symptoms of a failing Bosch oxygen sensor?
- Poor fuel economy: A faulty oxygen sensor can lead to an incorrect fuel-air mixture, causing the engine to consume more fuel than necessary.
- Check engine light: A malfunctioning oxygen sensor can trigger the check engine light on the dashboard.
- Engine misfires: If the oxygen sensor fails, it may disrupt the engine’s combustion process, leading to rough idling or misfires.
- Increase in emissions: A failing oxygen sensor can result in increased emissions, which can cause a vehicle to fail emissions tests.
Overall, understanding how Bosch oxygen sensors work and recognizing the signs of a failing sensor can help you maintain your vehicle’s performance and reduce its environmental impact.
Common Wiring Diagrams for Bosch Oxygen Sensors

The Bosch oxygen sensor is a critical component in the fuel management system of a vehicle, as it measures the amount of oxygen in the exhaust gases. Proper wiring of the oxygen sensor is essential for accurate readings and optimal performance. Here, we will discuss some common wiring diagrams for Bosch oxygen sensors.
Four-wire Bosch oxygen sensor: This type of oxygen sensor has four wires: two for the oxygen sensor heater circuit and two for the oxygen sensor signal circuit. The oxygen sensor heater circuit wires are typically colored black and white, while the oxygen sensor signal circuit wires are usually colored black and gray. It is important to connect the correct wires to ensure proper functioning of the oxygen sensor.
Three-wire Bosch oxygen sensor: The three-wire Bosch oxygen sensor consists of three wires: one for the oxygen sensor heater circuit, one for the oxygen sensor signal circuit, and one for the oxygen sensor ground. The oxygen sensor heater circuit wire is usually colored black, the oxygen sensor signal circuit wire is typically colored white, and the oxygen sensor ground wire is often colored gray. It is crucial to connect the wires correctly to ensure accurate oxygen readings.
When wiring a Bosch oxygen sensor, it is important to consult the vehicle’s wiring diagram or the Bosch sensor’s documentation for the specific wire colors and pin configurations. Incorrect wiring can lead to inaccurate readings and potentially damage the oxygen sensor or the vehicle’s fuel management system. It is recommended to use proper wiring connectors and follow best practices for secure and reliable connections.
Wiring Tips and Best Practices
When it comes to wiring Bosch oxygen sensors, there are a few key tips and best practices to keep in mind. These tips can help ensure proper installation and reliable operation of the sensor.
Use the correct wire gauge:
It is important to use the correct wire gauge when connecting a Bosch oxygen sensor. Using wires that are too thin can result in voltage drop and potential signal degradation. On the other hand, using wires that are too thick can make the installation more difficult. Bosch typically recommends using 18 to 20 gauge wires for their oxygen sensors.
Ensure proper grounding:
Proper grounding is essential for accurate readings from the oxygen sensor. Make sure to establish a good ground connection by connecting the sensor’s ground wire to a clean and solid ground point on the vehicle. Avoid grounding the sensor to painted or rusted surfaces as they may impede the proper flow of electrical current.
Use heat protection:
Bosch oxygen sensors can be sensitive to high temperatures, so it is important to protect the sensor and its wiring from excessive heat. Ensure that the sensor is mounted in a location that is away from direct heat sources, such as exhaust manifolds or catalytic converters. Additionally, consider using heat shields or heat wrap to protect the wiring from excessive heat exposure.
Follow Bosch’s wiring diagram:
To ensure proper installation, it is important to follow Bosch’s wiring diagram for the specific oxygen sensor model being used. Each Bosch oxygen sensor comes with a detailed diagram that outlines the correct wire colors and connections. Refer to this diagram during the installation process to avoid any wiring errors.
- Use the correct wire gauge (typically 18-20 gauge) for the oxygen sensor.
- Ensure proper grounding by connecting the sensor’s ground wire to a clean and solid ground point.
- Protect the sensor and wiring from excessive heat by mounting it away from heat sources and using heat shields or wrap.
- Follow Bosch’s wiring diagram for the specific oxygen sensor being installed to avoid any wiring errors.
Common Issues and Troubleshooting
When it comes to Bosch oxygen sensor wiring, there are a few common issues that may arise. Here are some troubleshooting tips to help you address these problems:
1. Loose or damaged wiring connections:
One of the most common issues is loose or damaged wiring connections. This can cause the sensor to malfunction and provide inaccurate readings. Inspect the wiring connections and ensure they are securely connected. Replace any damaged wiring to ensure proper functionality.
2. Faulty sensor:
If the wiring connections are secure and in good condition, but the sensor is still not functioning properly, it may be a faulty sensor. In this case, it is recommended to replace the sensor with a new one. Make sure to choose a genuine Bosch oxygen sensor for optimal performance.
3. Sensor not heating up:
In some cases, the oxygen sensor may not heat up properly, which can result in incorrect readings. Check the heater circuit and ensure it is functioning correctly. If necessary, replace the sensor with a new one that has a working heater circuit.
4. Incorrect installation:
Improper installation of the Bosch oxygen sensor can also lead to issues. Make sure to follow the manufacturer’s instructions carefully during installation. This includes proper positioning and tightening of the sensor. Improper installation can cause the sensor to provide inaccurate readings.
5. Engine performance issues:

If you are experiencing engine performance issues, such as poor fuel efficiency or rough idling, it may be related to the oxygen sensor. In this case, it is recommended to perform a diagnostic test to determine if the sensor is functioning correctly. Replace the sensor if necessary to resolve any engine performance issues.
Upgrading and Customizing Bosch Oxygen Sensor Wiring: Conclusion
Upgrading and customizing the wiring of Bosch oxygen sensors can greatly improve the performance and reliability of a vehicle’s oxygen sensor system. By following the proper procedures and guidelines, it is possible to enhance the signal quality, increase accuracy and responsiveness, and optimize the overall functionality of the oxygen sensor.
In this article, we have discussed the importance of properly wiring Bosch oxygen sensors, as well as the potential benefits of upgrading and customizing the wiring. We have explored various techniques and modifications that can be implemented, such as using shielded cables, adding connectors, or extending the wiring length. We have also provided tips and recommendations for ensuring a successful installation and avoiding potential issues.
It is essential to note that any modifications or upgrades to the wiring of Bosch oxygen sensors should be performed with caution and in compliance with the manufacturer’s instructions and recommendations. It is advisable to consult with an experienced technician or refer to official documentation to ensure proper installation and prevent any damage to the oxygen sensor or vehicle.
In conclusion, upgrading and customizing the wiring of Bosch oxygen sensors offers an opportunity to enhance the performance and efficiency of a vehicle’s oxygen sensor system. By following the proper procedures and taking appropriate measures, it is possible to optimize the functionality and accuracy of the oxygen sensor, leading to improved fuel efficiency, reduced emissions, and overall better vehicle performance.
- Proper wiring techniques and modifications can increase signal quality and accuracy of Bosch oxygen sensors.
- Shielded cables, connectors, and extending the wiring length are possible upgrades to consider.
- Consulting official documentation or an experienced technician is recommended for proper installation.
- Upgrading and customizing the wiring can lead to improved fuel efficiency, reduced emissions, and better vehicle performance.