
Club Car is a renowned manufacturer of electric golf carts that are widely used for transportation in golf courses and other recreational areas. These carts are powered by 36-volt batteries, which are responsible for providing the necessary electrical energy to drive the motors and other systems of the cart.
Understanding the battery wiring diagram for a Club Car 36-volt electric cart is crucial to ensure its proper functioning and maintenance. The wiring diagram illustrates the connections between the batteries, as well as the cables and components involved in the electrical system.
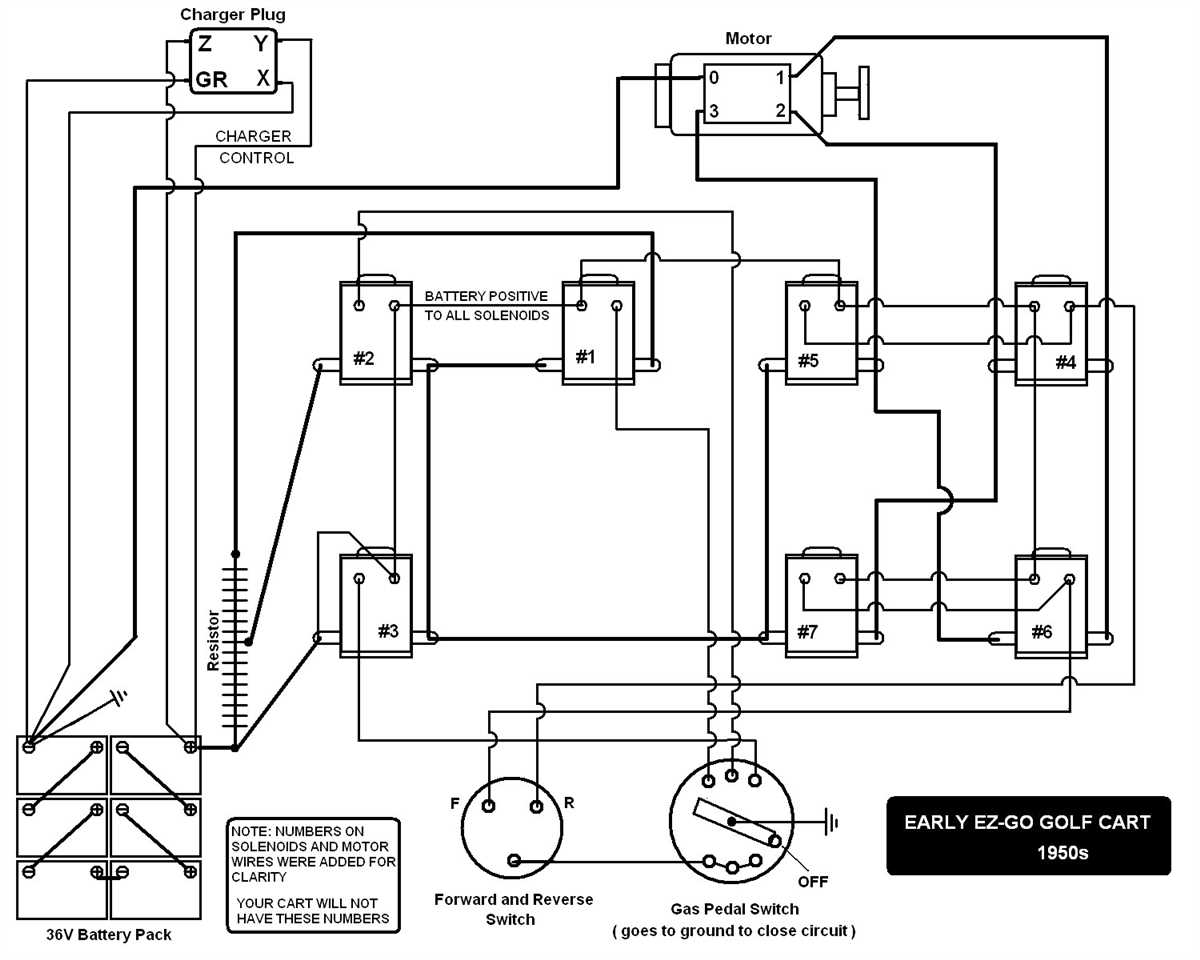
The diagram typically shows six batteries arranged in a series-parallel configuration, which means that three pairs of batteries are connected in series to form two groups. These two groups are then connected in parallel. This configuration allows the cart to operate at 36 volts while increasing the overall capacity and longevity of the battery pack.
Each battery is connected to the others through a series of cables and connectors. The positive terminal of one battery is connected to the negative terminal of the adjacent battery, creating a chain-like sequence. The last battery in the chain connects to the cart’s electrical system, providing the necessary power to run the motor, lights, and other accessories.
Understanding Club Car Battery Wiring Diagram 36 Volt
Club Car is a well-known brand in the golf cart industry. One of the key components of a Club Car golf cart is its battery system. Understanding the wiring diagram for the 36-volt battery system is essential for troubleshooting and maintaining your Club Car.
Battery Connections: The Club Car 36-volt battery system consists of six 6-volt batteries connected in series to produce a total voltage of 36 volts. In the wiring diagram, each individual battery is represented by a box, and the series connection is shown by the lines connecting the boxes. It is important to make sure that the batteries are connected in the correct sequence to ensure proper voltage and functionality.
Power Flow: The battery wiring diagram also illustrates the direction of power flow within the system. The positive terminal of the first battery is connected to the negative terminal of the second battery, and so on, until the positive terminal of the last battery is connected to the positive terminal of the controller or motor. This connection allows the electric current to flow from the batteries to the desired components of the golf cart.
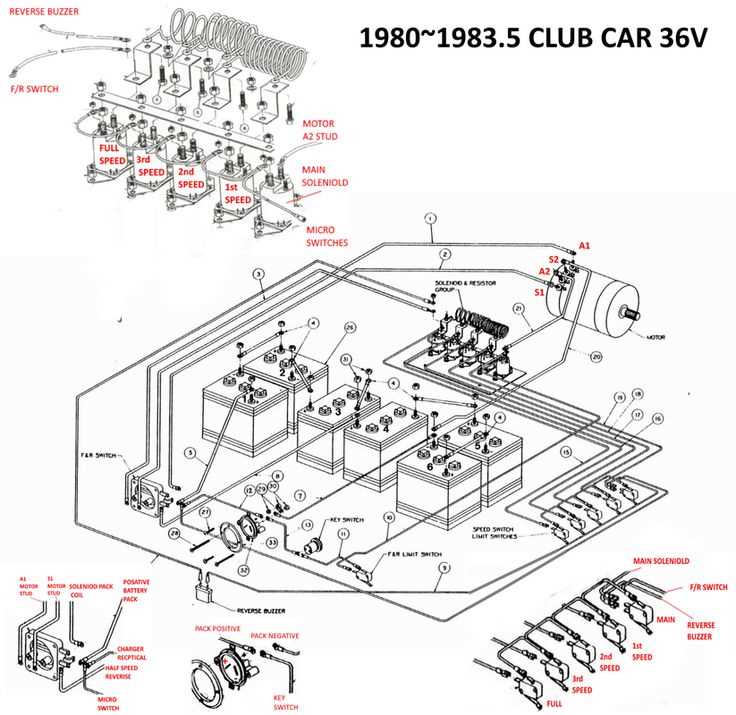
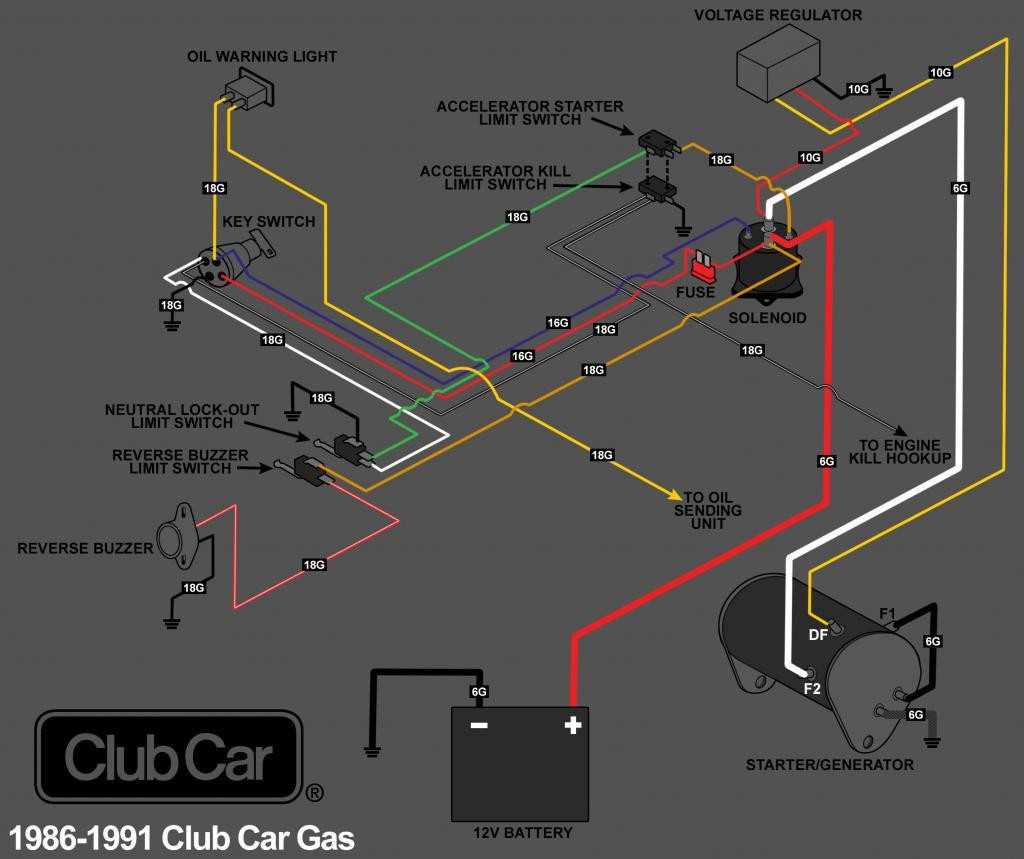
Controllers and Motors: The Club Car battery wiring diagram also includes the connections for the controller and motor. The controller regulates the flow of electricity from the batteries to the motor, controlling the speed and direction of the golf cart. The motor is responsible for generating the mechanical power to move the cart. These connections are crucial to ensure the proper functioning of the Club Car.
Wiring Layout: The battery wiring diagram provides a visual representation of the electrical connections within the Club Car golf cart. It helps identify any potential wiring issues, such as loose or corroded connections, which can cause electrical problems. By understanding the wiring layout, you can easily locate and fix any wiring-related issues that may arise.
In summary, understanding the Club Car battery wiring diagram for the 36-volt battery system is essential for troubleshooting and maintaining your golf cart. It provides information on the battery connections, power flow, controller and motor connections, and the overall wiring layout. By familiarizing yourself with this diagram, you can easily diagnose and resolve any electrical issues that may occur in your Club Car golf cart.
The Basics of Club Car Battery Wiring
Club Car is a well-known manufacturer of golf carts and other electric vehicles. To power these vehicles, Club Car typically uses a 36-volt battery pack. Understanding the basics of Club Car battery wiring is important for proper installation and maintenance of these vehicles.
Club Car battery wiring involves connecting multiple batteries together to create a battery pack. The wiring diagram for a 36-volt Club Car typically includes six 6-volt batteries connected in series to achieve the 36-volt total. The positive terminal of one battery is connected to the negative terminal of the next battery, creating a series circuit.
In addition to the series circuit, a Club Car battery wiring diagram will also show the connection of the battery pack to the vehicle’s electrical system. This includes the main positive and negative terminals that connect the battery pack to the motor controller and other electrical components.
Proper battery wiring is essential for the overall performance and longevity of a Club Car vehicle. Incorrect wiring can lead to voltage drops, reduced power, and even damage to the battery pack or electrical system. Regular maintenance and inspection of the battery wiring is necessary to ensure proper functionality and prevent any potential issues.
In conclusion, understanding the basics of Club Car battery wiring is crucial for anyone working with these vehicles. Following the correct wiring diagram and properly maintaining the battery pack will help ensure optimal performance and reliability.
Understanding the 36 Volt System
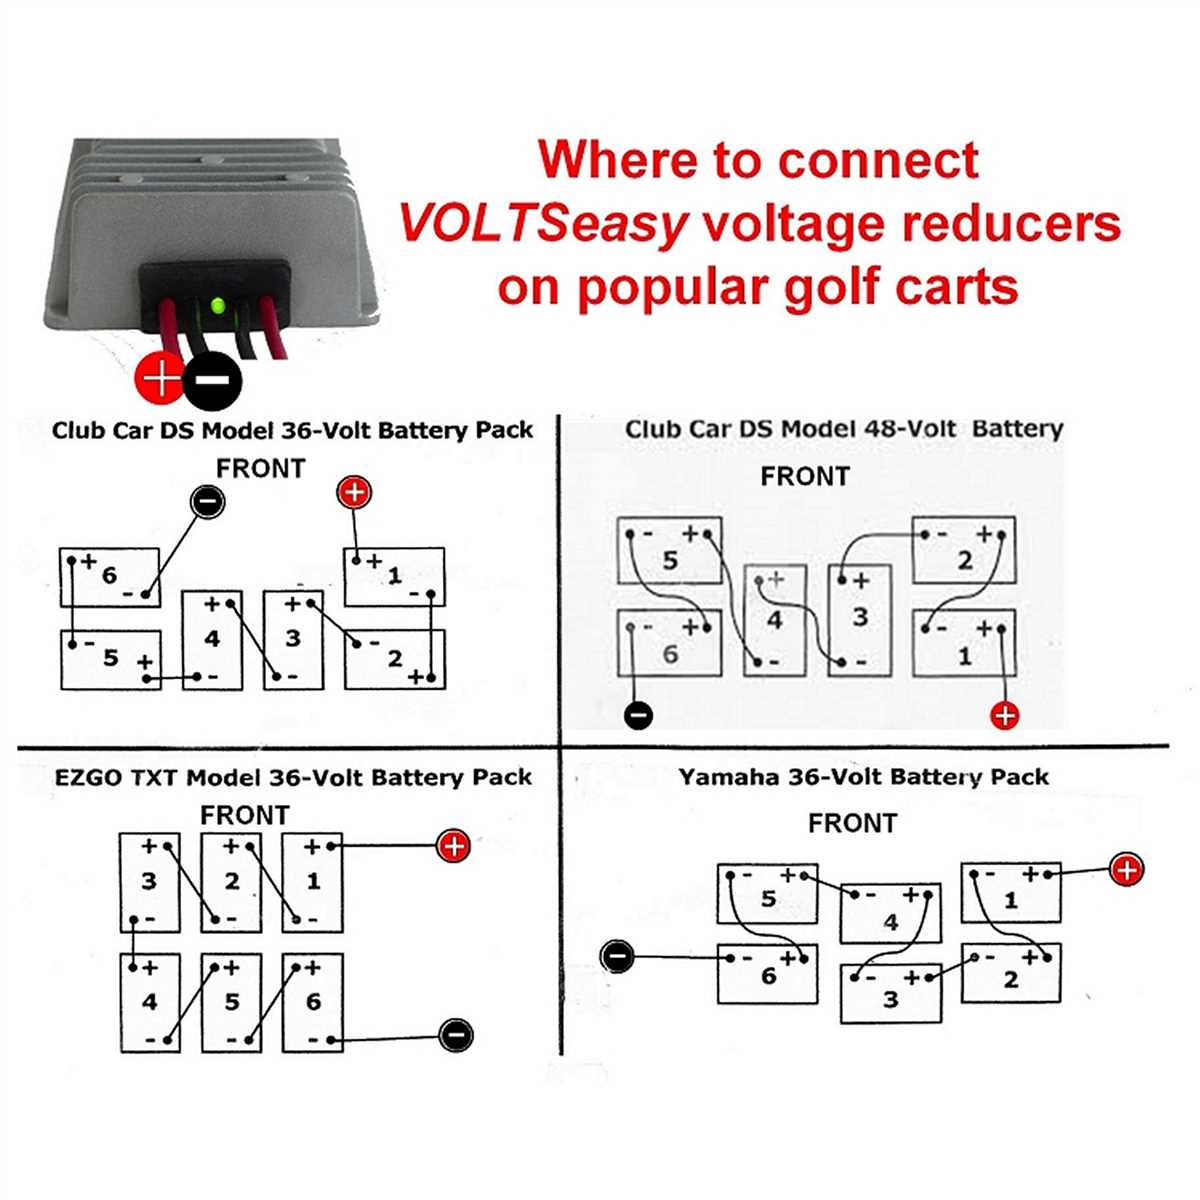
The 36 volt system is commonly used in Club Car golf carts and other electric vehicles. It consists of six 6-volt batteries connected in series to produce a total of 36 volts. Understanding how this system works can help you troubleshoot and maintain your golf cart’s battery and electrical system.
Series Connection: In a 36 volt system, the batteries are connected in series, which means the positive terminal of one battery is connected to the negative terminal of the next battery. This series connection increases the total voltage of the system while keeping the battery capacity the same.
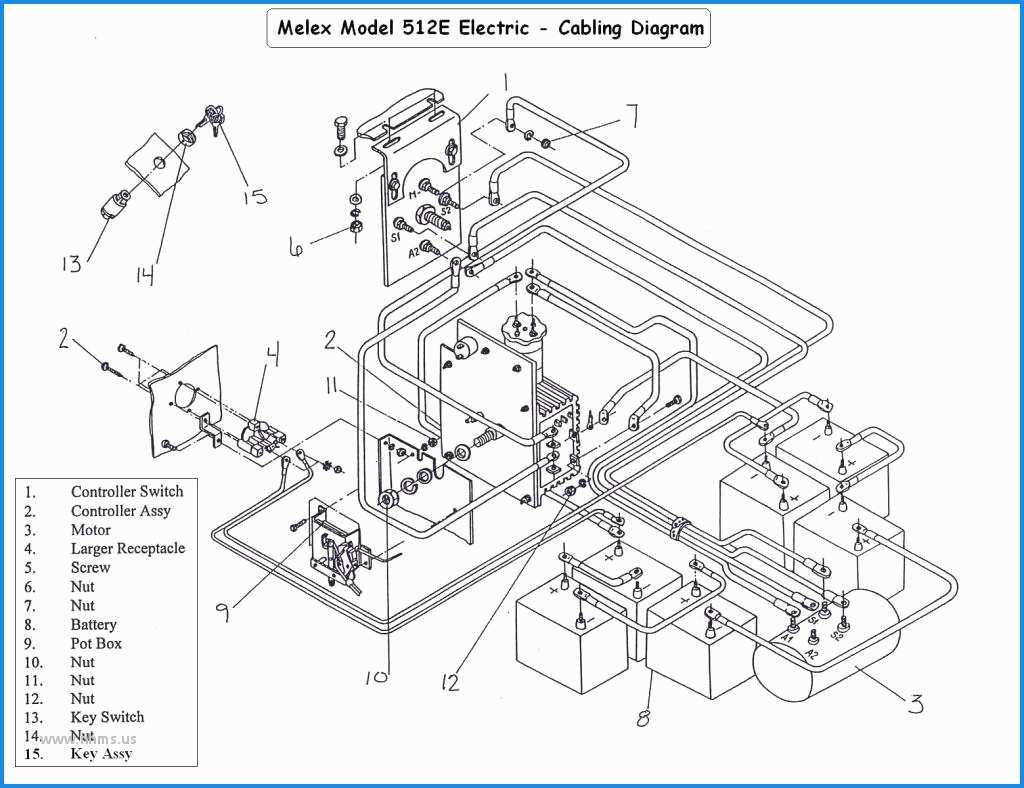
Battery Wiring Diagram: To properly connect the batteries in your Club Car golf cart, you need to follow a specific wiring diagram. The diagram shows the correct arrangement of the battery cables and terminals. It also indicates the connection points for various components, such as the solenoid and controller.
Charging: When it comes to charging a 36 volt system, it’s important to use a compatible charger. The charger needs to match the voltage and charging characteristics of the batteries. Overcharging or undercharging can lead to premature battery failure. It’s also important to maintain proper water levels in the batteries and regularly check the battery voltage to ensure they are being charged correctly.
Battery Maintenance: Regular battery maintenance is crucial for the longevity and performance of the 36 volt system. This includes tasks such as cleaning the battery terminals, inspecting and replacing damaged cables, and periodically equalizing the battery voltage to ensure all batteries are being charged evenly. It’s also important to monitor the overall health of the batteries and replace them as needed.
Troubleshooting: If you’re experiencing issues with your 36 volt system, understanding its components and wiring can help in troubleshooting. Common problems include weak or dead batteries, faulty cables or connections, and malfunctioning components like the solenoid or controller. By following the wiring diagram and conducting basic tests, you can identify and resolve these issues.
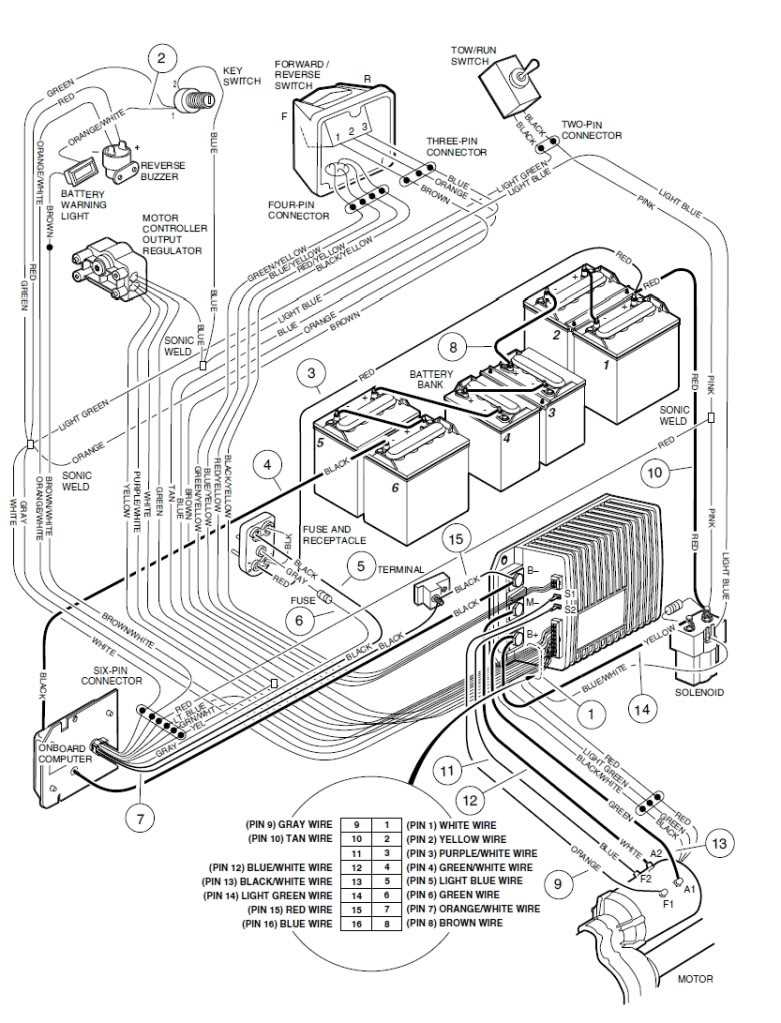
Components of a Club Car Battery Wiring Diagram 36 Volt
A Club Car battery wiring diagram 36 volt is a diagram that shows the electrical connections for a Club Car golf cart’s battery system. It is an essential tool for troubleshooting and understanding the wiring of the golf cart’s battery system. The diagram provides a visual representation of how the various components are connected and how the electrical current flows.
There are several key components that are typically included in a Club Car battery wiring diagram 36 volt. These components include the battery pack, the battery charger, and the various cables and connections that link them together. The battery pack is the heart of the golf cart’s electrical system and is responsible for providing power to the cart’s motor and accessories.
- The battery pack is made up of multiple 6-volt batteries that are connected in series to produce a total voltage of 36 volts.
- The battery charger is responsible for recharging the battery pack when it becomes depleted. It is connected to the battery pack through a charging cable and plugs into a standard electrical outlet.
- There are also various cables and connections that link the battery pack to the motor and other electrical components of the golf cart. These cables and connections are typically color-coded to help with identification and troubleshooting.
Understanding the components of a Club Car battery wiring diagram 36 volt is important for proper maintenance and troubleshooting of the golf cart’s electrical system. By following the diagram and properly connecting the various components, you can ensure the reliable operation of the golf cart and extend the lifespan of the battery pack.
Common Issues with Club Car Battery Wiring
When it comes to the wiring of batteries in a Club Car golf cart, there are some common issues that can arise. Understanding these issues can help you troubleshoot and fix any problems you may encounter.
Poor connections: One of the most common issues with battery wiring in a Club Car is poor connections. This could be due to loose or corroded terminals, frayed or damaged wires, or improper connections. Poor connections can lead to a loss of power or intermittent electrical issues. It’s important to regularly inspect and clean the battery terminals and connections to ensure they are tight and free from corrosion.
Incorrect wiring: Another common issue is incorrect wiring. This could involve connecting the batteries in the wrong order or connecting the positive and negative terminals incorrectly. Incorrect wiring can cause a variety of electrical problems, including a lack of power or damage to the electrical system. It’s important to refer to a wiring diagram specific to your Club Car model to ensure proper wiring.
Overloading: Overloading the electrical system is another common issue. This could involve adding too many accessories or components that draw excessive power from the batteries. Overloading the system can lead to a drained battery or even damage to the electrical components. It’s important to consult the Club Car’s manufacturer specifications and guidelines when adding or modifying electrical components.
Worn or damaged wires: Worn or damaged wires can also cause issues with battery wiring. Over time, wires can become corroded, frayed, or damaged, leading to a loss of power or intermittent electrical issues. It’s important to inspect the wiring regularly and replace any worn or damaged wires to ensure a reliable electrical connection.
By being aware of these common issues and regularly inspecting and maintaining your Club Car’s battery wiring, you can ensure a reliable and efficient electrical system for your golf cart. If you encounter any issues that you are unable to troubleshoot yourself, it is recommended to seek the assistance of a professional technician or refer to the Club Car’s official documentation for further guidance.
Conclusion
In conclusion, maintaining a Club Car battery wiring diagram 36 volt is essential for ensuring the longevity and optimal performance of your golf cart. By following these tips, you can keep your batteries in top condition and avoid costly repairs or replacements.
Regularly inspecting the wiring connections, cleaning the battery terminals, and checking the water levels are simple yet effective maintenance tasks that can prolong the life of your batteries. Additionally, following proper charging practices, such as using a compatible charger and avoiding overcharging or undercharging, can help maximize the battery’s lifespan.
Remember to refer to the Club Car battery wiring diagram 36 volt for proper wiring connections and ensure that all connections are secure and tight. If you notice any signs of damage or wear on the wiring or batteries, it is important to address them promptly to prevent further issues.
By taking proactive steps to maintain your Club Car battery wiring diagram 36 volt, you can enjoy reliable and efficient performance from your golf cart for years to come.