
Club Car is a trusted brand known for its high-quality golf carts and utility vehicles. These vehicles are powered by rechargeable batteries, and to keep them running, it’s essential to have a working charger. The charger receptacle is an integral part of the charging system, as it connects the charger to the battery pack. Understanding the wiring diagram of the charger receptacle is crucial for troubleshooting and maintaining your Club Car.
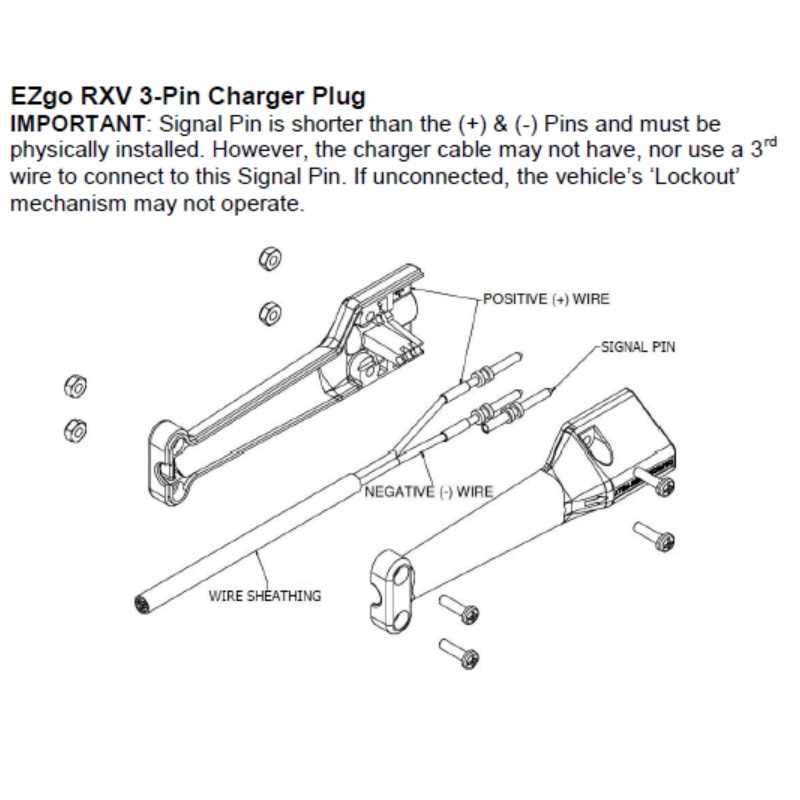
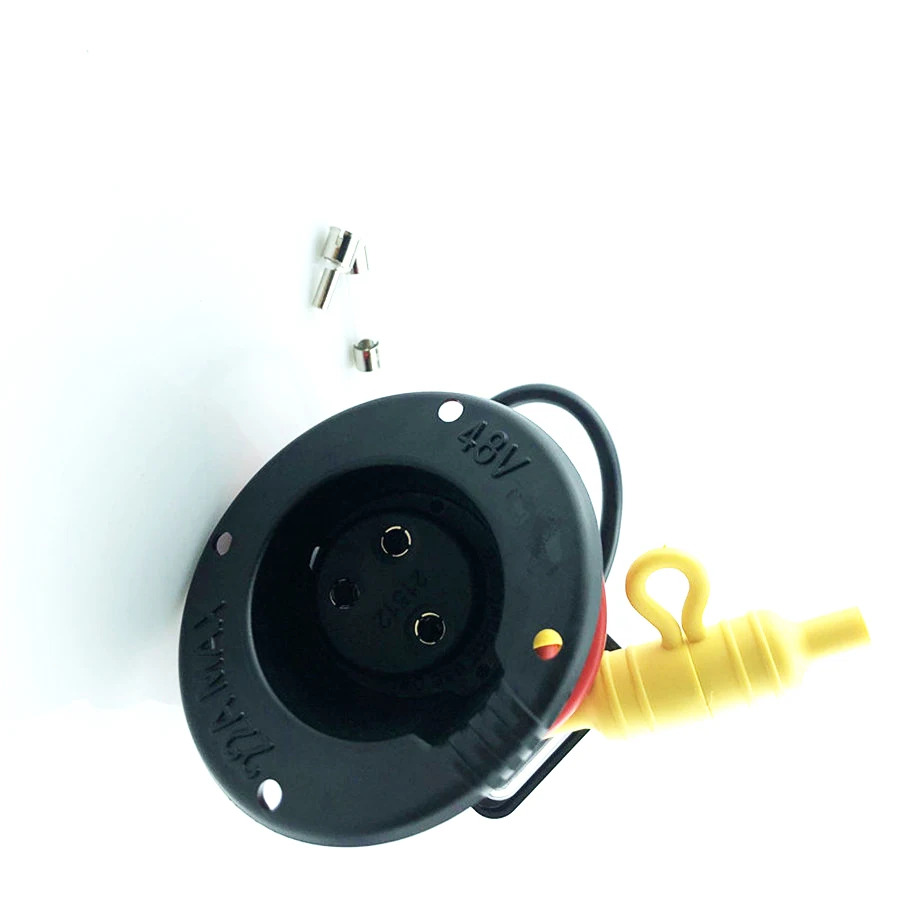
The charger receptacle in a Club Car typically has three pins, which are labeled A1, A2, and B. The A1 and A2 pins are connected to the charger, while the B pin is connected to the battery pack. The charger receptacle acts as a bridge between the charger and the battery pack, allowing the flow of electricity during the charging process. It is important to ensure that the wiring connections are correct to avoid any damage to the vehicle’s electrical system.
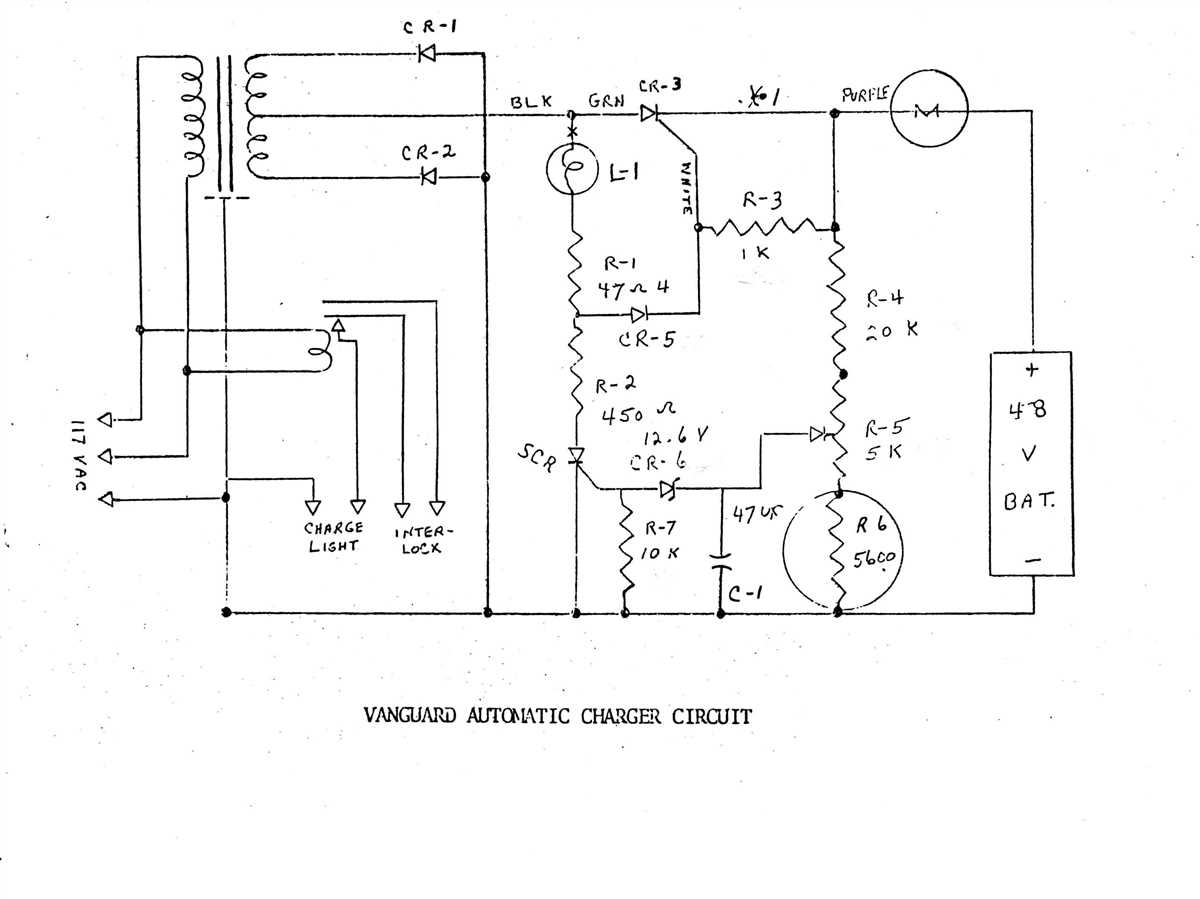
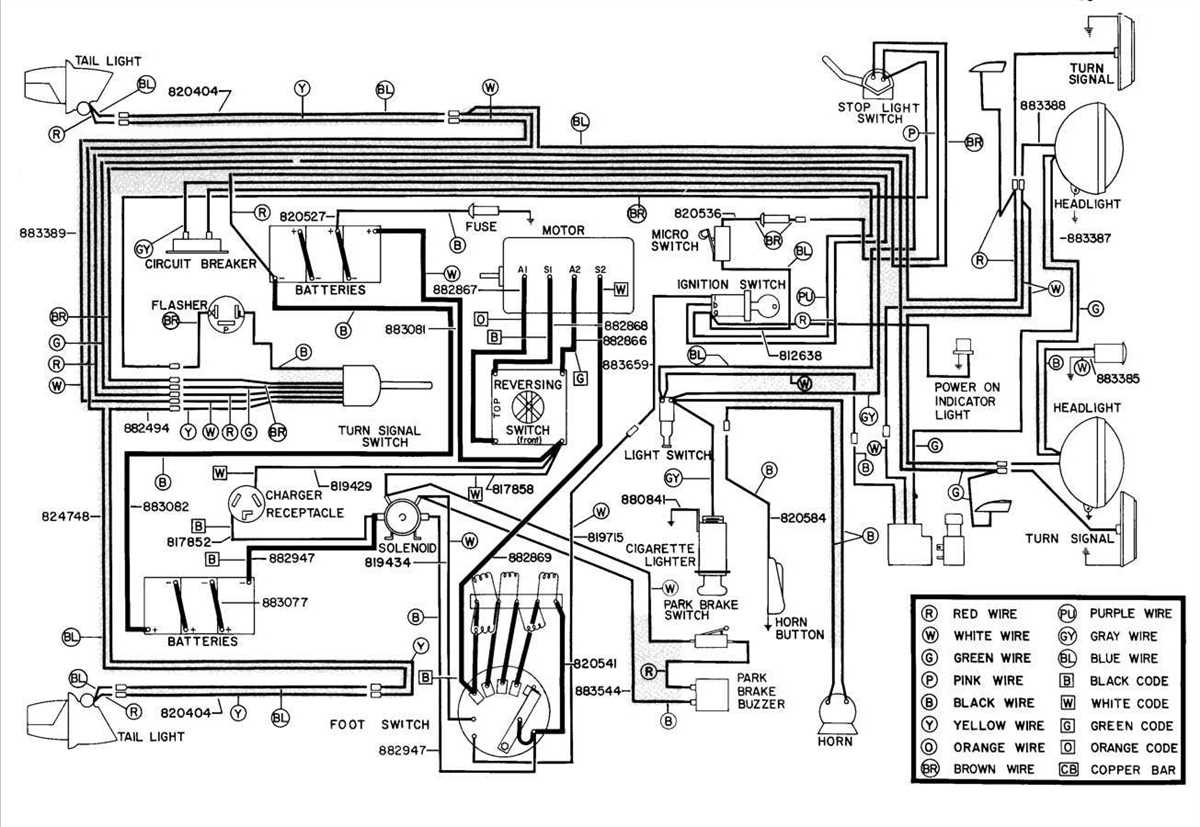
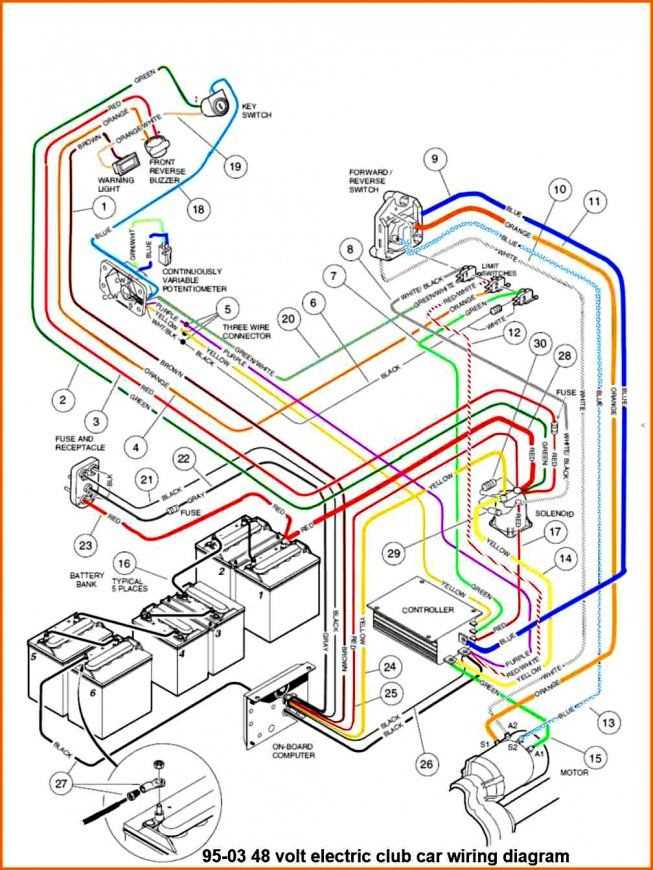
The wiring diagram for a Club Car charger receptacle shows the various connections and components involved in the charging system. It includes details about the charger plug, charger cord, and the charger receptacle itself. The diagram typically features labeled wires, indicating their purpose and proper connection points. Additionally, the diagram may include information about fuses, diodes, or other protective devices that are integral to the charging system’s safety and functionality.
In this step-by-step guide, we will walk you through the process of wiring a Club Car charger receptacle. The charger receptacle is an essential component for charging your Club Car golf cart, and it is important to ensure it is wired correctly for safe and efficient charging.
1. Gather Materials: Before you begin wiring the charger receptacle, gather all the necessary materials. You will need a Club Car charger receptacle, a wiring diagram specific to your Club Car model, wire cutters/strippers, electrical tape, and a 12-volt battery charger.
2. Disconnect Power: Before starting any electrical work, it is crucial to disconnect the power source. In this case, disconnect the battery cables from the battery to prevent any accidents or electrical shocks.
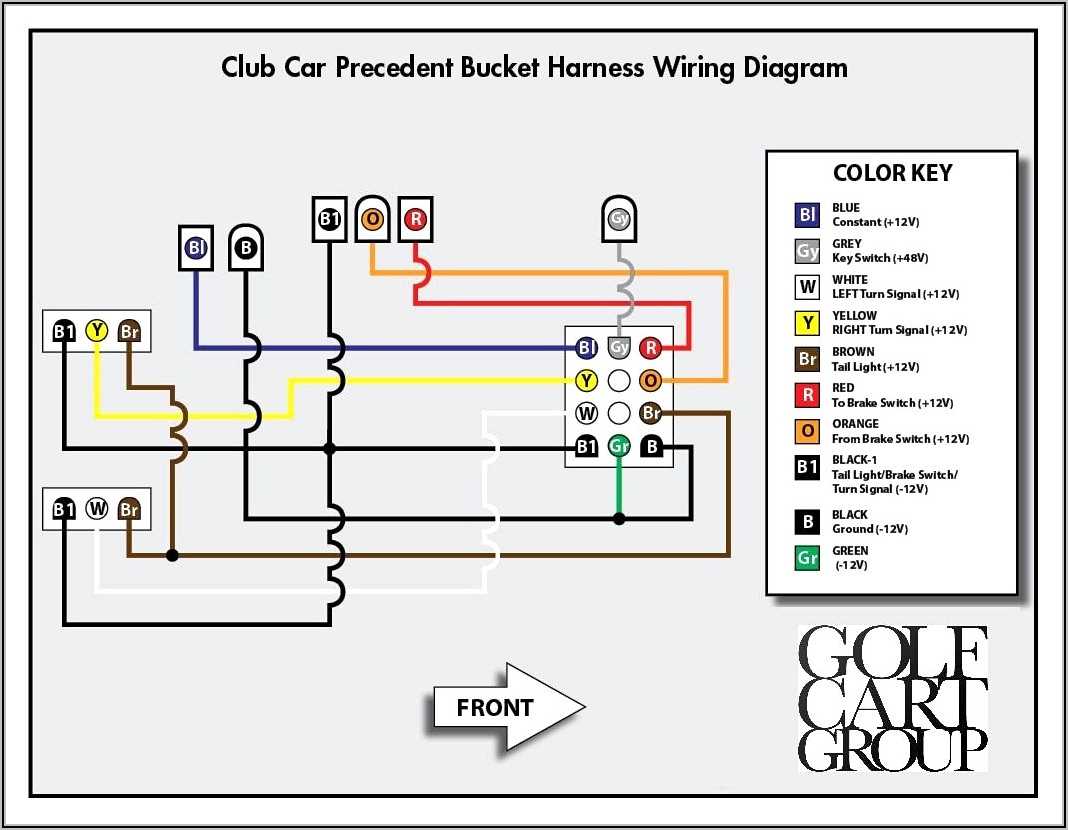
3. Study the Wiring Diagram: Refer to the wiring diagram specific to your Club Car model to understand the color coding and connection points for the charger receptacle. This diagram will guide you in correctly connecting the wires.
4. Run Wires: Using the wire cutters/strippers, cut and strip the wires according to the lengths specified in the wiring diagram. Run the wires from the charger receptacle to the designated connection points on the Club Car.
5. Connect Wires: Begin connecting the wires to their corresponding connection points. Ensure that each wire is securely fastened and make use of electrical tape to insulate the connections and prevent any short circuits.
6. Reconnect Power: Once all the wires are correctly connected, it is time to reconnect the battery cables to the battery. Double-check all the connections and ensure everything is secure.
7. Test the Charger Receptacle: With the power restored, plug in the 12-volt battery charger into the receptacle and check if it is functioning properly. The charger should begin charging the battery, indicating that the wiring was done correctly.
By following this step-by-step guide, you can wire a Club Car charger receptacle with ease and confidence. Remember to always refer to the specific wiring diagram for your Club Car model and prioritize safety by disconnecting the power before starting any electrical work.
Understand the Basics of Club Car Charger Receptacles
When it comes to charging your Club Car electric vehicle, having a reliable and properly functioning charger receptacle is essential. The charger receptacle is where you connect your charger to supply power to your vehicle’s batteries. Understanding the basics of Club Car charger receptacles is important for ensuring efficient charging and maintaining the overall health of your electric vehicle.
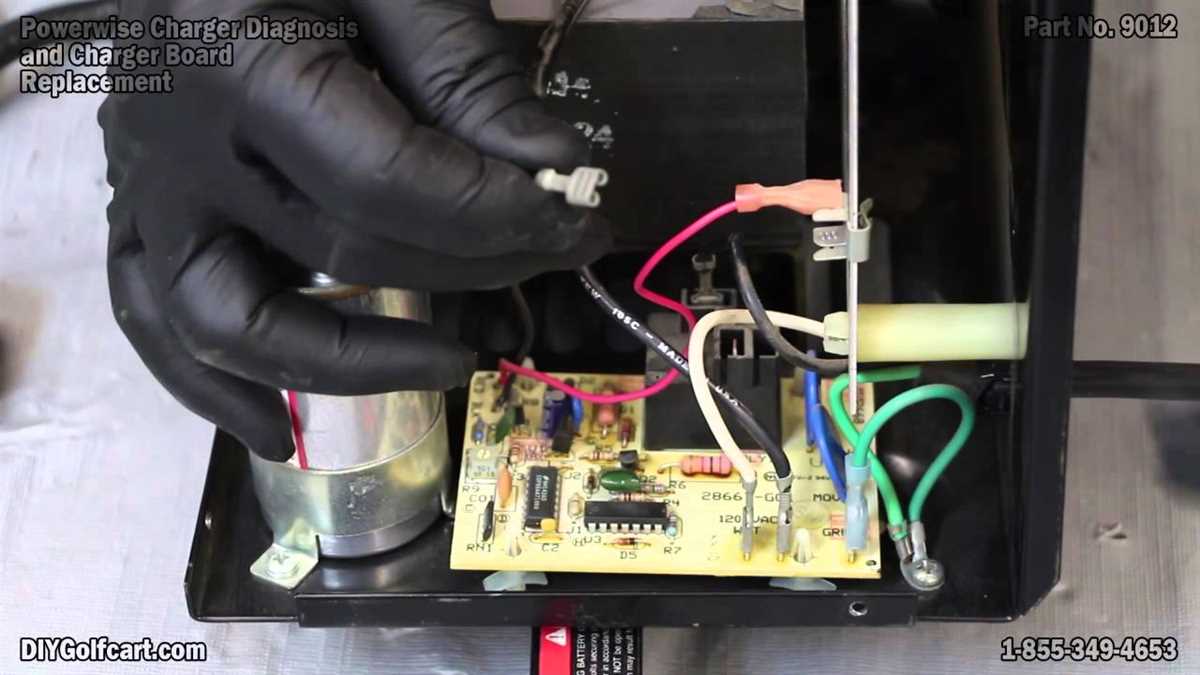
The Club Car charger receptacle typically consists of three main components: the receptacle itself, the wiring harness, and the control board. The receptacle is the physical component that you connect your charger to, while the wiring harness serves as the connection between the receptacle and the control board. The control board is responsible for regulating the charging process and protecting the batteries from overcharging or other potential issues.
It’s crucial to ensure that the wiring harness is properly connected and in good condition. Any loose or damaged wiring can lead to inefficient charging or even damage to your vehicle’s electrical system. Regularly inspecting the wiring harness for any signs of wear or damage and addressing any issues promptly is important for maintaining the reliability of your charger receptacle.
Additionally, understanding the different types of charger receptacles available for Club Car electric vehicles is important. Club Car offers both DS-style and Precedent-style charger receptacles, each with its own specific wiring configuration. It’s essential to ensure that you have the correct charger receptacle for your particular Club Car model to ensure compatibility and proper charging.
In conclusion, understanding the basics of Club Car charger receptacles is essential for efficient and reliable charging of your electric vehicle. Regularly inspecting and maintaining the wiring harness, using the correct charger receptacle for your Club Car model, and ensuring proper connections are all important steps in ensuring a smooth charging process and maximizing the lifespan of your vehicle’s batteries.
Gather the Required Tools and Materials
Before you begin wiring the charger receptacle for your club car, it is important to gather all the necessary tools and materials. This will ensure that you have everything you need for a successful installation. Here are some of the items you will need:
- Club Car Charger Receptacle: Make sure you have the correct type of receptacle for your club car. This will depend on the model and year of the car.
- Wire Cutters: A good pair of wire cutters will be essential for removing any existing wiring and cutting new wires to the proper length.
- Wire Strippers: Wire strippers are necessary for removing insulation from the ends of the wires, allowing for proper connection to the receptacle.
- Crimping Tool: A crimping tool will be needed for securely connecting the wires to the receptacle.
- Electrical Tape: Electrical tape will help protect the connections and prevent any short circuits.
- Wire Connectors: Wire connectors are used to join wires together and provide a secure and reliable connection.
- Mounting Hardware: Depending on the specific installation, you may need mounting hardware to secure the receptacle in place.
- User Manual or Wiring Diagram: It is always helpful to have the user manual or wiring diagram for your club car on hand, as it will provide guidance and specific instructions.
Once you have gathered all the necessary tools and materials, you will be ready to proceed with wiring the charger receptacle for your club car. Remember to always follow safety precautions and consult the user manual or wiring diagram for your specific model to ensure proper installation.
Disconnect the Battery and Charger
When working on a club car charger receptacle wiring diagram, it is important to prioritize safety. One of the first steps is to disconnect the battery and charger from the electrical system. This ensures that there is no power flowing through the system, reducing the risk of electrical shock or damage to the components.
To disconnect the battery, locate the battery compartment on the club car. Depending on the model, the battery compartment may be located under the seat or in the front or back of the vehicle. Use a wrench or socket to loosen and remove the bolts or screws that secure the battery cables to the terminals. Start by removing the negative (black) cable first, followed by the positive (red) cable. Carefully lift the battery out of the compartment and set it aside in a safe location away from any flammable materials.
Next, locate the charger and unplug it from the electrical outlet. This will ensure that no power is being supplied to the charger or the vehicle’s electrical system. Inspect the charger and the power cord for any signs of damage, such as frayed wires or exposed insulation. If any damage is found, do not proceed with the wiring diagram until the charger and power cord have been repaired or replaced.
By disconnecting the battery and charger, you can safely work on the club car charger receptacle wiring diagram without the risk of electrical shock or damage to the components. Always follow proper safety precautions and consult the manufacturer’s instructions for your specific vehicle model.
Remove the Existing Receptacle
To begin the process of installing a new charger receptacle for your Club Car, you will first need to remove the existing receptacle. This step is necessary to ensure that the new receptacle can be properly installed and connected to the charging system.
Here is a step-by-step guide on how to remove the existing receptacle:
- First, make sure that your Club Car is turned off and the key is removed from the ignition.
- Next, locate the existing charger receptacle on your Club Car. It is usually located on the front or side of the vehicle and is connected to the charging system.
- Using a wrench or socket set, carefully loosen and remove the nuts or screws that are securing the receptacle to the vehicle. Be sure to keep track of these fasteners, as you will need them later.
- Once the fasteners are removed, gently pull the receptacle away from the vehicle. You may need to wiggle it slightly to loosen it from any remaining connections.
- Inspect the wiring and connections on the back of the receptacle. Look for any signs of damage or wear that may indicate the need for replacement.
- If necessary, disconnect the wiring from the back of the receptacle. This may involve unscrewing terminals or gently pulling apart connectors, depending on the specific wiring setup.
- With the wiring disconnected, the old receptacle can be fully removed from the vehicle. Set it aside and prepare for the installation of the new receptacle.
By following these steps, you can safely and effectively remove the existing charger receptacle from your Club Car. This will allow you to proceed with the installation of a new receptacle, ensuring that your vehicle’s charging system is functional and reliable.
Create a Plan
Before installing the new receptacle for your club car charger, it is important to create a plan. Start by locating the ideal position for the receptacle. Consider factors such as accessibility, distance from the charger, and safety. Once you have determined the best location, mark it with a pencil or tape.
Gather Materials
Next, gather all the materials you will need for the installation. This may include a new receptacle, electrical wires, wire connectors, a screwdriver, and electrical tape. Make sure you have everything on hand before starting the installation process.
Turn Off Power Source
Before you begin the installation, it is crucial to turn off the power source. Locate the circuit breaker that controls the area where you will be working and switch it off. This will ensure your safety and prevent any electrical accidents or shocks.
Disconnect Old Receptacle
Now, you can start disconnecting the old receptacle. Remove the cover plate and unscrew the screws holding the receptacle to the outlet box. Carefully detach the wires from the old receptacle, making note of their positions. Use wire connectors to secure the loose wires and prevent any accidental contact.
Install New Receptacle
Take the new receptacle and align it with the marked position on the wall or outlet box. Insert the screws and tighten them to secure the receptacle in place. Next, connect the wires to the appropriate terminals on the receptacle. Refer to the wiring diagram provided with the receptacle for guidance. Once all the wires are securely connected, cover the receptacle with the plate and screw it in place.
Test and Finalize
After installing the new receptacle, it is important to test its functionality. Turn on the power source and plug in your club car charger. Check if the charger is receiving power and charging the vehicle’s batteries. If everything is working correctly, finalize the installation by cleaning up any debris and organizing the surrounding area.
Test the Wiring and Reconnect the Battery and Charger
Once you have completed the wiring of the club car charger receptacle according to the diagram, it is essential to test the connections before reconnecting the battery and charger. This will ensure that everything is properly installed and functioning correctly.
To test the wiring, you can use a multimeter set to measure continuity. First, disconnect the battery and charger from the receptacle. Then, take the multimeter and touch one probe to the positive wire and the other probe to the negative wire of the receptacle. If the multimeter beeps or shows a reading of close to zero, it means that the wiring is correctly connected.
If you do not get a reading or the multimeter does not beep, double-check the connections to make sure that they are securely tightened and properly connected. Check for any loose or frayed wires and fix them if necessary. Also, ensure that the wires are connected to the correct terminals as shown in the wiring diagram.
Once you have tested the wiring and ensured that everything is properly connected, you can reconnect the battery and charger to the club car charger receptacle. Make sure to connect the positive terminal of the battery to the positive wire and the negative terminal to the negative wire of the receptacle. Ensure that all connections are tight and secure.
Now, you can plug in the charger to the receptacle and turn it on. The charger should start charging the battery, and you should see the appropriate charging indicators or lights on the charger. If the charger does not start or the indicators do not light up, double-check the connections and consult the manufacturer’s manual for troubleshooting steps.
Overall, by following the wiring diagram and testing the connections, you can ensure that your club car charger receptacle is installed correctly and ready to charge your battery efficiently. Taking the time to properly wire and test the receptacle will save you from potential electrical issues and ensure the optimal performance of your club car’s charging system.
Q&A:
How can I test the wiring?
To test the wiring, you can use a multimeter to check for continuity or voltage in different parts of the circuit. Make sure to disconnect the battery and charger before testing.
What should I do if I find any faulty wiring?
If you find any faulty wiring, you should repair or replace it immediately. Faulty wiring can cause damage to the battery or charger and can be a safety hazard.
How do I reconnect the battery and charger?
To reconnect the battery and charger, you should first make sure that the wiring is properly connected. Then, connect the positive terminal of the battery to the positive terminal of the charger, and the negative terminal of the battery to the negative terminal of the charger.
What should I do if the battery or charger is not working after reconnecting?
If the battery or charger is not working after reconnecting, you should double-check the wiring connections. Make sure that the positive and negative terminals are properly connected, and that there are no loose or damaged wires.
Can I use a different charger for my battery?
It is recommended to use the charger that is specifically designed for your battery. Using a different charger may not provide the correct voltage or current, which can damage the battery or cause it to not charge properly.
How do I test the wiring?
To test the wiring, you can use a multimeter to check for continuity. Start by disconnecting the battery and charger from the circuit. Then, set your multimeter to the continuity setting and touch the probes to each end of the wire you want to test. If the multimeter beeps or shows a reading close to zero, it means the wire is continuous and there are no breaks or poor connections. If there is no beep or the reading is far from zero, it indicates a problem with the wiring.
How do I reconnect the battery and charger?
To reconnect the battery and charger, start by identifying the positive (+) and negative (-) terminals on both the battery and charger. Match the positive terminal of the battery with the positive terminal of the charger, and the negative terminal of the battery with the negative terminal of the charger. Make sure the connections are secure and tight to ensure proper charging. If there are any additional connectors or wiring involved, follow the manufacturer’s instructions for proper reconnection.