
If you are a proud owner of the Daisy Powerline 880 air rifle, then you probably know how important it is to understand its assembly process. Having an assembly diagram can be incredibly helpful in ensuring that you put your rifle together correctly and maintain its optimal performance. In this article, we will provide you with a detailed assembly diagram for the Daisy Powerline 880, so you can confidently take it apart and put it back together whenever needed.
The Daisy Powerline 880 is a popular choice among air gun enthusiasts due to its versatility and reliability. This rifle offers both BB and pellet ammunition options, making it suitable for various shooting preferences. However, it’s crucial to properly assemble your rifle to ensure its proper functioning and safety.
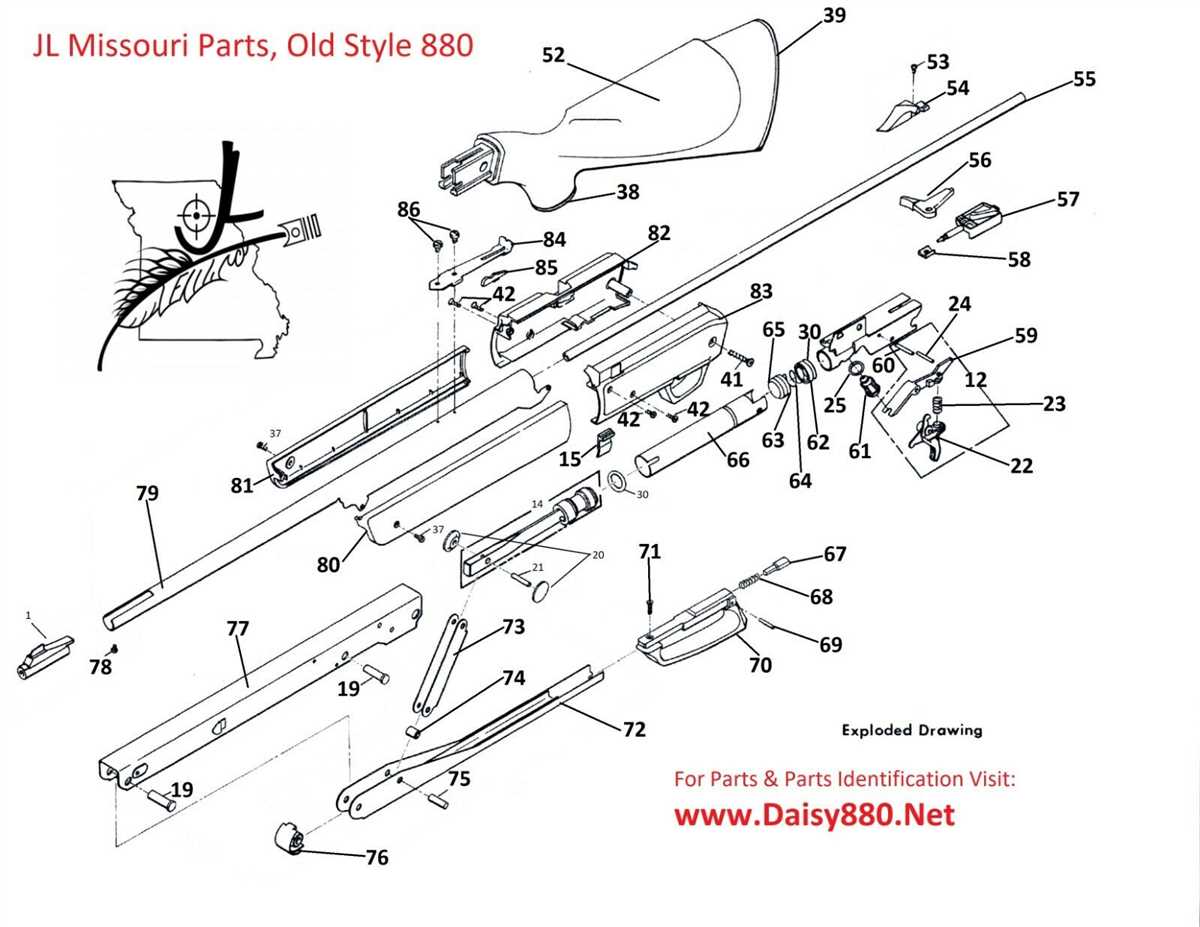
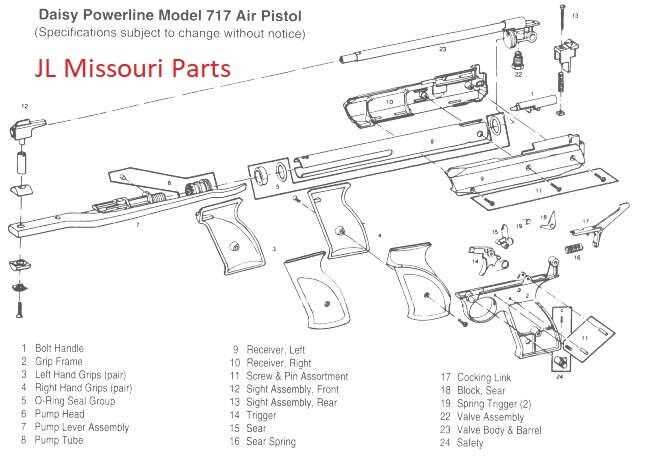
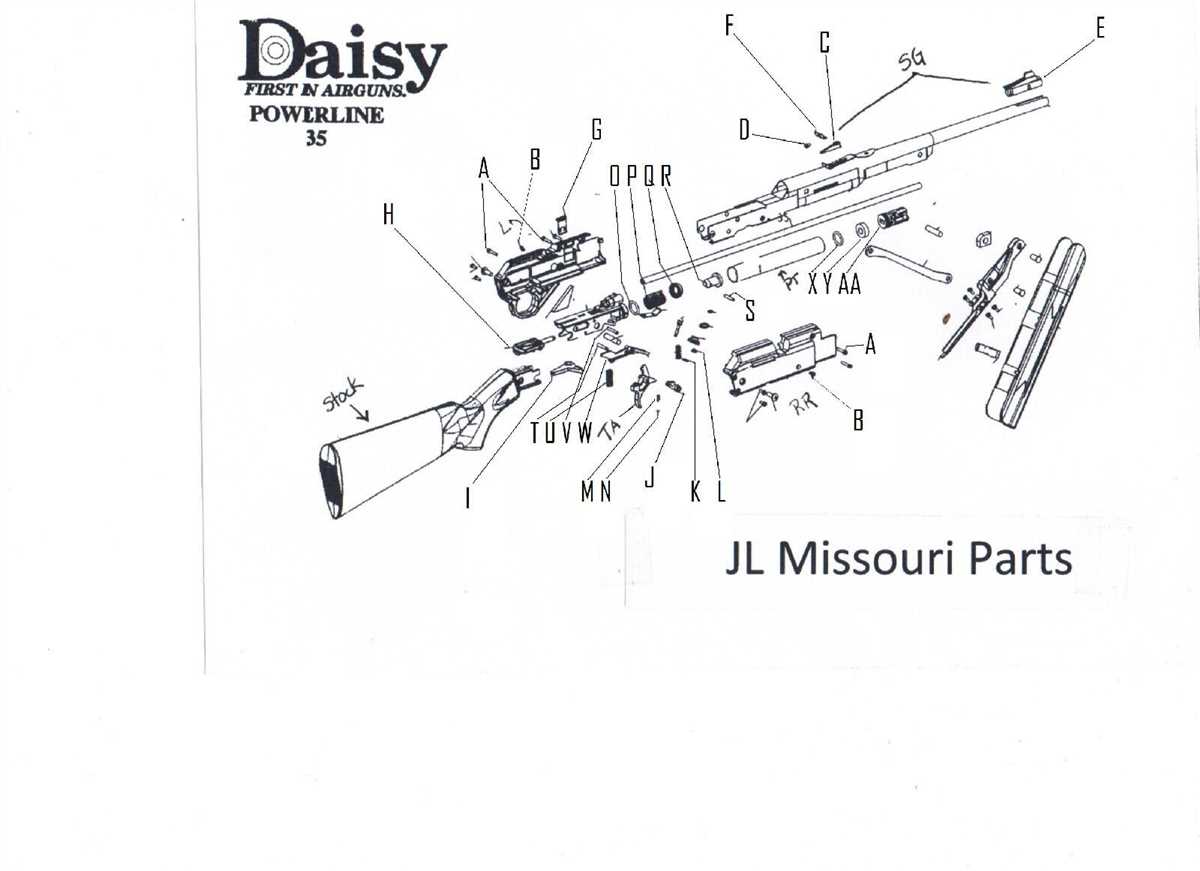
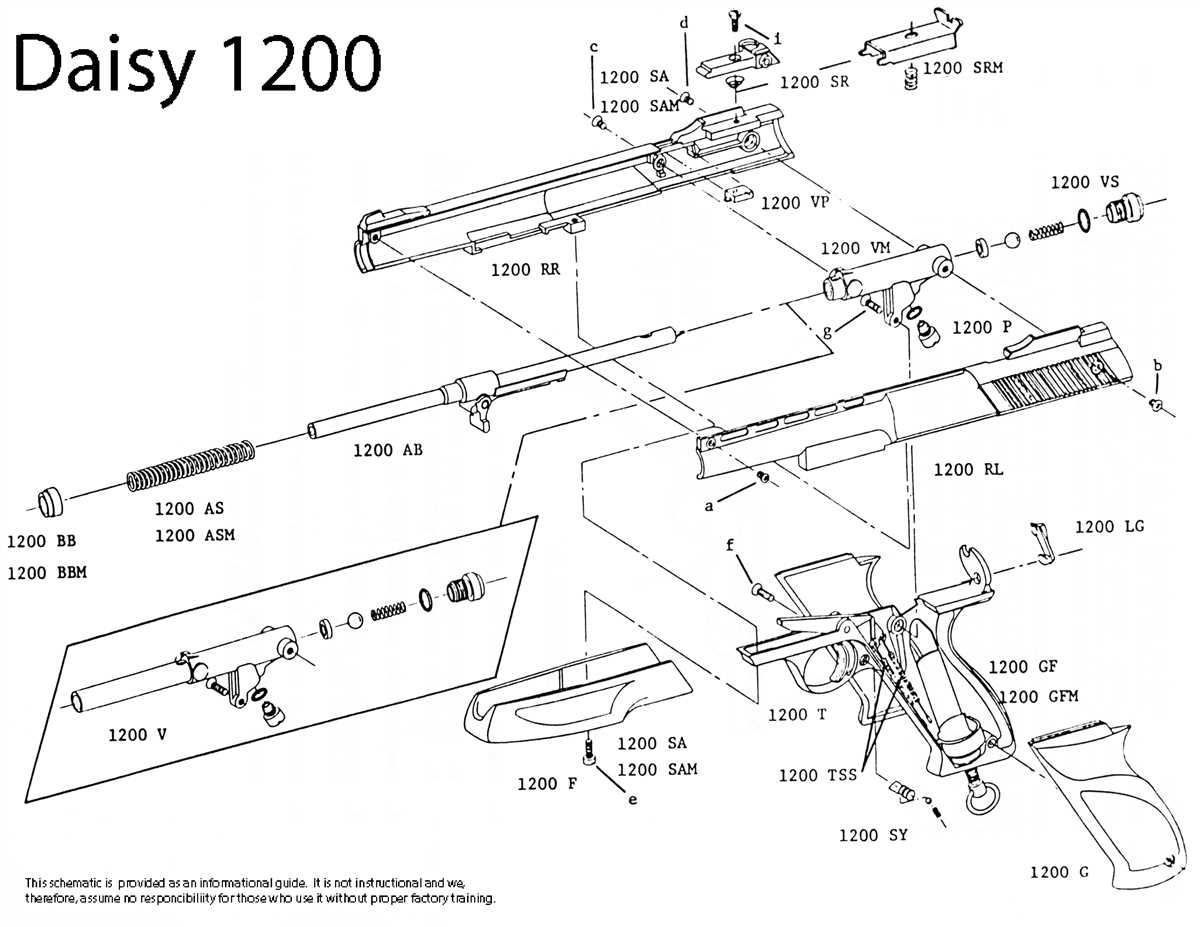
The assembly diagram for the Daisy Powerline 880 includes detailed illustrations of the different components and their correct placement. From the stock to the barrel, trigger assembly to the pump arm, each part is clearly labeled and depicted in the diagram. This diagram will help you understand the interconnection between the various components and guide you through the assembly process step by step.
By following the assembly diagram, you can avoid common mistakes or misplacements, which could affect your rifle’s performance. It’s essential to disassemble and assemble your Daisy Powerline 880 with care and precision to ensure its longevity and accuracy. With the help of the assembly diagram, you can confidently maintain and repair your air rifle whenever necessary.
Daisy Powerline 880 Assembly Diagram: A Step-by-Step Guide
The Daisy Powerline 880 is a popular air rifle that is known for its accuracy and power. If you recently purchased this rifle or need to disassemble and reassemble it for maintenance purposes, it is important to have a clear understanding of its assembly diagram. Here is a step-by-step guide to help you with the Daisy Powerline 880 assembly:
Step 1: Prepare Your Workspace
Before you start assembling the Daisy Powerline 880, make sure you have a clean and well-lit workspace. Lay out all the components of the rifle, including the stock, barrel, receiver, and trigger assembly, in an organized manner for easy access.
Step 2: Attach the Barrel
Begin by placing the barrel into the stock and aligning the holes on the barrel with the corresponding holes on the stock. Once aligned, insert the screws provided into the holes and tighten them using a screwdriver or Allen wrench. Ensure that the barrel is securely attached to the stock before moving on to the next step.
Step 3: Install the Receiver and Trigger Assembly
Next, carefully slide the receiver into the stock, making sure it fits securely. Attach the trigger assembly to the receiver by aligning the holes and inserting the screws. Use a screwdriver or Allen wrench to tighten the screws, ensuring that the trigger assembly is firmly attached to the receiver.
Step 4: Attach the Pump Handle
Now, it’s time to attach the pump handle to the receiver. Line up the holes on the pump handle with the corresponding holes on the receiver and insert the screws provided. Tighten the screws using a screwdriver or Allen wrench to secure the pump handle in place.
Step 5: Complete the Assembly
Once the barrel, receiver, trigger assembly, and pump handle are securely attached, inspect the rifle to ensure that all components are aligned and fastened properly. Give each screw a final check to make sure they are tightened securely. Your Daisy Powerline 880 is now fully assembled and ready to use.
Following this step-by-step guide will help you properly assemble your Daisy Powerline 880 air rifle. It is important to carefully follow the assembly diagram and ensure that all components are securely attached for optimal performance and safety.
Daisy Powerline 880: An Overview
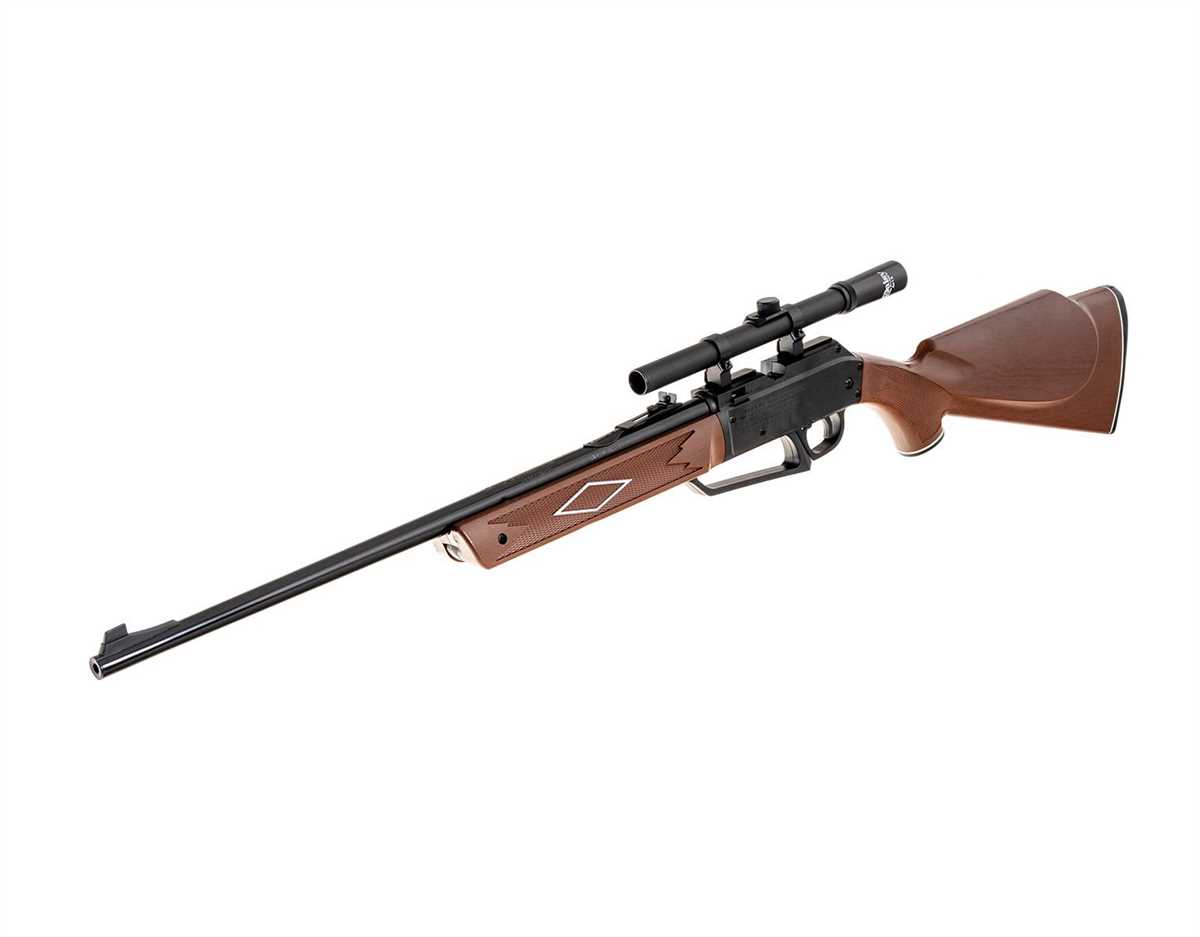
The Daisy Powerline 880 is a popular air rifle designed for target shooting and small game hunting. With its classic design and reliable performance, the Powerline 880 has become a favorite among airgun enthusiasts.
The Powerline 880 features a durable, synthetic stock and forearm that provide a comfortable grip and excellent control. Its lightweight design makes it easy to carry and maneuver in the field. The rifle is equipped with a rifled steel barrel, which enhances accuracy and delivers consistent power with each shot.
The Daisy Powerline 880 operates using a pneumatic multi-pump system, allowing shooters to adjust the velocity and power of their shots. By pumping the rifle multiple times, users can increase the energy and velocity of the pellet, providing versatility for different shooting applications and distances.
This air rifle is capable of firing both pellets and BBs, providing shooters with options depending on their shooting goals. The Powerline 880 has a maximum velocity of 800 feet per second (fps) with pellets and 750 fps with BBs. The rifle also features a crossbolt safety mechanism, ensuring safe handling during use.
Features of the Daisy Powerline 880:
- Durable synthetic stock and forearm for a comfortable grip.
- Rifled steel barrel for enhanced accuracy.
- Pneumatic multi-pump system for adjustable velocity and power.
- Capable of shooting both pellets and BBs.
- Maximum velocity of 800 fps with pellets and 750 fps with BBs.
- Crossbolt safety mechanism for safe handling.
Whether you’re a beginner or an experienced shooter, the Daisy Powerline 880 offers a reliable and versatile option for target practice and small game hunting. Its quality construction and adjustable features make it a popular choice among airgun enthusiasts. With proper care and maintenance, the Powerline 880 can provide years of enjoyable shooting experiences.
Tools and Equipment Needed for Assembly
When assembling the Daisy Powerline 880 airgun, it is important to have the right tools and equipment on hand to ensure a smooth and efficient assembly process. Here is a list of the essential tools and equipment that you will need:
- Phillips head screwdriver: This screwdriver is used for removing and tightening screws, which is essential for assembling the different parts of the airgun.
- Flat head screwdriver: A flat head screwdriver is also necessary for certain screws that may require a different type of head.
- Allen wrench set: The Allen wrench set includes different sizes of Allen wrenches, which are commonly used for tightening small screws and bolts.
- Needle-nose pliers: Needle-nose pliers are useful for holding small parts in place during assembly and can also be used for removing and adding certain components.
- Hammer: A small hammer may be required for tapping certain components into place or for adjusting certain parts that require a bit of force.
- Lubricating oil: Lubricating oil is necessary for ensuring smooth operation and reducing friction between moving parts. It should be applied according to the manufacturer’s instructions.
- Rubber mallet: A rubber mallet may be required for gently tapping certain parts into place without damaging them.
Having these tools and equipment readily available will make the assembly process much easier and more efficient. It is also important to carefully read and follow the assembly instructions provided by the manufacturer to ensure proper assembly and safe operation of the Daisy Powerline 880 airgun.
Step 1: Stock Assembly
Before starting the assembly process, ensure that you have all the necessary parts and tools. The stock assembly of the Daisy Powerline 880 consists of several components, including the stock, the butt plate, the stock screws, and the stock spacers.
To begin, take the stock and align it with the receiver. Make sure that the stock lines up properly with the receiver and that there are no gaps or misalignments. Once you have confirmed the proper alignment, insert the stock screws into the designated holes on the stock. Use a screwdriver or a wrench to tighten the screws, but be careful not to overtighten them, as it may cause damage to the stock.
Next, attach the butt plate to the stock. The butt plate is typically made of rubber or a similar material and provides a comfortable grip and recoil absorption when firing the air rifle. Align the butt plate with the rear end of the stock and insert the screws into the holes. Use a screwdriver or a wrench to tighten the screws securely.
If necessary, you may also need to add stock spacers to adjust the length of pull. Stock spacers are typically used to increase or decrease the distance between the butt plate and the trigger, allowing for a better fit and improved comfort for the shooter. To add stock spacers, remove the butt plate and insert the desired number of spacers. Reattach the butt plate, ensuring that it is securely tightened.
Once the stock assembly is complete, make sure to double-check all the screws and connections to ensure they are secure. A loose stock or butt plate can affect the accuracy and performance of the air rifle. Additionally, it is essential to follow the manufacturer’s instructions and guidelines throughout the assembly process to ensure the safe and proper functioning of the Daisy Powerline 880.
Step 2: Barrel Assembly
Once you have completed the first step of assembling your Daisy Powerline 880 air rifle, it is time to move on to the next step, which is the barrel assembly. This step is crucial in ensuring that your air rifle functions properly and is safe to use.
In this step, you will need to gather the following parts: the barrel, front sight, and barrel band. Begin by inserting the front sight into the appropriate slot on the top of the barrel. Make sure it is securely in place before proceeding.
Step 3: Pump Assembly
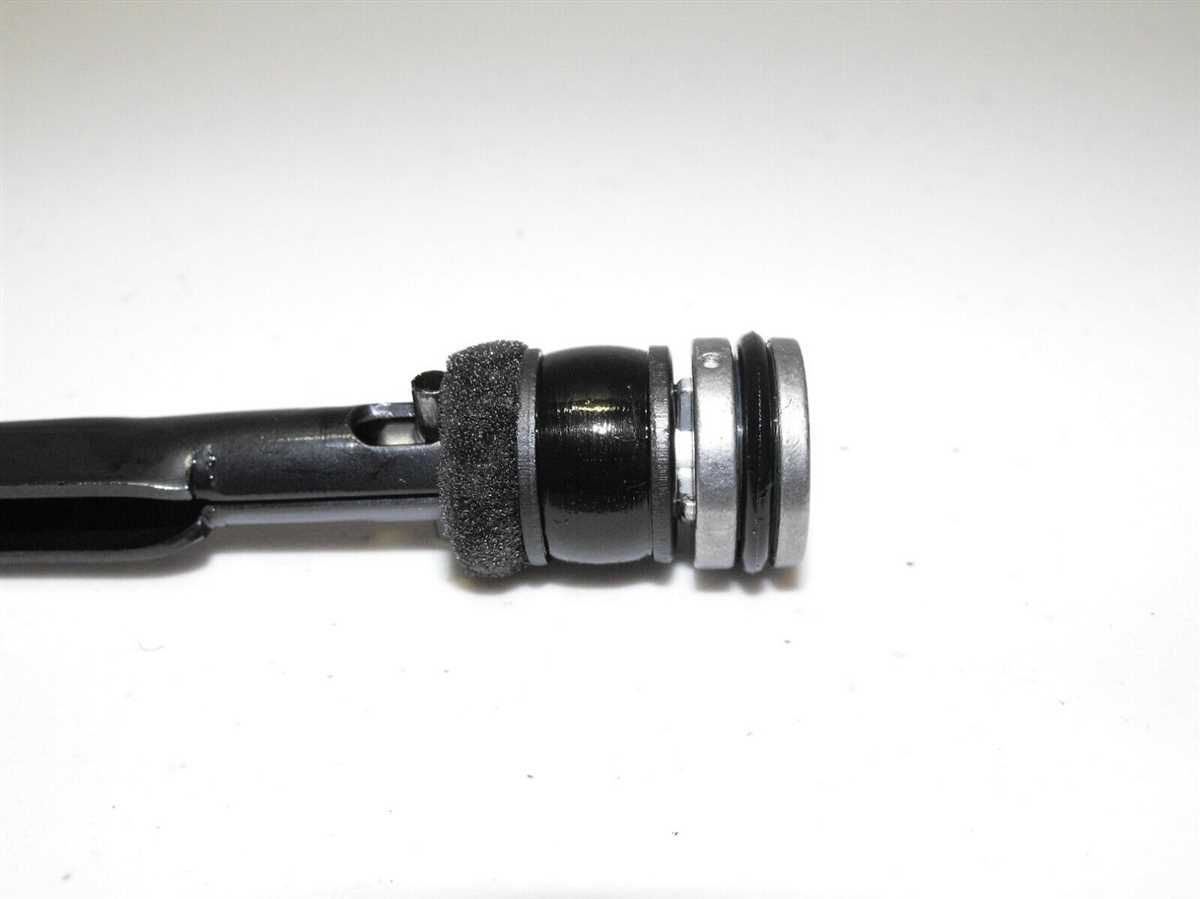
The pump assembly is a crucial part of the Daisy Powerline 880 air rifle, as it is responsible for pressurizing the air needed to propel the pellets. Follow these steps to properly assemble the pump:
- Insert the pump rod: Begin by inserting the pump rod into the compression tube located at the bottom of the rifle’s stock. Ensure that the rod is inserted securely and aligned straight.
- Attach the pump handle: Next, attach the pump handle to the end of the pump rod. This handle will provide the leverage needed to pump air into the rifle. Make sure it is firmly attached and positioned correctly.
- Pump the air rifle: To pump the air rifle, grasp the pump handle with both hands and pull it towards you, then push it back to its original position. Repeat this pumping motion several times to build up sufficient air pressure in the rifle.
- Secure the pump handle: Once you have finished pumping the air rifle, make sure to secure the pump handle in place. There may be a locking mechanism or latch that needs to be engaged to keep the handle from moving during use.
- Final checks: Before using the Daisy Powerline 880, double-check that the pump assembly is securely in place and functioning correctly. Ensure all connections are tight and that there are no visible signs of damage or leaks.
By following these steps, you can properly assemble the pump of the Daisy Powerline 880 air rifle. This will ensure that the rifle is able to generate enough air pressure to accurately propel the pellets and provide an optimal shooting experience. Remember to always follow the manufacturer’s instructions and exercise caution when handling firearms.
Step 4: Scope and Sight Installation
The final step in assembling your Daisy Powerline 880 is to install the scope and sights. This step is important for achieving accuracy and precision in your shooting.
Here are the steps to follow:
- Start by placing the scope onto the scope mount located on top of the air rifle.
- Tighten the scope mounting screws using a screwdriver or allen wrench, ensuring that the scope is securely attached.
- Next, align the sights by looking down the barrel and adjusting them until they are centered and aligned with your target.
- Make sure that the windage and elevation adjustment knobs on the sights are properly adjusted to match your shooting preference.
- Once you are satisfied with the alignment and adjustments, tighten any screws or knobs to keep the sights in place.
By following these steps, you will have successfully installed the scope and sights on your Daisy Powerline 880 air rifle. This will enhance your shooting experience by providing you with better accuracy and aim.
Remember to always follow proper safety guidelines and practice responsible shooting when using your air rifle. Happy shooting!