
The Dayton 2 Speed Fan Switch is a device that allows you to control the speed of your fan to achieve the desired level of comfort in your living or working space. This switch is commonly used in industrial and commercial settings where ventilation is crucial for maintaining a comfortable and safe environment. Whether you need to cool down a large warehouse or circulate air in a small office, the Dayton 2 Speed Fan Switch can help you achieve optimal airflow.
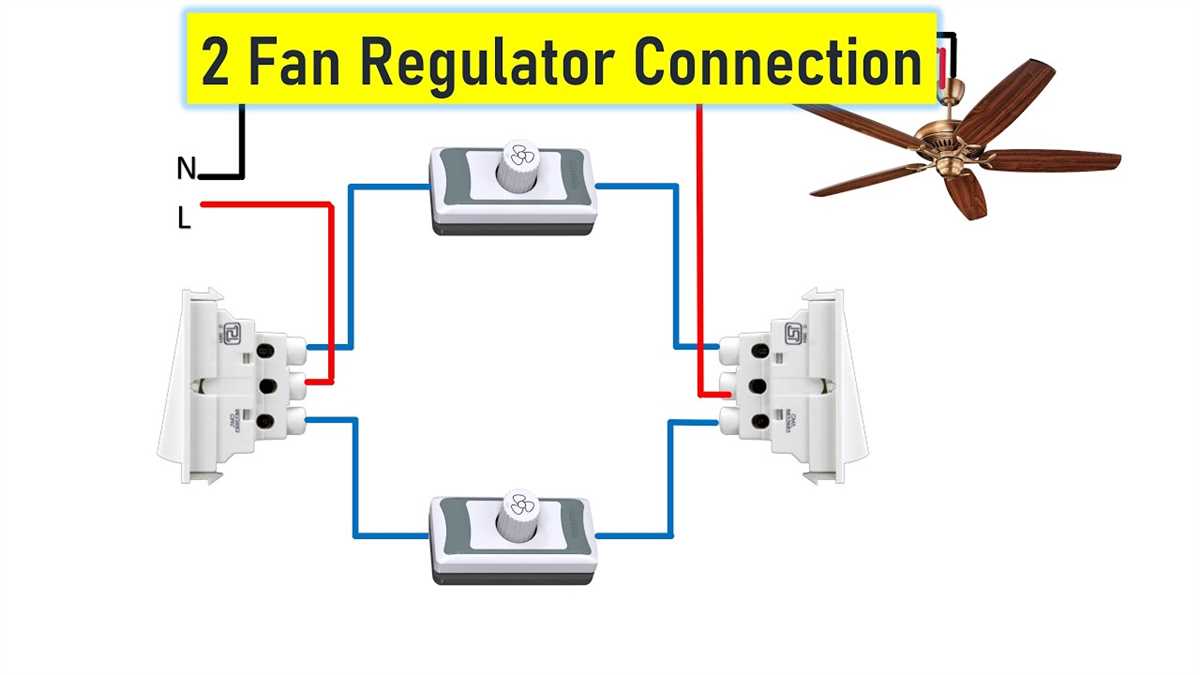
When it comes to wiring the Dayton 2 Speed Fan Switch, it’s important to follow the proper instructions to ensure the switch functions correctly and safely. The switch is designed to control two different speeds – high and low. This allows you to adjust the airflow based on your specific needs. The switch features four terminals labeled L, 1, 2, and 3, which correspond to different wires that need to be connected.
To wire the Dayton 2 Speed Fan Switch, you will need to refer to the wiring diagram that comes with the switch. The diagram will show you the appropriate connections for each wire. Generally, the L terminal is connected to the power source, while the 1 and 2 terminals are connected to the two different speeds of the fan motor. The 3 terminal is typically left unused, but it’s always a good idea to consult the diagram for your specific switch model to ensure correct wiring.
Dayton 2 Speed Fan Switch Wiring
The wiring of a Dayton 2 speed fan switch is a crucial component for controlling the speed of a fan motor. This switch is typically used in multi-speed ceiling fans, allowing the user to adjust the fan’s speed according to their preference. Proper wiring is essential to ensure the switch functions correctly and safely.
When wiring a Dayton 2 speed fan switch, it is important to follow the manufacturer’s instructions and safety guidelines. The switch will typically have labeled terminals for connecting the various wires. These terminals may include common, high-speed, low-speed, and off positions.
Here is a basic wiring guide for a Dayton 2 speed fan switch:
- Identify the power supply wire and connect it to the common terminal of the switch.
- Connect the fan motor’s high-speed wire to the high-speed terminal of the switch.
- Connect the fan motor’s low-speed wire to the low-speed terminal of the switch.
- Connect the fan motor’s neutral wire to the corresponding neutral wire in the wiring setup.
- Ensure all connections are secure and properly insulated to prevent any electrical hazards.
It is important to note that the specific wiring diagram may vary depending on the manufacturer and model of the fan switch. Always refer to the provided instructions and diagrams for accurate wiring instructions.
Once the Dayton 2 speed fan switch is wired correctly, you can enjoy the convenience of controlling the fan’s speed with ease. This allows for optimal comfort and airflow in different settings, such as bedrooms, living rooms, or offices.
What is a Dayton 2 speed fan switch?
The Dayton 2 speed fan switch is an electrical component used to control the speed of a two-speed fan motor. It is commonly used in HVAC systems, industrial fans, and other applications where variable fan speeds are required. The switch allows the user to select between two different speed settings, providing flexibility and control over the airflow.
Designed for easy installation, the Dayton 2 speed fan switch features a compact and durable construction. It is typically mounted on the front panel of the fan or in an accessible location for easy access. The switch is equipped with clear and concise wiring diagrams, making it straightforward to connect the switch to the motor and power source.
When the switch is set to the low speed setting, it reduces the voltage supplied to the fan motor, causing it to run at a slower speed. This is ideal for situations where quieter operation and reduced airflow are desired. On the high speed setting, the switch provides full voltage to the motor, enabling it to run at maximum speed, generating more airflow.
Overall, the Dayton 2 speed fan switch offers an effective and efficient solution for controlling the speed of a two-speed fan motor. Its user-friendly design and reliable performance make it a popular choice among HVAC professionals and DIY enthusiasts alike.
How does a Dayton 2 speed fan switch work?
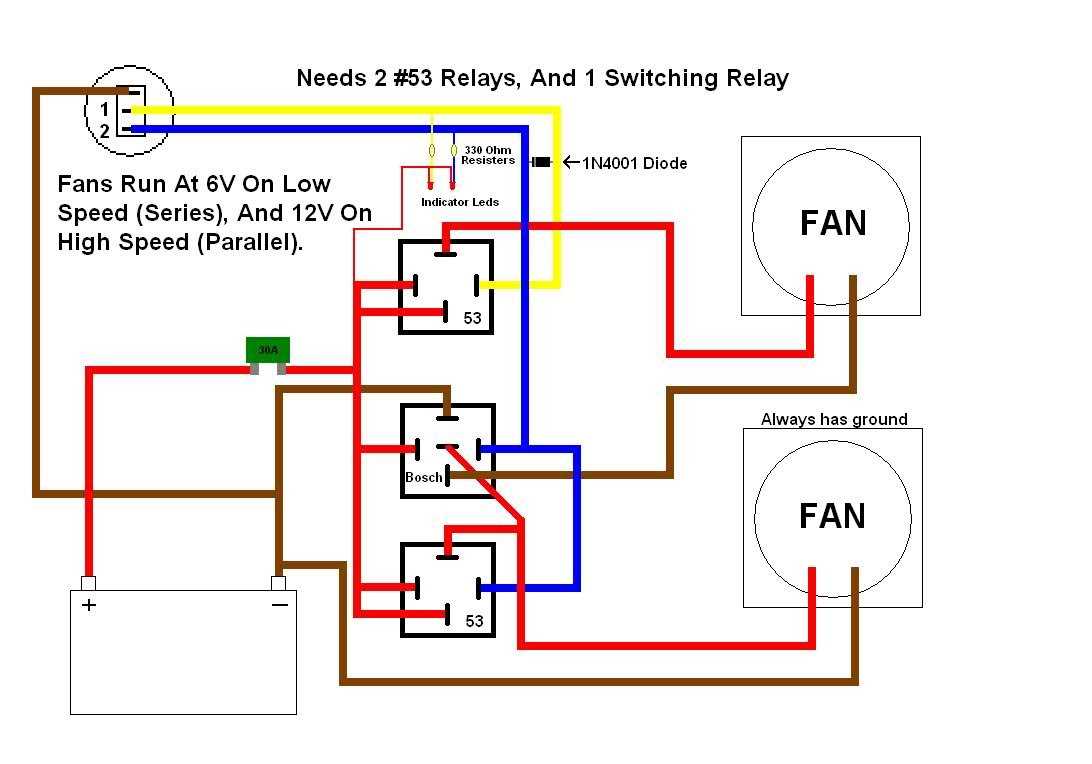
The Dayton 2 speed fan switch is a device designed to control the operation of a fan motor with two different speed settings. It is commonly used in industrial and commercial applications where adjustable airflow is required. The switch is typically connected between the power source and the fan motor, allowing the user to easily switch between high and low speed settings.
The switch operates by using a set of electrical contacts that can be manually adjusted to redirect the flow of electricity to different windings in the fan motor. When the switch is set to the high speed setting, the contacts are positioned in a way that allows the full voltage to reach the motor windings, resulting in a faster rotation speed of the fan blades. On the other hand, when the switch is set to the low speed setting, the contacts are adjusted to limit the voltage reaching the motor windings, thus reducing the speed of the fan.
The Dayton 2 speed fan switch is typically equipped with a toggle or rotary mechanism that allows the user to easily select the desired speed setting. The switch is often made of durable materials such as metal or high-quality plastic to ensure longevity and reliability. Additionally, it may have markings or indicators to indicate the current speed setting for easy identification and adjustment.
Step-by-step guide: How to wire a Dayton 2 speed fan switch
The wiring process of a Dayton 2-speed fan switch may seem daunting, but by following these steps, you’ll be able to successfully wire the switch to your fan:
- Start by gathering all the necessary tools and materials, including a Dayton 2-speed fan switch, wire strippers, electrical tape, wire nuts, and a screwdriver.
- Disconnect the power supply to the fan by turning off the circuit breaker or removing the fuse.
- Remove the fan’s motor access cover to gain access to the wiring terminals.
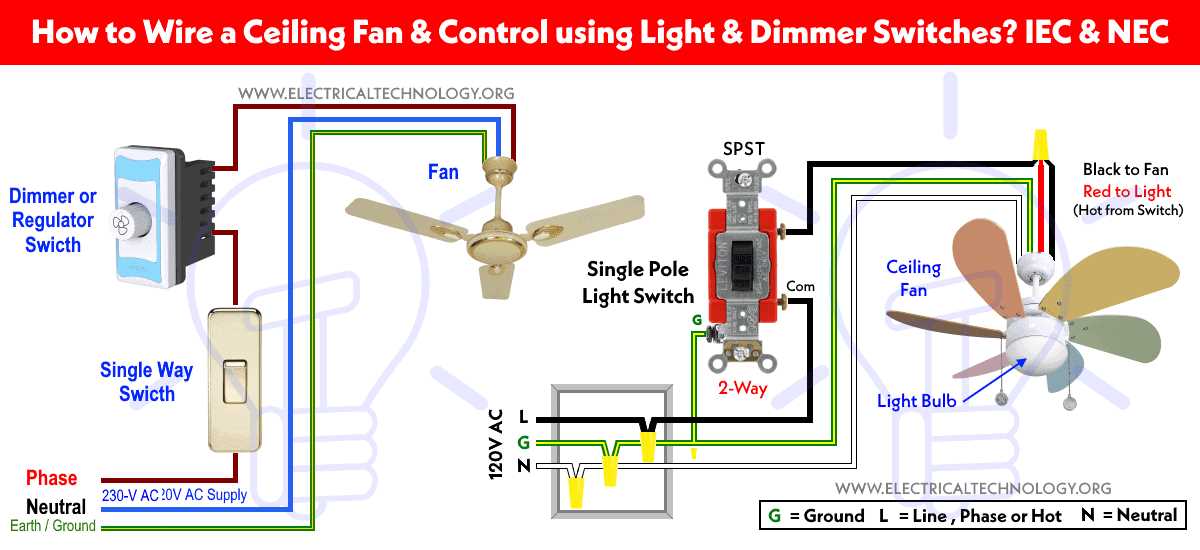
- Identify the wires connected to the fan switch. These wires are usually labeled with letters such as L, H, and C.
- Using the wire strippers, strip about 1/2 inch of insulation from the ends of the wires connected to the fan switch.
- Connect the ground or “C” wire to the green ground terminal on the fan switch. Use a wire nut to secure the connection.
- Connect the high-speed wire (usually labeled as “H”) to the black terminal on the fan switch and secure it with a wire nut.
- Connect the low-speed wire (usually labeled as “L”) to the red terminal on the fan switch and secure it with a wire nut.
- If the fan switch has a fourth terminal labeled “M” for medium speed, connect the medium-speed wire to this terminal and secure it with a wire nut.
- Double-check all the wire connections to ensure they are secure and properly insulated.
- Cover the wiring terminals with the fan’s access cover.
- Restore power to the fan by turning on the circuit breaker or inserting the fuse.
- Test the fan by turning it on and adjusting the speed using the Dayton 2-speed fan switch. Make sure the fan operates smoothly and at the desired speeds.
Following these steps will help you wire a Dayton 2-speed fan switch with ease and ensure the proper functioning of your fan. Remember to always prioritize safety and consult a professional electrician if you encounter any difficulties during the wiring process.