
The Deluxe Reverb AB763 schematic is a highly sought-after diagram by guitar enthusiasts and amplifier technicians alike. It is the electrical blueprint for the iconic Fender Deluxe Reverb amplifier, which has been cherished by musicians for decades.
Designed in the 1960s, the Deluxe Reverb AB763 schematic is known for its unparalleled clean tone and warm tube-driven sound. It features a combination of preamp tubes, power tubes, and a rectifier tube to deliver its distinct sound. This schematic provides a detailed layout of the circuitry and component values, allowing technicians to troubleshoot and modify the amplifier if needed.
The Deluxe Reverb AB763 schematic offers a glimpse into the inner workings of this legendary amplifier. It includes sections for the preamp, power amp, and various tone controls. For guitarists and gear enthusiasts, studying this schematic can provide valuable insights into the design choices and circuitry that contribute to the Deluxe Reverb’s distinctive sound.
Whether you’re a guitarist looking to understand the inner workings of your Deluxe Reverb amplifier or a technician aiming to mod or repair one, the Deluxe Reverb AB763 schematic is an essential resource. Its detailed depiction of the circuitry and component values provides a valuable reference for anyone interested in this beloved amplifier.
Deluxe Reverb AB763 Schematic Overview
The Deluxe Reverb AB763 schematic is a classic amplifier circuit design that has been used in countless guitar amplifiers since its introduction in the 1960s. The AB763 designation refers to the version of the Deluxe Reverb circuit that was introduced in 1963 and features several key components and design elements that give this amplifier its distinctive tone and characteristics.
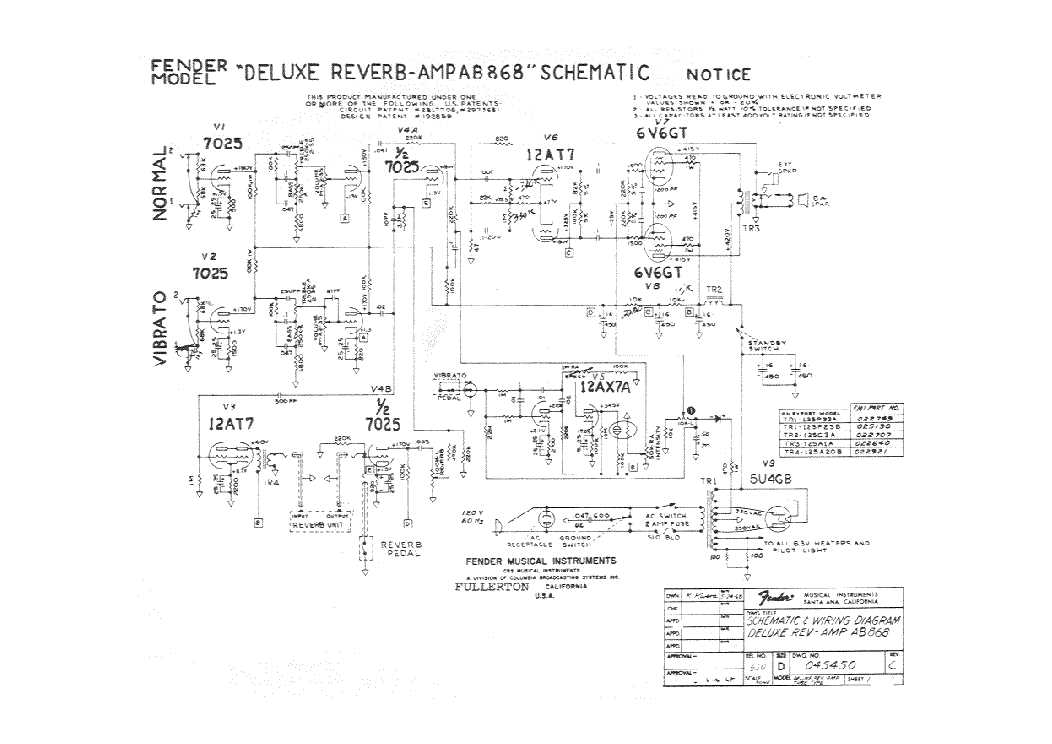
The Deluxe Reverb AB763 schematic consists of several sections, including the preamp, power amp, and rectifier sections. The preamp section is responsible for shaping the guitar signal and amplifying it, while the power amp section is responsible for further amplification and driving the speaker. The rectifier section converts the incoming AC power into DC power to be used by the amplifier.
One of the key features of the Deluxe Reverb AB763 schematic is the use of a tube-driven spring reverb. This reverb circuit adds a lush, ambient quality to the amplifier’s tone and is a highly sought-after feature by guitarists. The Deluxe Reverb AB763 schematic also includes a tremolo circuit, which adds a pulsating effect to the amplifier’s output.
The amplifier is powered by two 6V6GT power tubes, which provide the classic warm and creamy tone associated with the Deluxe Reverb. The preamp section utilizes three 12AX7 tubes, which provide plenty of gain and tonal shaping options. The rectifier section features a 5AR4 tube rectifier, which adds some sag and compression to the amplifier’s response.
In conclusion, the Deluxe Reverb AB763 schematic is a legendary amplifier circuit design with its distinctive tone and versatile features. From its tube-driven reverb to its tremolo circuit, this amplifier has become a go-to choice for many guitarists seeking classic vintage tones.
Understanding the Basics of the Deluxe Reverb AB763 Schematic
Introduction
The Deluxe Reverb AB763 is a classic guitar amplifier known for its rich tone and versatility. To understand its inner workings, it is essential to analyze the AB763 schematic. The schematic provides a blueprint of the amplifier’s circuitry, helping us understand how different components interact to produce the desired sound.
The Power Supply Section
Powering the Deluxe Reverb AB763 is a crucial aspect of its design. The power transformer, rectifier tube, and filter capacitors work together to convert AC voltage from the wall outlet into the DC voltage required by the amplifier’s circuits. The schematic displays the various connections and components involved in this process, giving us a clear understanding of the power supply section.
- The power transformer steps down the voltage from the wall outlet and provides separate secondary windings for different parts of the amplifier.
- The rectifier tube, often a 5AR4/GZ34, converts the AC voltage into DC voltage.
- The filter capacitors smooth out the DC voltage, removing any residual ripple or noise.
The Preamp Section
The preamp section of the Deluxe Reverb AB763 is responsible for shaping the input signal and amplifying it before it reaches the power amp section. The schematic provides a detailed view of the preamp circuit, including the various stages and components involved.
- The input jacks and volume controls set the initial level of the guitar signal.
- The first stage, often a 7025 or 12AX7 tube, amplifies the signal and adds some gain and tonal characteristics.
- The tone stack, consisting of tone controls and capacitors, allows for further shaping of the signal’s frequency response.
- The further preamp stages, including the Vibrato channel and Normal channel, provide additional gain and tonal options.
The Deluxe Reverb AB763 schematic also includes other sections, such as the power amp section and the tremolo circuit, which can be further explored to gain a comprehensive understanding of the amplifier’s design. By analyzing the schematic, guitarists and technicians can troubleshoot and modify the Deluxe Reverb AB763 to suit their specific needs.
Components and Connections in the Deluxe Reverb AB763 Schematic
The Deluxe Reverb AB763 schematic is a detailed diagram of the various components and connections found in the amplifier. It provides a visual representation of how the different parts of the amplifier are connected together, allowing technicians and enthusiasts to understand the circuitry and troubleshoot any issues that may arise.
Power Supply: At the heart of the schematic is the power supply, which provides the voltage necessary for the amplifier to function. The power supply consists of components such as transformers, rectifiers, and filter capacitors. These components work together to convert the incoming AC power into the DC power required by the amplifier.
Preamp Section: The preamp section of the Deluxe Reverb AB763 schematic consists of various stages that process the incoming guitar signal. These stages include the input jacks, volume and tone controls, and several tubes that amplify and shape the signal. The preamp section is responsible for adding gain, equalization, and other tonal characteristics to the signal.
Phase Inverter and Power Amp: The phase inverter and power amp sections of the schematic are responsible for further amplification of the signal and driving the speakers. These sections consist of additional tubes, such as power tubes and output transformers, which convert the amplified signal into a format that can be used to drive the speakers and produce sound.
Connections: The Deluxe Reverb AB763 schematic also shows the various connections between components, such as wires, resistors, capacitors, and other electronic elements. These connections ensure that the signal is routed correctly through the amplifier, allowing for proper amplification and tone shaping.
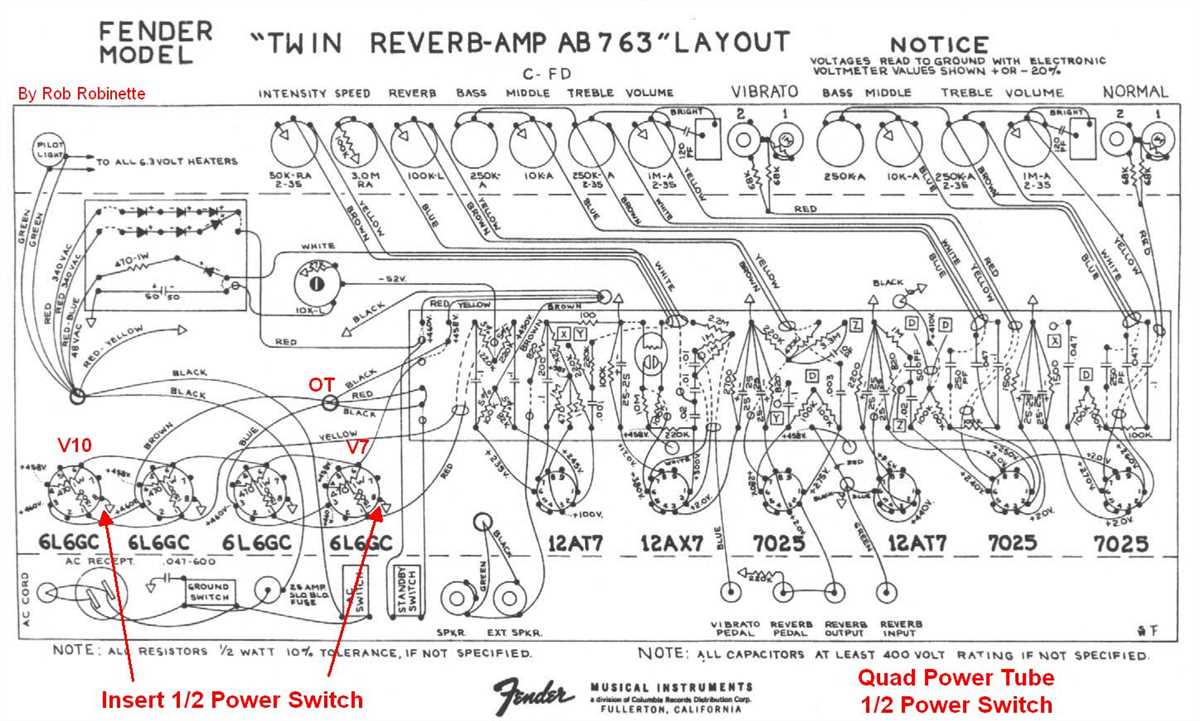
Layout and Wiring: In addition to the component and connection details, the schematic also provides information on the layout and wiring of the amplifier. This includes the physical arrangement of the components within the chassis, as well as the routing of wires and cables.
In summary, the Deluxe Reverb AB763 schematic provides a comprehensive overview of the components and connections within the amplifier. It serves as a valuable tool for understanding the inner workings of the amplifier and for troubleshooting any technical issues that may arise.
Exploring the Integrated Circuit, Tubes, and Wiring Diagram
An integrated circuit (IC) is an essential component in the Deluxe Reverb AB763 schematic. This small electronic device contains various electronic components such as transistors, resistors, and capacitors embedded on a single chip of semiconductor material. The IC helps in amplifying and processing the audio signals within the amplifier circuit.
The tubes, also known as vacuum tubes or valves, play a crucial role in the Deluxe Reverb AB763 schematic. These glass-encased electronic components generate and amplify the electrical signals to produce the desired sound output. The schematic depicts the arrangement of the tubes within the amplifier, showing how the different voltages and signals are applied to each tube for proper functioning.
Wiring Diagram
The wiring diagram in the Deluxe Reverb AB763 schematic illustrates the connections between various components in the amplifier. It shows the pathways for the flow of electrical currents and signals. The diagram includes symbols representing components such as resistors, capacitors, transformers, and switches, and indicates how they are interconnected to form the amplifier circuit.
The wiring diagram helps technicians and enthusiasts understand the internal workings of the amplifier and aids in troubleshooting problems or making modifications. It provides a visual guide for connecting and arranging the components correctly, ensuring the amplifier functions as intended.
- The IC, tubes, and wiring diagram represent crucial elements of the Deluxe Reverb AB763 schematic.
- The IC integrates various electronic components on a single chip, facilitating signal amplification and processing.
- Tubes generate and amplify the electrical signals within the amplifier circuit to produce the desired sound output.
- The wiring diagram showcases the connections and pathways of electrical currents and signals in the amplifier, aiding in troubleshooting and modifications.
Understanding the Signal Flow in the Deluxe Reverb AB763 Schematic
The Deluxe Reverb AB763 is a classic guitar amplifier that has been used by countless musicians over the years. In order to understand how this amplifier works, it is important to have a grasp of the signal flow as shown in the schematic. This schematic provides a visual representation of the electrical components and their connections within the amplifier.
The signal flow in the Deluxe Reverb AB763 begins with the input jack, where the guitar signal is first introduced. From there, the signal passes through a volume control, which allows the player to adjust the overall level of the sound. The next stage is the first gain stage, where the signal is amplified and shaped by a preamp tube. This tube, typically a 12AX7, adds color and character to the sound.
Next, the signal enters the tone stack, which consists of tone controls for bass, middle, and treble. These controls allow the player to shape the overall frequency response of the amplifier. The signal then moves on to the next gain stage, which further amplifies the signal and prepares it for the power amp section of the amplifier.
In the power amp section, the signal is fed into a phase inverter, which splits the signal into two equal but opposite phases. These phases are then fed into a pair of power tubes, typically 6V6 or 6L6 tubes, which provide the main amplification for the signal. The amplified signal is then sent to the output transformer, which matches the impedance of the amplifier to the speaker.
Finally, the signal is sent to the speaker, where it is converted into sound waves. The speaker is housed in a cabinet, which helps to control the dispersion of the sound. The result is the unmistakable tone and responsiveness that the Deluxe Reverb AB763 is known for.
Overall, understanding the signal flow in the Deluxe Reverb AB763 schematic is crucial for troubleshooting and modifying the amplifier. By familiarizing oneself with the various stages and components involved, one can better understand how the amplifier works and make informed decisions when making changes or repairs.
Analyzing the Preamp, Reverb, and Power Amp Stages
The Deluxe Reverb AB763 schematic consists of three main stages: the preamp stage, the reverb stage, and the power amp stage. Each stage plays a critical role in shaping the overall tone and characteristics of the amplifier.
The preamp stage is responsible for amplifying the incoming guitar signal and shaping its tonal characteristics. It consists of several gain stages, tone controls, and a tremolo circuit. The first gain stage is typically a 12AX7 tube, which provides the initial amplification and sets the foundation for the rest of the preamp section. The tone controls, including Bass, Middle, and Treble, allow the user to shape the frequency response to their liking, while the tremolo circuit adds modulation to the signal, creating a pulsating effect.
Reverb Stage
The reverb stage is where the iconic spring reverb effect is generated. It is composed of a separate dedicated reverb tank that utilizes a set of springs to create the reverberated sound. The reverb tank is driven by a separate preamp stage, which takes the preamp signal and sends it through the springs, capturing the reflections and creating the reverb effect. The reverb level control allows the user to adjust the intensity of the effect, from subtle to heavily reverberated.
Power Amp Stage
The power amp stage is responsible for driving the speaker and delivering the amplified signal to the output. In the Deluxe Reverb AB763 schematic, it consists of two 6V6 tubes running in Class AB push-pull configuration, which provides a balance between power and tonal characteristics. The power tubes are driven by a phase inverter, typically a 12AT7 or 12AX7 tube, which ensures the signals from the preamp stage are amplified and sent to the output in a balanced manner. The power amp stage also includes a negative feedback loop, which helps in reducing distortion and improving overall performance.
Overall, the Deluxe Reverb AB763 schematic incorporates a well-balanced combination of preamp, reverb, and power amp stages, resulting in its iconic tone and versatility. Each stage contributes to the overall sound, and understanding their individual functions can help in optimizing and customizing the amplifier’s performance to suit different musical styles and preferences.
Troubleshooting Common Issues in the Deluxe Reverb AB763 Schematic
The Deluxe Reverb AB763 schematic is a popular choice for guitar amplifiers due to its renowned tone and versatility. However, like any complex electronic device, it can experience issues that require troubleshooting. In this article, we will discuss some of the common problems you may encounter with this schematic and how to diagnose and fix them.
No Sound or Low Volume
If you plug in your Deluxe Reverb AB763 and there’s no sound or the volume is very low, there could be several causes. First, check the cables and connections to ensure they are properly connected and working. If the cables are fine, the issue may be with the tubes. Try replacing the preamp and power tubes one at a time to see if that resolves the problem. If not, check the transformers and capacitors for any signs of damage or failure.
Distorted or Fuzzy Sound
If your Deluxe Reverb AB763 is producing a distorted or fuzzy sound, it could be due to several factors. Start by checking the tubes and replacing any that may be faulty. Poor quality or worn-out tubes can cause distortion. Additionally, check the speaker and ensure it is working properly. If everything appears to be in order, there may be an issue with the bias or the tone circuit. Consult the schematic and check the relevant components for any signs of damage or misalignment.
Hum or Buzzing Noise
A common issue in amplifiers is the presence of a hum or buzzing noise. This can be caused by various factors, including ground loops, faulty grounding, or interference from other electrical devices. Start by checking the ground connections and ensuring they are secure. If the issue persists, try eliminating potential sources of interference, such as fluorescent lights or nearby electronics. If none of these steps solve the problem, it may be necessary to replace or repair the power supply section of the amplifier.
Intermittent or Cutting Out
If your Deluxe Reverb AB763 is intermittently cutting out or losing power, it could indicate a loose connection or a faulty component. Inspect all the connections in the amplifier circuit, paying special attention to the input and output jacks, switches, and potentiometers. If the issue persists, it may be necessary to thoroughly clean the controls and contacts to remove any built-up dirt or debris. If these measures don’t solve the problem, it may be necessary to consult a professional technician for further diagnosis and repair.
Tips and Tricks for Diagnosing and Fixing Problems
When working with the Deluxe Reverb AB763 schematic, it’s important to have some troubleshooting skills in your toolbox. Here are some tips and tricks to help you diagnose and fix problems:
1. Start with the basics
Before diving into complex troubleshooting, make sure to check the basics. Ensure that all tubes are properly seated and not loose, check the power and signal cables for any loose connections, and inspect for any obvious physical damage or burnt components.
2. Use a multimeter
A multimeter is an essential tool for diagnosing and fixing electronic problems. Use it to measure voltages and check for continuity across components. This will help you identify any faulty components or circuits.
3. Follow the signal path
Understanding the signal path in the circuit diagram is crucial for troubleshooting. By following the path, you can locate where the signal is lost or distorted. Focus on the key stages, such as the preamp, power amp, and output stage.
4. Swap components
If you suspect a faulty component, try swapping it with a known working one. This can help you isolate the problem to a specific component. Start with the most likely culprits, such as tubes, capacitors, resistors, and transformers.
5. Check for common issues
There are some common issues that Deluxe Reverb amps can experience. Check for loose solder joints, leaky capacitors, worn-out tubes, and faulty power transformers. These are often the cause of problems like noise, hum, or intermittent performance.
6. Seek professional help
If you’re unable to diagnose or fix a problem on your own, don’t hesitate to reach out to a professional technician or amp repair shop. They have the expertise and tools to handle complex repairs and ensure the amp is restored to its optimal performance.
With these tips and tricks, you’ll have a better understanding of how to diagnose and fix problems with your Deluxe Reverb amp. Remember to always prioritize safety and take necessary precautions when working with electronics.