
When it comes to maintaining our vehicles, understanding the intricate details of their components is crucial. This is especially true for the engine, which consists of various belts that help operate different systems. One of the most essential belts in your Dodge Nitro 3.7 is the serpentine belt, responsible for powering several key components such as the alternator, power steering pump, and air conditioning compressor.
If you find yourself in need of replacing the serpentine belt or simply want to know how it is routed in your Dodge Nitro 3.7, this article is here to guide you. By understanding the belt diagram, you can effectively troubleshoot any issues or carry out regular maintenance tasks without visiting a mechanic.
Our comprehensive guide provides you with a clear belt diagram for the Dodge Nitro 3.7, making it easier for you to understand the path the belt should follow. With this diagram in hand, you will have the knowledge and tools necessary to keep your Dodge Nitro 3.7 running smoothly and efficiently.
Dodge Nitro 3.7 Belt Diagram: Everything You Need to Know
When it comes to the Dodge Nitro 3.7, understanding the belt diagram is essential. The belt diagram displays the routing of the serpentine belt, which drives various engine accessories. By following the belt diagram, you can properly install and maintain the belt, ensuring the smooth operation of your engine.
What is a serpentine belt?
The serpentine belt is a crucial part of your vehicle’s engine system. It is a long, wide belt that snakes around various pulleys to drive components such as the alternator, power steering pump, air conditioning compressor, and water pump. Without a properly functioning serpentine belt, these components would not be able to operate effectively.
The importance of the belt diagram
The belt diagram is like a roadmap for installing and replacing the serpentine belt on your Dodge Nitro 3.7. It shows the precise route that the belt should follow, ensuring that it properly engages with each pulley. Using the correct belt diagram is crucial because an incorrect routing can lead to belt slippage, increased wear, and even component failure.
Where to find the belt diagram
The belt diagram for your Dodge Nitro 3.7 can typically be found under the hood of your vehicle. It may be located on a sticker or placard near the engine, or in the owner’s manual. If you are unable to locate the diagram, you can also refer to online resources or contact a Dodge dealership for assistance.
Tips for using the belt diagram
- Before installing a new serpentine belt, inspect all pulleys for any signs of damage or misalignment.
- Ensure that the belt is properly tensioned according to the manufacturer’s specifications.
- Use a belt tensioner tool to assist in properly tensioning the belt.
- Refer to the belt diagram frequently during the installation process to ensure accurate routing.
- If you are unsure about any part of the installation process, consult a professional mechanic for assistance.
By understanding the importance of the belt diagram and following the proper installation procedures, you can ensure the longevity and performance of your Dodge Nitro 3.7’s serpentine belt and engine accessories.
The Importance of a Belt Diagram for Your Dodge Nitro 3.7
Understanding the layout and configuration of the belts in your Dodge Nitro 3.7 is crucial for maintaining the performance and longevity of your vehicle. A belt diagram provides a visual representation of how each belt is routed throughout the engine compartment, ensuring that they are properly aligned and tensioned.
One of the primary benefits of having a belt diagram is the ability to easily identify and replace worn or damaged belts. By referring to the diagram, you can navigate the complex network of belts and pulleys, making the replacement process much more straightforward. This not only saves you time and effort but also ensures that you install the new belt correctly, preventing any future issues.
The belt diagram also serves as a helpful reference tool during routine maintenance tasks, such as inspecting and adjusting belt tension. With the diagram, you can easily locate the tensioner pulleys and determine the correct amount of tension for each belt. Proper belt tension is essential for optimal performance and prevents excessive wear on the belts and pulleys.
In addition to maintenance and replacement, a belt diagram is useful when troubleshooting issues related to belt performance. If you notice unusual noises or vibrations coming from the engine compartment, consulting the belt diagram can help you identify potential causes. By visually inspecting the belts and their alignment, you can pinpoint any misalignments or issues with pulley engagement.
Overall, having a belt diagram for your Dodge Nitro 3.7 is essential for maintaining the reliability and functionality of your vehicle’s belts. Whether you are replacing a worn belt, adjusting tension, or troubleshooting issues, the diagram provides a valuable resource to ensure that the belts are correctly installed and functioning optimally.
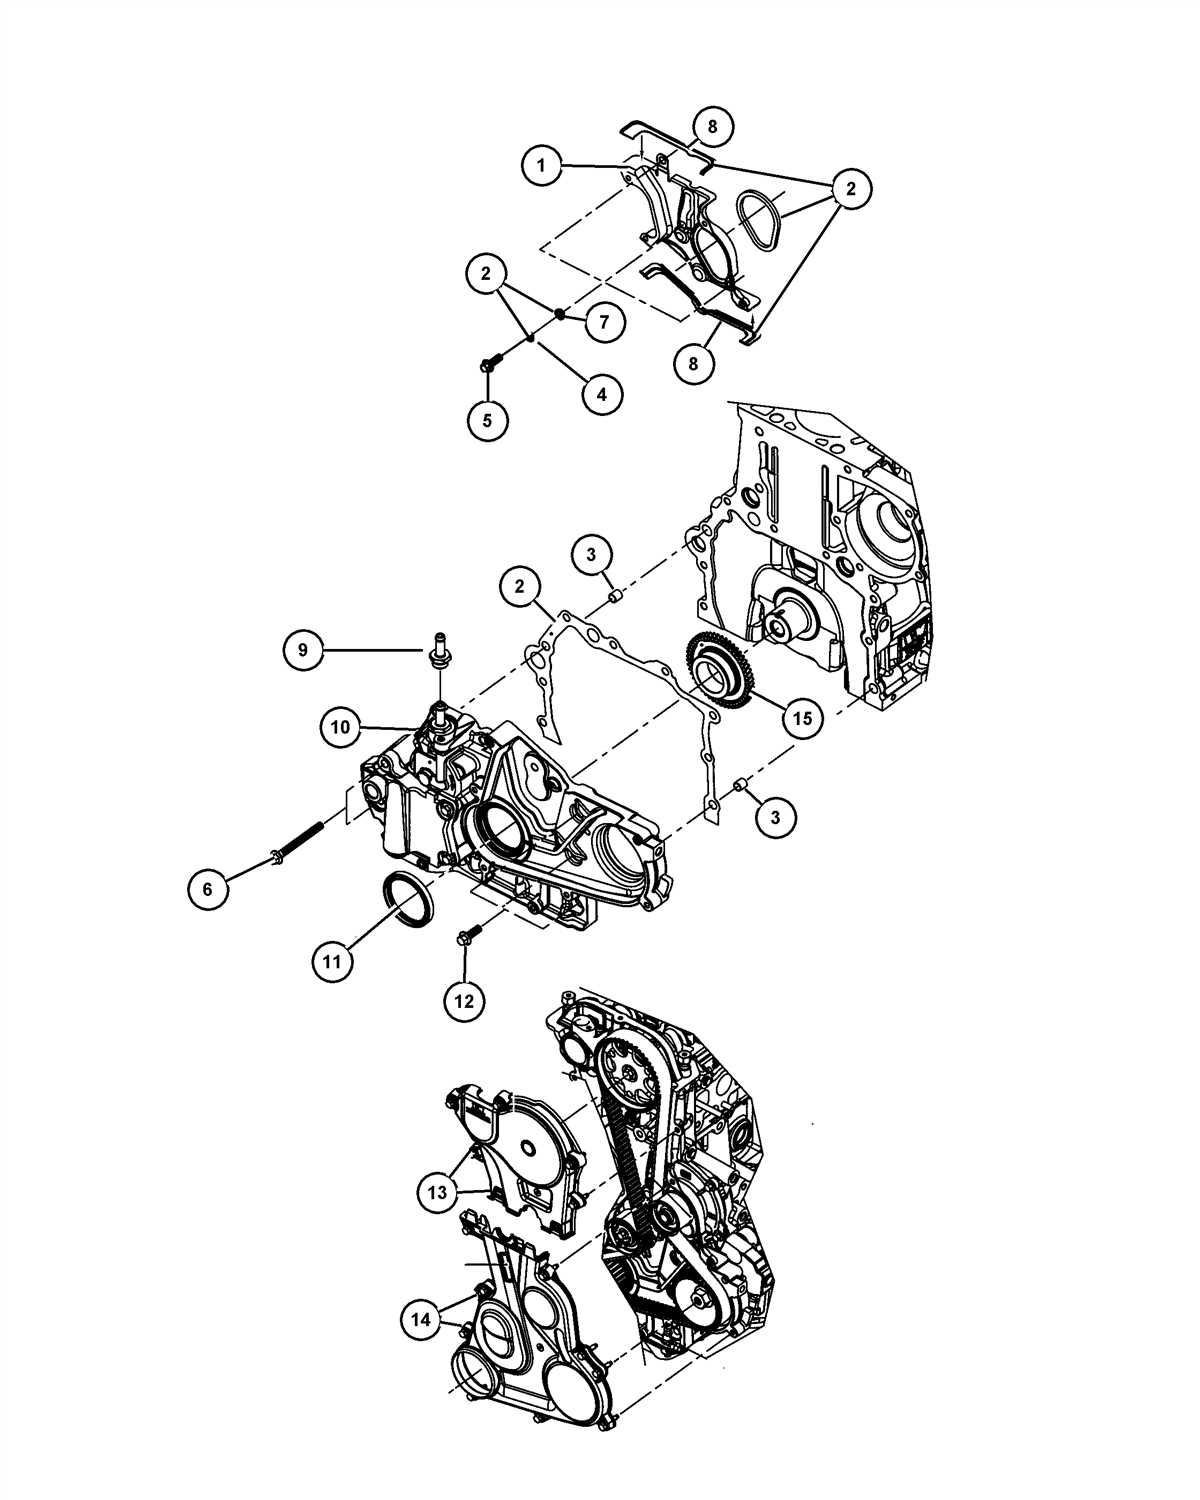
Understanding the Components of the Belt System
The belt system in a Dodge Nitro 3.7 plays a crucial role in ensuring the smooth functioning of various components in the vehicle’s engine. It is responsible for driving the alternator, water pump, power steering pump, and the air conditioning compressor. Understanding the different components of the belt system is essential for proper maintenance and troubleshooting.
The Serpentine Belt:
The serpentine belt is a long, single belt that wraps around multiple pulleys in the engine. It is called a serpentine belt because of its snake-like path. In the Dodge Nitro 3.7, the serpentine belt is responsible for transferring power from the engine to the various accessory components. It allows these components to operate simultaneously and efficiently.
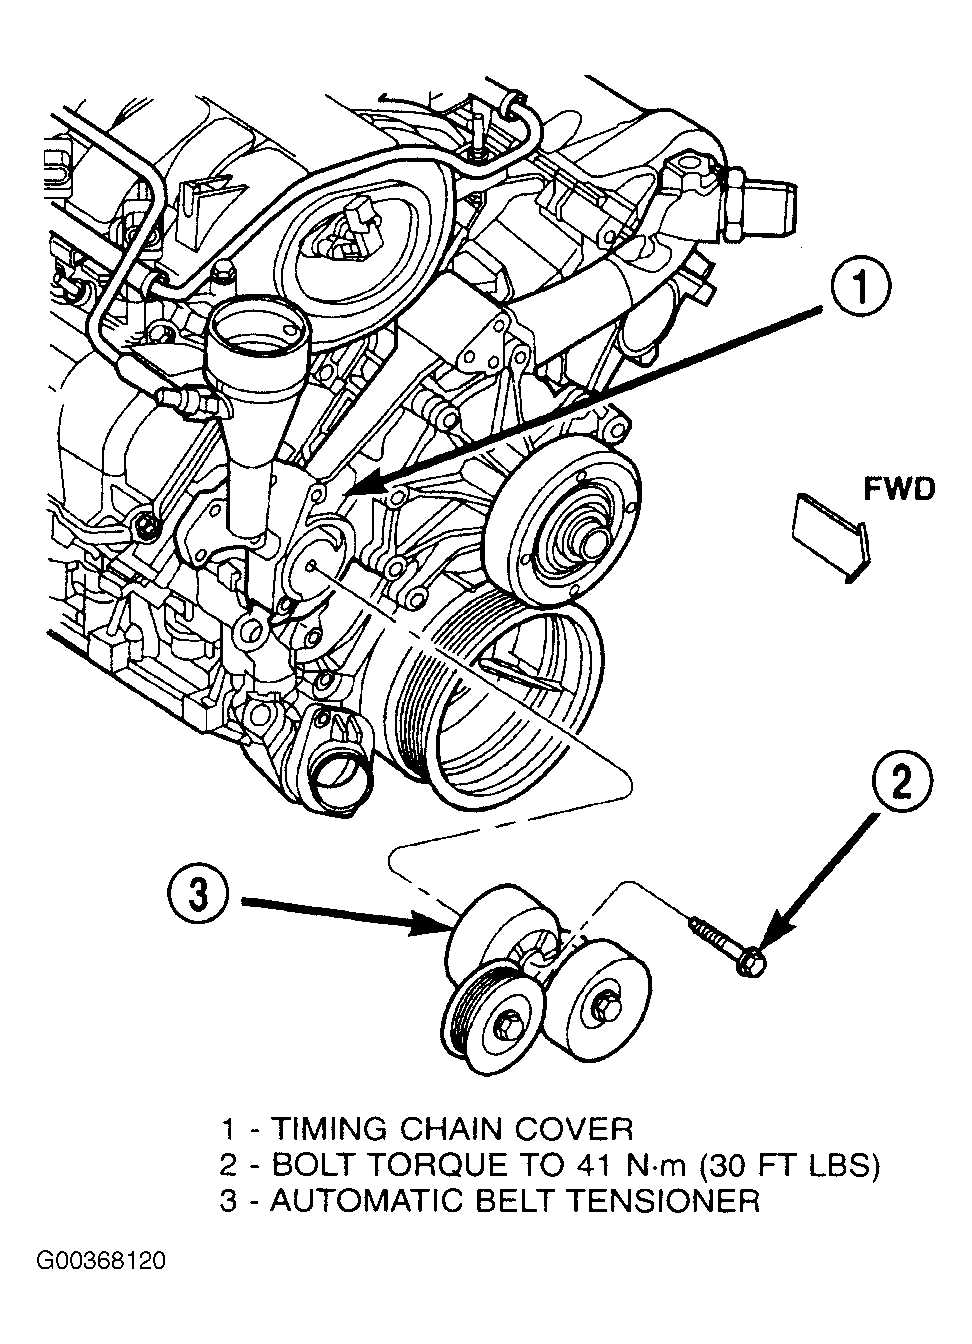
Tensioner and Idler Pulleys:
The tensioner pulley and idler pulleys in the belt system are critical for maintaining the proper tension in the serpentine belt. The tensioner pulley, as the name suggests, applies tension to the belt, keeping it tight. The idler pulleys help guide the belt’s path and prevent it from slipping or coming off the pulleys.
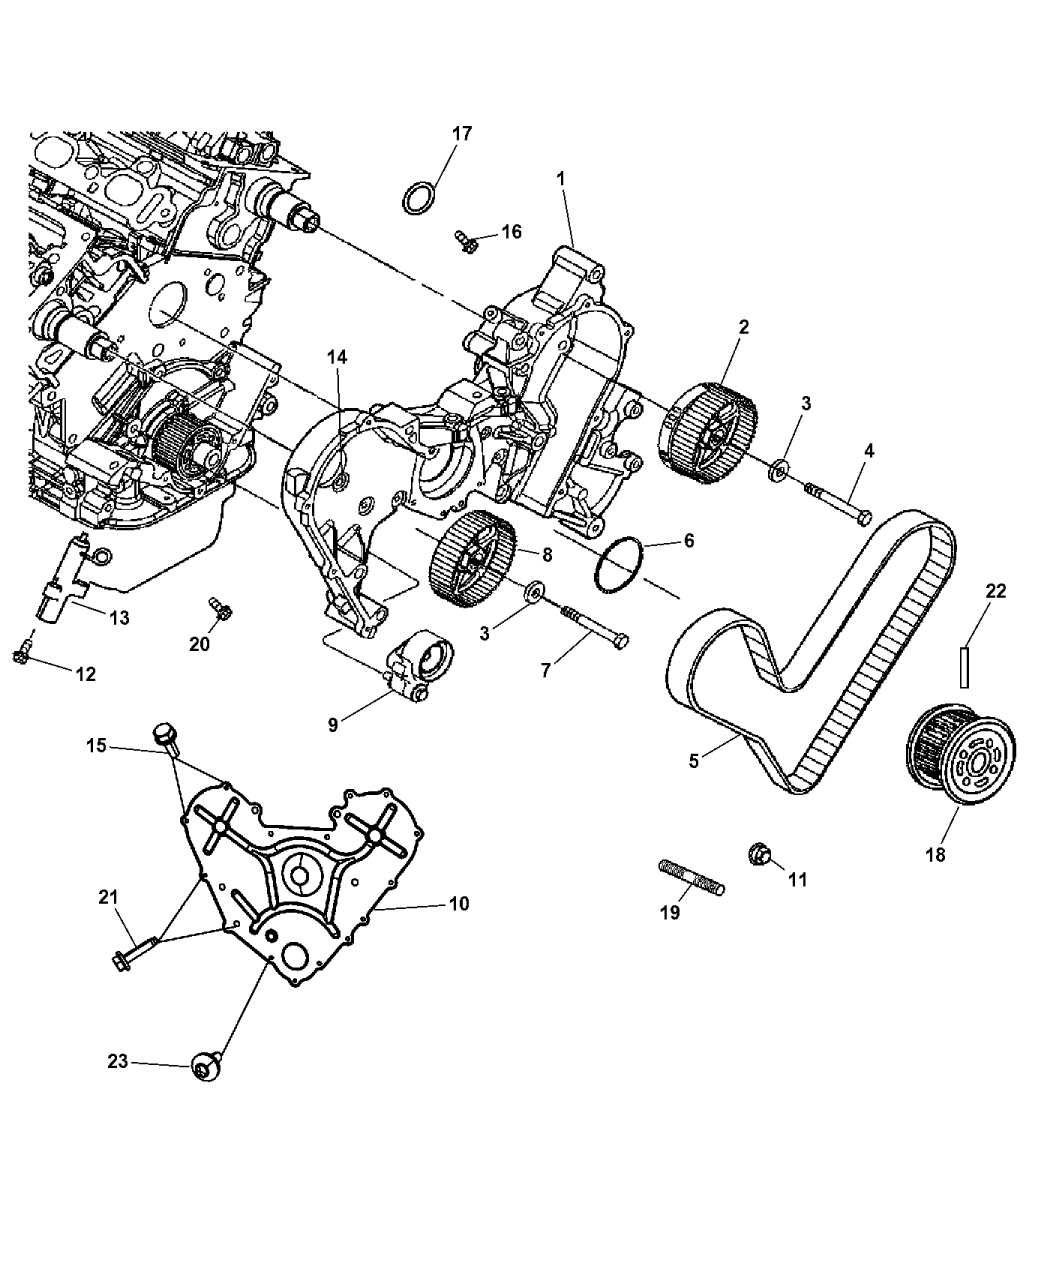
Accessory Components:
The belt system drives several important accessory components in the Dodge Nitro 3.7. The alternator is responsible for charging the battery and providing electrical power to various systems in the vehicle. The water pump circulates coolant in the engine, preventing overheating. The power steering pump assists with steering, making it easier to turn the wheels. The air conditioning compressor is responsible for cooling the cabin by compressing refrigerant.
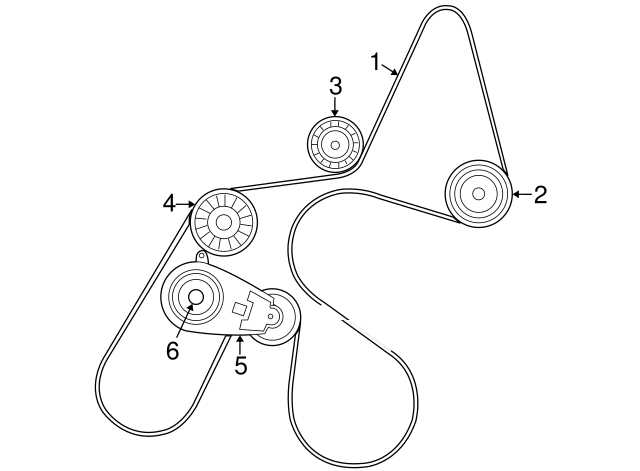
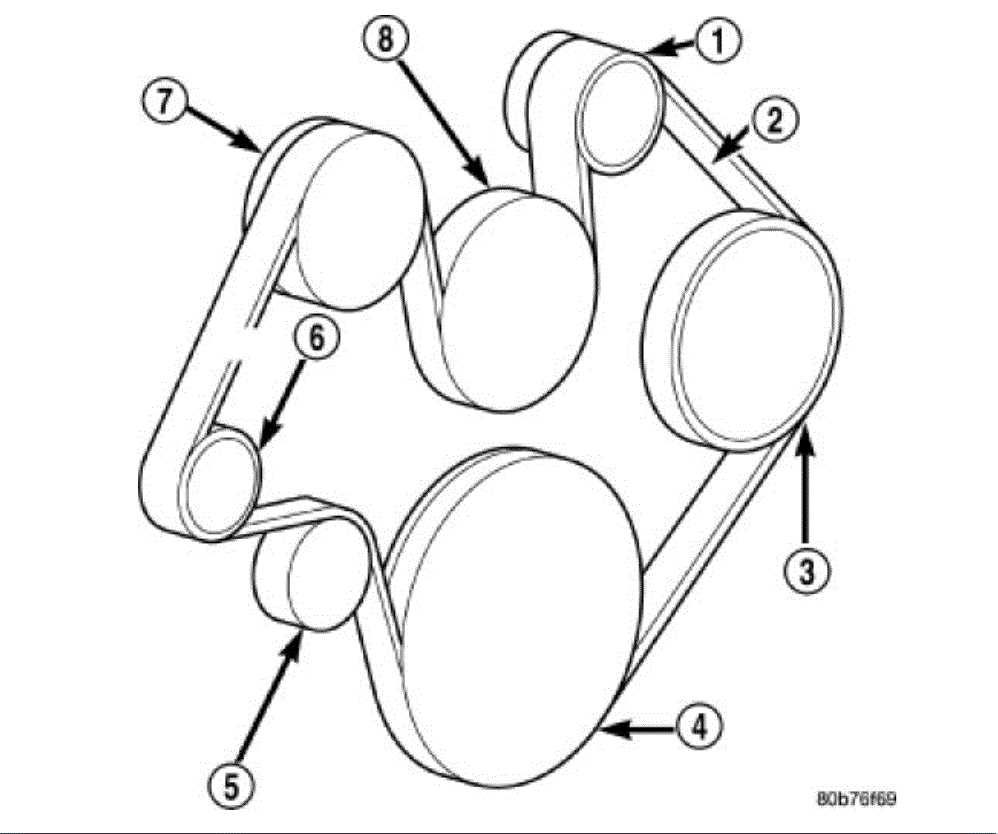
Belt Routing Diagram:
For proper installation and replacement of the serpentine belt, it is essential to refer to the belt routing diagram specific to the Dodge Nitro 3.7 model. This diagram outlines the correct path and orientation of the belt around the various pulleys, ensuring optimal performance and longevity.
Maintenance and Troubleshooting:
To maintain the belt system of a Dodge Nitro 3.7, regular inspections should be conducted to check for signs of wear, cracking, or damage. If any of these issues are noticed, the belt should be replaced promptly to prevent further damage or failure. Additionally, proper tension in the belt should be ensured, as a loose or overly tight belt can cause problems. Troubleshooting any issues with the belt system should involve identifying and addressing the root cause, such as a faulty pulley or improper alignment.
Step-by-Step Guide to Reading a Belt Diagram
Knowing how to read a belt diagram is essential for anyone who wants to perform their own car maintenance or repairs. The belt diagram provides a visual representation of how the different components of the engine are connected by belts. By following the diagram, you can easily identify the routing of the belts and ensure they are properly installed. Here is a step-by-step guide to reading a belt diagram.
Step 1: Identify the Engine Components
The first step in reading a belt diagram is to familiarize yourself with the various engine components that are belt-driven. This may include the alternator, power steering pump, water pump, air conditioning compressor, and others. Take note of the location and positioning of each component as shown in the diagram.
Step 2: Determine the Belt Routing
Next, carefully examine the belt diagram to determine the routing of the belts. The diagram will typically show arrows indicating the direction in which the belts should be installed and how they wrap around each component. Pay close attention to any pulleys or tensioners that may be present, as these play a crucial role in maintaining proper belt tension.
Step 3: Note the Belt Sizes
As you study the belt diagram, take note of the different belt sizes used for each component. Belts come in a variety of lengths and widths to accommodate different engine configurations. Ensuring that you have the correct belt size is crucial for proper operation and to avoid belt slippage or premature wear.
Step 4: Refer to the Vehicle Manual
If you are uncertain about any aspect of the belt diagram or need additional information, refer to the vehicle’s manual. The manual will often provide detailed instructions and diagrams specific to your make and model. It is essential to follow the manufacturer’s recommendations to ensure the belts are installed correctly and functioning as intended.
Step 5: Double-Check the Installation
Once you have familiarized yourself with the belt diagram and have the correct belts on hand, carefully install them according to the routing shown in the diagram. Use the appropriate tools to adjust tension as necessary, ensuring that each belt is properly tensioned. Double-check the installation and refer back to the diagram to verify that everything is correctly aligned.
By following this step-by-step guide, you can confidently read a belt diagram and successfully install or replace belts on your vehicle. Remember to always exercise caution and refer to the manufacturer’s instructions to ensure the job is done safely and correctly.
Replacing and Installing a New Belt on Your Dodge Nitro 3.7
One of the key components in the engine of your Dodge Nitro 3.7 is the belt, which is responsible for driving various accessories such as the alternator, power steering pump, and air conditioning compressor. Over time, the belt can become worn out or damaged, which may lead to a decrease in performance or even a breakdown. In such cases, it is important to replace the belt as soon as possible to ensure the proper functioning of these components.
Here is a step-by-step guide on how to replace and install a new belt on your Dodge Nitro 3.7:
- Start by locating the belt routing diagram, which is usually found somewhere in the engine compartment. This diagram will show you the correct path that the belt should follow around the various pulleys.
- Using a breaker bar or ratchet, locate the belt tensioner pulley and insert the tool into the square hole. Apply pressure in the direction indicated by the diagram to relieve the tension on the belt.
- While keeping pressure on the tensioner, carefully slide the old belt off the pulleys. Take note of the path the belt follows so that you can properly route the new belt.
- Compare the old belt with the new one to ensure they have the same length and width. It is also a good idea to inspect the new belt for any signs of damage or defects before proceeding.
- Starting at the crankshaft pulley, carefully route the new belt around the various pulleys, following the diagram. Make sure the belt is properly seated in each groove and that it is not twisted or misaligned.
- Once the new belt is properly routed, release the tension on the belt tensioner pulley. You should feel the tensioner spring back into position, applying the necessary tension to the belt.
- Finally, double-check the belt routing to ensure it matches the diagram and that the belt is properly tensioned. Start the engine and listen for any abnormal sounds or vibrations that may indicate an issue with the belt installation. If everything sounds and feels normal, you have successfully replaced and installed a new belt on your Dodge Nitro 3.7.
Remember to refer to the manufacturer’s instructions and diagrams specific to your Dodge Nitro 3.7 model for the most accurate and detailed information on replacing and installing the belt. If you are unsure or uncomfortable performing this task yourself, it is always recommended to seek the assistance of a professional mechanic.
Common Belt Problems and Solutions
Belts are an essential component of many mechanical systems, including engines, power steering systems, and air conditioning systems. Over time, belts can develop problems that affect their performance and reliability. Fortunately, most belt problems can be easily identified and resolved with the right knowledge and tools.
1. Belt Misalignment: One common belt problem is misalignment, where the belt does not run parallel to the pulleys it is wrapped around. This can cause excessive wear on the belt and the pulleys, leading to premature failure. To solve this issue, the pulleys should be properly aligned, and any tensioners or guide pulleys should be inspected and adjusted as necessary.
2. Belt Slippage: Belt slippage occurs when the belt loses traction on the pulleys, resulting in reduced power transfer and possible damage to the belt. This problem can be caused by insufficient tension, worn or damaged pulleys, or contaminants on the belt surface. To fix this issue, the belt tension should be adjusted to the manufacturer’s specifications, and any worn or damaged pulleys should be replaced. Cleaning the belt surface may also be necessary.
3. Belt Noise: Belt noise is often a sign of an underlying problem and should not be ignored. Squealing, chirping, or grinding noises can indicate issues such as improper tension, worn pulleys, or a misaligned belt. Inspecting and adjusting the belt tension, replacing worn pulleys, and ensuring proper alignment can help eliminate belt noise.
4. Belt Wear and Cracking: Belts can experience wear and cracking over time due to normal use and exposure to heat, oil, and other contaminants. This can lead to reduced belt strength and performance. Regular inspection of the belt for signs of wear, such as fraying or cracking, is essential. If any significant wear is found, the belt should be replaced promptly before it fails completely.
5. Improper Belt Installation: Incorrectly installed belts can cause numerous problems, including excessive tension, misalignment, and premature wear. It is crucial to follow the manufacturer’s instructions and use the correct tools for belt installation. If unsure, it is best to consult a professional or refer to the vehicle’s service manual for guidance.
Conclusion: Keeping the belts in good condition is crucial for the proper functioning of mechanical systems. Regular inspection, proper tensioning, and timely replacement of worn or damaged belts can help prevent costly repairs and ensure the longevity of the entire system.
Tips for Maintaining the Belt System of Your Dodge Nitro 3.7
The belt system in your Dodge Nitro 3.7 is an essential component that helps drive various engine accessories, such as the alternator, power steering pump, and air conditioning compressor. To ensure the optimal performance and longevity of your vehicle, it’s important to properly maintain the belt system. Here are some tips to help you keep your belt system in top condition:
- Regularly inspect the belts: Check the condition of the belts for any signs of wear, cracks, fraying, or glazing. If you notice any of these issues, it’s time to replace the belt.
- Adjust belt tension: The tension of the belts should be checked periodically. If you find that the belts are too loose or too tight, they need to be adjusted. Incorrect tension can lead to premature wear and failure of the belts.
- Replace worn-out pulleys and tensioner: Over time, the pulleys and tensioner can wear out and become misaligned, causing excessive belt wear. If you notice any squealing or chirping noises coming from the belt system, it may be due to worn-out pulleys or tensioner. Replace them as necessary.
- Keep the belt system clean: Any debris, such as dirt or oil, can damage the belts and reduce their lifespan. Regularly clean the belt system to ensure it remains free from contaminants.
- Follow the recommended belt replacement interval: It’s important to follow the manufacturer’s recommended belt replacement interval. Replace the belts at the specified mileage or time period, even if they appear to be in good condition. This preventive measure can help prevent untimely belt failure.
By following these tips, you can maintain the belt system of your Dodge Nitro 3.7 and avoid costly repairs or breakdowns. Regular inspections, proper tensioning, and timely replacements will ensure the reliable operation of your vehicle’s belt system.