
If you are planning to install the Dual XDCPA10BT car stereo system, it is crucial to understand the wiring diagram to ensure a smooth and hassle-free installation process. The Dual XDCPA10BT offers a range of features and advanced functionalities, making it an excellent choice for car enthusiasts who want to enhance their in-car audio experience.
The wiring diagram acts as a visual representation of the connections that need to be made between the car’s electrical system and the Dual XDCPA10BT stereo. It helps users understand how each wire should be connected, making it easier to install and reduce the chances of any errors or mishaps during the process.
Key components in the Dual XDCPA10BT wiring diagram:
The wiring diagram includes various components, such as the power supply, ground, speakers, amplifiers, and other peripheral devices. Each component has its designated wire color and connection point, simplifying the installation process.
By carefully following the Dual XDCPA10BT wiring diagram, individuals can connect the stereo system to their car’s electrical system seamlessly. It is essential to adhere to the instructions mentioned in the wiring diagram to avoid any damage to the stereo or the car’s electrical system.
Dual xdcpa10bt Wiring Diagram
The Dual xdcpa10bt is a car stereo receiver that offers various entertainment features, including Bluetooth connectivity, USB and AUX inputs, and AM/FM radio. To install this stereo in your vehicle, it is important to have a proper understanding of the wiring diagram.
The wiring diagram for the Dual xdcpa10bt typically includes important information such as the color coded wires and their corresponding functions. This diagram can help you correctly connect the stereo’s wires to your vehicle’s wiring harness. It is crucial to follow the wiring diagram carefully to ensure proper installation and avoid any damage to the stereo or your vehicle’s electrical system.
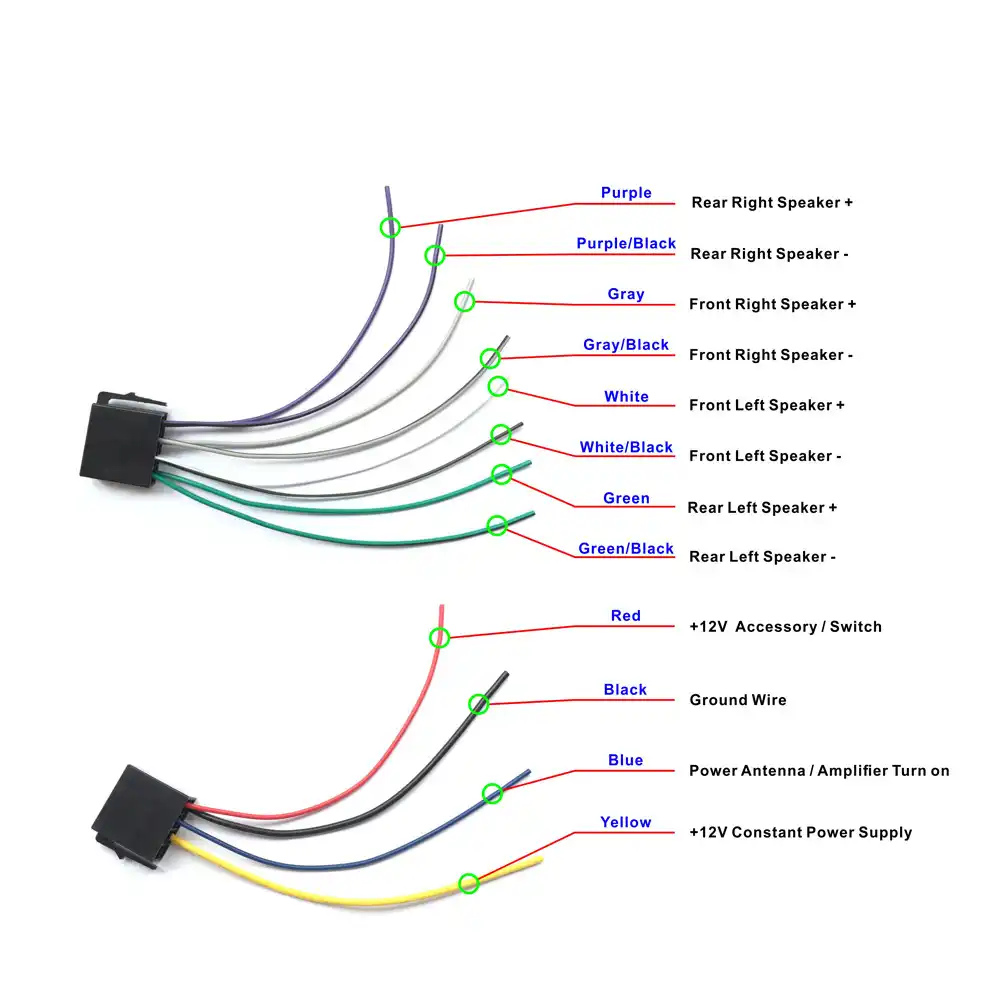
Important Wiring Guide:
- Red wire: Connect to the ignition switch to provide power to the stereo when the key is turned on.
- Yellow wire: Connect to a constant power source to retain memory and presets.
- Black wire: Ground the stereo by connecting it to a metal part of the vehicle’s chassis.
- Blue wire: Connect to the amplifier’s remote turn-on lead (if applicable).
- White and white/black wires: Connect to the left front speaker.
- Gray and gray/black wires: Connect to the right front speaker.
- Green and green/black wires: Connect to the left rear speaker.
- Purple and purple/black wires: Connect to the right rear speaker.
- Orange wire (illumination): Connect to the vehicle’s illumination wire (if applicable).
Following the Dual xdcpa10bt wiring diagram and using the appropriate wire connectors will ensure a proper and secure connection between the stereo and your vehicle’s electrical system. It is recommended to double-check all connections before powering on the stereo to avoid any potential issues.
Preparation
Before you begin the installation of the Dual xdcpa10bt car stereo, it is important to gather all the necessary tools and materials. This will help ensure a smooth and efficient installation process. Here is a list of items you will need:
- Wiring harness: The Dual xdcpa10bt comes with its own wiring harness, which will connect the stereo to your vehicle’s electrical system.
- Wire connectors: These connectors will be used to join the wires from the wiring harness to the wires in your vehicle.
- Electrical tape: This will be used to secure the wire connectors and provide insulation.
- Trim removal tools: You may need these tools to safely remove any panels or trim pieces in your vehicle to access the stereo mounting location.
- Screwdriver or socket set: Depending on the mounting method, you may need a screwdriver or socket set to remove any screws or bolts holding the stereo in place.
- Antenna adapter: If your vehicle has a different antenna connection than the one on the Dual xdcpa10bt, you will need an antenna adapter to ensure proper reception.
Once you have gathered all the necessary tools and materials, you can proceed with the installation of the Dual xdcpa10bt car stereo. Make sure to carefully read through the installation instructions provided in the stereo’s manual before starting the installation process. This will help prevent any mistakes and ensure a successful installation.
Wiring Instructions
If you are looking to install a Dual XDcpa10bt car stereo in your vehicle, it is important to follow the correct wiring instructions to ensure proper functionality. The following steps outline the necessary wiring process:
-
Disconnect the negative battery terminal to ensure safety during the installation process.
Note: This step is crucial to avoid any electrical accidents or damage.
-
Identify the wiring harnesses and connectors specific to your vehicle model. Refer to the car’s manual or consult a professional if needed.
-
Match the wires from your Dual XDcpa10bt car stereo to the corresponding wires in your vehicle’s wiring harness.
- Connect the red power wire from the car stereo to the accessory wire in the vehicle’s harness.
- Connect the yellow power wire from the car stereo to the constant 12V wire in the vehicle’s harness.
- Connect the black ground wire from the car stereo to the vehicle’s chassis or a grounding point.
- Connect the speaker wires according to their positive (+) and negative (-) terminals, ensuring proper polarity.
- Connect any additional wires, such as those for the antenna or steering wheel controls, if applicable.
-
Once all the wires are properly connected, carefully tuck them away and secure them using zip ties or electrical tape to ensure they do not interfere with other components or become loose during vehicle operation.
-
Reconnect the negative battery terminal to restore power.
-
Test the functionality of the Dual XDcpa10bt car stereo to ensure all features, such as audio playback and control, are working correctly.
By following these wiring instructions, you can safely and effectively install the Dual XDcpa10bt car stereo in your vehicle, enhancing your audio experience on the road.
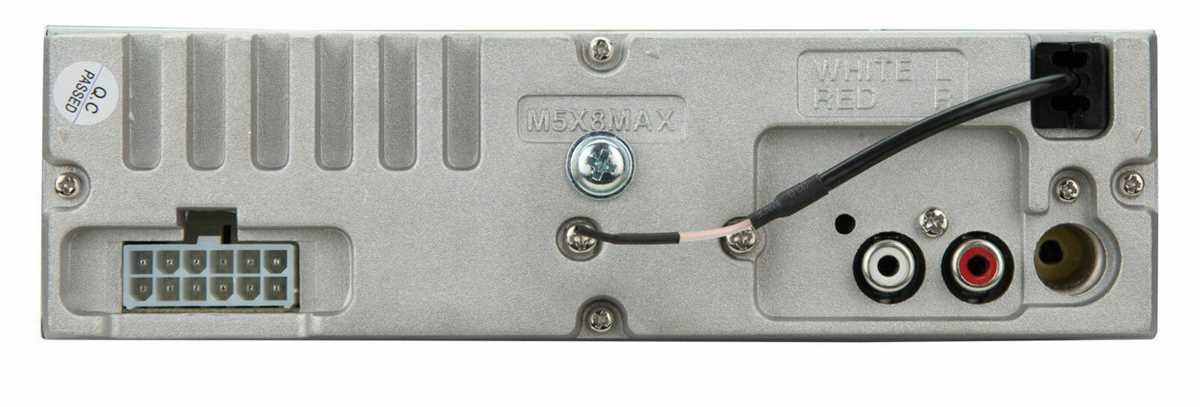
Connection Diagram
When it comes to installing a Dual xdcpa10bt car stereo, it’s important to understand the connection diagram. Properly connecting the wires ensures that the stereo functions correctly and delivers optimal sound quality.
The connection diagram for the Dual xdcpa10bt includes several key components. These include power wires, ground wires, speaker wires, and input/output wires. Each wire serves a specific purpose and must be connected correctly to ensure proper operation.
- Power wires: The power wires are responsible for supplying electricity to the car stereo. There are typically two power wires – yellow and red. The yellow wire should be connected to a constant source of power, while the red wire should be connected to a switched power source.
- Ground wire: The ground wire is used to provide a path for electrical current and ensure proper grounding of the car stereo. It is typically black in color and should be connected to a metal part of the vehicle’s chassis.
- Speaker wires: The speaker wires are responsible for transmitting audio signals from the car stereo to the speakers. There are usually four sets of speaker wires – front left, front right, rear left, and rear right. These wires should be connected to the corresponding speakers.
- Input/output wires: The input/output wires are used to connect additional devices to the car stereo, such as auxiliary input, USB, or Bluetooth. These wires should be connected according to the specific requirements of the connected devices.
Following the connection diagram provided by Dual ensures that all the wires are connected correctly, minimizing the risk of electrical damage and ensuring optimal performance of the car stereo. It is recommended to consult the user manual for detailed instructions on how to connect the wires and troubleshoot any potential issues.
Troubleshooting
The Dual xdcpa10bt wiring diagram provides a comprehensive guide for installing and wiring your Dual XDCPA10BT car stereo. However, if you encounter any issues during the installation or operation of your car stereo, troubleshooting can help you identify and resolve the problem. Here are some common troubleshooting steps:
- No power: If your car stereo does not power on, make sure the wiring connections are secure and that the power supply is properly connected. Check the fuses and ensure they are not blown. If necessary, consult the wiring diagram and user manual for further instructions.
- No sound: If you have power but no sound, check the speaker connections and make sure they are properly wired. Make sure that the speakers are not blown or damaged. Adjust the volume and balance settings on your car stereo to ensure they are properly configured.
- Bluetooth connection issues: If you are having trouble connecting your device via Bluetooth, make sure the Bluetooth feature is enabled on your car stereo and your device. Ensure that both devices are within range and not connected to any other devices. Restart both devices if necessary.
- Display issues: If the display on your car stereo is not functioning properly, check the wiring connections and ensure they are securely connected. Adjust the brightness and contrast settings to ensure they are properly configured. If the issue persists, consult the user manual for further troubleshooting steps.
- Button or control issues: If you are experiencing problems with the buttons or controls on your car stereo, make sure they are not stuck or obstructed. Clean the buttons and controls with a soft cloth if necessary. If the issue continues, consult the user manual for further guidance.
- General troubleshooting: If none of the above steps resolve the issue, try resetting your car stereo to its factory settings. Disconnect the power supply for a few minutes, then reconnect it and power on the car stereo. This can sometimes resolve any software or configuration issues.
Remember, if you are unsure or uncomfortable with troubleshooting your Dual XDCPA10BT car stereo, it is always recommended to seek professional assistance. Proper installation and troubleshooting can help ensure the optimal performance and longevity of your car stereo.
Q&A:
What is troubleshooting?
Troubleshooting is the process of identifying and solving problems or issues that occur with a system, device, or software.
Why is troubleshooting important?
Troubleshooting is important because it helps to identify and resolve problems, which can improve system performance, reduce downtime, and save time and money.
What are some common troubleshooting techniques?
Some common troubleshooting techniques include rebooting the device, checking for software updates, reviewing error messages, and isolating the problem by testing different components or systems.
What should I do if I cannot solve a problem through troubleshooting?
If you cannot solve a problem through troubleshooting, it may be necessary to seek assistance from a technical support team or consult the documentation or user manual for further guidance.