
Wiring a fan in a can is a relatively simple task that can be done by anyone with basic electrical knowledge. A fan in a can is a type of fan enclosure that is typically installed in a bathroom or other small space to improve ventilation. It consists of a fan, grille, and ducting system.
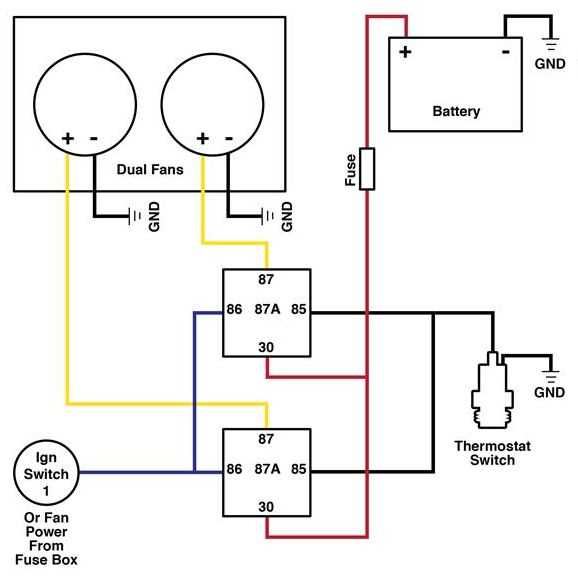
The wiring diagram for a fan in a can outlines the specific connections that need to be made in order to properly install and operate the fan. The diagram typically shows the power source, fan motor, and any additional switches or controls that are needed.
When wiring a fan in a can, it is important to follow the wiring diagram carefully to ensure that the fan operates safely and efficiently. The diagram will indicate the correct wire colors and locations for each connection, as well as any additional wiring components that may be necessary.
Overview
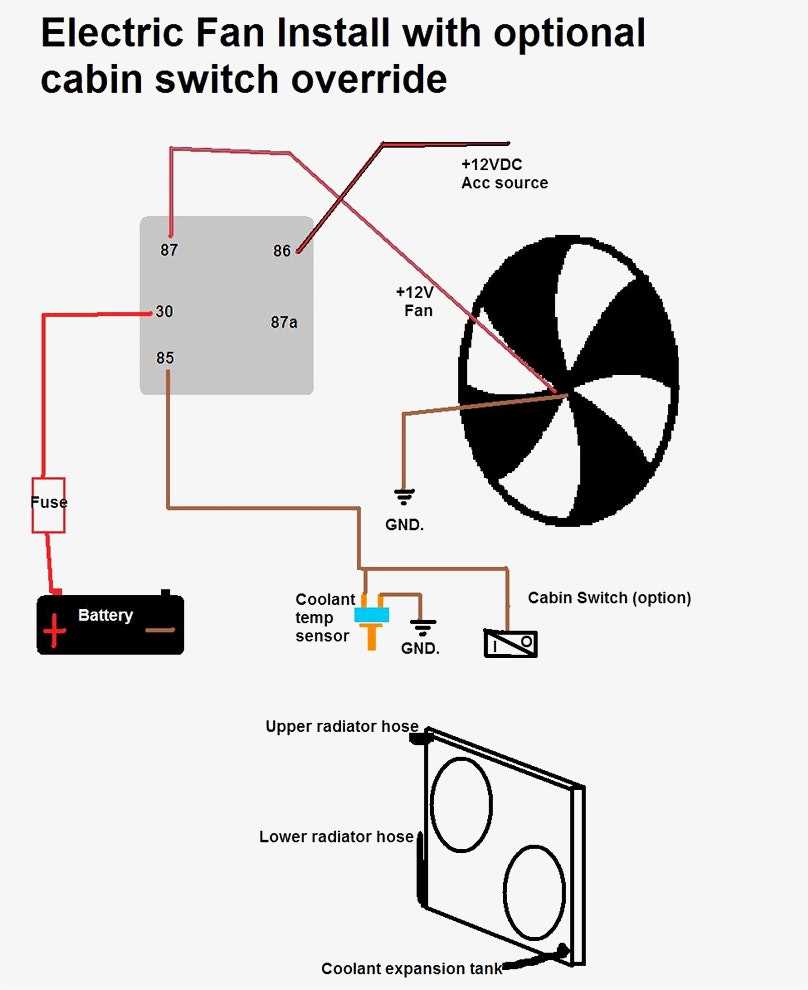
The wiring diagram for a “Fan in a can” is a crucial component in setting up a ventilation system. This diagram provides a detailed illustration of how to connect the necessary wiring for the fan to operate effectively. It is essential to properly understand and follow this diagram to ensure the fan functions correctly.
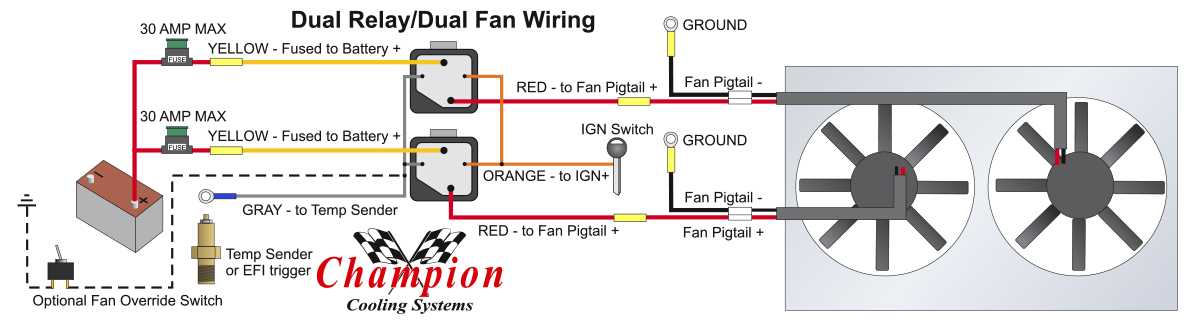
The diagram typically includes key components such as the fan motor, electrical connections, power source, and any additional controls or switches. It shows the specific wiring connections required, including the necessary wire sizes, color codes, and any necessary grounding or bonding connections.
The Fan in a can wiring diagram often includes clear labels and annotations to help with easy understanding and troubleshooting. It may also provide additional information about the fan’s specifications, such as voltage requirements, maximum current capacity, and recommended circuit protection devices.
To ensure proper installation, it is essential to carefully study the diagram and follow the manufacturer’s instructions. Incorrect wiring can lead to malfunctioning or damaged equipment, electrical hazards, or even fire hazards. It is always recommended to consult a qualified electrician or follow local electrical codes and regulations when performing any electrical installation.
Step 1: Gather the necessary materials
Before starting the wiring process for a fan in a can, you will need to gather the necessary materials. Having all the required items ready will make the installation process smoother and more efficient. Here are the materials you will need:
- A fan in a can unit: This is the main component of the setup, which includes the fan and the canister.
- Electrical wire: You will need wire of the appropriate gauge to connect the fan unit to the power source.
- Junction box: This is where the connections will be made. Make sure it is compatible with the fan unit and the wire gauge you are using.
- Wire connectors: These are used to secure the electrical connections and ensure proper conductivity.
- Electrical tape: This is used to insulate the connections and prevent any electrical hazards.
- Screwdriver or drill: You will need these tools to secure the fan unit and the junction box in place.
Make sure to check the instructions provided with the fan in a can unit for any additional materials or tools that may be required. Having all the necessary materials ready will ensure a smooth and successful wiring process for your fan in a can setup.
Step 2: Turn off the power
Before starting any electrical work, it is important to ensure that the power to the circuit you will be working on is turned off. This step is crucial for your safety and the safety of others, as working on live circuits can be extremely dangerous.
To turn off the power, locate the circuit breaker or fuse box that controls the circuit you will be working on. This may be located in your basement, garage, or utility room. Open the circuit breaker panel or fuse box cover to access the switches or fuses.
If you are using a circuit breaker panel:
- Identify the switch that corresponds to the circuit you will be working on. There may be labels or numbering on the panel to help you identify the correct switch.
- Flip the switch to the “off” position. You should hear it click and see the switch move to the opposite position.
- Double-check that the power is off by testing the device or appliance you will be working on with a non-contact voltage tester.
If you are using a fuse box:
- Locate the fuse that corresponds to the circuit you will be working on. The fuses may be labeled or color-coded to help you identify the correct one.
- Carefully remove the fuse from its socket. You may need to use a small tool, such as a fuse puller or pliers, to do this.
- Inspect the fuse to ensure it is blown. If the fuse appears intact, you may want to test it with a multimeter to confirm that it is not conducting electricity.
Keep in mind that turning off the power at the circuit breaker or fuse box only cuts off the electricity supply to that specific circuit. It is still important to use caution when handling electrical components and to avoid contact with live wires. If you are unsure about any aspect of this process, consult a licensed electrician.
Step 3: Identify the wires
Now that you have gathered all the necessary tools and materials, it’s time to identify the wires of the fan in a can. This step is crucial in order to ensure proper installation and avoid any potential electrical hazards.
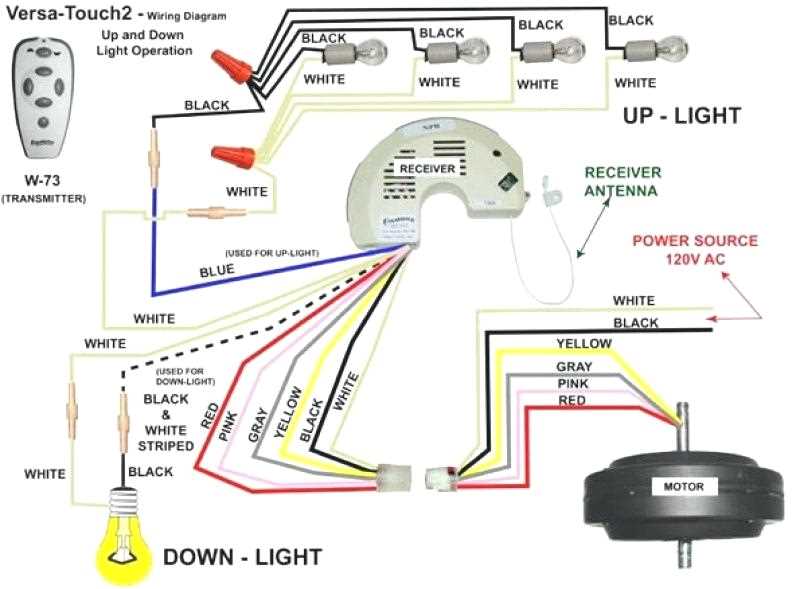
Start by carefully examining the wires and their colors. Most modern fans in a can typically have three wires: black, white, and green. The black wire is the hot wire, which carries the electrical current from the power source. The white wire is the neutral wire, which completes the electrical circuit. And the green wire is the ground wire, which provides a safe path for the electrical current in case of a short circuit.
Note: It’s important to note that the wire colors may vary depending on the fan in a can model and manufacturer. Always refer to the product’s wiring diagram or manual for accurate information.
Once you have identified the wires and their corresponding colors, you can proceed to connect them to the appropriate terminals. Make sure to use wire nuts or other suitable connectors to secure the connections. It’s also recommended to wrap each connection with electrical tape for added safety and protection.
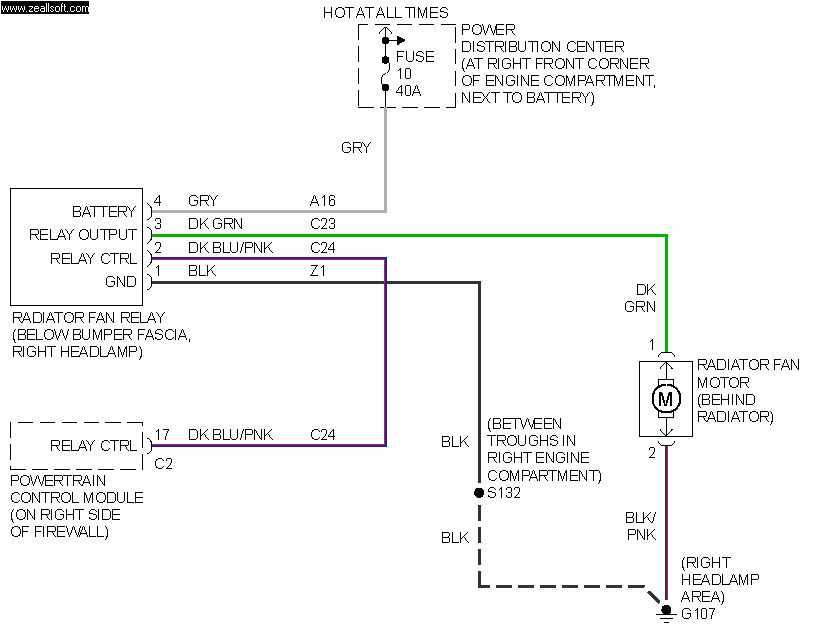
- Black wire (hot) – Connect to the black or red wire from the power source.
- White wire (neutral) – Connect to the white wire from the power source.
- Green wire (ground) – Connect to the green or bare copper wire from the power source.
Once all the wires are securely connected, you can proceed to test the fan in a can to ensure that it is functioning properly. Follow the manufacturer’s instructions on how to operate the fan and check for any abnormal noises or vibrations. If everything looks good, you can continue with the installation process and mount the fan in a can in the desired location.
Step 4: Connect the wires

Now that you have identified the wires on your fan and in the can, it’s time to connect them. The first step is to strip the insulation off the ends of the wires, using wire strippers or a utility knife. Make sure to remove about 1/2 inch of insulation to expose the bare wire.
Next, match the colors of the wires from the fan to the corresponding colors in the can. Typically, the black wire from the fan will connect to the black or red wire in the can, the white wire from the fan will connect to the white wire in the can, and the green wire (ground wire) from the fan will connect to the green or bare copper wire in the can. If the colors don’t match, refer to the wiring diagram provided by the manufacturer.
- Strip the insulation off the ends of the wires using wire strippers or a utility knife.
- Match the colors of the wires from the fan to the corresponding colors in the can.
- Connect the wires together by twisting them clockwise and securing them with wire nuts.
- Tuck the connected wires back into the can and secure the can to the ceiling joist using the provided hardware.
- Finally, install the fan blades and any additional accessories, following the instructions provided by the manufacturer.
After you have connected all the wires and secured them with wire nuts, give them a gentle tug to ensure they are tightly connected. Once you are satisfied with the connections, you can tuck the wires back into the can and secure the can to the ceiling joist using the hardware provided. Make sure the fan is securely mounted before proceeding.
With the wiring complete, you can now install the fan blades and any additional accessories that came with your fan. Follow the instructions provided by the manufacturer to correctly install these components. Once everything is installed, you can turn on the power and test the fan to make sure it is working properly.
Step 5: Secure the connections
Once all the necessary connections have been made, it is important to secure them properly to ensure that they do not come loose or become damaged. This step is crucial for the overall safety and functionality of the fan in a can system.
Here are some key points to keep in mind when securing the connections:
- Tighten all screws and bolts: Make sure that all screws and bolts used to secure the connections are tightened properly. This will help prevent any loose connections that could lead to electrical shorts or malfunctions.
- Use cable ties or clamps: Consider using cable ties or clamps to organize and secure the cables. This will help prevent them from becoming tangled or damaged over time.
- Protect exposed wires: If there are any exposed wires, it is important to protect them using electrical tape or wire sleeves. This will help prevent any accidental contact or damage to the wires.
- Follow manufacturer’s instructions: Always refer to the manufacturer’s instructions for specific recommendations on securing the connections. They may provide additional guidelines or precautions that are specific to the fan in a can system.
By following these steps to secure the connections, you can ensure that your fan in a can system is installed properly and will operate safely and efficiently.