
If you’re looking to upgrade or replace the stereo in your Ford Ranger, having a wiring harness diagram is essential. The stereo wiring harness diagram shows you the color-coded wires that connect to the different components of your audio system. With this information, you’ll be able to easily and correctly connect your new stereo, speakers, and any other audio accessories you want to install.
The Ford Ranger stereo wiring harness diagram typically includes information on the power wire, ground wire, illumination wire, speaker wires, and any other wires that are necessary for the operation of your audio system. Each wire is labeled with its color and function, making it easy to identify and connect the correct wires.
Using the wiring harness diagram can save you time and frustration when installing a new stereo in your Ford Ranger. Instead of guessing which wires go where, you can simply follow the diagram to ensure a proper and secure connection. This can help prevent damage to your new stereo or other components and ensure optimal performance of your audio system.
Whether you’re a car audio novice or an experienced DIY enthusiast, having a Ford Ranger stereo wiring harness diagram is a valuable resource. It provides you with the information you need to confidently and successfully install or upgrade your audio system. So before you get started, make sure to find and reference the wiring harness diagram specific to your Ford Ranger model and stereo type.
Ford Ranger Stereo Wiring Harness Diagram

When it comes to installing a new stereo system in your Ford Ranger, it’s important to have a wiring harness diagram to guide you. The stereo wiring harness is used to connect the new stereo to the existing wiring system in your vehicle, ensuring that all the necessary connections are made correctly. Having a diagram can make the installation process much easier and eliminate any guesswork.
The Ford Ranger stereo wiring harness diagram typically includes information such as the wire color codes, the function of each wire, and the connection points. This diagram allows you to easily identify the correct wires and make the appropriate connections. It’s important to follow the diagram carefully to ensure that all the connections are made correctly and that the stereo system functions properly.
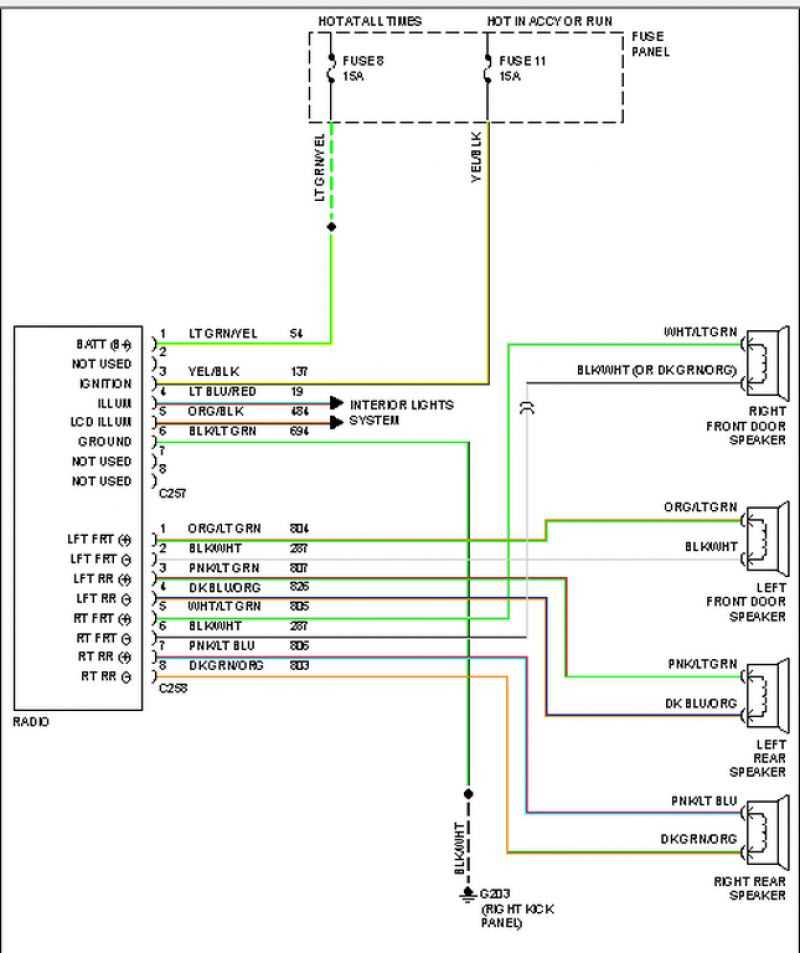
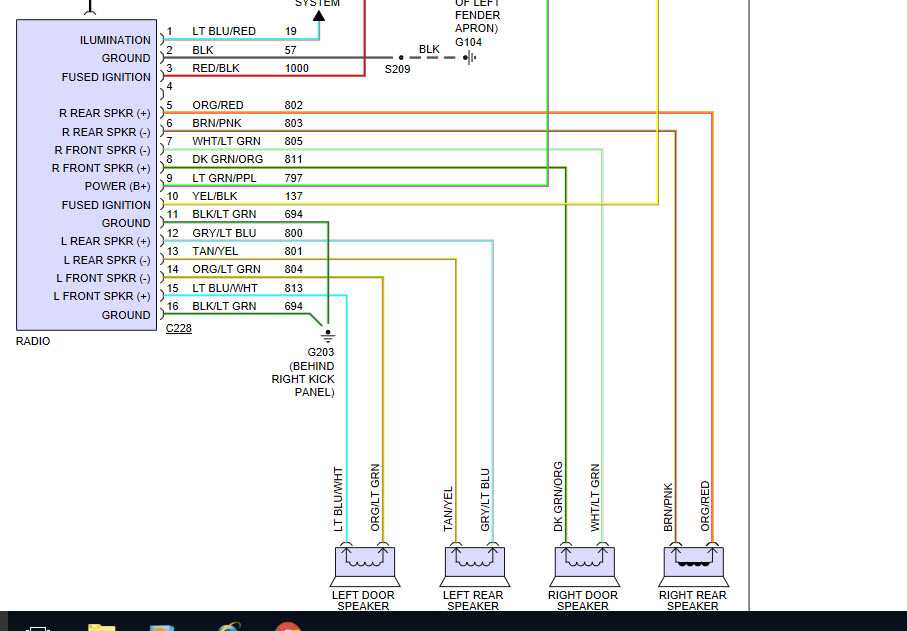
Here is a sample wiring harness diagram for a Ford Ranger stereo:
| Wire Color | Function | Connection |
|---|---|---|
| Red | Power | Connect to the ignition switch |
| Yellow | Memory | Connect to a constant power source |
| Black | Ground | Connect to a metal chassis |
| Green | Left Front Speaker Positive | Connect to the positive terminal of the left front speaker |
| Green/Black | Left Front Speaker Negative | Connect to the negative terminal of the left front speaker |
| Gray | Right Front Speaker Positive | Connect to the positive terminal of the right front speaker |
| Gray/Black | Right Front Speaker Negative | Connect to the negative terminal of the right front speaker |
| White | Left Rear Speaker Positive | Connect to the positive terminal of the left rear speaker |
| White/Black | Left Rear Speaker Negative | Connect to the negative terminal of the left rear speaker |
| Violet | Right Rear Speaker Positive | Connect to the positive terminal of the right rear speaker |
| Violet/Black | Right Rear Speaker Negative | Connect to the negative terminal of the right rear speaker |
By following a wiring harness diagram like the one above, you can easily install a new stereo system in your Ford Ranger. Just make sure to double-check all the connections and test the stereo system before finalizing the installation.
Overview of Ford Ranger Stereo Wiring Harness
When it comes to upgrading the stereo system in your Ford Ranger, it’s important to understand the wiring harness and how it works. The wiring harness is a crucial component that allows you to connect the aftermarket stereo to your vehicle’s electrical system without any modifications or damage.
Typically, the Ford Ranger stereo wiring harness consists of several wires that are color-coded to match the aftermarket stereo’s wiring. These wires include the power wire, ground wire, speaker wires, and other auxiliary wires. The color-coded system makes it easier to identify and connect the correct wires during the installation process.
The power wire, usually red, is responsible for supplying power to the stereo system. It connects to the vehicle’s power source, such as the battery or fuse box, to ensure proper functionality. On the other hand, the ground wire, typically black, is essential for grounding the stereo and preventing electrical noise or interference.
The speaker wires, usually identified with different colors, are used to connect the stereo to the speakers in your Ford Ranger. These wires carry the audio signals from the stereo to the speakers, allowing you to enjoy high-quality sound. It’s important to match the correct speaker wires to the corresponding speakers to ensure proper audio output.
In addition to the power, ground, and speaker wires, there might be other auxiliary wires in the Ford Ranger stereo wiring harness. These wires could be used for features like steering wheel controls, Bluetooth connectivity, or USB inputs. It’s important to consult the wiring diagram specific to your vehicle and stereo model to correctly identify and connect these auxiliary wires.
Overall, the Ford Ranger stereo wiring harness is an essential component for upgrading your stereo system. It simplifies the installation process and ensures a seamless connection between your aftermarket stereo and the vehicle’s electrical system. By understanding the different wires and their functions, you can easily install and enjoy a superior audio experience in your Ford Ranger.
Understanding the Wiring Diagram
When it comes to installing a stereo system in a Ford Ranger, understanding the wiring diagram is vital. The wiring diagram provides a blueprint of the electrical connections and components in the vehicle, allowing you to properly connect your stereo system without damaging any existing wiring or components.
The wiring diagram consists of several key components:
- Power wires: These wires provide the electrical power needed to operate the stereo system. They are usually color-coded and can be connected to the battery or the fuse box.
- Speaker wires: These wires connect the stereo system to the speakers throughout the vehicle. Each speaker has its own set of positive and negative wires, which must be properly connected to ensure sound quality.
- Ground wires: These wires are connected to the metal chassis of the vehicle and provide a path for electrical current to return to the battery. Ground wires are essential for preventing electrical shorts and ensuring the proper functioning of the stereo system.
- Accessory wires: These wires provide power to additional features and accessories in the vehicle, such as power windows, lights, or an amplifier. They are usually connected to the fuse box or the ignition switch.
- Control wires: These wires are responsible for controlling the functions of the stereo system, such as volume, tone, and source selection. They are usually connected to the controls on the front of the stereo unit.
By studying the wiring diagram and understanding the purpose of each wire, you can confidently install your stereo system in a Ford Ranger. It is important to follow the diagram closely and double-check your connections to ensure a successful installation. If you are unsure about any aspect of the wiring diagram, it is best to consult a professional or refer to a trusted wiring guide to avoid any potential damage to your vehicle’s electrical system.
Identifying the Wire Connections
When installing a new stereo in a Ford Ranger, it is important to understand the wire connections in order to properly connect the stereo wiring harness. The wire connections can vary depending on the year and model of the Ford Ranger, so it is essential to consult the wiring diagram specific to your vehicle.
Ignition Wire: One of the key connections to identify is the ignition wire, which provides power to the stereo when the key is turned on. This wire is typically connected to the ignition switch and can be found in the vehicle’s wiring harness. It is usually colored red or yellow.
Constant 12V Wire: Another important wire to identify is the constant 12V wire, which provides continuous power to the stereo even when the ignition is off. This wire is usually connected directly to the vehicle’s battery and can be identified as a yellow or orange wire.
Ground Wire: The ground wire is essential for the proper functioning of the stereo and is usually connected to the vehicle’s chassis. It is typically colored black and can be found in the wiring harness.
Speaker Wires: The speaker wires are responsible for transmitting audio signals from the stereo to the speakers. These wires are usually color-coded and can be found in pairs. Each pair is dedicated to a specific speaker and includes a positive wire (colored) and a negative wire (striped).
Antenna Wire: The antenna wire is used to connect the stereo to the vehicle’s antenna, allowing for radio reception. This wire is generally blue and can be found in the wiring harness.
By properly identifying and connecting the wire connections, you can ensure that the new stereo functions correctly and integrates seamlessly with your Ford Ranger.
Wiring Harness Installation Steps
Installing a wiring harness in your Ford Ranger can greatly improve the functionality and sound quality of your stereo system. Here are the steps to follow when installing a wiring harness:
1. Gather the Necessary Tools and Materials: Before beginning the installation, make sure you have all the tools and materials you’ll need. This includes a wiring harness adapter specific to your Ford Ranger model, wire cutters, wire strippers, electrical tape, and zip ties.
2. Disconnect the Battery: For safety purposes, disconnect the negative terminal of your vehicle’s battery before working on the wiring harness.
3. Remove the Factory Stereo: Use a panel removal tool to carefully remove the trim panels surrounding the factory stereo. Once the panels are removed, unscrew and disconnect the wiring harness and antenna cable from the stereo.
4. Connect the Wiring Harness Adapter: Connect the wiring harness adapter to the wiring harness of your vehicle. Match the color-coded wires on the adapter with the corresponding wires on the vehicle’s harness and secure the connections using wire connectors or soldering.
5. Connect the Wiring Harness to the Stereo: Plug the other end of the wiring harness adapter into the back of your new stereo unit. Make sure all connections are secure.
6. Test the Connections: Before reassembling the trim panels, reconnect the negative terminal of the battery and test the stereo connections. Ensure that all functions, such as audio playback and control, are working properly.
7. Secure and Reassemble: Once the connections are tested and working correctly, neatly secure the wiring harness with zip ties and electrical tape. Reassemble the trim panels and ensure they are properly aligned and secured.
8. Enjoy Your Upgraded Stereo System: With the wiring harness successfully installed, you can now enjoy an enhanced stereo system in your Ford Ranger, complete with improved functionality and sound quality.
- Note: It’s always best to refer to the specific wiring diagram or instructions provided with your wiring harness adapter for precise installation steps and wire color codes.
- Disclaimer: Electrical work can be dangerous, so if you’re not comfortable or experienced in working with automotive wiring, it’s recommended to seek professional installation.
Troubleshooting and Common Issues
While installing or troubleshooting a stereo wiring harness in your Ford Ranger, you may encounter a few common issues. Here are some troubleshooting tips to help you resolve them:
No Sound
If there is no sound coming from your stereo after installing the wiring harness, check the following:
- Make sure all connections are secure and properly plugged in.
- Check the speakers and speaker wires for any damage or loose connections.
- Verify that the stereo unit is functioning properly.
- Ensure that the volume is turned up and not muted.
Poor Sound Quality
If you notice poor sound quality or distortion from your stereo, try these troubleshooting steps:
- Check the speaker wire connections to ensure they are properly connected and not damaged.
- Check the equalizer settings on your stereo and adjust as needed.
- Inspect the speakers for any signs of damage or wear.
- Consider upgrading your speakers or stereo unit for improved sound quality.
Misfiring or Cutting Out
If your stereo cuts out or misfires while playing, try the following troubleshooting steps:
- Check the wiring harness connections to ensure they are properly connected and secure.
- Inspect the wiring harness for any signs of damage or fraying.
- Ensure that the stereo unit is receiving sufficient power and ground connections.
- Consider upgrading your wiring harness for improved reliability.
Overall Summary
Installing a stereo wiring harness in your Ford Ranger can enhance your audio experience while driving. By following the proper installation steps and troubleshooting any issues that may arise, you can enjoy high-quality sound from your stereo system. Remember to double-check all connections and consult the wiring harness diagram for your specific vehicle model to ensure a successful installation. If you encounter any difficulties or require further assistance, it is recommended to consult a professional or contact the manufacturer for support.