
If your GE dryer’s drum is no longer rotating, it could be due to a broken or worn-out belt. Fortunately, replacing the belt is a relatively simple task that can be done with a few tools and a little know-how. To get started, you’ll need to consult a GE dryer belt installation diagram to ensure you’re installing the new belt correctly.
The diagram will provide you with step-by-step instructions on how to access the dryer’s belt and pulley system, as well as how to remove the old belt and install the new one. It will also show you the correct path for threading the belt through the idler pulley and around the drum. Following the diagram is crucial to ensure the belt is installed properly, as an incorrectly installed belt could lead to further damage to the dryer or even create safety hazards.
Before attempting the belt replacement, it’s essential to gather all the necessary tools and materials. These typically include a socket set, a Phillips screwdriver, pliers, and, of course, a new replacement belt. It’s also a good idea to unplug the dryer from the power source for safety purposes. Additionally, it’s recommended to consult the dryer’s user manual or the manufacturer’s website for specific instructions that may be unique to your model.
What is a GE dryer belt installation diagram?
A GE dryer belt installation diagram is a visual guide that provides step-by-step instructions on how to install a belt on a GE dryer. The diagram includes illustrations and labeled components to help users understand the correct placement and routing of the belt. This diagram is particularly useful for individuals who are unfamiliar with dryer repair or for those who want to ensure they are installing the belt correctly.
The GE dryer belt installation diagram typically includes information such as the model number of the dryer, the type of belt needed, and the tools required for the installation. It may also include additional tips or precautions to take during the installation process. The diagram is designed to be a helpful resource for individuals who prefer visual instructions over written ones.
Components of a GE dryer belt installation diagram
- Model number of the dryer
- Type of belt needed
- Step-by-step instructions
- Illustrations of the dryer and belt placement
- Labeled components
- Tools required for installation
- Tips or precautions
The GE dryer belt installation diagram is typically provided by the manufacturer and can be found in the dryer’s user manual or on the manufacturer’s website. It is important to follow the instructions provided in the diagram to ensure proper installation and avoid damage to the dryer. If in doubt, it is always recommended to consult a professional or contact the manufacturer for assistance.
Overview of a GE dryer belt installation diagram
When it comes to maintaining and repairing your GE dryer, understanding the belt installation diagram is essential. The diagram provides a visual representation of how the dryer belt should be correctly installed, ensuring proper functioning of the appliance. By following the diagram, you can easily replace a worn-out or broken belt, saving you time and money from calling a professional repair service.
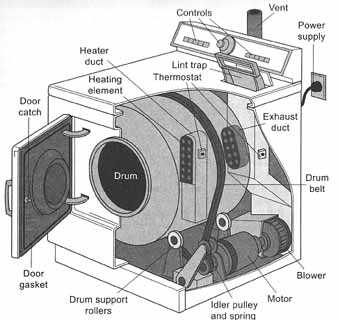
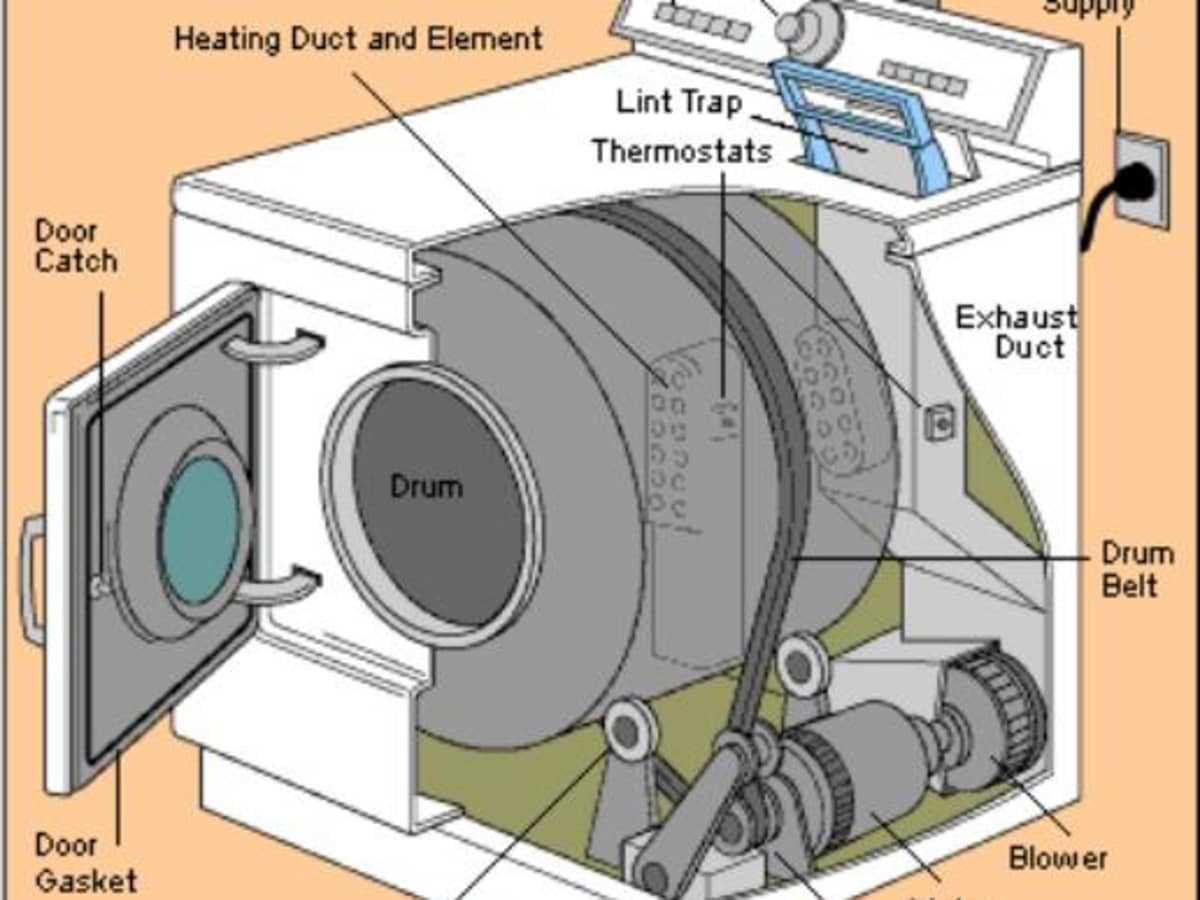
The GE dryer belt installation diagram typically includes the following key components:
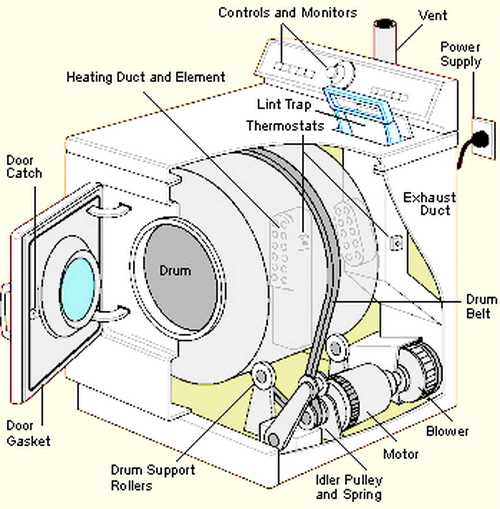
- Belt: The main component of the diagram, the belt is a flexible loop made of rubber or polyester. It wraps around the drum and connects to the motor pulley, enabling the rotation of the drum.
- Drum: The large, cylindrical component inside the dryer that holds and tumbles the clothes. The belt wraps around the drum, creating the necessary friction for clothes to tumble and dry evenly.
- Motor Pulley: The pulley attached to the motor shaft that drives the rotation of the drum. The belt connects to the motor pulley, transferring power from the motor to the drum.
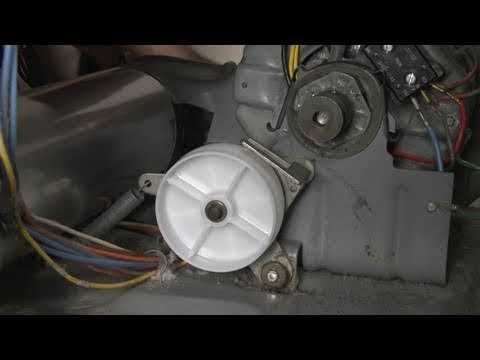
- Idler Pulley: The pulley that maintains tension on the belt. It is spring-loaded and keeps the belt tight, preventing slippage during operation. The belt wraps around the idler pulley, creating tension for proper functioning.
In the installation diagram, each component is depicted with clear illustrations and labeled accordingly. This visual guide makes it easier for you to locate and understand the positioning of each part, ensuring a successful belt replacement.
Before starting the installation process, it is important to consult the specific dryer model’s instruction manual or the manufacturer’s website to obtain the correct diagram. Different GE dryer models may have slight variations in belt installation, so it is crucial to have the accurate diagram for your specific appliance.
Remember to disconnect the dryer from the power source before attempting any repairs or installations. Furthermore, it is recommended to wear protective gloves to ensure safety during the process. By following the GE dryer belt installation diagram and taking necessary precautions, you can confidently replace the belt and get your dryer back in working condition.
Step-by-step instructions for using a GE dryer belt installation diagram
When it comes to installing a new belt in your GE dryer, having a clear diagram can be incredibly helpful. Here are step-by-step instructions for using a GE dryer belt installation diagram:
- Start by disconnecting the power to the dryer. This is an important safety precaution that should always be followed.
- Remove the top panel of the dryer by unscrewing the screws that hold it in place. Set the panel aside.
- Next, locate the old belt inside the dryer. Carefully remove it from the drum and motor pulley.
- Refer to the GE dryer belt installation diagram to determine the correct placement of the new belt. The diagram will show you how the belt wraps around the drum and motor pulley.
- With the diagram as your guide, position the new belt around the drum, making sure it is lined up properly.
- Thread the belt around the motor pulley, following the path indicated in the diagram. Take your time to ensure the belt is securely in place.
- Double-check your work to make sure the belt is properly aligned and tensioned. Make any necessary adjustments before moving on.
- Replace the top panel of the dryer and secure it with the screws that were removed earlier.
- Finally, reconnect the power to the dryer and test it to ensure the belt is functioning correctly.
By following these step-by-step instructions and using a GE dryer belt installation diagram, you can successfully replace the belt in your GE dryer and have it working like new again.
Common issues and troubleshooting tips related to GE dryer belt installation
Installing a new belt in your GE dryer can help restore its functionality and ensure proper drying of your clothes. However, there are a few common issues that you may encounter during the belt installation process. Here are some troubleshooting tips to help you overcome these challenges:
Belt slipping off pulleys:
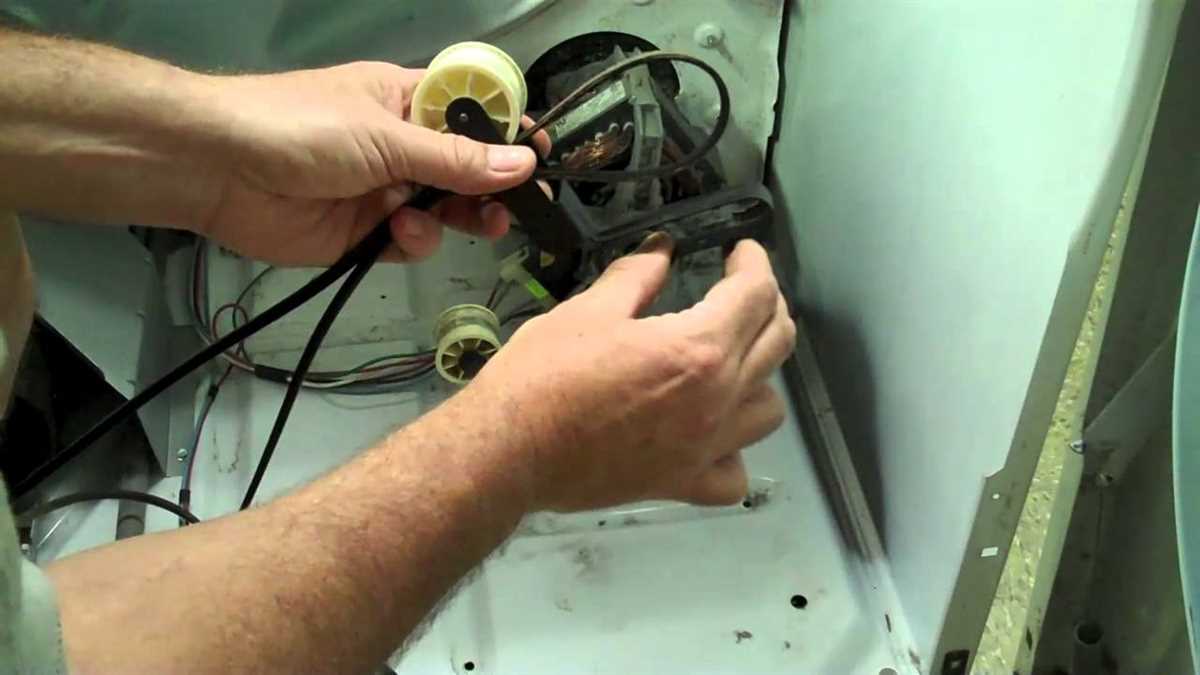
If your belt keeps slipping off the pulleys, it could be due to improper tension or alignment. Start by ensuring that the belt is correctly positioned on the motor pulley and the idler pulley. Use pliers to adjust the tension on the idler pulley by moving it closer to the motor. This will increase the tension on the belt and prevent it from slipping off.
If the belt continues to slip off even after adjusting the tension, check for any worn or damaged pulleys. Replace any worn pulleys to ensure smooth rotation and proper belt alignment.
Belt not rotating drum:
If the belt is installed correctly but the drum is not rotating, there may be an issue with the motor or the idler pulley. First, check if the motor is running properly by listening for any unusual noises or vibrations. If the motor seems to be functioning fine, inspect the idler pulley for any signs of damage or wear. Replace the idler pulley if necessary.
In some cases, the belt itself may be faulty or worn out. Inspect the belt for any signs of fraying or damage. If the belt is damaged, replace it with a new one to ensure proper rotation of the drum.
By following these troubleshooting tips, you can address common issues related to GE dryer belt installation and ensure efficient and reliable operation of your dryer.
Benefits of using a GE dryer belt installation diagram
Installing a dryer belt on your GE dryer can be a challenging task, especially if you are not familiar with the appliance. However, by using a GE dryer belt installation diagram, you can simplify the process and ensure that the belt is installed correctly.
One of the key benefits of using a GE dryer belt installation diagram is that it provides a visual representation of the installation steps. This can be especially helpful for individuals who are more visual learners or for those who prefer to have a visual reference while working. The diagram typically includes clear and detailed illustrations that show the specific steps involved in installing the belt, making it easier to follow along and avoid any potential mistakes.
Another advantage of using a GE dryer belt installation diagram is that it often includes accompanying instructions or guidelines. These instructions can provide additional clarity and guidance on how to properly install the belt, ensuring that it is tightened to the correct tension and placed in the correct position. With the combination of the visual diagram and the accompanying instructions, you can have a comprehensive understanding of the installation process and complete it with confidence.
Additionally, using a GE dryer belt installation diagram can save you time and effort. Instead of trying to decipher complicated written instructions or attempting to install the belt through trial and error, you can rely on the diagram as a reliable reference. This can help you avoid unnecessary frustration and potential mistakes, allowing you to complete the installation more efficiently.
In conclusion, utilizing a GE dryer belt installation diagram offers several benefits, including visual guidance, clear instructions, and time savings. By using this valuable resource, you can ensure that the belt is installed correctly and enjoy the optimal performance of your GE dryer.
Tips for finding and using a GE dryer belt installation diagram
When it comes to replacing the belt on your GE dryer, having access to a detailed installation diagram can be incredibly helpful. Here are some tips to help you find and effectively use a GE dryer belt installation diagram:
1. Look for the official GE website:
Start by visiting the official GE website. They often provide resources and support for their appliances, including diagrams and instructional materials. Look for a section specifically dedicated to dryers or repairs, where you may find the installation diagram for your specific model.
2. Check online appliance repair forums:
Appliance repair forums are a great resource for finding information and diagrams. Many experienced technicians and DIY enthusiasts share their knowledge and experiences on these forums. Look for discussions or threads related to GE dryers and belt replacement to see if anyone has shared a diagram or instructions.
3. Consult user manuals or guides:
Your GE dryer might have come with a user manual or guide that includes an installation diagram. Check the manual or guide that came with your dryer to see if it provides any visual instructions for replacing the belt.
4. Use generic dryer belt installation diagrams:
If you are unable to find a specific GE dryer belt installation diagram, you can still find generic diagrams that apply to most dryer models. These diagrams typically illustrate the basic steps and configurations for installing a dryer belt. While they may not be tailored specifically to your GE dryer, they can still provide helpful guidance.
5. Follow the instructions carefully:
Once you have obtained a GE dryer belt installation diagram, make sure to read and understand the instructions before starting the installation process. Pay attention to specific details such as the orientation of the belt or the path it should take around the drum and pulley system. Following the instructions carefully will help ensure a proper and secure installation.
Overall, finding and using a GE dryer belt installation diagram can greatly simplify the belt replacement process. It is important to take your time, follow the instructions, and refer to the diagram as needed to ensure a successful installation.