
When it comes to your kitchen appliances, there are few things more frustrating than a malfunctioning oven. Whether it’s a faulty heating element or a broken control panel, a malfunctioning oven can disrupt your cooking routine and leave you feeling helpless. That’s why it’s important to have a solid understanding of your oven’s parts and how they work together to create the perfect cooking environment.
One of the most popular oven brands out there is GE Profile, known for its quality and durability. To help you better understand your GE Profile oven, we’ve put together a comprehensive diagram that breaks down its various parts. From the heating elements and convection fan to the control board and door latch assembly, this diagram will give you a complete overview of how your oven functions.
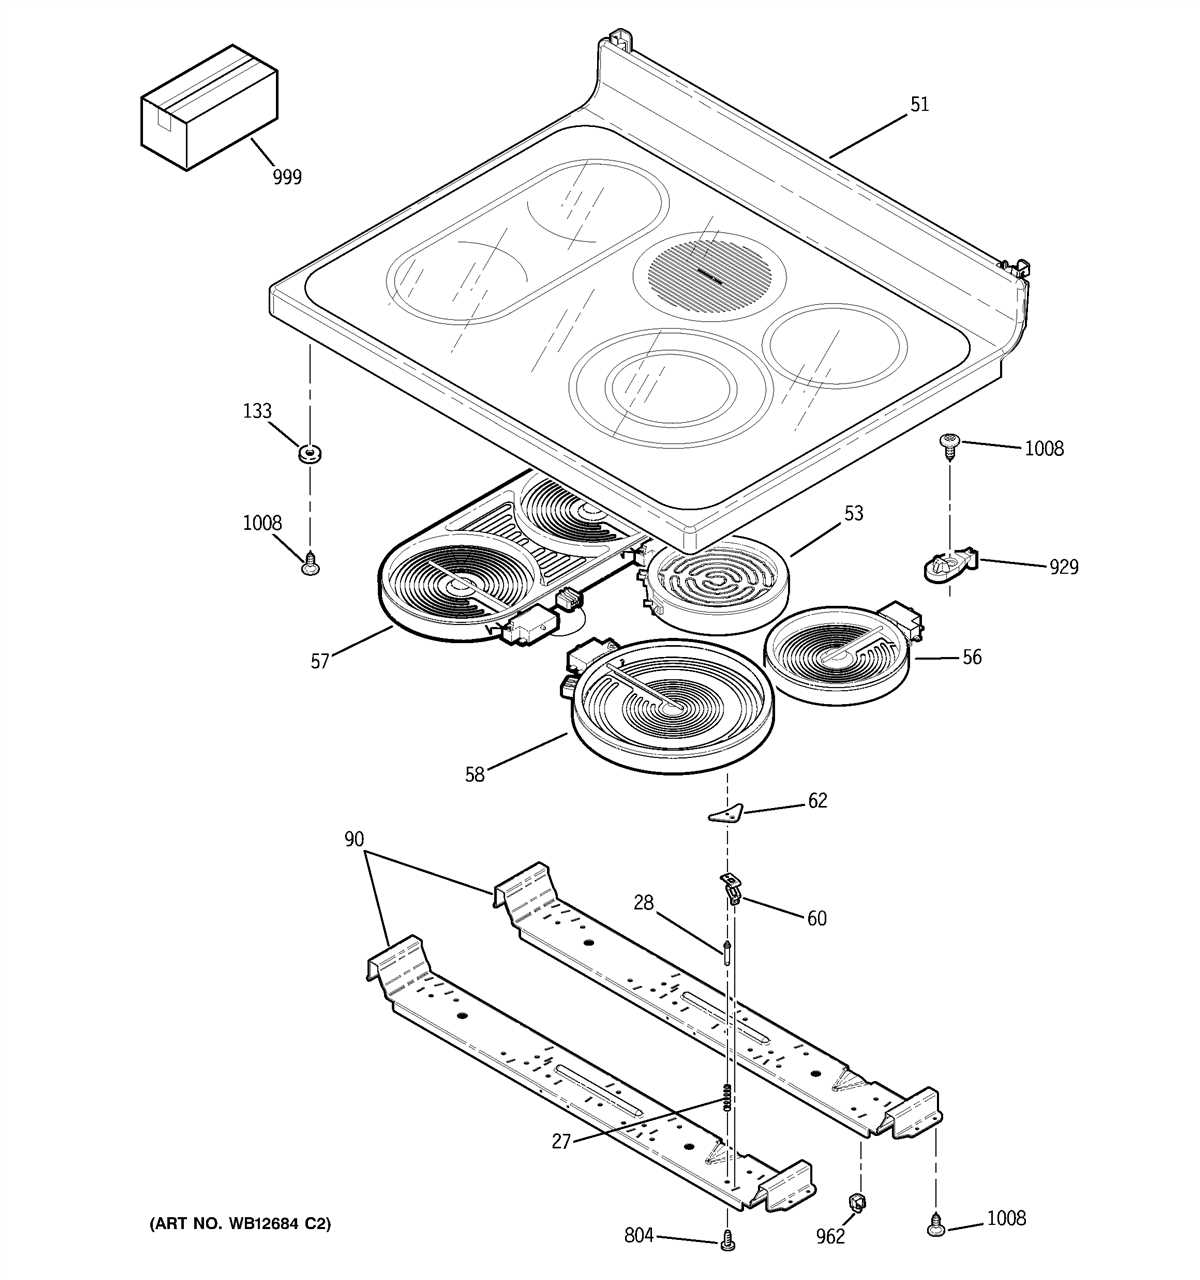
One of the key components of any oven is the heating element, which is responsible for generating the heat needed to cook your food. In a GE Profile oven, you’ll typically find two heating elements: one at the top and one at the bottom. The top heating element is used for broiling, while the bottom heating element is used for baking and roasting. Understanding how these elements work will help you troubleshoot any heating issues you may encounter.
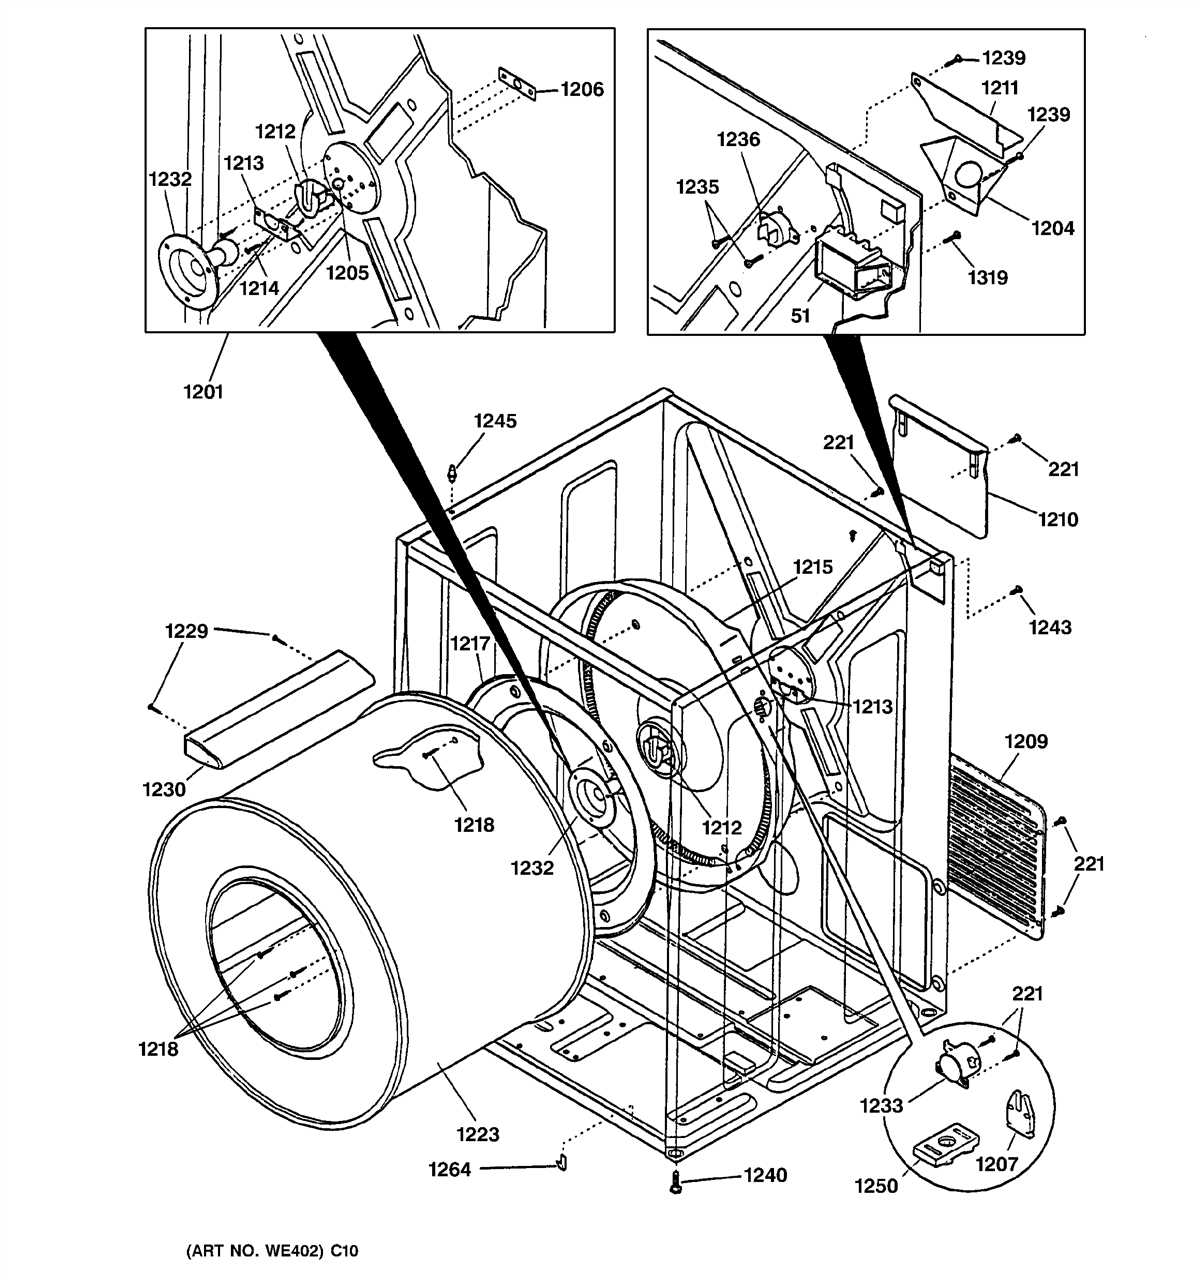
Another important part of your GE Profile oven is the convection fan, which helps circulate hot air evenly throughout the oven cavity. This ensures that your food cooks evenly and thoroughly, so you don’t end up with hot spots or undercooked sections. The convection fan is typically located at the back of the oven and is powered by a fan motor. If you notice that your food is not cooking evenly, it’s possible that there may be an issue with the convection fan or its motor.
These are just a few examples of the many parts that make up a GE Profile oven. By familiarizing yourself with these components and understanding how they work together, you’ll be better equipped to troubleshoot any issues that may arise. So the next time your oven acts up, you’ll have the knowledge and confidence to fix it yourself or communicate effectively with a professional technician. Remember, a well-maintained oven is the key to delicious and perfectly cooked meals!
Understanding the GE Profile Oven Parts Diagram: A Comprehensive Guide
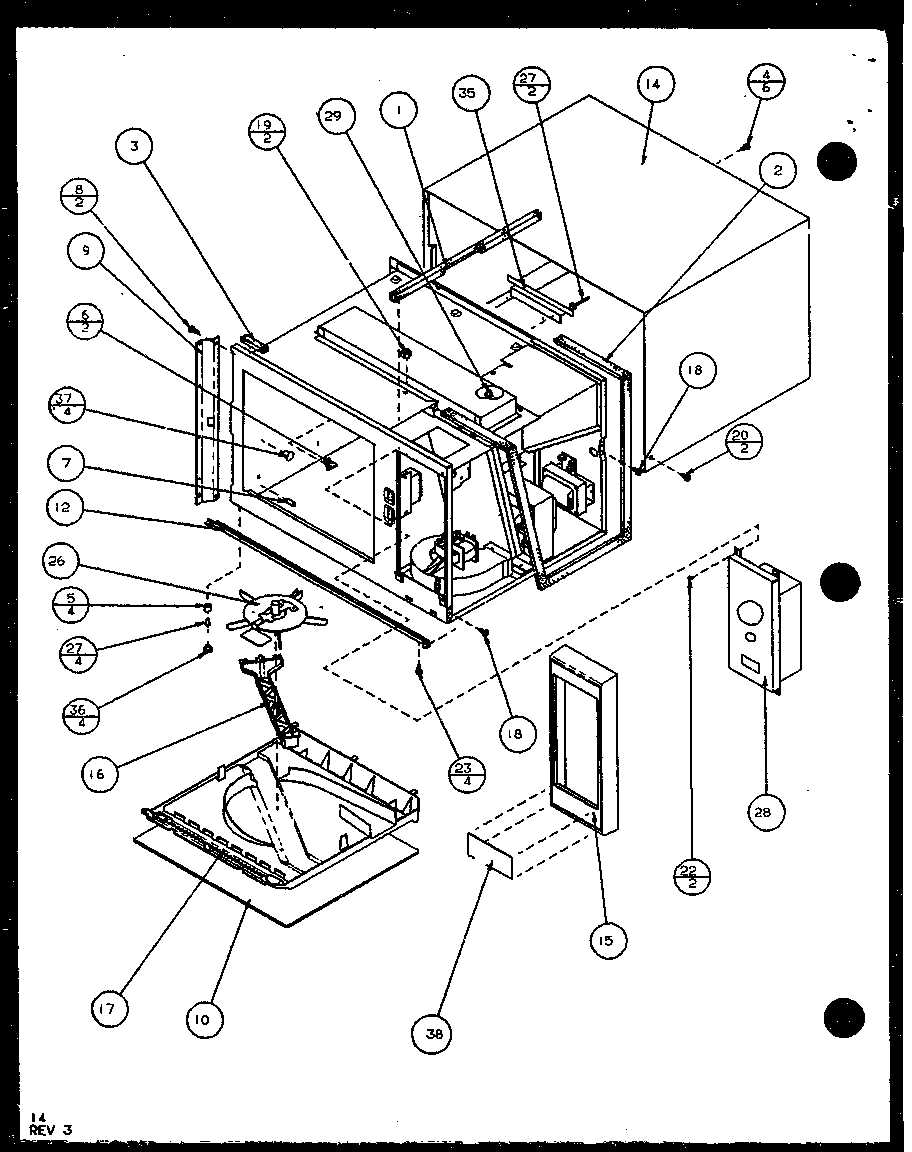
When it comes to troubleshooting and repairing your GE Profile oven, having a good understanding of the oven parts diagram can be extremely helpful. This comprehensive guide will walk you through the main components of the oven and provide an overview of their functions.
1. Control Panel: The control panel is where you can set the desired temperature, mode, and cooking time for your oven. It usually consists of buttons, knobs, and a digital display. This is the main interface for operating the oven.
2. Oven Temperature Sensor: The oven temperature sensor is responsible for monitoring the temperature inside the oven cavity. If the sensor is faulty, it can cause the oven to not heat properly or overheat. It is usually located near the back of the oven.
3. Bake Element: The bake element is located at the bottom of the oven and is responsible for generating heat for baking. It is a long, coiled wire that glows red when it is active. If the bake element is not working, your oven may not heat evenly or at all.
4. Broil Element: The broil element is located at the top of the oven and is responsible for generating heat for broiling. It works similarly to the bake element but is designed to provide intense heat from above. If the broil element is not working, your oven may not broil properly.
5. Oven Door Gasket: The oven door gasket is a rubber seal that keeps the heat inside the oven cavity when the door is closed. If the gasket is damaged or worn out, it can cause heat to escape and affect the oven’s performance. It is important to regularly inspect and replace the oven door gasket if necessary.
6. Oven Light: The oven light is located inside the oven cavity and provides illumination when the door is open. It allows you to check on your food without opening the door and releasing heat. If the light bulb is burned out, it can be easily replaced.
7. Oven Racks: The oven racks are removable metal shelves that provide support for the food being cooked. They can be adjusted to different positions to accommodate different cooking needs. It is important to properly position the oven racks to ensure optimal cooking results.
8. Thermal Fuse: The thermal fuse is a safety device that cuts off power to the oven if it overheats. It is usually located near the control board or behind the rear panel of the oven. If the thermal fuse is blown, it will need to be replaced to restore power to the oven.
This GE Profile oven parts diagram provides a comprehensive overview of the main components of the oven and their functions. By understanding the role of each part, you will be better equipped to diagnose and troubleshoot any issues that may arise with your oven.
Oven Control Board: The Brain of Your GE Profile Oven
When it comes to the functionality of your GE Profile oven, the oven control board is the brain of the operation. This essential component controls all of the main functions and settings of your oven, from setting the temperature to determining the cooking time.
The oven control board is responsible for receiving input from the various buttons and knobs on the oven’s control panel, and it translates those inputs into commands that can be understood by the oven’s heating elements, timers, and other components. It also displays important information such as the current temperature and cooking time.
The control board is made up of various electronic components, including microprocessors and relays, which work together to ensure that your oven operates smoothly and efficiently. If any of these components fail or become damaged, it can result in issues with your oven’s performance or even render it completely non-functional.
If you are experiencing problems with your GE Profile oven, such as inconsistent heating, error codes, or a non-responsive control panel, there is a good chance that the oven control board may be the culprit. In such cases, it is recommended to consult the oven’s parts diagram and identify the specific control board that corresponds to your model.
Replacing the oven control board can be a complex task and should ideally be performed by a qualified technician. However, with the help of the right tools and a bit of technical know-how, it is possible to replace the control board yourself. Just make sure to disconnect the power supply to the oven before attempting any repairs or replacements.
Heating Elements: Powering Your Oven’s Cooking Performance
When it comes to cooking, a reliable and efficient oven is essential. At the heart of every oven is its heating element, which generates the necessary heat to cook your meals to perfection. Understanding the different types of heating elements in your GE Profile oven can help you troubleshoot and maintain its performance.
1. Bake Element: The bake element is the most commonly used heating element in an oven. Located at the bottom of the oven cavity, it provides a consistent temperature for baking and roasting. This element is typically made of metal and is powered by electricity. If you notice uneven cooking or a lack of heat in your oven, a faulty bake element may be the culprit.
2. Broil Element: The broil element is located at the top of the oven cavity and is responsible for providing the high, direct heat needed for broiling. This element is typically made of quartz or ceramic and can reach extremely high temperatures. If your oven struggles to reach the desired broiling temperature, the broil element may need to be replaced.
3. Convection Element: Some GE Profile ovens are equipped with a convection element, which is responsible for circulating hot air within the oven cavity. This type of heating element helps to cook food more evenly and efficiently. If your convection setting is not working properly, the convection element may need to be inspected or replaced.
Regular maintenance and inspection of your oven’s heating elements are crucial to ensure optimal cooking performance. If you notice any issues with temperature control, uneven cooking, or a complete lack of heat, it’s important to check the heating elements and consult the GE Profile oven parts diagram for further guidance.
- Regularly clean your oven to prevent build-up or damage to the heating elements.
- Refer to the manufacturer’s instructions for proper maintenance and replacement of heating elements.
- Consider scheduling regular professional servicing to ensure the longevity and performance of your oven.
By understanding the role and importance of the heating elements in your GE Profile oven, you can ensure that your cooking experiences are consistently delicious and enjoyable.
Temperature Sensors: Ensuring Precision Cooking
The key to achieving precision cooking in a GE Profile oven lies in its temperature sensors. These sensors are designed to accurately measure the temperature inside the oven cavity, allowing the appliance to maintain a consistent and precise cooking temperature. Without these sensors, it would be difficult to achieve the desired cooking results, as the oven may become too hot or too cold.
GE Profile ovens are equipped with multiple temperature sensors strategically placed throughout the oven cavity. These sensors continuously monitor the temperature and send signals to the oven’s control board, which then adjusts the heat output accordingly. This ensures that the oven maintains a steady temperature and provides consistent cooking results.
- Convection ovens: In convection ovens, temperature sensors play an even more crucial role. Convection ovens have a fan that circulates hot air throughout the oven cavity, resulting in faster and more even cooking. The temperature sensors in these ovens help to monitor and regulate the airflow and temperature distribution, ensuring that the food cooks evenly from all sides.
- Error detection and safety: Temperature sensors also serve a critical safety function. In the event of a malfunction or overheating, the sensors can detect abnormal temperature levels and trigger an alarm or automatically shut off the oven. This feature helps to prevent accidents and protects both the oven and the surrounding area from potential damage or fire.
In summary, temperature sensors in GE Profile ovens are essential for achieving precision cooking. They ensure that the oven maintains a consistent and accurate temperature, resulting in perfectly cooked meals. Additionally, these sensors help to regulate airflow and temperature distribution in convection ovens and provide safety features to prevent accidents. With the help of temperature sensors, you can have confidence in the performance and reliability of your GE Profile oven.
Door Assembly: Safety and Efficiency in One
The door assembly is a crucial component of any GE Profile oven. It ensures the safety of users by providing a barrier between the hot oven cavity and the surrounding environment. Additionally, it plays a significant role in maintaining the efficiency of the oven by preventing heat loss and maintaining the desired temperature inside the oven.
The GE Profile oven door assembly consists of several important parts, including the door handle, hinges, gasket, and glass panels. The door handle allows users to easily open and close the oven door, ensuring convenience and ease of use. The hinges are responsible for supporting the weight of the door and enabling smooth movement when opening or closing the oven. The gasket is a seal that forms a tight barrier between the door and the oven cavity, preventing heat from escaping and ensuring efficient cooking.
The glass panels in the door assembly serve both practical and aesthetic purposes. They allow users to monitor the cooking progress without opening the oven door, thus minimizing heat loss. Additionally, the glass panels add a sleek and stylish look to the oven, enhancing the overall appearance of the kitchen.
When it comes to maintaining the door assembly, regular inspection and maintenance are essential. It is important to check the condition of the door handle, hinges, gasket, and glass panels to ensure they are in good working order. Any signs of wear or damage should be addressed promptly to prevent further issues and maintain the safety and efficiency of the oven.
In conclusion, the door assembly of a GE Profile oven is a critical component that provides safety and efficiency. Its various parts work together to create a barrier between the oven cavity and the surrounding environment, preventing heat loss and ensuring optimal cooking conditions. Regular maintenance and inspection of the door assembly are necessary to ensure its continued performance and longevity.
Control Panel: Convenient Access to Your Oven’s Features
The control panel of your GE Profile oven is designed to provide you with convenient access to all of your oven’s features and functions. With a user-friendly interface, the control panel allows you to easily set and adjust the temperature, timer, and cooking mode for your desired cooking needs.
Equipped with a digital display, the control panel provides accurate and precise information about the current settings and status of your oven. Whether you’re baking, broiling, or using the convection feature, the control panel ensures that you have complete control over your cooking process.
The control panel includes intuitive buttons and knobs that make it easy to navigate through the various cooking options. From preheating your oven to selecting the cooking time and temperature, the control panel puts all the essential functions at your fingertips.
Additionally, the control panel features a variety of helpful features, such as a delay-start function, Sabbath mode, and self-cleaning options. These additional functions enhance the convenience and versatility of your oven, allowing you to customize your cooking experience to meet your specific needs and preferences.
In summary, the control panel of your GE Profile oven plays a vital role in providing you with convenient access to all of your oven’s features and functions. Its user-friendly interface, digital display, and intuitive buttons make it easy to set and adjust the temperature, timer, and cooking mode. With additional features like delay-start and self-cleaning options, the control panel enhances the convenience and versatility of your oven. Enjoy the convenience and control that the control panel offers as you prepare delicious meals for yourself or your loved ones.