
The horn in a vehicle is an important safety feature that alerts other drivers and pedestrians of your presence on the road. The horn relay is a crucial component in the horn circuit, responsible for controlling the flow of electrical current to the horn. Understanding the wiring diagram for the GM horn relay is essential for troubleshooting and repairing any issues with the horn system.
The GM horn relay wiring diagram provides a visual representation of how the horn relay is connected to the battery, ground, horn switch, and horn itself. It shows the electrical connections and components involved in the horn circuit, including fuses, relays, and switches. By studying the diagram, you can identify the specific wires and connections that need to be inspected or repaired.
One common problem with the GM horn relay wiring is a faulty connection or a blown fuse. If the horn in your GM vehicle is not working, you can use the wiring diagram to trace the path of the electrical current and locate any potential issues. This will help you determine whether the problem lies with the relay, the horn switch, or any other component in the horn circuit.
Having a good understanding of the GM horn relay wiring diagram can also be useful when installing aftermarket horns or custom horn systems in your vehicle. It allows you to properly connect the new components to the existing wiring, ensuring a safe and functional horn system.
What is a horn relay and why is it necessary?
A horn relay is an electrical device that controls the power supply to the horn in a vehicle. It is an important component of the horn system as it allows for efficient and reliable operation of the horn. The horn relay acts as a switch, activating the horn when the steering wheel button or horn pad is pressed.
One of the main reasons why a horn relay is necessary is to protect the electrical system of the vehicle. The horn requires a high current to produce a loud sound, and directly connecting it to the steering wheel button can put a strain on the electrical system. The horn relay acts as a buffer, allowing the high current to flow through it instead of directly through the steering wheel button.
The horn relay also ensures that the horn is activated consistently and reliably. When the horn button is pressed, the relay closes the circuit, allowing power to flow from the battery to the horn. This eliminates the need for the horn button to directly handle the high current and ensures that the horn is always ready to sound when needed.
In addition to protecting the electrical system and ensuring reliable operation, the horn relay also allows for flexibility in the wiring and installation of the horn system. The relay can be placed closer to the source of power, reducing voltage drop and ensuring that the horn receives sufficient power for optimal performance.
In conclusion, the horn relay is a necessary component in a vehicle’s horn system. It protects the electrical system, ensures reliable operation, and allows for flexibility in wiring and installation. Without a horn relay, the horn may not work properly and could potentially cause damage to the vehicle’s electrical system.
Understanding the Wiring of a GM Horn Relay
In a General Motors (GM) vehicle, the horn relay is responsible for allowing the horn to sound when the horn button is pressed. The relay acts as a switch that controls the flow of electricity to the horn. Understanding the wiring of a GM horn relay is essential for troubleshooting and repairing any issues related to the horn system.
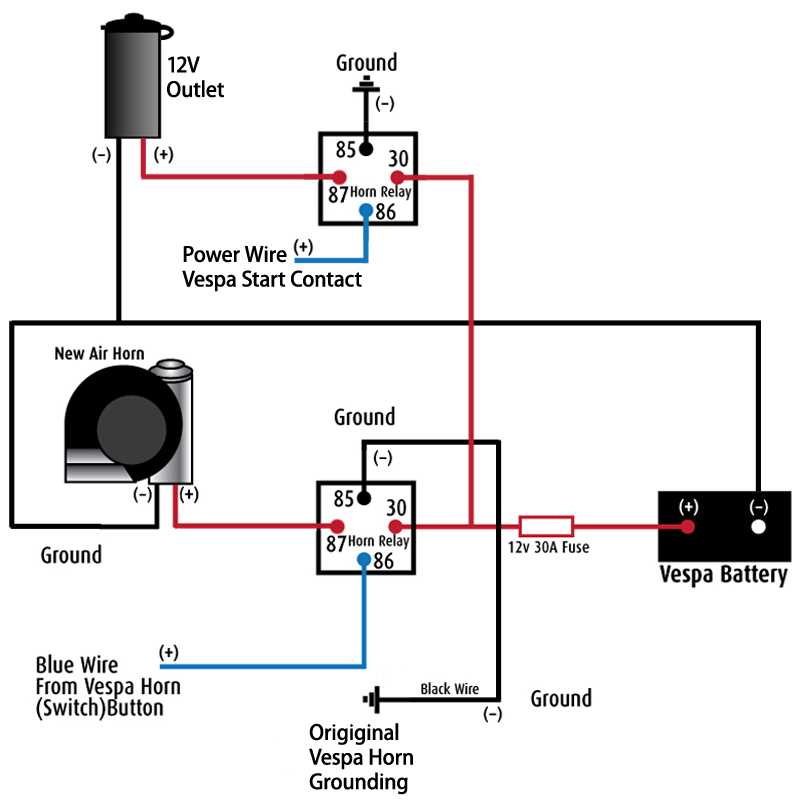
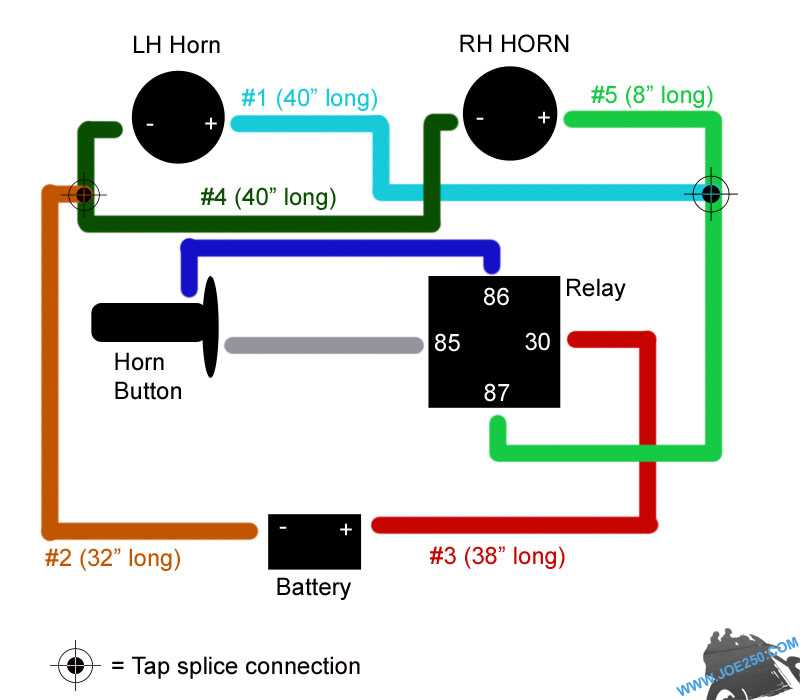
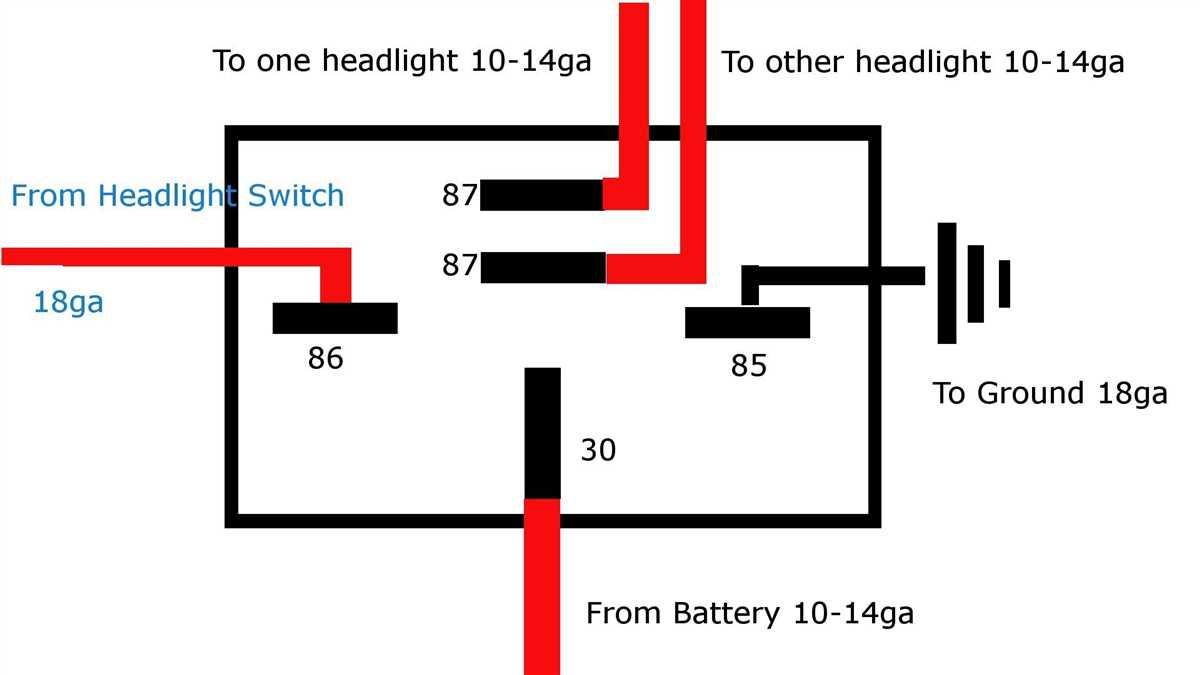
The wiring of a GM horn relay typically consists of four terminals or pins. These terminals have specific functions and must be properly connected for the horn to function correctly. Here is a breakdown of the common terminal assignments:
- Pin 30: This is the power input terminal. It receives power from a fused source, such as the battery or fuse box, to supply electricity to the horn relay.
- Pin 85: This is the ground terminal. It is usually connected to a metal chassis or body ground of the vehicle to provide a return path for the electrical current.
- Pin 86: This is the control terminal. It receives a low-amperage signal from the horn button or steering wheel control. When this terminal receives the signal, it activates the relay and allows power to flow from pin 30 to pin 87.
- Pin 87: This is the power output terminal. When the relay is activated, it allows power to flow from pin 30 to pin 87, which is connected to the horn.
Proper wiring of the GM horn relay involves connecting the battery power source to pin 30, grounding pin 85, connecting the horn button or control wire to pin 86, and connecting the horn to pin 87. Additionally, it is important to ensure that all connections are secure and free from corrosion to maintain optimal performance.
By understanding the wiring of a GM horn relay, vehicle owners can troubleshoot and diagnose potential issues such as a non-functioning horn. By checking the connection integrity and following the proper wiring diagram, it becomes easier to identify and resolve any wiring-related problems affecting the horn system in a GM vehicle.
The components involved in GM horn relay wiring
In the GM horn relay wiring system, several components work together to produce the desired horn functionality. These components include the horn button, the horn relay, the fuse, and the horn itself.
The horn button, located on the steering wheel, serves as the activation point for the horn system. When the button is pressed, it completes the circuit, allowing current to flow through the system and activate the horn. The horn button is typically connected to the horn relay using a wire.
The horn relay acts as a switch in the circuit and controls the flow of current to the horn. It receives the signal from the horn button and, when activated, allows the current to pass through to the horn. The horn relay is usually mounted in the engine compartment and is connected to the horn and the fuse.
A fuse is an essential component in the horn relay wiring system as it protects the circuit from overloading and prevents damage to the electrical components. The fuse is usually located in the fuse box and is connected between the battery and the horn relay.
The final component in the GM horn relay wiring system is the horn itself. It is usually located near the front of the vehicle and produces the audible sound when activated. The horn is connected to the horn relay, and when the relay allows the current to flow through to the horn, it creates the honking sound.
Overall, the GM horn relay wiring system is a complex network of components that work together to produce the desired horn functionality. Each component plays a crucial role in the operation of the system, and any issues with any of these components can result in the horn not working correctly.
Step-by-step guide to wiring a GM horn relay
If you are looking to wire a GM horn relay, you have come to the right place. Wiring a horn relay can be a simple process if you follow the right steps. In this guide, we will walk you through the process step-by-step, making it easy for you to install your GM horn relay correctly.
Step 1: Gather the necessary materials
- GM horn relay
- Fuse holder with fuse
- 16-gauge primary wire
- 14-gauge primary wire
- 12-gauge primary wire
- Wire connectors (butt connectors or crimp connectors)
- Wire strippers
- Electrical tape
Step 2: Locate the existing horn wire
Start by locating the existing horn wire in your vehicle. This wire is usually found in the steering column or under the dashboard. Once you have found the wire, use wire strippers to remove a small section of insulation from the end of the wire.
Step 3: Connect the primary wire to the relay
Take the 16-gauge primary wire and strip off about half an inch of insulation from one end. Attach this end to the terminal on the horn relay labeled “87.” Use a wire connector to secure the wire in place. Repeat this process for the other end of the primary wire, connecting it to the existing horn wire.
Step 4: Connect the power wire to the relay
Next, take the 14-gauge primary wire and strip off about half an inch of insulation from one end. Connect this end to the terminal on the horn relay labeled “30.” Use a wire connector to secure the wire in place.
Step 5: Connect the ground wire to the relay
Now, take the 12-gauge primary wire and strip off about half an inch of insulation from one end. Attach this end to the terminal on the horn relay labeled “85.” Use a wire connector to secure the wire in place. Connect the other end of the ground wire to a metal surface on your vehicle’s chassis using a screw or bolt.
Step 6: Install the fuse
Insert the fuse into the fuse holder, and then connect the fuse holder to the power wire (the 14-gauge wire connected to the relay). This will protect your horn circuit from electrical overloads.
Step 7: Test the horn
With all the wiring complete, it’s time to test your horn. Press the horn button on your steering wheel, and you should hear the horn sound. If not, double-check your connections and make sure everything is wired correctly.
Following these steps will ensure that you wire your GM horn relay correctly. Remember to take your time and double-check your work to avoid any potential issues down the line. Good luck!
Troubleshooting common issues with GM horn relay wiring
When it comes to troubleshooting issues with GM horn relay wiring, there are a few common problems that can arise. These issues can range from a non-functioning horn to a horn that constantly stays on. By understanding these problems and their potential causes, you can more easily diagnose and resolve any issues you may encounter with your GM vehicle’s horn relay wiring.
No horn sound
If you press the horn button on your GM vehicle and no sound is produced, there are a few potential causes to consider. One common issue is a faulty horn relay. The horn relay is responsible for providing power to the horn when the button is pressed. If the relay is defective or not properly connected, it can prevent the horn from sounding. Another potential cause is a blown fuse. If the fuse that is responsible for the horn circuit is blown, it will disrupt the power flow and prevent the horn from functioning.
Horn continuously stays on
If your GM vehicle’s horn stays on continuously, even when the horn button is not being pressed, there may be an issue with the horn relay wiring. One possible cause is a short circuit in the wiring. A short circuit can occur when the positive and negative wires in the circuit come into contact with each other, resulting in a constant flow of power to the horn. Another potential cause is a stuck horn switch. If the horn switch is stuck in the pressed position, it will continuously send a signal to the relay, keeping the horn on.
- To troubleshoot these issues, start by checking the horn relay. Ensure that it is properly connected and functioning correctly. Replace it if necessary.
- Check the horn fuse to see if it is blown. If it is, replace it and see if the horn begins to work.
- If the horn stays on continuously, check for any signs of a short circuit in the wiring. Look for exposed or damaged wires that could be causing the issue.
- If the horn switch is stuck, you may need to dismantle the steering wheel and inspect the switch for any obstructions or damage. Clean or replace the switch as needed.
By troubleshooting these common issues with GM horn relay wiring, you can ensure that your vehicle’s horn is functioning properly and address any problems that may arise.
Tips and Recommendations for Installing a GM Horn Relay
Installing a GM horn relay can be a straightforward process with the right knowledge and tools. Here are some tips and recommendations to help you successfully install a GM horn relay:
1. Familiarize yourself with the wiring diagram:
Before you begin the installation process, make sure you have a clear understanding of the wiring diagram specific to your GM vehicle. This will help you identify the appropriate wires and connections for the horn relay.
2. Disconnect the battery:
For safety purposes, always disconnect the negative terminal of the battery before starting any electrical work on your vehicle. This will prevent any potential electrical shorts or accidents during the installation process.
3. Locate the horn relay position:
Depending on your GM vehicle model, the horn relay may be located in different places. Refer to your vehicle’s manual or consult an authorized GM service center to find the exact location of the horn relay before starting the installation.
4. Check the condition of the wiring:
Inspect the condition of the existing horn wiring and connections. Ensure that there are no frayed or damaged wires, loose connections, or signs of corrosion. If any issues are found, repair or replace the wiring before installing the new horn relay.
5. Follow the manufacturer’s instructions:
When installing the GM horn relay, carefully follow the manufacturer’s instructions provided with the relay kit. These instructions will outline the specific steps and wiring connections necessary for the successful installation of the relay.
6. Test the horn relay:
After completing the installation, it is crucial to test the functionality of the horn relay. Reconnect the battery and perform a test by pressing the horn button. If the horn does not sound, double-check the wiring connections and consult the wiring diagram.
7. Secure and route the wiring:
Once the horn relay is installed and properly tested, ensure that all wiring is securely fastened and routed away from any moving parts or hot surfaces. Use zip ties or wire loom to organize and protect the wiring from potential damage.
Following these tips and recommendations will help you successfully install a GM horn relay and ensure the proper functioning of your vehicle’s horn. If you encounter any difficulties or are unsure about any step of the installation process, it is always best to consult a professional automotive technician for assistance.