
The GT235 is a popular model of lawn and garden tractor manufactured by John Deere. This versatile machine is designed to handle a variety of tasks, from mowing large lawns to hauling heavy loads. One important component of the GT235 is the deck belt, which is responsible for driving the mower blades. It’s essential to understand the deck belt diagram to ensure proper installation and maintenance.
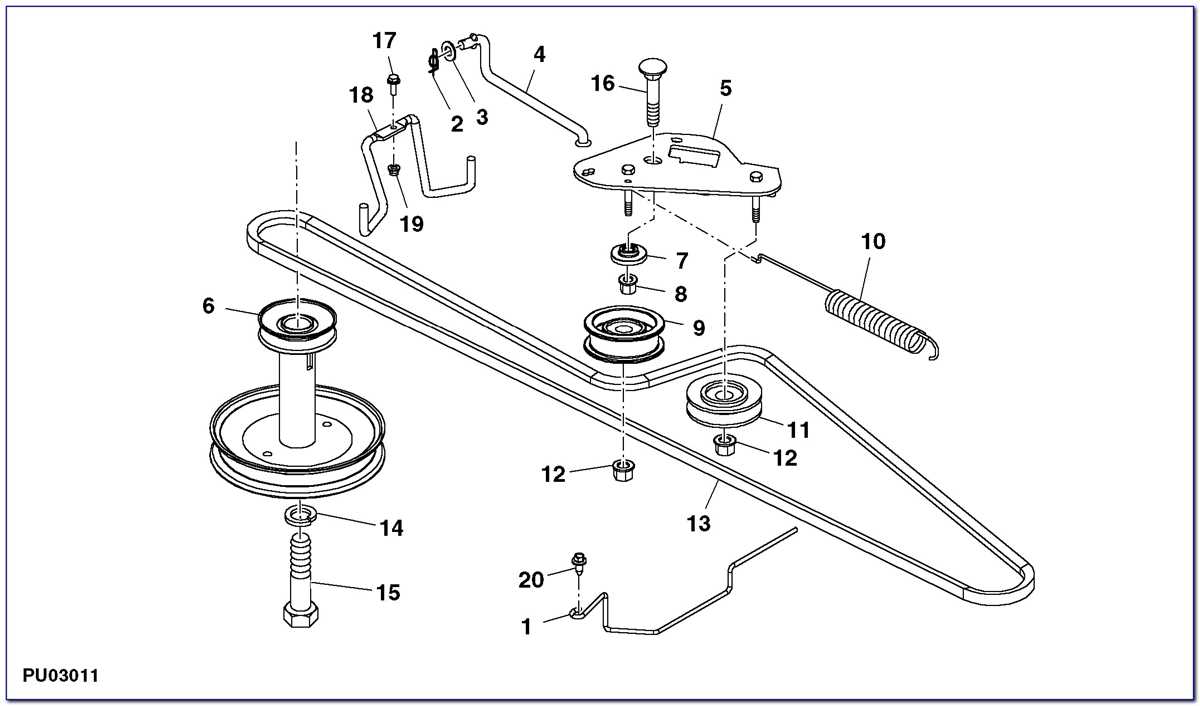
The deck belt diagram illustrates the routing of the belt around the various pulleys and idlers on the mower deck. This diagram is crucial for anyone performing maintenance or repairs on their GT235’s deck belt. It provides a visual guide for correctly positioning the belt, ensuring optimal performance and longevity.
By following the deck belt diagram, you can easily replace a worn-out or damaged belt, as well as perform routine maintenance tasks like adjusting tension. The diagram shows each pulley’s location, so you know exactly where to thread the belt. It also indicates the correct path the belt should take, ensuring it remains tight and engaged during operation.
Overall, the deck belt diagram is an invaluable resource for GT235 owners. Understanding this diagram allows you to properly maintain your mower’s deck belt, ensuring it operates smoothly and efficiently. Whether you’re a seasoned tractor owner or a first-time user, familiarizing yourself with the GT235 deck belt diagram is a must.
Gt235 Deck Belt Diagram: A Step-by-Step Guide
When it comes to maintaining your Gt235 lawn tractor, one important aspect to keep in mind is the deck belt. The deck belt is responsible for driving the blades on the mower deck, allowing you to achieve a clean and even cut. If your deck belt becomes worn or damaged, it’s crucial to replace it in order to keep your lawn tractor running smoothly.
To replace the deck belt on your Gt235 lawn tractor, follow these step-by-step instructions:
- Gather the necessary tools: Before you begin, make sure you have all the tools you’ll need, including a wrench, socket set, and a new deck belt that matches the specifications of your Gt235 lawn tractor.
- Disconnect the spark plug: For safety reasons, always disconnect the spark plug wire before performing any maintenance on your lawn tractor. This will prevent the engine from accidentally starting while you’re working on it.
- Remove the mower deck: Using your wrench and socket set, remove the bolts that secure the mower deck to the tractor frame. Once the bolts are removed, carefully lower the deck to the ground.
- Locate the deck belt: The deck belt is usually located underneath the mower deck. Refer to your Gt235 deck belt diagram to identify the exact location.
- Remove the old belt: Loosen the tensioner pulley and slide the old belt off of the pulleys. Take note of the belt path to ensure proper installation of the new belt.
- Install the new belt: Place the new belt onto the pulleys, following the belt path you observed when removing the old belt. Make sure the belt is properly seated on each pulley.
- Reattach the mower deck: Carefully lift the mower deck back into place and secure it to the tractor frame using the bolts you previously removed. Use your wrench and socket set to tighten the bolts securely.
- Reconnect the spark plug: Once the mower deck is securely attached, reconnect the spark plug wire to the spark plug.
- Test the mower: Start the engine and engage the mower blades to test the new deck belt. Ensure that the blades are spinning smoothly and that the belt is properly functioning.
By following this step-by-step guide and referring to your Gt235 deck belt diagram, you’ll be able to replace the deck belt on your lawn tractor with ease. Remember to always prioritize safety and consult your owner’s manual for specific instructions and guidelines.
Know your equipment
When it comes to maintaining and operating your Gt235 deck belt, it’s important to familiarize yourself with the equipment. Understanding the different components and how they work together will not only help you keep your machine running smoothly, but also improve safety and efficiency.
The deck belt: One of the key components of the Gt235 is the deck belt, which is responsible for driving the blades and cutting the grass. It is crucial to know the correct belt diagram to ensure proper installation and operation. This diagram provides a visual representation of how the belt should be threaded through the pulleys, allowing for optimal performance.
The pulleys: Another important aspect to be familiar with is the pulley system. The Gt235 has several pulleys that work in conjunction with the deck belt. These pulleys play a critical role in guiding the belt and maintaining tension, ensuring that the blades rotate properly and the grass is cut evenly. Understanding how these pulleys are arranged and how they interact with the belt is essential to keep the machine running smoothly.
By knowing your equipment and understanding how it operates, you can troubleshoot issues more effectively and address any maintenance needs in a timely manner. Regularly inspecting and replacing worn components, such as the deck belt or pulleys, will help extend the lifespan of your Gt235 and ensure optimal performance. Additionally, following the manufacturer’s guidelines for maintenance and operation will improve safety and prevent potential accidents while using the machine.
Overall, taking the time to familiarize yourself with the Gt235 deck belt and its related components is a valuable investment. Knowing the correct belt diagram, understanding the role of the pulley system, and following proper maintenance procedures will help you maintain a well-functioning machine that delivers excellent results. So, make sure to have the necessary information and tools on hand to keep your Gt235 in top shape.
Prepare for the task
Before starting the task of replacing the deck belt on your Gt235 lawnmower, it is important to gather all the necessary tools and materials. This will ensure that you have everything you need to complete the job efficiently and effectively.
First and foremost, you will need a new deck belt that is compatible with your Gt235 model. It is recommended to purchase this from a reputable dealer or directly from the manufacturer to ensure the quality and fit. Additionally, you will need a socket wrench set, a belt tension gauge, and a jack or ramps to elevate the lawnmower.
Once you have all the necessary tools and materials, it is important to review the owner’s manual or look up a detailed diagram of the Gt235 deck belt. This will provide you with step-by-step instructions and a visual aid to follow along with during the process. Familiarize yourself with the belt routing and tensioning system to ensure you understand how everything works together.
Step 1: Before beginning any work on the lawnmower, ensure that the engine is turned off and the key is removed. This will prevent any accidents or injuries during the process.
Step 2: Use the jack or ramps to elevate the lawnmower, providing better access to the deck belt area. Make sure the lawnmower is secured and stable before proceeding.
Step 3: Locate the deck belt and carefully inspect it for any signs of wear or damage. If there are any visible cracks, fraying, or stretching, it is recommended to replace the belt to prevent further issues.
Locate the deck belt

When it comes to maintaining and repairing your GT235 deck belt, it’s important to know where to locate it. The deck belt is an essential part of your lawn mower’s cutting system, connecting the engine to the blades. It is responsible for driving the blades to cut grass efficiently.
To locate the deck belt on your GT235, you will need to follow these steps:
- Make sure the engine is off and cool before starting.
- Position the GT235 on a flat, level surface for safety.
- Lower the mower deck to the lowest cutting position.
- Remove the spark plug wire to prevent accidental starting.
- Locate the mower deck. It is the metal housing underneath the lawn mower.
- Find the belt covers on the deck. These are black plastic covers that protect the belt.
- Carefully remove the belt covers by unscrewing the screws or releasing the clips.
- Once the covers are removed, you will see the deck belt.
By following these steps, you will be able to locate the deck belt on your GT235. It’s important to regularly inspect the condition of the belt for any signs of wear or damage. If you notice any issues, such as cracks, fraying, or stretching, it may be time to replace the deck belt to ensure optimal performance of your lawn mower.
Remove the old deck belt
Before replacing the deck belt on your Gt235 John Deere mower, it is important to first remove the old belt. Follow these steps to remove the old deck belt:
- Park the mower on a level surface and engage the parking brake to ensure it does not move while you are working.
- Turn off the engine and disconnect the spark plug wire for safety.
- Lower the mower deck to its lowest position using the deck lift lever.
- Locate the deck belt, which is the belt that connects the engine pulley to the mower blades.
- Take note of how the belt is routed around the deck pulleys and idler pulleys, as this will help when installing the new belt.
- Use a wrench or socket to loosen the tension on the deck belt idler pulley. This will allow you to remove the belt from the pulleys.
- Carefully slide the deck belt off of the pulleys and remove it from the mower.
- Inspect the old belt for any signs of damage or wear. If the belt appears damaged or worn, it is recommended to replace it with a new one.
Once you have successfully removed the old deck belt, you can proceed with installing the new belt according to the correct diagram and routing. Consult the Gt235 deck belt diagram for proper installation instructions.
Install the new deck belt
Follow these step-by-step instructions to properly install the new deck belt on your Gt235 lawn tractor:
- Prepare the tractor: Before starting, make sure the tractor is turned off and the engine is cool. Engage the parking brake, lower the mower deck to its lowest cutting position, and remove the ignition key for safety.
- Locate the old belt: Take note of how the old deck belt is routed around the pulleys and mowing deck. This will serve as a reference for installing the new belt.
- Remove the old belt: Using a wrench or socket set, loosen the tension on the belt tensioning arm and slide the old belt off the pulleys. Take care not to damage any components or pulleys during this process.
- Install the new belt: Begin by routing the new deck belt around the pulleys according to the reference made in step 2. Make sure the belt is properly seated in all pulley grooves and that it is not twisted or misaligned in any way.
- Adjust the belt tension: Once the new belt is in place, use a wrench or socket set to adjust the tension on the belt tensioning arm. The belt should be tight enough to provide proper engagement with the pulleys, without being overly stretched or loose.
- Test the belt: Before starting the engine, manually rotate the mower blades to ensure that the belt is properly engaged and rotating smoothly. If any issues are noticed, recheck the belt routing and tensioning.
- Reassemble and clean up: Once the belt is securely installed and functioning correctly, reassemble any components that were removed for belt access. Clean up any debris or tools used during the installation process.
By following these instructions, you can successfully install a new deck belt on your Gt235 lawn tractor, ensuring optimal performance and longevity of your mowing equipment.
Test the belt and finalize the installation
With the new belt installed on your GT235 mower deck, it’s important to test its functionality to ensure proper operation. Follow these steps to test the belt:
- Turn on the engine and engage the mower deck.
- Observe the motion of the belt as the blades start to rotate. Ensure that the belt is running smoothly and without any unusual noises or vibrations.
- Engage and disengage the mower deck a few times to confirm that the belt is engaging and disengaging correctly.
- If there are any issues or abnormalities, such as slipping or squeaking, further adjustment or replacement may be required.
Once you have confirmed that the belt is functioning properly, you can finalize the installation by tightening any remaining bolts or fasteners on the mower deck. Make sure that all components are secure and in their proper positions.
Additionally, double-check the belt tension and make any necessary adjustments based on the manufacturer’s recommendations. A properly tensioned belt will ensure optimal performance and longevity.
In conclusion, replacing the deck belt on your GT235 mower is a straightforward process that can be completed with a few basic tools. By following the steps outlined in this guide and testing the belt for proper functionality, you can ensure that your mower is ready to tackle your lawn care needs with ease.