
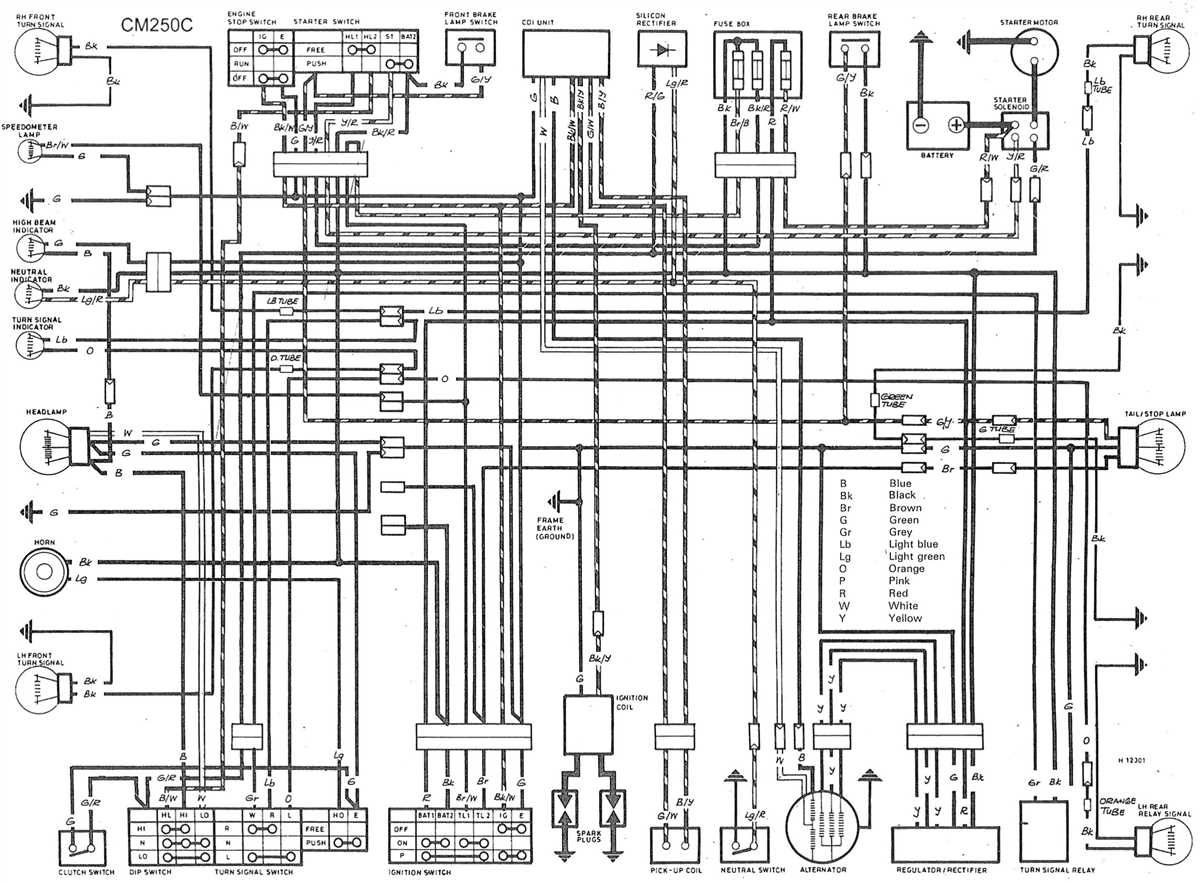
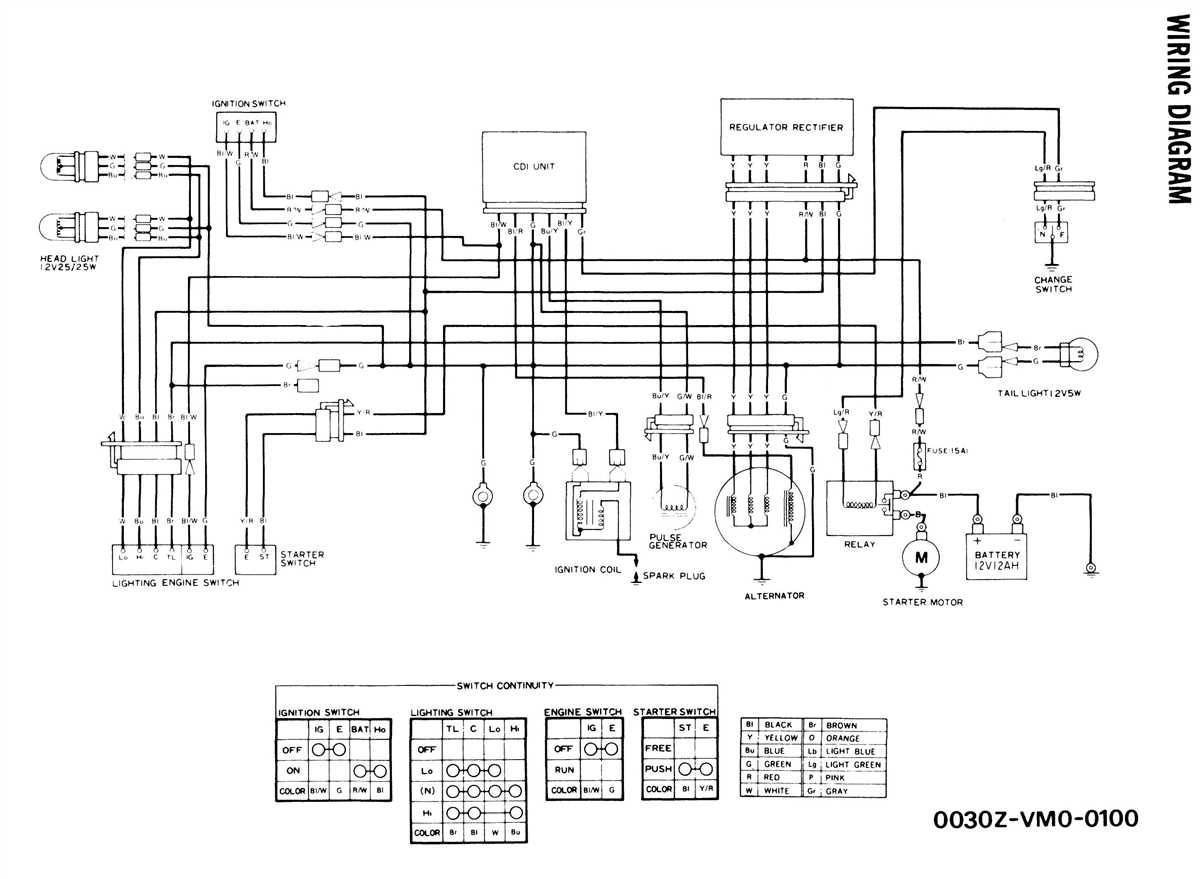
When it comes to understanding the electrical system of your Honda Rebel 250, having a wiring diagram can be incredibly helpful. The wiring diagram is a visual representation of how all the electrical components in your motorcycle are connected and work together. It provides a detailed overview of the wires, connectors, switches, fuses, and other electrical components, making it easier to troubleshoot and repair any electrical issues you may encounter.
The Honda Rebel 250 wiring diagram is particularly important for owners and enthusiasts who like to tinker with their motorcycles or perform their own maintenance and repairs. With the diagram at hand, you can easily identify which wires are responsible for specific functions, such as powering the headlight, taillight, turn signals, or charging the battery. This knowledge can be invaluable when it comes to diagnosing and fixing electrical problems.
Whether you are a seasoned mechanic or a DIY enthusiast, having a reliable and accurate wiring diagram is crucial. It can save you time, money, and frustration by providing a clear blueprint of the electrical system. So, if you are experiencing any electrical issues with your Honda Rebel 250 or simply want to have a better understanding of how the electrical components are interconnected, getting your hands on a wiring diagram is a wise decision.
Honda Rebel 250 Wiring Diagram: A Comprehensive Guide
When it comes to understanding and troubleshooting the electrical system of your Honda Rebel 250 motorcycle, having a wiring diagram can be an invaluable tool. A wiring diagram is a visual representation of the electrical connections and components in a system, which can help you identify and understand how the various parts of your motorcycle’s electrical system work together.
What is Included in a Honda Rebel 250 Wiring Diagram?
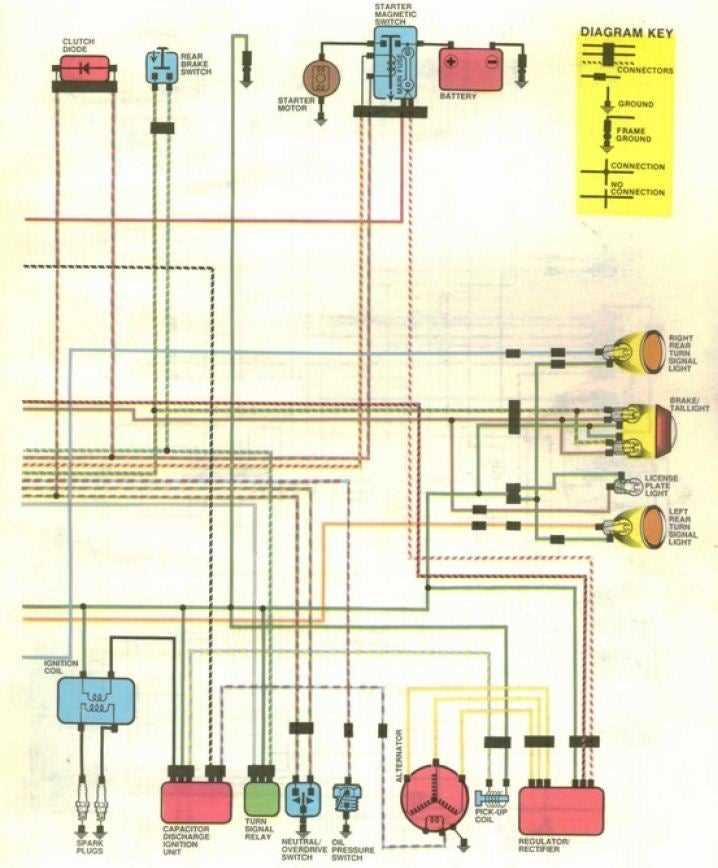
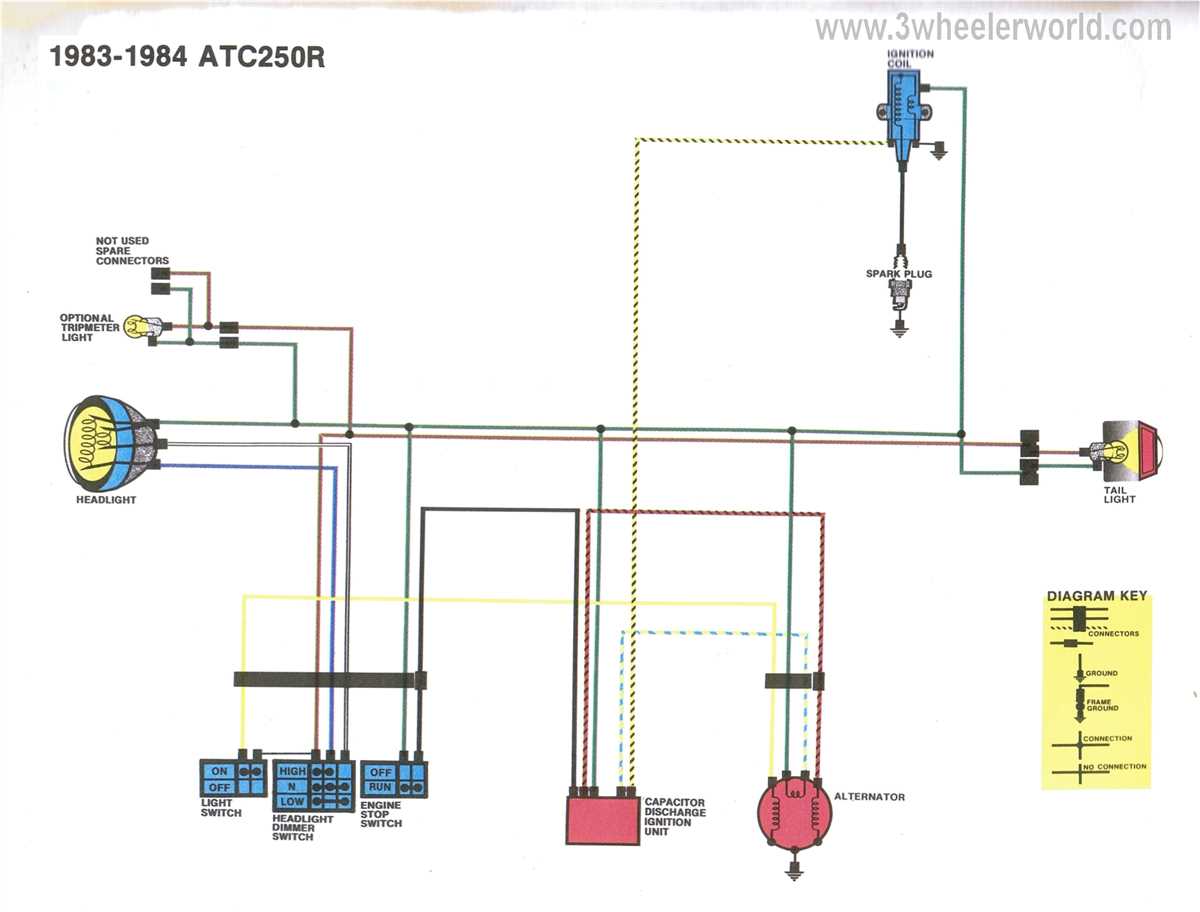
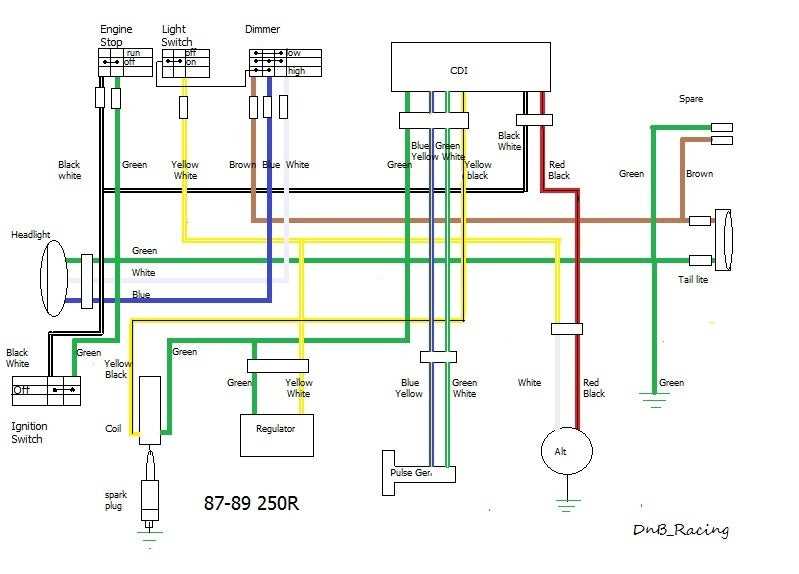
A comprehensive Honda Rebel 250 wiring diagram will typically include information about the various electrical components and their connections, such as the ignition switch, starter motor, battery, charging system, lights, turn signals, and more. It will also show the color codes of the wires, which can be useful for troubleshooting and repairing any electrical issues.
How to Use a Honda Rebel 250 Wiring Diagram?
Using a Honda Rebel 250 wiring diagram is fairly straightforward. Start by familiarizing yourself with the symbols and color codes used in the diagram. These symbols represent different electrical components, while the color codes indicate the color of the wires, which can help you trace and identify them easily.
For example, a dotted line might represent a wire that is not connected, while a solid line might indicate a direct connection between two components. Similarly, different colors may represent different functions or circuits, such as red for power or blue for ground.
Once you understand the symbols and color codes, you can use the wiring diagram to trace the electrical connections and identify any potential issues. This can be particularly helpful when troubleshooting electrical problems, such as a blown fuse or a faulty wiring connection.
Where to Find a Honda Rebel 250 Wiring Diagram?
A Honda Rebel 250 wiring diagram can be found in the owner’s manual or repair manual for your motorcycle. These manuals are usually available from Honda dealerships or can be purchased online. Additionally, there are several online resources and forums dedicated to motorcycles, where you may be able to find a wiring diagram or seek advice from fellow Honda Rebel 250 owners.
If you’re unsure about interpreting the wiring diagram or need further assistance, it’s always recommended to consult a professional motorcycle mechanic or an experienced Honda technician who can provide guidance and help you troubleshoot any electrical issues you may encounter with your Honda Rebel 250 motorcycle.
The Importance of a Wiring Diagram for Honda Rebel 250
When it comes to working on a Honda Rebel 250, having access to a wiring diagram is essential. A wiring diagram is a detailed diagram that shows the electrical connections and components of a motorcycle. It provides a visual representation of how the wiring system is laid out and allows mechanics and enthusiasts to understand and troubleshoot electrical issues effectively.
Understanding the Wiring System: The wiring system in a Honda Rebel 250 is complex, with various wires connecting different components, such as the ignition system, lights, and switches. Without a wiring diagram, it can be challenging to identify which wires go where and how they are connected. This can lead to confusion and mistakes during repair or modification procedures.
Troubleshooting Electrical Issues: Electrical issues can arise in any motorcycle, including the Honda Rebel 250. Whether it’s a malfunctioning light, a non-responsive switch, or a faulty ignition system, having a wiring diagram can greatly simplify the process of troubleshooting and finding the root cause of the problem. By referring to the wiring diagram, mechanics can trace the electrical pathways and test the connections to identify any faults or anomalies.
Modifications and Upgrades: Many motorcycle enthusiasts enjoy customizing their bikes or adding aftermarket accessories. When making modifications or upgrades to the electrical system of a Honda Rebel 250, it is crucial to have a wiring diagram to ensure proper integration and compatibility. The wiring diagram will help enthusiasts understand how to connect the new components to the existing electrical system without causing any damage or electrical issues.
Preventing Electrical Accidents: Working on a motorcycle’s electrical system without a wiring diagram can be risky. Mistakes in connecting wires or mishandling electrical components can lead to short circuits, electrical fires, or even damage to the motorcycle’s electrical system. By using a wiring diagram, mechanics and enthusiasts can minimize the risk of accidents and ensure that the electrical connections are made correctly and safely.
In conclusion, a wiring diagram is an invaluable tool when working on a Honda Rebel 250 or any motorcycle. It provides a visual representation of the wiring system, helps troubleshoot electrical issues, aids in modifications and upgrades, and reduces the risk of electrical accidents. Having access to a wiring diagram is essential for anyone involved in maintaining, repairing, or customizing a Honda Rebel 250.
Understanding the Electrical System of Honda Rebel 250
The Honda Rebel 250 is a popular motorcycle known for its reliability and simplicity. Understanding the electrical system of this bike is essential for proper maintenance and troubleshooting. By familiarizing yourself with the key components and their functions, you can keep your Rebel running smoothly and address any electrical issues that may arise.
At the heart of the Rebel 250’s electrical system is the battery. This 12-volt battery provides the initial power needed to start the bike and operates various electrical components, such as the lights and indicators. It is important to regularly check the battery’s voltage and ensure it is properly charged to avoid any starting or electrical problems.
Another vital component is the alternator, which is responsible for charging the battery while the engine is running. The alternator converts mechanical energy from the engine into electrical energy, which is then used to power the bike and recharge the battery. Regular maintenance of the alternator is crucial to ensure it is functioning properly and providing sufficient power to the battery.
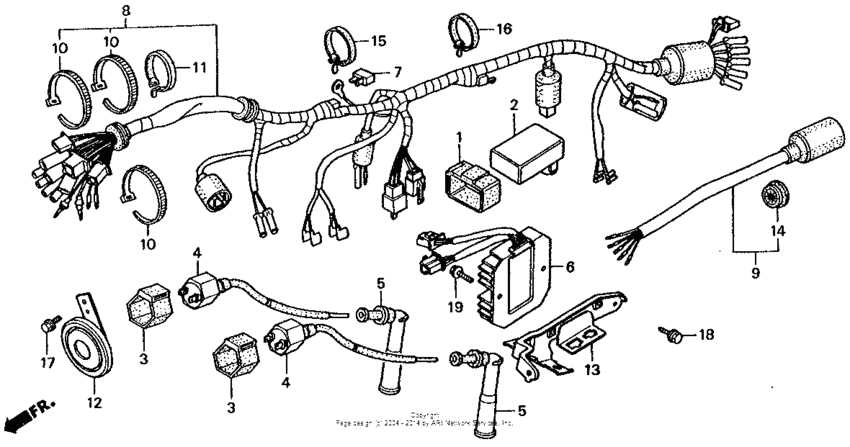
The wiring harness acts as the nervous system of the motorcycle, connecting all the electrical components together. It consists of a network of wires that transmit electrical signals, allowing various parts of the bike to communicate and operate. Properly inspecting and maintaining the wiring harness is essential, as any loose connections or damaged wires can cause electrical malfunctions or failures.
- The ignition switch is another important component that controls the flow of electrical power to the engine.
- The fuse box protects sensitive electrical components from power surges by breaking the circuit in case of a fault.
- The headlight and tail light are crucial for visibility and safety, especially during nighttime rides.
- The turn signals and brake lights ensure proper signaling and communication with other motorists.
Being familiar with the electrical system of your Honda Rebel 250 can help you diagnose and fix any electrical issues that may arise. Regular maintenance and inspections of key components, such as the battery, alternator, wiring harness, and lights, can prevent major problems and keep your bike in optimal condition.
Step-by-Step Guide to Reading a Honda Rebel 250 Wiring Diagram

When it comes to troubleshooting or understanding the electrical system of your Honda Rebel 250, having a wiring diagram can be very helpful. A wiring diagram is a visual representation of the electrical connections and components in a motorcycle, and it can provide valuable information about the wiring harness, fuses, switches, and other electrical parts.
1. Identify the key components: Start by looking at the key components in the wiring diagram, such as the battery, ignition switch, fuse box, and various connectors. These components are usually labeled and their symbols can be found in the diagram’s legend or key. Familiarize yourself with these symbols to make it easier to follow the diagram.
2. Understand the wiring harness: The wiring harness is a bundle of wires that connects all the electrical components in the motorcycle. It is usually represented by a series of lines in the wiring diagram. Pay attention to the color codes and numbers on the lines, as they indicate the specific wires or cables and their corresponding connections.
3. Follow the flow of electricity: The wiring diagram will show the flow of electricity from the battery to various electrical components, such as the lights, ignition system, and sensors. Follow the lines to understand the path of the electrical current and how it is distributed throughout the motorcycle. This can help you pinpoint any potential issues or faulty connections.
4. Check for switches and relays: Switches and relays are important components in the electrical system that control the flow of electricity to different parts of the motorcycle. The wiring diagram will show the location and connections of these switches and relays. Make sure to pay attention to the symbols and labels used for these components to avoid confusion.
5. Refer to the wiring diagram legend: The legend or key of the wiring diagram will provide additional information about the symbols used and their meanings. It may also include notes or explanations of specific wiring connections or components. Use this information to clarify any uncertainties or questions you may have while reading the diagram.
In summary, reading a Honda Rebel 250 wiring diagram requires familiarizing yourself with the key components, understanding the wiring harness, following the flow of electricity, checking for switches and relays, and referring to the wiring diagram legend. By following these steps and paying attention to detail, you will be able to effectively read and interpret the diagram, making troubleshooting and electrical repairs easier.
Common Wiring Issues in Honda Rebel 250 and How to Troubleshoot Them
When it comes to the wiring system of a Honda Rebel 250 motorcycle, there are a few common issues that riders may encounter. These issues can cause problems with the electrical components of the bike, including the lights, horn, and ignition system. Knowing how to troubleshoot these issues can help riders quickly identify and resolve any wiring problems.
One common wiring issue in the Honda Rebel 250 is a blown fuse. If the lights or horn on the bike stop working, it is likely that a fuse has blown. To troubleshoot this problem, riders should first locate the fuse box, which is usually located under the seat or inside the side cover. They can then check the fuses to see if any are blown. Blown fuses can be replaced with new ones of the same amperage rating.
Another common wiring issue in the Honda Rebel 250 is a loose or corroded connection. Over time, the connections between the wires and the electrical components can become loose or corroded, which can cause the lights or horn to stop working intermittently or not work at all. Riders can troubleshoot this issue by inspecting the connections and cleaning or tightening them as necessary. Applying a small amount of dielectric grease to the connections can also help prevent future corrosion.
Frequently Asked Questions
- Q: Why is my Honda Rebel 250 not starting?
- Q: Why are my turn signals not working on my Honda Rebel 250?
- Q: How do I replace a damaged wire in the wiring harness of my Honda Rebel 250?
A: If the motorcycle is not starting, it could be due to a wiring issue with the ignition system. Riders should check the connections to the ignition coil and spark plug and ensure they are secure. They should also check the ignition switch for any signs of damage or corrosion.
A: If the turn signals are not working, it is likely due to a wiring issue. Riders should check the wiring connections to the turn signal switch and bulbs. They should also check the flasher relay for any signs of damage or corrosion.
A: To replace a damaged wire in the wiring harness, riders should first identify the location of the damage. They can then cut out the damaged section of wire and strip back the insulation to expose the bare wire. They can then splice in a new section of wire using butt connectors and secure it with electrical tape or heat shrink tubing. It is important to ensure that the new wire is the same gauge as the original wire for proper electrical conductivity.
Tips for Properly Maintaining the Electrical System of Honda Rebel 250
The electrical system is a crucial component of any motorcycle, and the Honda Rebel 250 is no exception. Proper maintenance of the electrical system is essential to ensure the bike runs smoothly and reliably. Here are some tips to help you maintain the electrical system of your Honda Rebel 250.
1. Check the battery regularly
The battery is the heart of the electrical system, providing the power needed to start the engine and run the lights, indicators, and other electrical components. Regularly check the battery for any signs of corrosion, loose connections, or damage. Clean the battery terminals and tighten the connections if necessary. If the battery is old or not holding a charge, consider replacing it to prevent any electrical issues.
2. Inspect the wiring and connections
The wiring and connections throughout the bike’s electrical system should be regularly inspected for any signs of wear, damage, or loose connections. Look for frayed or exposed wires, melted insulation, or loose connectors. Repair or replace any damaged components to prevent electrical faults or short circuits.
3. Maintain the charging system
The charging system, including the alternator and voltage regulator, is responsible for keeping the battery properly charged while the engine is running. Check the alternator belt tension regularly and ensure it is in good condition. Make sure the voltage regulator is functioning correctly and maintaining the appropriate charging voltage. Any issues with the charging system can lead to a drained battery or electrical malfunctions.
4. Keep the electrical components clean and dry
Electrical components, such as switches, connectors, and fuses, should be kept clean and free from moisture. Moisture can cause corrosion, which can lead to poor electrical connections and malfunctioning components. Use a dry cloth or compressed air to clean any dirt or debris from the electrical components regularly.
5. Follow the wiring diagram
When working on the electrical system, always refer to the wiring diagram for your Honda Rebel 250. The wiring diagram shows the electrical connections, colors, and component locations for easy troubleshooting and repair. Incorrectly connecting wires or components can cause serious electrical issues or damage to the system.
By following these tips, you can ensure the electrical system of your Honda Rebel 250 remains in proper working condition. Regular maintenance and attention to detail will help prevent any electrical issues and keep your bike running smoothly on the road.
Summary
In conclusion, a Honda Rebel 250 wiring diagram can be a valuable resource for owners and enthusiasts looking to understand and troubleshoot the electrical system of their motorcycles. These diagrams provide a visual representation of the wiring connections and components, making it easier to identify and resolve any issues related to the electrical system.
There are several places where users can find and download a Honda Rebel 250 wiring diagram. Online forums and communities dedicated to motorcycles and Honda Rebel 250 specifically are a good starting point. Many of these forums have sections where users can share and request wiring diagrams.
Another option is to visit the official Honda website and search for the specific wiring diagram for the Rebel 250 model. The website may provide downloadable PDF files or links to external resources.
Additionally, there are third-party websites and online databases that offer a wide range of motorcycle wiring diagrams, including those for the Honda Rebel 250. These websites often provide comprehensive collections of wiring diagrams for various motorcycle models and can be a valuable resource for anyone looking for specific diagrams.
Remember to always double-check the accuracy and relevance of the wiring diagram before using it for any repairs or modifications. It’s important to ensure that the diagram matches the year and model of the Honda Rebel 250 to avoid any potential issues.
Overall, with the right resources and a good understanding of the electrical system, a Honda Rebel 250 wiring diagram can be a useful tool for troubleshooting and maintaining the motorcycle’s electrical components.