
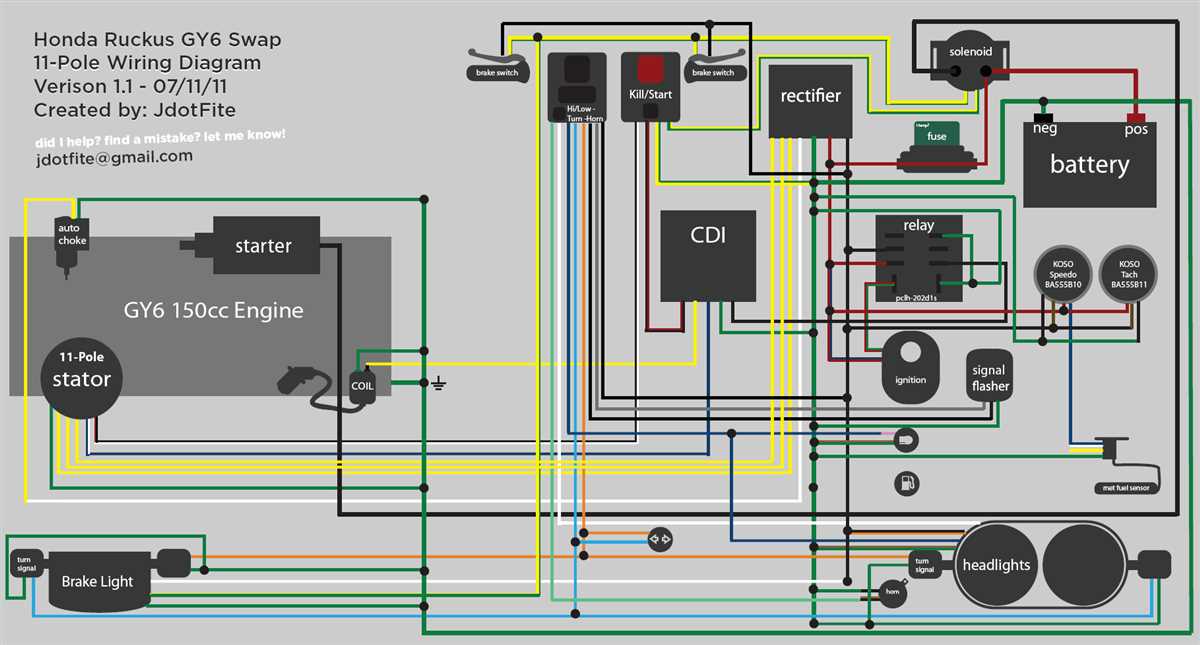
If you are a motorcycle enthusiast looking to modify or upgrade your Honda Ruckus turn signal wiring, you’ve come to the right place. The Honda Ruckus is a popular choice among scooter riders for its unique design and customizable features. One of the most common modifications that riders make to their Ruckus is upgrading the turn signal wiring to improve visibility and safety on the road.
Upgrading the turn signal wiring on your Honda Ruckus not only enhances its appearance but also ensures your signals are always working properly. Without a doubt, a working turn signal is crucial on any vehicle, especially on a motorcycle where the rider’s presence on the road can often be overlooked. By improving the wiring, you can ensure that your turn signals are bright, visible, and responsive, allowing you to communicate your intentions clearly to other drivers.
Whether you are a seasoned motorcycle mechanic or a beginner enthusiast, understanding the wiring system of your Honda Ruckus turn signals is essential. This guide will take you through the process step-by-step, providing all the necessary information and tips to make your turn signal wiring upgrade a smooth and successful project. From identifying the correct wires to connecting the new wiring components, you’ll have a clear understanding of how to improve your Ruckus turn signals in no time.
Honda Ruckus Turn Signal Wiring: A Comprehensive Guide
The Honda Ruckus is a popular scooter that is known for its unique design and customization options. One of the most common modifications owners make to their Ruckus is adding turn signals. Installing turn signals on a Honda Ruckus can be a bit tricky, but with the right wiring guide, it can be a straightforward process.
1. Gather the necessary materials: Before starting the wiring process, make sure you have all the required materials. You will need turn signals with the appropriate wiring harness, electrical tape, wire connectors, a 12-volt test light, and a wiring diagram.
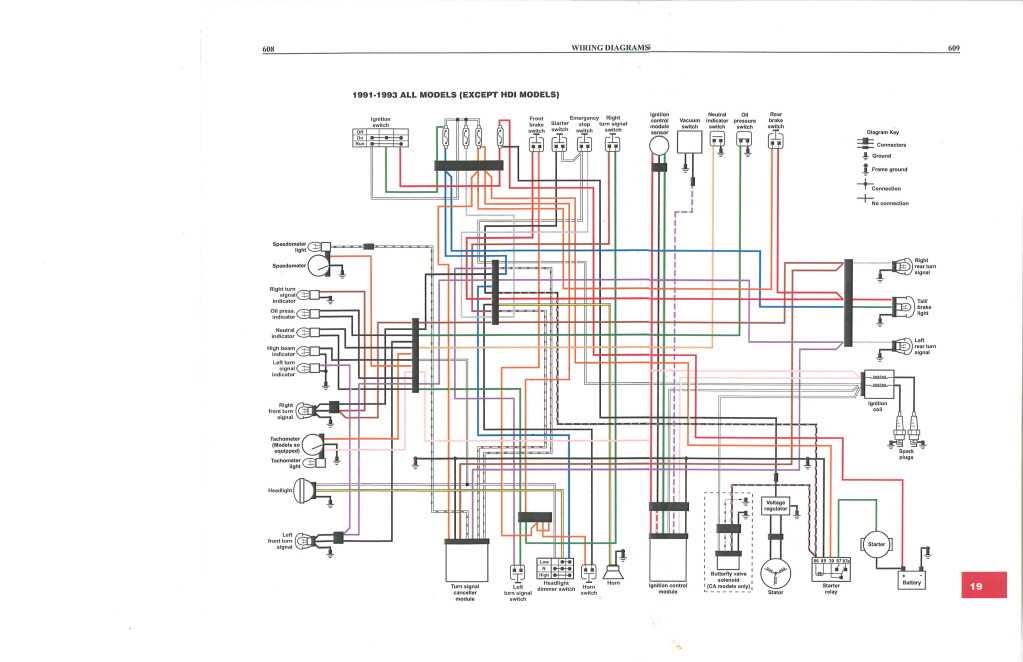
2. Understand the wiring diagram: It is essential to have a clear understanding of the wiring diagram. The diagram will illustrate the different color-coded wires and their corresponding functions. Familiarize yourself with the diagram before proceeding with the wiring process.
3. Locate the wiring harness: To begin the installation, locate the wiring harness on your Honda Ruckus. This is typically located under the seat or in the front frame area. Take note of the wire colors and their connections to ensure a proper installation.
4. Connect the turn signal wires: Using the wire connectors, connect the turn signal wires to the corresponding wires on the Ruckus wiring harness. It is crucial to match the colors correctly to ensure the turn signals work correctly. Use electrical tape to secure the connections and prevent any accidental shorts.
5. Test the turn signals: After completing the wiring, use a 12-volt test light to verify that the turn signals are functioning correctly. Test each turn signal individually to ensure they are working as intended. If necessary, double-check the wiring connections to troubleshoot any issues.
By following this comprehensive guide, you can successfully wire turn signals onto your Honda Ruckus. Remember to take your time and double-check each step to ensure a proper installation. Adding turn signals can enhance both the safety and aesthetic appeal of your Honda Ruckus, allowing you to ride with confidence.
Understanding the Basics of Honda Ruckus Turn Signal Wiring
When it comes to Honda Ruckus turn signal wiring, it’s essential to have a good understanding of the basics to ensure proper functioning of the turn signals on your scooter. The turn signal system consists of several components that work together to provide the necessary signals for turning and changing lanes.
Turn Signal Switch: The turn signal switch is located on the handlebar of the Honda Ruckus and is used to activate the turn signals. When you press the switch in the desired direction, it sends an electrical signal to the turn signal relay.
Turn Signal Relay: The turn signal relay is responsible for controlling the power supply to the turn signal lights. It receives the signal from the turn signal switch and then activates the appropriate turn signal lights on the front and rear of the scooter.
Turn Signal Lights: The turn signal lights are located on the front and rear of the Honda Ruckus and indicate your intended direction of travel. When the turn signals are activated, the lights blink in a specific pattern to alert other drivers of your intentions.
Wiring Harness: The wiring harness is a collection of wires that connect the various components of the turn signal system. It ensures that the electrical signals are transmitted properly between the switch, relay, and lights. It’s essential to check the wiring harness for any loose or damaged connections that may affect the performance of the turn signals.
Understanding the basics of Honda Ruckus turn signal wiring is crucial for troubleshooting any issues with the turn signal system. By familiarizing yourself with the various components and their functions, you can easily diagnose and fix any problems that may arise. Remember to take safety precautions and consult a professional if you’re unsure about any aspect of the wiring.
Step-by-Step Guide: Wiring Front Turn Signals on Honda Ruckus
If you’re looking to install front turn signals on your Honda Ruckus, this step-by-step guide will walk you through the process. Adding front turn signals not only increases your visibility on the road but also enhances the overall appearance of your scooter.
Requirements:
- Honda Ruckus scooter
- Front turn signal lights
- Wiring harness
- Wire cutters/strippers
- Electrical tape
- Socket set or wrench
- Screwdriver
Step 1: Preparation
Start by disconnecting the negative battery terminal to ensure your safety and prevent any electrical shorts. Locate the front turn signal mounting area on your Honda Ruckus, usually near the handlebars. Remove any existing equipment or parts that may obstruct the installation of the turn signal lights.
Step 2: Wiring
Take the wiring harness and locate the wires labeled for the front turn signals. Your harness may come with a color-coded diagram for easy identification. Using wire cutters/strippers, carefully strip the insulation from the ends of each wire. Connect the positive (+) wire of the turn signal light to the corresponding positive wire of the Honda Ruckus using electrical connectors or by soldering them together. Repeat this process for the negative (-) wires.
Step 3: Mounting
With the wiring connected, mount the front turn signal lights onto the designated area on the Honda Ruckus. This may involve removing screws or bolts, aligning the lights, and then tightening them securely in place. Ensure the lights are positioned correctly and face the appropriate direction to provide maximum visibility to other road users.
Step 4: Testing
Reconnect the negative battery terminal and test the functionality of the front turn signals. Activate the turn signal switch and observe if the lights blink properly. If they do not work, double-check the wiring connections and troubleshoot any issues. Once the front turn signals are working correctly, securely fasten any loose wires and use electrical tape to insulate the connections for added protection.
By following this step-by-step guide, you can successfully wire and install front turn signals on your Honda Ruckus. Remember to always prioritize safety and consult the manufacturer’s instructions or seek professional assistance if needed.
Step-by-Step Guide: Wiring Rear Turn Signals on Honda Ruckus

If you own a Honda Ruckus and want to upgrade your rear turn signals, this step-by-step guide will help you wire them properly. Rear turn signals not only improve visibility but also enhance the overall safety of your ride. By following these instructions, you will be able to configure the wiring for your new turn signals quickly and efficiently.
Materials you will need:

- Two rear turn signal units
- Wire strippers
- Electrical tape
- Soldering iron and solder
- Heat shrink tubing
- Wire connectors
Step 1: Prepare the wiring
Start by removing the existing rear turn signal units from your Honda Ruckus. Use the wire strippers to remove a small section of insulation from each wire. Make sure to strip enough wire for a secure connection.
Step 2: Solder the connections
Take the wires from the new turn signal units and match them to the corresponding wires from the Ruckus. Use the soldering iron and solder to securely connect each wire. Apply heat shrink tubing over the soldered connection and use a heat source to shrink it into place. This will provide added protection and prevent any short circuiting.
Step 3: Secure the connections

After soldering and insulating the connections, use wire connectors to join the wires from the Ruckus to the turn signal units. Ensure a tight and secure connection by twisting the wire connector clockwise until it is snug. Use electrical tape to wrap around the connectors for extra protection.
Repeat these steps for the other side of the rear turn signals.
With the wiring complete, you can now re-install the rear turn signal units on your Honda Ruckus. Make sure to test the turn signals to ensure they are functioning properly before hitting the road. Enjoy your improved visibility and enhanced safety on your Honda Ruckus!
Troubleshooting Common Issues with Honda Ruckus Turn Signal Wiring
When it comes to the turn signal wiring on a Honda Ruckus, there are a few common issues that can arise. Troubleshooting these issues will help ensure that your turn signals are working properly and safely.
One common issue is a faulty connection. If your turn signals are not working at all, it is important to check the connections between the wiring harness and the turn signal assembly. Ensure that the connections are secure and free from any corrosion or damage. If any connections are loose or damaged, they will need to be repaired or replaced.
Another common issue is a blown fuse. If your turn signals are not working, but other electrical components on your Honda Ruckus are functioning properly, then it is likely that the fuse for the turn signals has blown. Check the fuse box and replace any blown fuses with new ones of the correct amperage.
In some cases, the issue may be with the turn signal switch. If your turn signals are not staying on or are not functioning as they should, the switch itself may be faulty. Inspect the switch for any signs of damage or wear and consider replacing it if necessary.
If none of these troubleshooting steps resolve the issue with your Honda Ruckus turn signal wiring, it may be necessary to consult a professional or refer to the wiring diagram for further assistance. Proper troubleshooting and maintenance of your turn signals is essential for the safety of yourself and others on the road.
Upgrading Your Honda Ruckus Turn Signals: Tips and Tricks
In this article, we have discussed various tips and tricks for upgrading your Honda Ruckus turn signals. By following these suggestions, you can enhance the functionality, visibility, and overall appearance of your vehicle’s turn signals. Here is a summary of the key points:
1. LED Turn Signals:
Consider upgrading to LED turn signals, as they offer several benefits over traditional incandescent bulbs. LEDs are brighter, more energy-efficient, and have a longer lifespan. They also come in a variety of styles and colors, allowing you to customize the look of your Ruckus.
2. Wiring Harness Extension:
If you are installing aftermarket turn signals that have shorter wiring, you may need to extend the wiring harness. Use wire connectors and heat shrink tubing to securely connect the extensions, ensuring proper functionality and safety.
3. Resistor Installation:

When switching to LED turn signals, you may encounter hyperflashing issues due to the lower power consumption. Install load resistors in parallel with the turn signal wires to mimic the higher power draw of incandescent bulbs and resolve hyperflashing.
4. Integrated Tail Lights:
For a cleaner and more streamlined look, consider upgrading to integrated tail lights that combine the brake light and turn signals into a single unit. This modification not only enhances aesthetics but also improves visibility to other drivers.
5. Maintenance and Inspection:
Regularly inspect and clean your turn signals to ensure proper functioning and visibility. Check for any loose connections, damaged wires, or burnt-out bulbs. Replace any faulty components promptly to maintain optimal safety on the road.
By implementing these tips and tricks, you can transform your Honda Ruckus turn signals into a reliable and stylish feature of your vehicle. Whether you choose to upgrade to LED lights, extend the wiring harness, install load resistors, or opt for integrated tail lights, these modifications will enhance the look and functionality of your Ruckus. Remember to prioritize safety and always follow local regulations when making any changes to your vehicle’s lighting system.