
Installing a ceiling fan can be a great way to add both style and functionality to any room. However, when it comes to wiring your new Hunter fan, it’s important to follow the proper steps in order to ensure safe and efficient operation. Understanding the wiring requirements for your specific fan model is crucial to avoid potential electrical hazards and damage to your fan.
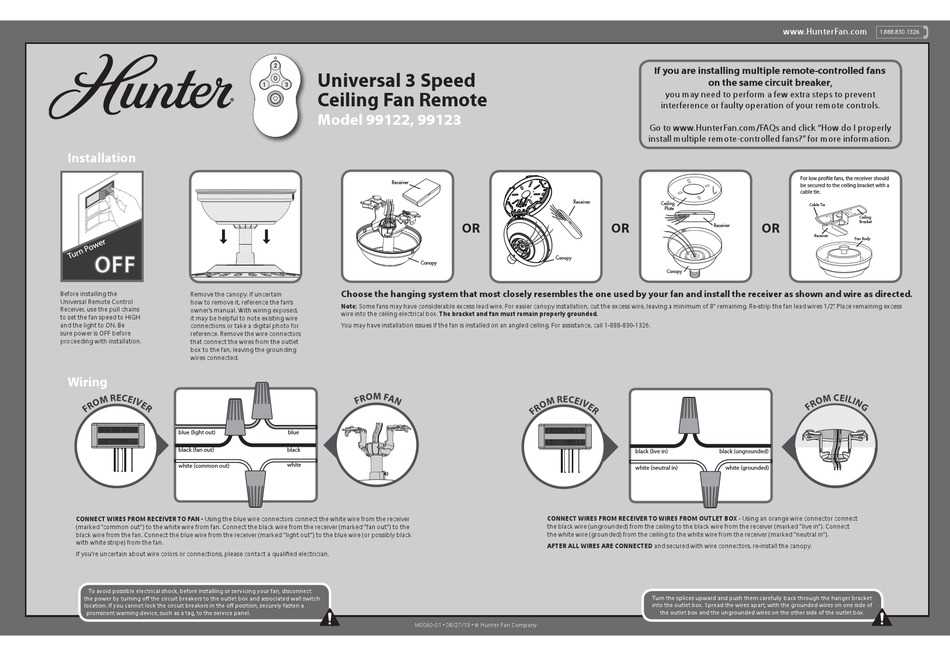
Every Hunter fan comes with a detailed installation manual that includes specific instructions for wiring the fan. Before beginning the wiring process, it’s important to read through the manual thoroughly and familiarize yourself with the specific wiring diagram for your fan. This will help you understand the correct wiring connections and ensure that you are following the manufacturer’s guidelines.
Hunter fans come with various wiring options, depending on the specific model and its features. Some fans may require a separate wall switch for controlling the fan and light, while others may be wired to operate on a single switch. It’s important to determine the wiring configuration that best suits your needs and to ensure that you have the necessary wall switch or switches in place.
Hunter Fan Wiring: A Complete Guide
If you’re looking to install or repair a Hunter fan, understanding the wiring is essential. Hunter fans are known for their durability and performance, but incorrect wiring can cause problems and even damage the fan. In this guide, we’ll walk you through the process of wiring a Hunter fan step by step.
Step 1: Turn off the Power
Before starting any wiring project, it’s crucial to turn off the power to the circuit you’ll be working on. Locate the circuit breaker or fuse box that controls the fan, and switch off the corresponding breaker or remove the fuse. This step is essential for your safety.
Step 2: Identify the Wires
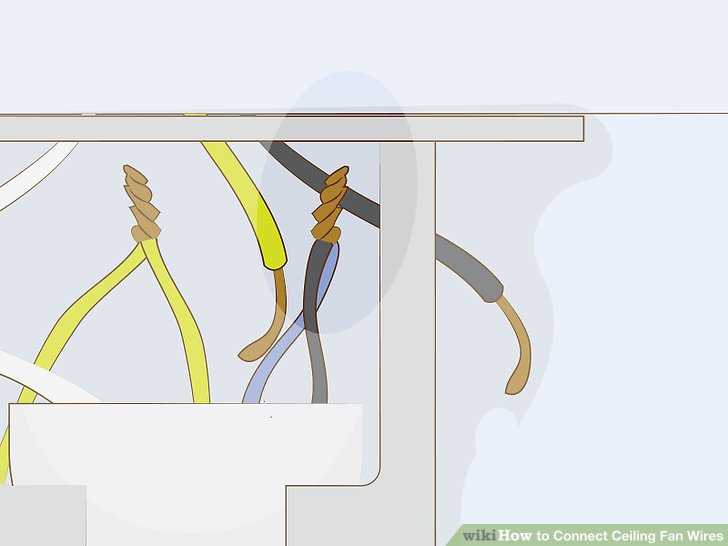
Next, you’ll need to identify the different wires coming from your Hunter fan. The most common wires you’ll encounter are the black (hot), white (neutral), and green or copper (ground) wires. Additionally, there may be a blue wire for the fan’s light kit, and sometimes a red wire for multiple fan speeds.
Step 3: Connect the Wires
Using wire connectors or electrical tape, connect the black wire from the fan to the black wire from the ceiling. Then, connect the white wire from the fan to the white wire from the ceiling. If your fan has a light kit, connect the blue wire from the fan to the corresponding wire from the ceiling. If there is a red wire, this is typically for the fan’s multiple speeds, and it should be connected to the appropriate wire from the ceiling.
- Black to black
- White to white
- Blue to blue (for light kit)
- Red to appropriate wire (for multiple speeds)
Step 4: Grounding
Lastly, don’t forget to properly ground your Hunter fan. Connect the green or copper wire from the fan to the green or copper wire from the ceiling using a wire connector or grounding screw. This step ensures the safe operation of your fan.
Remember, if you’re unsure about any step of the wiring process, it’s always best to consult a professional electrician. Proper wiring is crucial for the performance and safety of your Hunter fan.
Understanding the Basics of Hunter Fan Wiring
Hunter fans are popular ceiling fans that come with a variety of features and options. One important aspect of installing a Hunter fan is understanding the basics of wiring. Proper wiring is crucial for the fan to function correctly and safely. In this guide, we will discuss the essential elements of Hunter fan wiring.
The first step in Hunter fan wiring is identifying the wires coming from the fan motor. These wires typically include a black, white, and blue wire. The black wire is responsible for the fan’s motor operation, while the white wire connects to the neutral wire in the electrical circuit. The blue wire is usually used to control the fan’s light kit, if applicable. It’s essential to consult the fan’s instruction manual to ensure you correctly identify these wires.
To begin the wiring process, you will need to turn off the power at the circuit breaker and remove the old ceiling light fixture. Once the fixture is removed, you can start connecting the wiring for the Hunter fan. It’s important to note that if you are not confident in your electrical wiring skills, it’s best to consult a professional electrician to avoid any safety hazards.
Next, you will need to connect the black wire from the fan’s motor to the black or red wire in the electrical box. This wire will provide the power for the fan’s motor operation. The white wire from the fan’s motor should be connected to the white wire in the electrical box, which serves as the neutral wire. If your fan has a light kit, the blue wire from the fan’s motor should be connected to the blue or black wire in the electrical box that controls the light fixture.
After connecting the wires, it’s essential to secure them with wire connectors or electrical tape to prevent any loose connections. Once all the connections are secure, you can attach the fan to the ceiling bracket and install any additional components, such as the fan blades and light kit, if applicable. Finally, you can turn the power back on at the circuit breaker and test the fan to ensure it is working correctly.
In conclusion, understanding the basics of Hunter fan wiring is crucial for a successful installation. Identifying the wires, connecting them correctly, and ensuring secure connections are essential steps in the process. If you are not confident in your wiring skills, it’s always best to seek the assistance of a professional electrician to ensure proper installation and avoid any safety hazards.
How to Identify the Wires in a Hunter Fan
When it comes to wiring a Hunter fan, it is important to identify the different wires and their functions. This knowledge is essential for proper installation and troubleshooting. By understanding the purpose of each wire, homeowners can ensure that their fan operates safely and efficiently.
Wire Colors
Hunter fans typically feature four different wire colors: black, white, blue, and green. Each color corresponds to a specific function, helping users identify the wires during installation or repairs.
- Black wire: The black wire is typically the hot wire, responsible for delivering power to the fan. It connects to the black or red wire from the ceiling.
- White wire: The white wire is the neutral wire and completes the electrical circuit. It connects to the white wire from the ceiling.
- Blue wire: The blue wire is often used to control the fan’s light kit. It connects to the corresponding blue wire from the ceiling.
- Green wire: The green wire represents the ground wire and is crucial for safety. It connects to the green or bare copper wire from the ceiling.
Additional Wires
In addition to the main wires mentioned above, some Hunter fans may have additional wires for specific functions, such as fan speed control or remote control operation. These additional wires can vary depending on the specific model and features of the fan. It is important to consult the fan’s instruction manual or wiring diagram to properly identify and connect these additional wires.
Overall, by understanding the functions and colors of the wires in a Hunter fan, homeowners can confidently install and maintain their fans. However, if there is uncertainty or difficulty in identifying the wires, it is recommended to seek professional assistance to avoid any wiring mistakes or electrical hazards.
Step-by-Step Guide to Hunter Fan Wiring
Are you looking to install a new fan in your home? Hunter fans are known for their quality and durability, and with the right wiring, you can have a comfortable and stylish addition to your space. In this step-by-step guide, we will walk you through the process of wiring a Hunter fan, so you can enjoy the benefits of a cool breeze in no time.
Gather the necessary tools and materials
Before you begin the wiring process, make sure you have all the tools and materials you need. You will need a screwdriver, wire nuts, electrical tape, wire cutters, and a voltage tester. Additionally, ensure that you have the correct wiring diagram for your Hunter fan model, as the wiring may vary depending on the specific model.
Turn off the power
Safety is paramount when working with electrical wiring. Begin by turning off the power to the circuit you will be working on. Locate the circuit breaker in your electrical panel and switch it off to cut off the power supply. Use a voltage tester to double-check that the power is indeed off before proceeding.
Mount the fan
Once the power is off, it’s time to mount the fan. Follow the instructions provided with your Hunter fan to secure it to the ceiling. Make sure to use the appropriate hardware and ensure that the fan is securely fastened and balanced.
Wiring the fan
Now that the fan is mounted, it’s time to wire it. First, remove the fan canopy cover to access the wiring. You will typically find three wires: a black (hot) wire, a white (neutral) wire, and a green or bare copper (ground) wire. Connect the black wire from the fan to the black (hot) wire from the electrical box, using a wire nut to secure the connection. Repeat this process with the white and ground wires, connecting them to their respective counterparts.
Once the connections are secure, use electrical tape to wrap around the wire nuts for added protection. Carefully tuck the wires into the electrical box and replace the canopy cover.
Test the fan
With the wiring complete, it’s time to test the fan. Switch the power back on at the circuit breaker and use the fan’s remote or wall switch to turn it on. Check that all functions, such as the fan speed and lights, are working correctly. If everything is functioning as expected, you have successfully wired your Hunter fan.
Final touches
Once the fan is working properly, take a few moments to ensure that all screws and connections are secure. Double-check that the fan is correctly balanced and adjust as necessary. Enjoy the cool breeze and comfort provided by your newly installed Hunter fan.
Following this step-by-step guide, you can confidently wire your Hunter fan and enjoy the benefits of improved air circulation and added style in your space. Remember to prioritize safety and refer to the specific instructions and wiring diagram for your Hunter fan model to ensure a successful installation.
Common Issues with Hunter Fan Wiring
When it comes to Hunter fan wiring, there are several common issues that people may encounter. One of the most common issues is improper wiring connections. This can occur if the wires are not properly connected or if they are connected to the wrong terminals. It is important to carefully follow the instructions provided by Hunter when wiring the fan to ensure proper connections.
Another common issue is a faulty wiring harness. Over time, the wiring harness in a Hunter fan may become damaged or worn out. This can result in a variety of problems, including flickering lights, a non-operational fan, or even a short circuit. If you suspect that the wiring harness is faulty, it may need to be replaced in order to resolve the issue.
Common Problems with Wiring Connections:
- Improperly connected wires
- Wires connected to wrong terminals
Common Problems with Wiring Harness:
- Damage or wear over time
- Flickering lights
- Non-operational fan
- Short circuit
In addition to these common issues, it is also important to check for any loose or damaged wires. Loose or damaged wires can cause a variety of problems, including intermittent power or even a complete failure of the fan. It is important to carefully inspect the wiring and make any necessary repairs or replacements.
Overall, when dealing with Hunter fan wiring, it is important to carefully follow the instructions provided by the manufacturer and to check for any common issues such as improper wiring connections or faulty wiring harnesses. By addressing these issues, you can ensure that your Hunter fan operates properly and safely.
Troubleshooting Hunter Fan Wiring Problems
If you’re having problems with your Hunter fan wiring, there are a few steps you can take to troubleshoot the issue. Whether your fan is not turning on at all or is not functioning properly, these troubleshooting tips can help you identify and fix the problem.
1. Check the power supply
The first thing you should do when troubleshooting Hunter fan wiring problems is to check the power supply. Ensure that the fan is connected to a working electrical outlet and that the circuit breaker or fuse is not tripped or blown. You can also try plugging another device into the same outlet to see if it works.
2. Inspect the wiring connections
Next, visually inspect the wiring connections of your Hunter fan. Look for any loose or disconnected wires. Ensure that all the wires are securely attached to their respective terminals. If you find any loose connections, tighten them using a screwdriver or wire connectors.
Additionally, check for any damaged or frayed wires. If you notice any, you may need to replace the damaged sections or the entire wiring harness.
3. Test the fan control switch

If your Hunter fan has a control switch, such as a pull chain or a remote control, test it for proper functionality. Make sure that the switch is in the correct position and that it is delivering power to the fan motor. You can use a multimeter to test the continuity of the switch and ensure that it is working correctly.
4. Verify the fan motor’s condition
If your Hunter fan still doesn’t work after checking the power supply, wiring connections, and control switch, it’s possible that the fan motor itself is faulty. You can test the motor by connecting it directly to a power source, bypassing any control switches or wiring. If the motor doesn’t start running, it may need to be replaced.
In conclusion, troubleshooting Hunter fan wiring problems involves checking the power supply, inspecting the wiring connections, testing the fan control switch, and verifying the fan motor’s condition. By following these steps, you should be able to identify and resolve any wiring issues that may be causing problems with your Hunter fan.
Professional Tips for Hunter Fan Wiring Installation
Installing a Hunter fan in your home or office can provide improved air circulation and cooling, as well as add a stylish element to your space. Proper wiring installation is essential for the safe and efficient operation of your Hunter fan. Here are some professional tips to keep in mind during the wiring process:
- Turn off the power: Before starting any wiring work, make sure to turn off the power at the circuit breaker or fuse box. This will prevent any accidents or electrical shocks during the installation.
- Read the instructions: Each Hunter fan model may have slightly different wiring requirements. Take the time to read the included instructions thoroughly to understand the specific wiring diagram and steps for your fan model.
- Use proper tools: To ensure a secure and reliable connection, use the appropriate tools for the job. This may include wire cutters, wire strippers, pliers, and screwdrivers. Using the wrong tools can lead to damaged wires or improper connections.
- Label the wires: Before disconnecting any existing wires, it is advisable to label them. This will make it easier to identify which wire is connected to which component when it comes time to install the new fan. Use labels or colored tape to mark the wires accordingly.
- Follow the color coding: Hunter fans typically have color-coded wires to indicate their function. Match the wires according to their colors for proper connections. For example, connect the black wire to the black wire, white to white, and so on. If the fan has a ground wire, it should be connected to the ground wire in the electrical box.
- Secure the connections: Once the wires are properly connected, it is important to secure them with wire nuts or electrical tape. This will prevent any loose or exposed wires that can cause electrical hazards.
- Test the fan: After completing the wiring installation, turn the power back on and test the fan to ensure that it is functioning correctly. Check for any unusual noises, vibrations, or wobbling, as these can indicate improper installation.
- Consult a professional if needed: If you are unsure about any aspect of the Hunter fan wiring installation or if you encounter any difficulties, it is always best to consult a professional electrician. They have the expertise and experience to handle any electrical wiring issues safely.
By following these professional tips, you can ensure a successful Hunter fan wiring installation and enjoy the benefits of a well-functioning and stylish fan in your space.