
If you’ve ever taken apart an iPhone 6s or plan to do so in the future, understanding the screw diagram is crucial. The iPhone 6s features a complex design with numerous screws that hold the device together. Knowing the locations and sizes of these screws is essential for successful disassembly and reassembly.
The screw diagram for the iPhone 6s provides a visual representation of the screw positions and sizes. This diagram helps technicians and DIY enthusiasts identify and locate the different screws used in the device. It also indicates the proper screwdriver size to use for each screw, ensuring that the correct amount of force is applied during the process.
By referring to the screw diagram, you can avoid common mistakes such as using the wrong screwdriver size or stripping the screws. This can save you time, money, and frustration. Whether you’re replacing a battery, screen, or any other component, having a clear understanding of the screw placement is crucial for a successful repair.
Understanding the iPhone 6s Screw Diagram
The iPhone 6s screw diagram is a visual representation of the various screws used in the iPhone 6s model. It provides a detailed overview of the position and type of screws used in the device, allowing technicians and repair experts to understand the layout and disassembly process.
This diagram is particularly valuable when disassembling and repairing an iPhone 6s, as it helps guide technicians in removing the appropriate screws and components without causing damage to the device. By following the diagram, repair experts can ensure a smooth disassembly process and avoid any potential complications or mistakes.
Types of Screws
The iPhone 6s screw diagram typically includes several types of screws, each serving a specific purpose. These screws may vary in size, shape, and threading, and it’s important to identify and differentiate them correctly.
- Pentalobe screws: These screws have a unique star-shaped head and are commonly found near the bottom of the iPhone 6s. They require a special pentalobe screwdriver to remove and are often used to secure the display assembly.
- Phillips screws: Phillips screws have a cross-shaped head and are commonly used throughout the iPhone 6s. They can be found securing various components, such as the logic board, battery, and connectors. A Phillips screwdriver is typically required to remove them.
- Tri-point screws: Tri-point screws have a Y-shaped head and are typically found securing smaller components, such as the battery connector or the front-facing camera module. They require a tri-point screwdriver for removal.
Importance of the Screw Diagram
The iPhone 6s screw diagram is an essential resource for repair experts and technicians. It helps ensure that the correct screws are used during the reassembly process, preventing any potential damage or functionality issues. By following the diagram, professionals can effectively troubleshoot, repair, and replace components within the iPhone 6s without causing further complications.
Moreover, the screw diagram can also be useful for individuals who want to disassemble and repair their own iPhone 6s. It provides a clear visual guide, allowing enthusiasts to gain a deeper understanding of the internal components and assembly of the device.
In conclusion, the iPhone 6s screw diagram is a vital tool for anyone involved in the repair or disassembly process of an iPhone 6s. It provides a detailed overview of the various screws used, ensuring a safe and efficient repair experience for technicians and enthusiasts alike.
Overview of the Iphone 6s Screw Diagram
The iPhone 6s is a popular model of smartphone that was released by Apple in 2015. Like any electronic device, it is made up of various components that are held together by screws. Understanding the screw diagram of the iPhone 6s is important for anyone who wants to repair or disassemble the device.
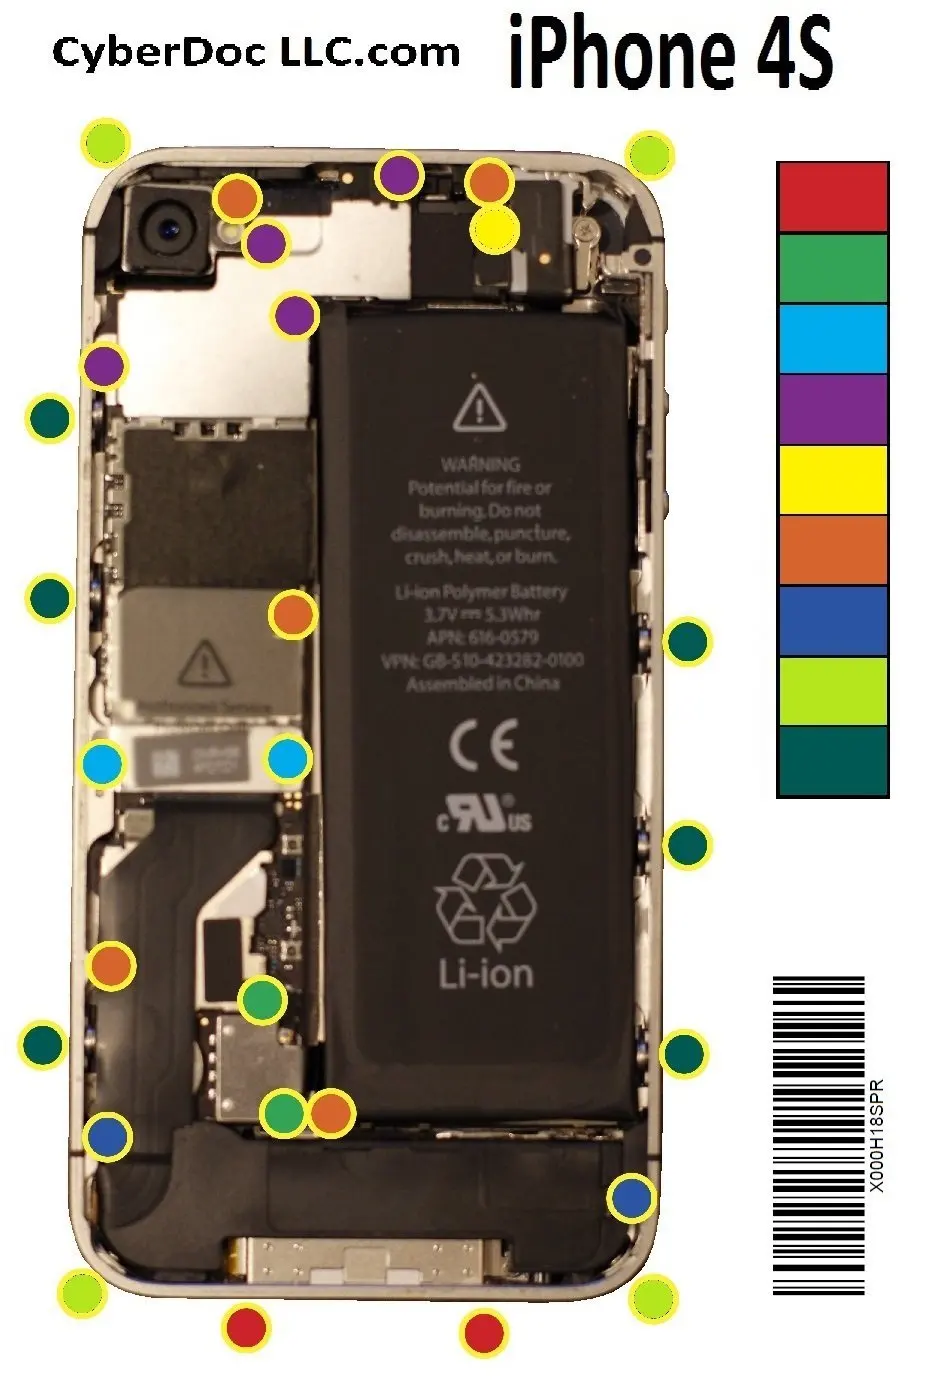
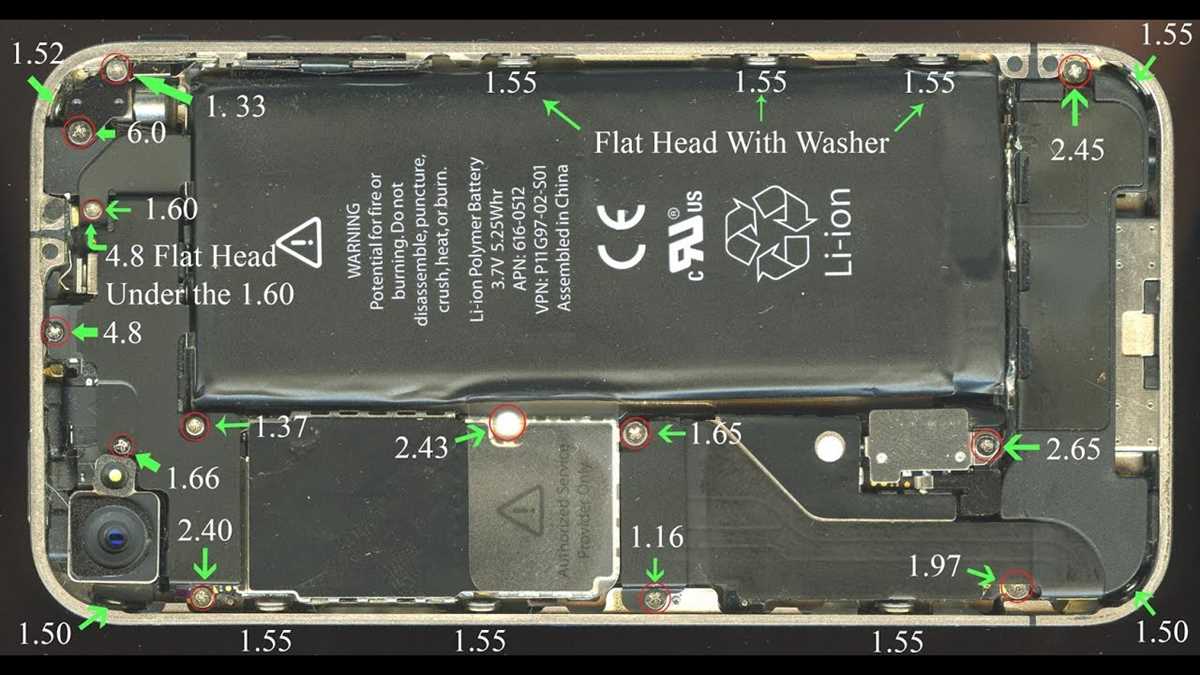
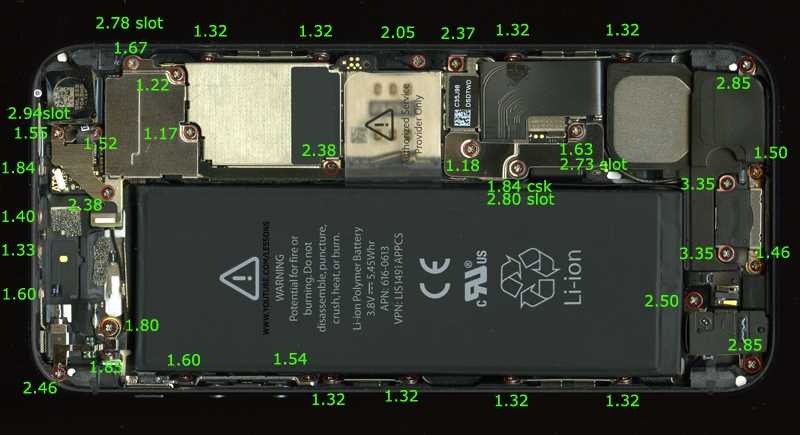
The iPhone 6s screw diagram provides a visual representation of the different types and sizes of screws used in the device. It specifies their exact locations, ensuring that each screw is placed in the correct position during reassembly. This diagram is especially useful when dealing with tiny screws that can easily be misplaced or mixed up.
The screw diagram of the iPhone 6s includes a variety of screws, including Phillips screws, pentalobe screws, and standoff screws. Phillips screws are the most common type of screw used in the iPhone 6s and can be identified by their cross-shaped indentation. Pentalobe screws, on the other hand, have a five-pointed star-shaped indentation and are commonly found on the external enclosure of the device.
Standoff screws are longer and thicker than other screws and are used to secure specific components inside the iPhone 6s, such as the logic board and the battery. They provide stability and prevent these components from moving around, ensuring the proper functioning of the device.
In conclusion, the iPhone 6s screw diagram is a valuable resource for anyone looking to repair or disassemble the device. It provides a clear depiction of the different types and sizes of screws used in the iPhone 6s, ensuring that each screw is placed correctly during reassembly. By following the screw diagram, individuals can confidently work on their iPhone 6s without the risk of misplacing or mixing up the screws.
Identifying Different Types of Screws
When it comes to working with screws, it’s important to be able to identify the different types that are available. Each type of screw has its own unique characteristics, which make it suitable for certain applications. By understanding the differences between screws, you can ensure that you choose the right one for your project.
One way to identify different types of screws is by their head shape. Some common head shapes include flat heads, round heads, and pan heads. Flat heads are countersunk, meaning they sit flush with the material they’re screwed into. Round heads protrude slightly above the surface, while pan heads are domed and offer a larger contact area with the material.
Another way to distinguish between screws is by their drive type. The drive type refers to the tool or driver that is used to turn the screw. Some common drive types include Phillips, slotted, and Torx. Phillips screws have a cross-shaped recess, while slotted screws have a single straight slot. Torx screws have a star-shaped recess, which provides a higher torque transfer and reduces the risk of stripping.
- Flat Head Screw: A screw with a flat top and a cone-shaped bearing surface.
- Round Head Screw: A screw with a rounded top that protrudes slightly above the surface.
- Pan Head Screw: A screw with a rounded, domed top that provides a larger contact area.
- Phillips Screw: A screw with a cross-shaped recess, requiring a Phillips screwdriver.
- Slotted Screw: A screw with a single straight slot, requiring a slotted screwdriver.
- Torx Screw: A screw with a star-shaped recess, providing a higher torque transfer.
By understanding the different types of screws and their characteristics, you can make informed decisions when it comes to choosing the right screw for your specific project. Whether you need a screw with a flat head, a round head, or a pan head, or a screw with a Phillips, slotted, or Torx drive, there’s a screw out there that will meet your needs.
Understanding Screw Placement

When it comes to repairing an iPhone 6s, understanding the placement of screws is crucial. The screws in the iPhone 6s are not all the same and have specific locations where they need to be installed. This makes it important to have a clear understanding of the screw diagram to ensure proper reassembly.
The screw diagram for the iPhone 6s shows the different sizes and types of screws that are used in the device. Each screw is labeled with a corresponding number or letter, indicating its specific location. This diagram helps technicians and DIY repairers to identify the correct screws and their placements during the disassembly and reassembly process.
Some of the key screw placements in the iPhone 6s include:
- P0.6 Y000 Tri-point Screw: This screw is used to secure the battery connector and other internal components.
- P2.6 Y000 Tri-point Screw: This screw is used to secure the display assembly and motherboard.
- Pentalobe Screws: These screws are used to secure the display assembly and back panel of the iPhone 6s.
It is important to carefully follow the screw diagram and use the proper tools, such as a precision screwdriver set, to avoid damaging the device or stripping the screws. Proper screw placement ensures a secure and functional repair of the iPhone 6s.
By understanding the screw placement in the iPhone 6s and using the correct screws, technicians and DIY repairers can confidently disassemble and reassemble the device, providing a reliable and professional repair.
Importance of Proper Screw Handling
The screw plays a crucial role in the assembly and disassembly of devices like the iPhone 6s. It is a small but essential component that holds different parts of a device together. Proper screw handling is of utmost importance to ensure the overall functionality and longevity of the device.
One of the key reasons why proper screw handling is important is to prevent damage to the device. Using incorrect or incompatible screws can lead to stripped or damaged screw holes, making it difficult to secure the components properly. This can result in loose parts, poor connections, and even malfunction of the device. Hence, it is crucial to use the right screws and handle them carefully to avoid any damage.
Proper screw handling also ensures the safety of the user. Loose or incorrectly installed screws can pose a risk, especially in devices like smartphones that are frequently held and used close to the face. If a loose screw comes off, it can potentially cause harm to the user, such as scratches, cuts, or even damage to the device itself. Therefore, it is vital to handle screws properly, ensuring they are tightly secured and in their correct positions.
Additionally, proper screw handling facilitates easy repairs and maintenance. When a device needs to be repaired or serviced, knowing the correct placement and size of each screw is essential. Proper handling and organization of the screws make the disassembly and reassembly process smoother and more efficient. This saves time and effort for both the repair technician and the device owner.
Overall, proper screw handling is essential for the functionality, safety, and maintenance of devices like the iPhone 6s. By using the correct screws, handling them carefully, and ensuring they are properly secured, users can prevent damage, ensure safety, and facilitate easy repairs. It is a small but significant aspect of device assembly and maintenance that should not be overlooked.
Common Issues with Screws in iPhone 6s
When it comes to the iPhone 6s, screws play a crucial role in holding the device together and ensuring its functionality. However, like any other component, screws in the iPhone 6s can also experience common issues that may require attention and repair. Let’s explore some of these issues and how they can impact the device.
1. Loose or Missing Screws

One common issue with screws in the iPhone 6s is that they can become loose or even go missing. This can happen due to regular use, sudden impacts, or improper handling of the device. When screws become loose or go missing, it can lead to structural instability, potential damage to internal components, and even affect the overall performance of the device.
2. Stripped Screw Heads
Another issue that iPhone 6s owners may encounter is stripped screw heads. This happens when the screwdriver slips or is applied with excessive force, causing the screw head to become damaged. Stripped screw heads can make it difficult to remove or tighten screws properly, which can disrupt the normal functioning of the device and make repairs more challenging.
3. Incorrect Screw Placement
In some cases, users may accidentally place screws in the wrong locations during repairs or when reassembling the device. This can lead to improper alignment, instability, and potential damage to various components. Using incorrect screw sizes or mixing up screws can cause serious issues and should be avoided to ensure the proper functioning of the iPhone 6s.
4. Over-tightening or Under-tightening Screws
It is crucial to tighten screws to the appropriate level when assembling or repairing an iPhone 6s. Over-tightening screws can cause damage to the delicate internal components, while under-tightening screws may result in instability and a loose overall structure. Striking the right balance is essential to maintain the integrity and performance of the device.
Overall, screws in the iPhone 6s can encounter a range of issues that may affect the device’s functionality and structural stability. It is important to handle and repair the device with care, ensuring the correct placement, tightening, and usage of screws to avoid these common issues.
Tips for Reassembling an Iphone 6s Using the Screw Diagram
Reassembling an iPhone 6s can be a challenging task, but with the help of a screw diagram, it becomes much easier. The screw diagram provides a visual representation of where each screw should be placed during the reassembly process. Here are some tips to help you successfully reassemble your iPhone 6s using the screw diagram.
1. Organize Your Screws
Before starting the reassembly process, it is crucial to organize your screws. Use a magnetic mat or a small container with compartments to keep the screws separated and easily accessible. Label each compartment or section according to the step or section of the screw diagram to ensure you place the screws correctly.
2. Familiarize Yourself with the Screw Diagram
Take the time to study the screw diagram thoroughly before attempting to reassemble your iPhone 6s. Identify each screw location and the corresponding number or letter indicated on the diagram. This will help you understand the order and placement of the screws.
3. Follow the Screw Diagram Carefully
As you begin the reassembly process, follow the screw diagram step by step. Start from the first section of the diagram and work your way through each step, ensuring that you place the correct screw in the designated location. Double-check the diagram after each step to confirm that you have placed the screws correctly.
4. Exercise Caution and Patience
Reassembling an iPhone 6s requires precision and patience. Take your time to align each screw properly and avoid overtightening them. Some screws may be different in size, so refer to the screw diagram to ensure you are using the right screw for each location. Apply gentle pressure when tightening the screws to avoid damaging the device.
5. Verify the Reassembly
Once you have followed the screw diagram and completed the reassembly process, double-check your work. Make sure all the screws are securely in place and that there are no loose parts. Carefully inspect the device to ensure everything is aligned correctly and functioning properly.
By following these tips and using the screw diagram as a guide, you can successfully reassemble your iPhone 6s. Remember to take your time, exercise caution, and refer to the diagram as needed. With patience and attention to detail, you can restore your iPhone 6s to its fully functional state.